5.9号今日总结
Posted psh888
tags:
篇首语:本文由小常识网(cha138.com)小编为大家整理,主要介绍了5.9号今日总结相关的知识,希望对你有一定的参考价值。
今天做了python的实验四
代码如下:
import re
from collections import Counter

import requests
from lxml import etree
import pandas as pd
import jieba
import matplotlib.pyplot as plt
from wordcloud import WordCloud

headers =
    "User-Agent": "Mozilla/5.0 (Windows NT 10.0; Win64; x64) AppleWebKit/537.36 (KHTML, like Gecko) Chrome/101.0.4951.54 Safari/537.36 Edg/101.0.1210.39"


comments = []
words = []


def regex_change(line):
    # 前缀的正则
    username_regex = re.compile(r"^\\d+::")
    # URL,为了防止对中文的过滤,所以使用[a-zA-Z0-9]而不是\\w
    url_regex = re.compile(r"""
        (https?://)?
        ([a-zA-Z0-9]+)
        (\\.[a-zA-Z0-9]+)
        (\\.[a-zA-Z0-9]+)*
        (/[a-zA-Z0-9]+)*
    """, re.VERBOSE | re.IGNORECASE)
    # 剔除日期
    data_regex = re.compile(u"""        #utf-8编码
        年 |
        月 |
        日 |
        (周一) |
        (周二) |
        (周三) |
        (周四) |
        (周五) |
        (周六)
    """, re.VERBOSE)
    # 剔除所有数字
    decimal_regex = re.compile(r"[^a-zA-Z]\\d+")
    # 剔除空格
    space_regex = re.compile(r"\\s+")
    regEx = "[\\n”“|,,;;\'\'/?! 。的了是]"  # 去除字符串中的换行符、中文冒号、|,需要去除什么字符就在里面写什么字符
    line = re.sub(regEx, "", line)
    line = username_regex.sub(r"", line)
    line = url_regex.sub(r"", line)
    line = data_regex.sub(r"", line)
    line = decimal_regex.sub(r"", line)
    line = space_regex.sub(r"", line)
    return line


def getComments(url):
    score = 0
    resp = requests.get(url, headers=headers).text
    html = etree.HTML(resp)
    comment_list = html.xpath(".//div[@class=\'comment\']")
    for comment in comment_list:
        status = ""
        name = comment.xpath(".//span[@class=\'comment-info\']/a/text()")[0]  # 用户名
        content = comment.xpath(".//p[@class=\'comment-content\']/span[@class=\'short\']/text()")[0]  # 短评内容
        content = str(content).strip()
        word = jieba.cut(content, cut_all=False, HMM=False)
        time = comment.xpath(".//span[@class=\'comment-info\']/a/text()")[1]  # 评论时间
        mark = comment.xpath(".//span[@class=\'comment-info\']/span/@title")  # 评分
        if len(mark) == 0:
            score = 0
        else:
            for i in mark:
                status = str(i)
            if status == "力荐":
                score = 5
            elif status == "推荐":
                score = 4
            elif status == "还行":
                score = 3
            elif status == "较差":
                score = 2
            elif status == "很差":
                score = 1
        good = comment.xpath(".//span[@class=\'comment-vote\']/span[@class=\'vote-count\']/text()")[0]  # 点赞数(有用数)
        comments.append([str(name), content, str(time), score, int(good)])
        for i in word:
            if len(regex_change(i)) >= 2:
                words.append(regex_change(i))


def getWordCloud(words):
    # 生成词云
    all_words = []
    all_words += [word for word in words]
    dict_words = dict(Counter(all_words))
    bow_words = sorted(dict_words.items(), key=lambda d: d[1], reverse=True)
    print("热词前10位:")
    for i in range(10):
        print(bow_words[i])
    text = \' \'.join(words)

    w = WordCloud(background_color=\'white\',
                     width=1000,
                     height=700,
                     font_path=\'simhei.ttf\',
                     margin=10).generate(text)
    plt.show()
    plt.imshow(w)
    w.to_file(\'wordcloud.png\')


print("请选择以下选项:")
print("   1.热门评论")
print("   2.最新评论")
info = int(input())
print("前10位短评信息:")
title = [\'用户名\', \'短评内容\', \'评论时间\', \'评分\', \'点赞数\']
if info == 1:
    comments = []
    words = []
    for i in range(0, 60, 20):
        url = "https://book.douban.com/subject/10517238/comments/?start=&limit=20&status=P&sort=new_score".format(
            i)  # 前3页短评信息(热门)
        getComments(url)
    df = pd.DataFrame(comments, columns=title)
    print(df.head(10))
    print("点赞数前10位的短评信息:")
    df = df.sort_values(by=\'点赞数\', ascending=False)
    print(df.head(10))
    getWordCloud(words)
elif info == 2:
    comments = []
    words=[]
    for i in range(0, 60, 20):
        url = "https://book.douban.com/subject/10517238/comments/?start=&limit=20&status=P&sort=time".format(
            i)  # 前3页短评信息(最新)
        getComments(url)
    df = pd.DataFrame(comments, columns=title)
    print(df.head(10))
    print("点赞数前10位的短评信息:")
    df = df.sort_values(by=\'点赞数\', ascending=False)
    print(df.head(10))
    getWordCloud(words)
import matplotlib.pyplot as plt
import numpy as np

x = np.arange(0, 10, 0.0001)
y1 = x ** 2
y2 = np.cos(x * 2)
y3 = y1 * y2
plt.plot(x, y1,linestyle=\'-.\')
plt.plot(x, y2,linestyle=\':\')
plt.plot(x, y3,linestyle=\'--\')
plt.savefig("3-1.png")
plt.show()

import matplotlib.pyplot as plt
import numpy as np
fig, subs = plt.subplots(2, 2)
subs[0][0].plot(x, y1)
subs[0][1].plot(x, y2)
subs[1][0].plot(x, y3)
plt.savefig("3-2.png")
plt.show()
import matplotlib.pyplot as plt
import numpy as np

x = np.arange(-2, 2, 0.0001)
y1 = np.sqrt(2 * np.sqrt(x ** 2) - x ** 2)
y2 = (-2.14) * np.sqrt(np.sqrt(2) - np.sqrt(np.abs(x)))
plt.plot(x, y1, \'r\', x, y2, \'r\')
plt.fill_between(x, y1, y2, facecolor=\'orange\')
plt.savefig("heart.png")
plt.show()
今日刷题总结2
度
在无向图中每个节点所连边的条数就是该节点的度数。
在有向图图中,指向该节点的边的条数称为入度,反之称为出度。有向图的度是出度与入度之和。
在树中,节点的子女个数称为节点的度。
DHCP协议
dhcp是一个局域网的网络协议,是基于udp协议工作的,主要用于集中管理和分配ip地址,使网络中的主机动态地获得ip地址、网关地址、dns服务器地址等,提升地址的使用率。dhcpv4有2个端口,67号和68号端口分别为dhcp server和dhcp client服务端口。
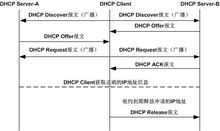
dhcp协议采用c/s模型,当服务器收到来自主机的ip地址申请时,才会向主机发送相关的地址配置信息。工作原理如下:
(1)DHCP Client以广播的方式发出DHCP Discover报文。
(2)所有的DHCP Server都能够接收到DHCP Client发送的DHCP Discover报文,所有的DHCP Server都会给出响应,向DHCP Client发送一个DHCP Offer报文。
(3)DHCP Offer报文中“Your(Client) IP Address”字段就是DHCP Server能够提供给DHCP Client使用的IP地址,且DHCP Server会将自己的IP地址放在“option”字段中以便 DHCP Client区分不同的DHCP Server。DHCP Server在发出此报文后会存在一个已分配IP地址的纪录。
(4)DHCP Client只能处理其中的一个DHCP Offer报文,一般的原则是DHCP Client处理最先收到的DHCP Offer报文。
(5)DHCP Client会发出一个广播的DHCP Request报文,在选项字段中会加入选中的DHCP Server的IP地址和需要的IP地址。
(6)DHCP Server收到DHCP Request报文后,判断选项字段中的IP地址是否与自己的地址相同。如果不相同,DHCP Server不做任何处理只清除相应IP地址分配记录;如果相 同,DHCP Server就会向DHCP Client响应一个DHCP ACK报文,并在选项字段中增加IP地址的使用租期信息。
(7)DHCP Client接收到DHCP ACK报文后,检查DHCP Server分配的IP地址是否能够使用。如果可以使用,则DHCP Client成功获得IP地 址并根据IP地址使用租期自动启动续延过 程;如果DHCP Client发现分配的IP地址已经被使用,则DHCP Client向DHCPServer发出DHCP Decline报文,通知DHCP Server禁用这个IP地址,然后DHCP Client开始新的 地址申请过程。
(8)DHCP Client在成功获取IP地址后,随时可以通过发送DHCP Release报文释放自己的IP地址,DHCP Server收到DHCP Release报文后,会回收相应的IP地址并重新分配。

文件操作函数
fseek(文件,偏移量,类别),其中类别为:文件开头0,文件当前位置1,文件末尾2。
fseek(fp,0L,0)就是把文件指针fp移到里开头0字节的地方,即开始位置。
rewind(fp)相当于fseek(fp,0L,0)。
OSI七层模型
第一层:物理层
第二层:数据链路层 802.2、802.3ATM、HDLC、FRAME RELAY
第三层:网络层 IP、IPX、APPLETALK、ICMP
第四层:传输层 TCP、UDP、SPX
第五层:会话层 RPC、SQL、NFS 、X WINDOWS、ASP
第六层:表示层 ASCLL、PICT、TIFF、JPEG、 MIDI、MPEG
第七层:应用层 HTTP,FTP,SNMP等
写回法(write back)
即写cache时不写入主存,而当cache数据被替换出去时才写回主存。写回法的cache中的数据会与主存的不一致。为了识别cache中的数据是否与主存中的一致,cache中的每一块要增加一个记录信息位,以反映此行是否被CPU修改过。修改cache中某一块时设置这个位为浊(dirty)。根据这个位的值,cache中每一块都有两个状态:清(clean)和浊(dirty),在将新的值放入浊的块的时候,将原值写回到主存,否则,直接将新值存入这个块。
与写回法相对应的是写通过法(write through,也叫直写法)。该模式下,CPU对主存写数据时,不经过cache直接写到内存。
以上是关于5.9号今日总结的主要内容,如果未能解决你的问题,请参考以下文章