Keycloak 创建和修改自定义用户信息
Posted 许青叶的博客
tags:
篇首语:本文由小常识网(cha138.com)小编为大家整理,主要介绍了Keycloak 创建和修改自定义用户信息相关的知识,希望对你有一定的参考价值。
前言
公司在用 Keycloak 作为认证服务器,之前在系统数据库里存的,后来想了想是不是可以在 Keycloak 中存。在网上找的方法大多都是通过 admin 接口去改,但这种方法就需要两种解决方案,一种就是需要一个能登 admin 账号的服务去改,另一个就是直接改数据库。这里经过本人研究提供一种新方法。
准备工作
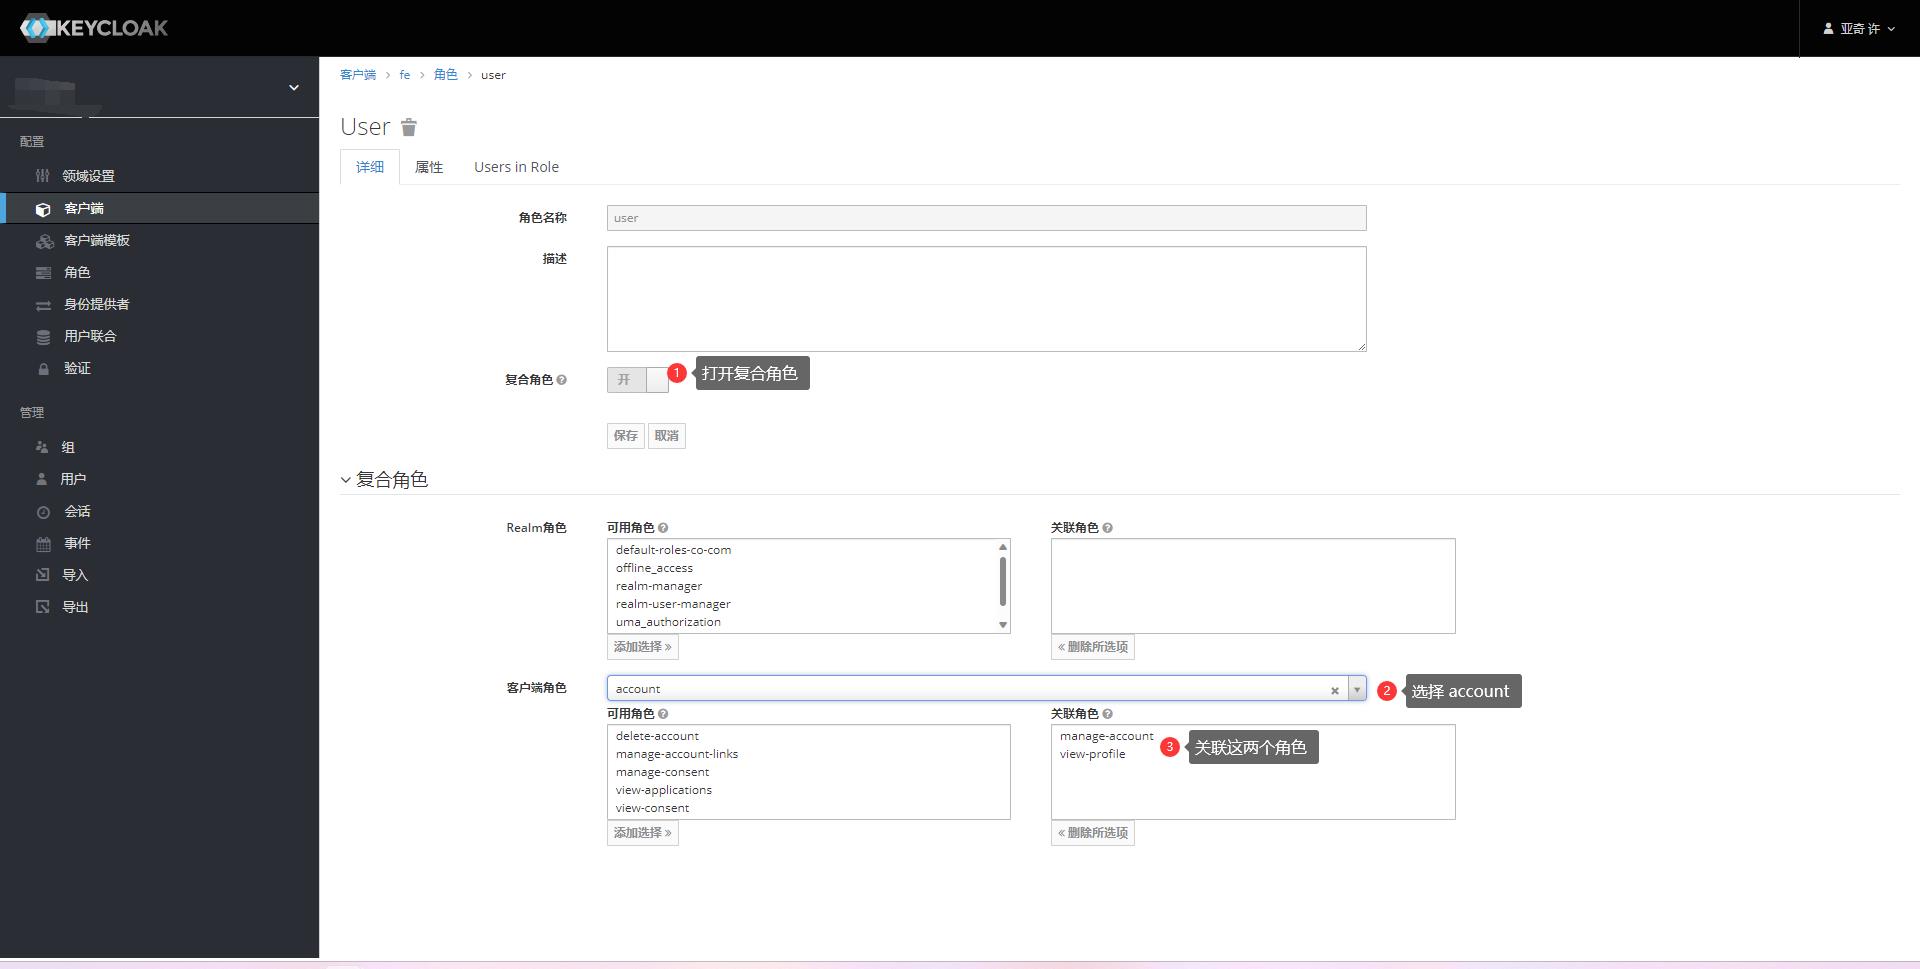
赋予客户端用户在 account 接口修改和读取用户信息的角色

接入接口
- 在前端编写代码通过 GET 方法访问
https://<你的 KeyCloak 域名>/auth/realms/<你的 Realm>/account/,且Content-Type必须为application/json,下面是参考代码
let token = "<你的 token>"
let myHeaders = new Headers();
myHeaders.append("Content-Type", "application/json");
myHeaders.append("Authorization", "Bearer " + token);

let requestOptions =
   method: \'GET\',
   headers: myHeaders
;

let userInfo = await fetch("https://<你的 KeyCloak 域名>/auth/realms/<你的 Realm>/account/", requestOptions)
   .then(response => response.json())
   .catch(error => console.log(\'error\', error));
- 编辑信息,用户信息的 JSON 结尾处有
attributes属性,attributes是存储自定义信息的地方。赋值格式是"attributes": "phone": ["133"], \'birthday\': ["2023"] ,属性值是数组里面包一个字符串。数据格式参考如下
原始信息
  "id": "xxxx",
  "username": "xxxx",
  "firstName": "xxx",
  "lastName": "xxx",
  "email": "xxxx@xxxx.com",
  "emailVerified": false,
  "userProfileMetadata":
    "attributes": [

        "name": "username",
        "displayName": "$username",
        "required": true,
        "readOnly": true,
        "validators":
      ,

        "name": "email",
        "displayName": "$email",
        "required": true,
        "readOnly": false,
        "validators":
          "email":
            "ignore.empty.value": true


      ,

        "name": "firstName",
        "displayName": "$firstName",
        "required": true,
        "readOnly": false,
        "validators":
      ,

        "name": "lastName",
        "displayName": "$lastName",
        "required": true,
        "readOnly": false,
        "validators":

    ]
  ,
  "attributes":
    "birthday": [
      "2023/05/09"
    ],
    "avatar": [
      "http://test.com/test.jpg"
    ],
    "locale": [
      "zh-CN"
    ]
增加手机号(phone 属性,值为 13333)
  "id": "xxxx",
  "username": "xxxx",
  "firstName": "xxx",
  "lastName": "xxx",
  "email": "xxxx@xxxx.com",
  "emailVerified": false,
  "userProfileMetadata":
    "attributes": [

        "name": "username",
        "displayName": "$username",
        "required": true,
        "readOnly": true,
        "validators":
      ,

        "name": "email",
        "displayName": "$email",
        "required": true,
        "readOnly": false,
        "validators":
          "email":
            "ignore.empty.value": true


      ,

        "name": "firstName",
        "displayName": "$firstName",
        "required": true,
        "readOnly": false,
        "validators":
      ,

        "name": "lastName",
        "displayName": "$lastName",
        "required": true,
        "readOnly": false,
        "validators":

    ]
  ,
  "attributes":
    "birthday": [
      "2023/05/09"
    ],
    "avatar": [
      "http://test.com/test.jpg"
    ],
    "locale": [
      "zh-CN"
    ],
    "phone": [
      "13333"
    ]
- 提交信息,将修改后的 JSON 通过 POST 方法再发回
https://<你的 KeyCloak 域名>/auth/realms/<你的 Realm>/account/,返回 Body 中无内容,判断成功失败看接口是否返回 200,参考代码
requestOptions =
   method: \'POST\',
   headers: myHeaders,
   body: userInfo
;

let result = await fetch("https://<你的 KeyCloak 域名>/auth/realms/<你的 Realm>/account/", requestOptions)
   .catch(error => console.log(\'error\', error));
创建 keycloak 自定义主题
【中文标题】创建 keycloak 自定义主题【英文标题】:Creating keycloak custom theme 【发布时间】:2018-08-30 14:49:42 【问题描述】:我的 UI 中有三个视图:
起始页(带有指向注册和登录页面的链接) 登录页面 注册页面我不知道如何首先显示起始页。我的自定义主题中的起始页面是登录页面(my-site/auth)。怎么改?
我尝试使用请求参数,但无法在 .ftl 模板页面中获取 url 参数。
如何通过端点扩展服务器或读取模板中的url参数?
也许还有其他解决方案...谢谢!
【问题讨论】:
【参考方案1】:我会改用我自己的服务器来显示起始页面,而不是在所有这些中使用 keycloak。示例:
起始页位于 -> web.myapp.company.com Keycloak 在 -> auth.myapp.company.com 申请 -> myapp.company.com在 web.myapp.company.com 中,您将拥有一个标准网页,其中包含指向 myapp.company.com 的链接以访问应用程序(将重定向如果未登录,则进行 keycloak 身份验证)和另一个指向 auth.myapp.company.com/realms/myrealm/protocols/open-id-connect/registrations 的链接,以防用户想要to register himself。
【讨论】:
以上是关于Keycloak 创建和修改自定义用户信息的主要内容,如果未能解决你的问题,请参考以下文章