Compiler Design Lab 实现过程
Posted guhgf18
tags:
篇首语:本文由小常识网(cha138.com)小编为大家整理,主要介绍了Compiler Design Lab 实现过程相关的知识,希望对你有一定的参考价值。
Programming 2 (SS 2023)
Saarland University
Faculty MI
Compiler Design Lab
Preparation
To be able to edit the project in Mars, you first have to checkout the repository and import the project:
1. Clone the project in any folder:
where $NAME has to be replaced with your CMS username.
2. Open the cloned directory in Mars.
Check that the settings Assemble all files in directory and Initialize Program Counter to global ‘main’ if defined
in the Settings menu in MARS are activated to compile the file src/main.asm and set the program entry point to
the label main.
In the following document, we refer to the term character as a single byte encoding of a character according to the
ASCII standard. The IBANs only contain ASCII upper case letters and digits. The KNRs and the BLZs consist of
ASCII digits only.
IBAN-Calculator (10 Points)
D E P P B B B B B B B B K K K K K K K K K K
Country code
Check digits
BLZ
KNR
In this project, you will implement an IBAN calculator that converts a bank account number (KNR) and a bank
code (BLZ) to a German IBAN according to the format shown above, or extracts the KNR and the BLZ from a
German IBAN. You can find a general introduction to IBANs in the Wikipedia (https://en.wikipedia.org/
wiki/International_Bank_Account_Number).
You will write the program in MIPS assembler. To make the project easier to handle, it is divided into several
tasks. Each task has its own file in which you will write the corresponding subroutine. Please also pay attention to
the hints at the end of the project description.
1 Extract BLZ and KNR (2 Points)
Write a subroutine 代 做iban2knr (file src/iban2knr.asm), which extracts the BLZ and the KNR from a German
IBAN. Your subroutine receives the following arguments:
1. A buffer with a German IBAN with 22 characters.
2. The target buffer for the BLZ with space for 8 characters.
3. The target buffer for the KNR with space for 10 characters.
2 Remainder calculation (4 Points)
Write a subroutine modulo_str (file src/moduloStr.asm), which calculates the remainder of a number given
as a string. Your subroutine receives the following arguments:
1. A buffer with a number.
1
2. The length of the number in the buffer.
3. The divisor.
The result is returned in the return register. The number in the buffer is the remainder of the division of the number
represented in the buffer by the divisor. The number in the buffer is a decimal number greater than zero represented
as a string of digits and has no sign. The least significant digit of the number is at position
Tcl与Design Compiler (十三)——Design Compliler中常用到的命令(示例)总结
本文如果有错,欢迎留言更正;此外,转载请标明出处 http://www.cnblogs.com/IClearner/ ,作者:IC_learner
本文将描述在Design Compliler中常用到的命令,这些命令按照流程的顺序进行嵌套讲解,主要是列举例子;大概的讲解布局如下所示:
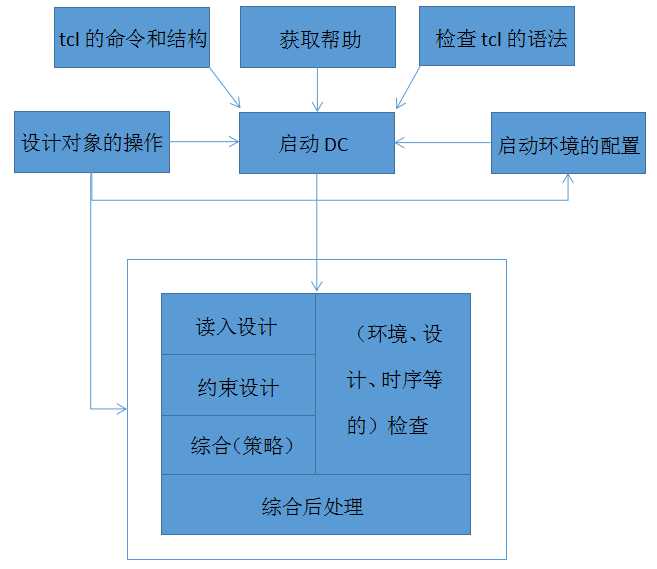
大概有11个部分,下面我们逐个部分进行(简单的)介绍的举例。
1、tcl的命令和结构
tcl的命令和结构请参照第二节的内容:
http://www.cnblogs.com/IClearner/p/6617207.html ,下面是简单的常用举例。
--> 设置变量命令: set PER 2.0
显示变量命令: echo $PER # Result: 2.0
--> 表达式操作:
set MARG 0.95
expr $PER * $MARG
# expr: *, /, +, >, <, =, <=, >=
set PCI_PORTS [get_ports A]
set PCLPORTS [get_ports “Y??M Z*”]
-->命令嵌套,显示命令中嵌套表达式命令:
echo “Effctv P = [expr $PERIOD * $MARGIN]”
# Result with soft quotes: “Effctv P = 1.9”
等价于:
echo {Effctv P = [expr $PERIOD * $MARGIN]}
# Result with hard quotes:
# “Effctv P = [expr $PERIOD * $MARGIN]”
-->tcl的注释行:# Tcl Comment line
set COMMENT injine ; # Tel inline comment
-->设置tcl中的列表变量:
set MY_DESIGNS “A.v B.v Top.v”
查看列表变量:
foreach DESIGN $MY_DESIGNS {
read_verilog $DESIGN
}
-->for循环:
for { set i 1} { $i < 10 } { incr i} {
read_verilog BLOCK_$i.v
}
2、获取帮助
-->在dc_shell 中能用的命令:
pwd 、 cd 、 Is、history、 !l 、 !7 、 Ireport 、
sh <LINUX_command> :加上sh后,可以执行在linux中执行的命令,如sh gvim xxx.v & (&是后台运行)、
printenv、
get_linux_variable <LINUX_variable>
-->在dc_shell中寻求帮助:
下面的这些man、printvar命令都只能在dc_shell中运行:
help -verbose *clock :列出与*clock有关的选项
create_clock -help :查看create_clock这个命令的简单用法
man create_clock :查看create_clock这个命令的详细信息
printvar Mibrary :查看 Mibrary这个变量的内容
man target_library :查看target_library这个命令的详细信息
-->linux关联DC中的帮助,获取更多的帮助
为了能够在linux中使用dc_shell中的man命令,或者说能在linux中查看某些dc的命令,可以使用关联(alias):
$ alias dcman “/usr/bin/man -M $SYNOPSYS/doc/syn/man”
然后我们就可以使用dcman来参看dc中的命令了,例如:
$dcman targetjibrary
3、tcl语法的检查
当在DC可以执行tcl文件,在运行之前,我们要检查这个tcl文件是否有语法错误,可以使用下面的命令:
$dcprocheck xxx.tcl
4、设计对象的操作
关于设计对象的内容(比如上面是设计对象等),请查看前面的章节,这里我们只进行说对设计对象操作的一些命令(这些命令可以在dc_shell 中执行,或者写在tcl文件中)。
-->获取设计对象
get_ports 、get_pins 、get_designs 、get_cells 、get_nets 、get_clocks 、get_nets -of_objects [get_pins FF1_reg/Q] 、get_libs <lib_name> 、get_lib_cells <lib_name/cell_names> 、get_lib_pins <lib_name/cell_name/pin_names>
-->设计对象(的集合):
设计对象的物集,总之就是多个设计对象(组成一个集合)
all_inputs 、all_outputs 、all_clocks 、all_registers 、all_connected 、all_fanin 、all_fanout 、all_ideal_nets
-->对设计对象的操作:
获取设计对象(get_ports pci_*)后赋予给变量PCI__PORTS:
set PCI__PORTS [get_ports pci_*]
echo $PCI__PORTS # -? _sel184
查询设计对象:
query_objects $PCI__PORTS # -> {pci_1 pci_2 ...}
获取设计对象的名字:
get_object_name $PCIMPORTS # -> pci_1 pci_2 ...
获取设计对象物集的大小:
sizeof_collection $PCI_PORTS # -> 37
往设计对象物集里面增加设计对象:
set PCI_PORTS [add_to_collection $PCI_PORTS [get_ports CTRL*]]
从设计对象物集里面减少设计对象:
set ALL_INP_EXC_CLK [remove_from_collection [alljnputs] [get_ports CLK]]
比较设计对象:
compare_collections
设计对象的索引:
index_collection
分类设计对象:
sort_collection
循环查看(进行遍历)设计对象物集的内容:
foreach_in_collection my_cells [get_cells -hier * -filter “is_hierarchical == true”] {
echo “Instance [get_object_name $cell] is hierarchical”
}
过滤运算符:
# Filtering operators: ==, !=, >, <, >=, <=, =~, h
filter_collection [get_cells *] “ref_name AN*”
get_cells * -filter “dontjouch == true”
get_clocks * -filter “period < 10”
列出所有单元属性并将输出重定向到文件:
# List all cell attributes and redirect output to a file
redirect -file cell_attr {list_attributes -application -class cell}
Grep以dont_为开头的单元属性文件:
# Grep the file for cell attributes starting with dont_
$grep dont_ cell__attr | more
列出属性为dont_touch的单元名字:
# List the value of the attribute dont_touch
get_attribute <cell_name> dont_touch
识别当前设计集中的胶合单元(GLUE_CELLS):
# Example: Identify glue cells in the current design
set GLUE_CELLS [get_cells *-filter “is_hierarchicai == false”]
5、启动环境的配置
这些设置主要是在.synopsys_dc.setup文件中;或者在common_setup.tcl和dc_setup.tcl文件中,然后.synopsys_dc.setup文件把这两个文件包含。
·common_setup.tcl文件中:
set ADDITIONAL_SEARCH_PATH “./libs/sc/LM ./rtl ./scripts”
set TARGET_LIBRARY_FILES sc_max.db
set ADDL_LINK_LIBRARY_FILES IP_max.db
set SYMBOL_LIBRARY_FILES sc.sdb
set MW_DESIGN_LIB MY_DESIGN_LIB
set MW_REFERENCE_LIB_DIRS “./libs/mw_lib/sc ./libs/mw_libs/IP”
set TECH_FILE ./Iibs/tech/cb13_6m.tf
set TLUPLUS_MAX__FILE ./Iibs/tlup/cb13_6m_max.tluplus
set MAP FILE ./Iibs/tlup/cb13_6m.map
·dc_setup.tcl文件中:
#库的设置:
set_app_var search_path "$search_path $ADDITIONAL_SEARCH_PATH"
set_app_var target_library $TARGET_LIBRARY_FILES
set_app_var link_library "* $target_library $ADDL_LINK_LIBRARY_FILES"
set_app_var symbol_library $SYMBOL_LIBRARY_FILES
set_app_var mw_reference_library $MW_REFERENCE_LIB_DIRS
set_app_var mw_design_library $MW_DESIGN_LIB
get_app_var -list -only_changed_vars *
#如果存在Milkyway design库,那就不创建;否则创建Milkyway design库
if {![file isdirectory $mw_design Jibrary ]} {
create_mw_lib -technology $TECH_FILE -mw_reference_library $mw_reference_library $mw_design_library
}
open_mw_lib $mw_design_library
check_library
set_tlu_plus_tiles -max_tluplus $TLUPLUS_MAX_FILE -tech2itf_map $MAP_FILE
check_tlu_plus_files
history keep 200
set_app_var alib_library_analysis_path ../ ; # ALIB files
define_design_lib WORK -path ./work
set_svf <myjilename.svf>
set_app_var sh_enable_page_mode false
suppress_message {LINT-28 LINT-32 LINT-33 UID-401}
set_app_var alib_library_analysis_path [get_unix_variable HOME]
alias h history
alias rc “report_constraint -all_violators”
6、DC的启动方式(举例)
$dc_shell -topographical #交互式启动
dc_shell-topo> start_gui #启动图形化界面
dc_sheli-topo> stop_gui #停止图形化界面
$design_vision -topographical #启动图形化界面的同时,调用拓扑模式
$dc_shell -topo -f dc.tcl | tee -i dc.log #批处理模式
7、读入设计
有下面这些读入情况:
·read_db library_file.db
·read_verilog {A.v B.v TOP.v}
·read_sverilog {A.sv B.sv TOP.sv}
·read_vhdl {A.vhd B.vhd TOP.vhd}
·read_ddc MY_TOP.ddc
·analyze -format verilog {A.v B.v TOP.v}
elaborate MY_TOP -parameters “A_WIDTH=8, B__WIDTH=16”
然后是读入设计后的一些必要操作:
设置顶层设计:
current_design MY_T0P
检查是否缺失子模块:
link
检查设计:
if {[check_design] ==0} {
echo “Check Design Error”
exit #检查出错,退出DC
}
写出读入后的未映射设计:
write_file -f ddc -hier -out unmappedd/TOP.ddc
8、(环境、设计、时序等的)检查和移除
reset_design
report_clock
report_clock -skew -attr
report_design
report_port -verbose
report_path_group
report_timing
report_timing_requirements -ignored
report_auto_ungroup
report_interclock_relation
check_timing
reset_path -from FF1_reg
remove_clock
remove_clockJransition
remove_clock_uncertainty
remove_input_delay
remove_output_delay
remove_driving_cell
list_libs
redirect -file reports/lib.rpt {report_lib <libname>}
report_hierarchy [-noleaf]
# Arithmetic implementation and resource-sharing info
report_resources
# List area for all cells in the design
report_cell [get_cells -hier *]
check_design
check_design -html check_design.html
sh firefox check_design.html
report_constraint -all_violators
report_timing [ -delay <max | min> ]
[ -to <pi n_port_clockJ ist> ]
[ -from <pin__port_clock_list> ]
[ -through <pin_port_list> ]
[ -group]
[ -input__pins ]
[ -max_paths <path_count> ]
[ -nworst <paths_per_endpoint_count >]
[ -nets ]
[ -capacitance ]
[ -significant_digits <number>]
report_qor
report_area
report_congestion
9、约束的设置和执行
·预算估计:
如果实际输出负载值未知,则用于“负载预算”。找到库中最大的max_capacitance值,并将该值作为保守的输出负载。
set LIB_NAME ssc_core_slow
set MAX_CAP 0
set OUTPUT_PINS [get_lib_pins $LIB_NAME/*/* \\
-filter "direction == 2"]
Foreach_in_collection pin $OUTPUT_PINS {
set NEW_CAP [get_attribute Spin max_capacitance]
if {$NEW_CAP > $MAX_CAP} {
set MAX_CAP $NEW_CAP
}
}
set_load $MAX _CAP [all_outputs]
·普通的约束:
reset_design
############# CLOCKS###################
# 默认情况下,每一个时钟都只对于一个时钟,除非设置下面的命令为真:
set_app_var timing_enable_multiple_clocks_per_reg true
#下面是时钟建模的例子:
create_clock -period 2 -name Main_Clk [get_ports Clk1]
create_clock -period 2.5 -waveform {0 1.5} [get_ports Clk2]
create_clock -period 3.5 -name V_Clk; # 这是虚拟时钟
create_generated_clock -name DIV2CLK -divide_by2 -source [get_ports Clk1] [get_pins I_DIV__FF/Q]
set_clock_uncertainty -setup 0.14 [get_clocks *]
set_clock_uncertainty -setup 0.21 -from [get_clocks Main_Clk] -to [get_clocks Clk2]
set_clock_latency -max 0.6 [get_clocks Main_Clk] ; # 这是版图之前的时钟情况
set_propagated__clock [all_clocks]; # 这是时钟树综合后的情况
set_clock_latency -source -max 0.3 [get_clocks Main_Clk]
set_clock_transition 0.08 [get_clocks Main_Clk]
############# CLOCK TIMING EXCEPTIONS ########
set_clock_group -logically_exclusive | -physically_exclusive | -asynchronous -group CLKA -group CLKB
set_false_path -from [get_clocks Asynch_CLKA] -to [get_clocks Asynch_CLKB]
set_multicycle_path -setup 4 -from -from A_reg -through U_Mult/Out -to B_reg
set_multicycle_path -hold 3 -from -from A_reg -through U_Mult/Out -to B_reg
set_input_delay -max 0.6 -clock Main_Clk [alljnputs]
set_input_delay -max 0.3 -clock Clk2 -clock_fall -add_delay [get_ports “B E”]
set_input_delay -max 0.5 -clock -network_latency_included V_Clk [get_ports “A C F”]
set_output_delay -max 0.8 -clock -source_latency_included Main_Clk [all__outputs]
set_output_delay -max 1.1 -clock V_Clk [get_ports “OUT2 OUT7]
################ ENVIRONMENT ######################
set_max_capacitance 1.2 [alljnputs]; # (这是用户自定义的设计规则约束)
set_load 0.080 [all_outputs]
set_load [expr [load_of slow_proc/NAND2_3/A] * 4] [get_ports OUT3]
set_load 0.12 [all_inputs]
set_input_transition 0.12 [remove_from_collection [all_inputs][get_ports B]]
set_driving_cell -lib_cell FD1 -pin Q [get_ports B]
与物理设计有关的约束:
create_bounds ...
create_rp_groups...
set_app_var placer_soft_keepout_channel_width...
set_app_var placer_max_cell_density_threshold...
set_congestion_options...
setjgnoredjayers...
set_aspect_ratio 0.5 # (高度和宽度的比值)
set_utilization 0.7 #(利用率)
set_placement_area -coordinate {0 0 600 400}
create_die_area -polygon {{0 0} {0 400} {200 400} {200 200} {400 200} {400 0} {0 0}}
set_port_side {R} Port__N
set_port_location -coordinate {0 40} PortA
set_cell_location -coordinate {400 160} -fixed -orientation {N} RAM1
create_placement_blockage -name Blockagel -coordinate {350 110 600 400}
create_bounds -name “b1” -coordinate {100 100 200 200} INST_1
create_site_row -coordinate {10,10} -kind CORE -space 5 -count 3 {SITE_ROW#123}
create_voltage_area -name VA1 -coordinate {100 100 200 200} INST_1
create_net__shape -type wire -net VSS -origin {0 0} -length 10 -width 2 -layer M1
create_wiring_keepouts -name "my__keep1" -layer "METAL1" -coord {12 12 100 100}
report_physical_constraints
reset_physical_constraints
约束的执行:
redirect -tee -file reports/precompile.rpt {source -echo -verbose TOP.con}
redirect -append -tee -file reports/precompile.rpt {check_timing}
如果有直接的tcl约束,那么直接约束:
source <Physical_Constraints_TCL_file>
如果没有的话,可以从物理设计中抽取:
extract_physieal_constraints <DEF_file>
read_floorplan <floorplan_cmd_file>
10、综合优化
路径分组:
group_path -name CLK1 -criticai_range <10% of CLK1 Period> -weight 5
group_path -name CLK2 -critical_range <10% of CLK2 Period> -weight 2
group_path -name INPUTS -from [alljnputs]
group_path -name OUTPUTS -to [all_outputs]
group_path -name COMBO -from [alljnputs] -to [all_outputs]
set_fix_multiple_port_nets -all -buffer_constants
综合时的选项:
# Licenses required to take advantage of all Design Compiler optimization
# features: DC-Ultra, DesignWare, DC-Extension (for DC-Graphical), DFTC
# Enable multi-core optimization, if applicable:
set_host_options -max_cores <#>
report_host__options
remove_host_options
# 防止特定的子模块被 ungrouped:
set_ungroup <top_level_and/or_pipeiined_blocks> false
# 防止DesignWare层次结构被 ungrouped:
set_app_var compile_ultra_ungroup_dw false
# 如果需要:禁用特定子设计的边界优化:
set_boundary_optimization <cells or designs> false
# 如果需要:从适应性重新定时中排除特定的单元/设计(-retime)(也就是放在某些模块或者设计的寄存器被retime移动):
set_dont_retime <cells_or_designs> true
# 如果需要:通过手动控制寄存器复制的个数
#最大扇出的情况:
set_register_replication [-num_copies 3 | -max_fanout 40] [get_cells B_reg]
# 如果需要:更改寄存器复制命名样式:
set_app_var register_replication_naming_style "%s_rep%d"
# 如果要求应用,那么就要为测试准备的综合选择扫描寄存器,并且禁止自动地移位寄存器定义:
set_scan_configuration -style <multiplexed_flip_flop | clocked_scan | lssd | aux_clock_lssd>
set_app_var compile_seqmap_identify_shift_registers false
# 如果有要求保持流水线中的寄存器器输出,就要进行约束:
set_dont_retime [get_cells U_Pipeline/R12_reg*] true
# 如果设计中包含有纯的流水线设计,那么可以进行寄存器retiming:
set_optimize_registers true -design My_Pipeline_Subdesign -clock CLK1 -delay_threshold <clock_period>
# 默认情况下,整个层次结构使用compile_ultra -spg进行拥塞优化,选择性地禁用/启用子设计上的拥塞优化:
set_congestion_optimization [get_designs A] false
# 第一次编译:根据需要启用/禁用优化:
compile_ultra -scan -retime -timing [-spg] \\
[-no_boundary] \\
[-no_autoungroup] \\
[-no_design_rule] \\
[-no_seq_output_inversion]
#根据需要,更多地关注违规的关键路径:
group_path -name <group_name> -from <path_start> -to <path_end> -critical range <10% of max delay goal> -weight 5
# 执行增量编译:
compile_ultra -scan -timing -retime -incremental [-spg]
11、综合后处理
set_app_var verilogout_no_tri true
change_names -rule verilog -hier
write_file - f verilog -hier -out mapped/TOP.v
write__file - f ddc -hier -out mapped/TOP.ddc
write_sdc TOP.sdc
write_scan_def -out TOP_scan.def
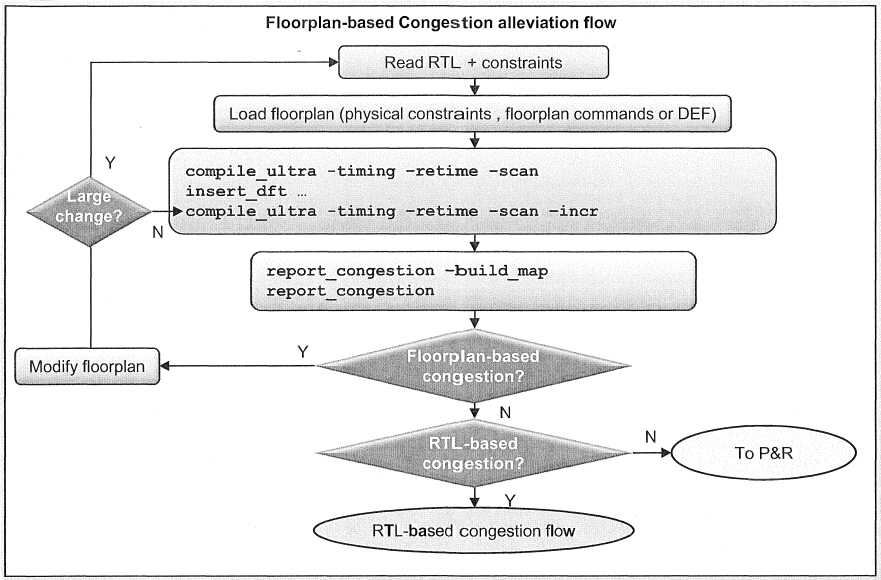
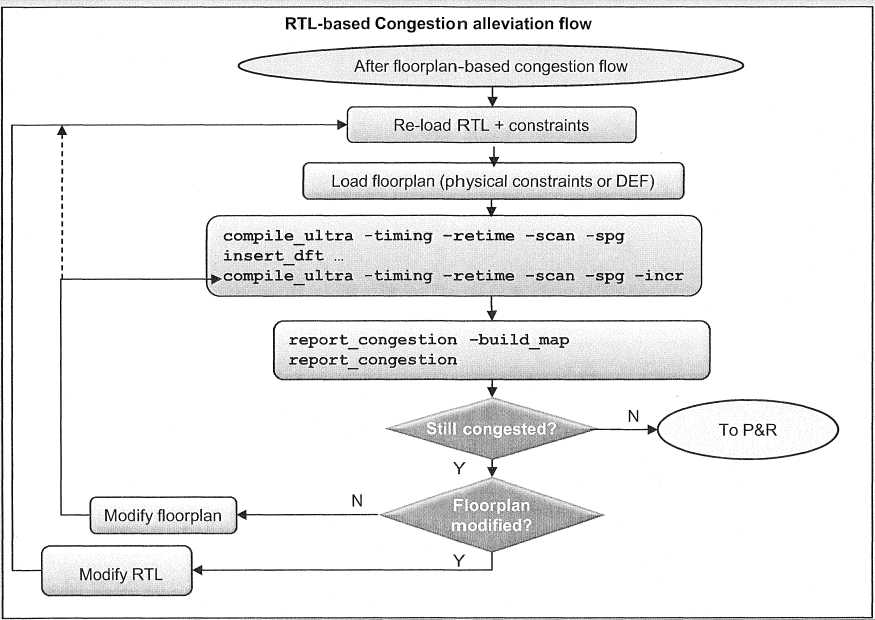
最后附上两张流程图:
以上是关于Compiler Design Lab 实现过程的主要内容,如果未能解决你的问题,请参考以下文章