Android中Fragment怎样刷新UI
Posted
tags:
篇首语:本文由小常识网(cha138.com)小编为大家整理,主要介绍了Android中Fragment怎样刷新UI相关的知识,希望对你有一定的参考价值。
参考技术A 刷新UI,你要是获取后台数据的话,可以用定时器,自己设定多长时间刷新 参考技术B 在activity 的onActivityResult 调用fragment 的onActivityResult 方法,例如getSupportFragmentManager().getFragments().get(mViewPager.getCurrentItem()).onActivityResult(requestCode, requestCode, data);
然后在fragment的onActivityResult做处理
Android Fragment 创建不同页面
文章目录
1 Fragment 介绍
- Android在3.0版本引入了 Fragment(碎片) 功能,它非常类似于Activity,可以 像Activity一样包含布局
- 它出现的初衷是为了适应大屏幕的平板电脑,使用Fragment我们可以把屏幕划分 成几块,合理利用屏幕空间
- Fragment 通常是嵌套在 Activity 中使用
2 Fragment 特点
- Fragment并不能单独使用,他需要嵌套在Activity 中使用,作为
Activity界面的一部分组成出现 - 可以在一个Activity中同时出现
多个Fragment,并且一个Fragment 也可在多个Activity中使用 - 在Activity运行过程中,可以通过transaction的
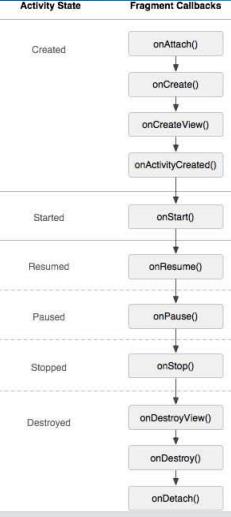
add()、remove()、 replace()方法来添加、移除或者替换Fragment - Fragment可以响应自己的输入事件,并且有自己的生命周期,但它 的生命周期受其宿主Activity的生命周期影响。比如Activity 被 destory销毁了,它也会跟着被销毁
3 在Activity中创建Fragment 并切换

3.1 创建布局文件并创建Fragment类
- 自定义Fragment要继承Fragment类,并重写onCreateView方法
- 使用LayoutInflater加载布局,并返回加载的布局文件
import android.os.Bundle;
import android.view.LayoutInflater;
import android.view.View;
import android.view.ViewGroup;

import androidx.annotation.NonNull;
import androidx.annotation.Nullable;
import androidx.fragment.app.Fragment;

import java.util.zip.Inflater;

public class FragmentOne extends Fragment {
    @Nullable
    @Override
    public View onCreateView(@NonNull LayoutInflater inflater, @Nullable ViewGroup container, @Nullable Bundle savedInstanceState) {
        // 1. 加载Fragment布局
        View view = inflater.inflate(R.layout.fragment_layout_1, container, false);
        return view;
    }
}
3.3 在UI中显示Fragment
过程:
- 开启Fragment事务,当Fragment为创建时添加到事务中,不能重复添加,否则报错
- 实现当前布局前,隐藏其他的布局,
transaction.hide(fragmentOne); - 显示当前布局,如果对当前布局,则对当前布局进行保存
- 提交事务
- 修改UI的状态
- 封装的方法
    private void showFragmentOne() {
        /**
         * 点击事件后,显示对应的fragment
         * */

        // 1. 开启事务
        FragmentTransaction transaction = getSupportFragmentManager().beginTransaction();
        // Fragment为null时, 创建Fragment并添加到tansaction中
        if (fragmentOne == null) {
            fragmentOne = new FragmentOne();
            // fragment只能添加一次, 将Fragment关联到布局中
            transaction.add(R.id.fragment_view, fragmentOne);
        }

        // 2. 显示当前布局之前,隐藏所有的布局
        hideAllFragment(transaction);

        //3. 在事务中显示当前布局
        transaction.show(fragmentOne);

        // 4. 记录当前的Fragment 以便于操作
        nowFragment = fragmentOne;

        // 5. 提交事务
        transaction.commit();

        // 设置布局的变化
        tab_1.setBackgroundColor(Color.RED);
        tab_2.setBackgroundColor(Color.WHITE);
        tab_3.setBackgroundColor(Color.WHITE);


    }
4 UI加载Fragment,并设置Activity为点击事件监听器
import androidx.appcompat.app.AppCompatActivity;
import androidx.fragment.app.Fragment;
import androidx.fragment.app.FragmentTransaction;

import android.graphics.Color;
import android.os.Bundle;
import android.view.View;
import android.widget.TextView;


public class MainActivity extends AppCompatActivity implements View.OnClickListener{

    // 定义控件
    private Fragment fragmentOne, fragmentTwo, fragmentThree, nowFragment;
    private TextView tab_1, tab_2, tab_3;


    @Override
    protected void onCreate(Bundle savedInstanceState) {
        super.onCreate(savedInstanceState);
        setContentView(R.layout.activity_main);

        initUI();

    }

    private void initUI() {
        /**
         * 初始化点击控件,绑定各个控件
         * 2. 设置按钮的背景颜色
         * 3. 添加点击事件
         * */
        tab_1 = findViewById(R.id.tab_1);
        tab_2 = findViewById(R.id.tab_2);
        tab_3 = findViewById(R.id.tab_3);

        // 设置初始时的背景颜色
        tab_1.setBackgroundColor(Color.RED);
        tab_2.setBackgroundColor(Color.WHITE);
        tab_3.setBackgroundColor(Color.WHITE);

        // 开始的时候显示第一个布局
        showFragmentOne();

        // 第二种添加监听器
        tab_1.setOnClickListener(this);
        tab_2.setOnClickListener(this);
        tab_3.setOnClickListener(this);

//        // 设置监听器
//        tab_1.setOnClickListener(new View.OnClickListener() {
//            @Override
//            public void onClick(View v) {
//                showFragmentOne();
//            }
//        });
//
//        tab_2.setOnClickListener(new View.OnClickListener() {
//            @Override
//            public void onClick(View v) {
//                showFragmentTwo();
//            }
//        });
//
//        tab_3.setOnClickListener(new View.OnClickListener() {
//            @Override
//            public void onClick(View v) {
//                showFragmentThree();
//            }
//        });


    }

    @Override
    public void onClick(View v) {
        if (v.getId() == R.id.tab_1) {
            showFragmentOne();
        }
        if (v.getId() == R.id.tab_2) {
            showFragmentTwo();
        }
        if (v.getId() == R.id.tab_3) {
            showFragmentThree();
        }
    }

    private void showFragmentOne() {
        /**
         * 点击事件后,显示对应的fragment
         * */

        // 1. 开启事务
        FragmentTransaction transaction = getSupportFragmentManager().beginTransaction();
        // Fragment为null时, 创建Fragment并添加到tansaction中
        if (fragmentOne == null) {
            fragmentOne = new FragmentOne();
            // fragment只能添加一次, 将Fragment关联到布局中
            transaction.add(R.id.fragment_view, fragmentOne);
        }

        // 2. 显示当前布局之前,隐藏所有的布局
        hideAllFragment(transaction);

        //3. 在事务中显示当前布局
        transaction.show(fragmentOne);

        // 4. 记录当前的Fragment 以便于操作
        nowFragment = fragmentOne;

        // 5. 提交事务
        transaction.commit();

        // 设置布局的变化
        tab_1.setBackgroundColor(Color.RED);
        tab_2.setBackgroundColor(Color.WHITE);
        tab_3.setBackgroundColor(Color.WHITE);


    }

    private void showFragmentTwo() {

        // 1. 创建事务
        FragmentTransaction transaction = getSupportFragmentManager().beginTransaction();
        if (fragmentTwo == null) {
            fragmentTwo = new FragmentTwo();
            transaction.add(R.id.fragment_view, fragmentTwo);
        }

        // 2. 隐藏所有Fragment
        hideAllFragment(transaction);

        // 3. 显示当前Fragment
        transaction.show(fragmentTwo);

        // 4. 记录当前fragment
        nowFragment = fragmentTwo;

        // 5. 提交事务
        transaction.commit();

        // 设置布局的变化
        tab_1.setBackgroundColor(Color.WHITE);
        tab_2.setBackgroundColor(Color.RED);
        tab_3.setBackgroundColor(Color.WHITE);

    }

    private void showFragmentThree() {
        // 1. 获取事件
        FragmentTransaction transaction = getSupportFragmentManager().beginTransaction();
        if (fragmentThree == null) {
            fragmentThree = new FragmentThree();
            // 绑定布局
            transaction.add(R.id.fragment_view, fragmentThree);

        }

        // 2. 隐藏所有的fragment
        hideAllFragment(transaction);

        // 3. 显示当前的Fragment
        transaction.show(fragmentThree);

        // 4. 记录当前的Fragment
        nowFragment = fragmentThree;

        // 5. 提交事件
        transaction.commit();

        // 修改按钮布局
        tab_1.setBackgroundColor(Color.WHITE);
        tab_2.setBackgroundColor(Color.WHITE);
        tab_3.setBackgroundColor(Color.RED);

    }

    private void hideAllFragment(FragmentTransaction transaction) {
        if (fragmentOne != null) {
            transaction.hide(fragmentOne);
        }
        if (fragmentTwo != null) {
            transaction.hide(fragmentTwo);
        }
        if (fragmentThree != null) {
            transaction.hide(fragmentThree);
        }

    }


}
以上是关于Android中Fragment怎样刷新UI的主要内容,如果未能解决你的问题,请参考以下文章
android Fragment跳转到Activity,再返回实现刷新Fragment(广播方法)
android fragment 怎样调用activity中的方法
Kotlin Android - 当主活动添加项目时,从 Fragment 刷新 ListView