通过python读取xlsx中的数据生成各种图标
Posted 悄悄成长
tags:
篇首语:本文由小常识网(cha138.com)小编为大家整理,主要介绍了通过python读取xlsx中的数据生成各种图标相关的知识,希望对你有一定的参考价值。
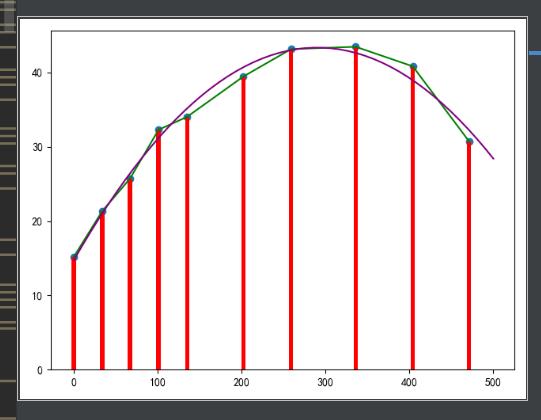
运行结果:

程序代码如下:
#将excel中的数据进行读取分析
import openpyxl
import numpy as np
import math
import matplotlib.pyplot as pit
wk=openpyxl.load_workbook(\'信息11.xlsx\')
sheet=wk.active
rows=sheet.max_row
cols=sheet.max_column
lst1=[]
lst2=[]
for i in range (1,rows+1):
    size1=sheet.cell(i,1).value
    lst1.append(size1)
    size2 = sheet.cell(i, 2).value
    lst2.append(size2)
num=0
dic_size={}
for item in lst1:
    dic_size[lst1[num]]=lst2[num]
    num+=1
#弄成百分比的形式
lst_total=[]
for item in dic_size:
    lst_total.append([item,dic_size[item]])
labels=[item[0] for item in lst_total] #使用列表生成式,得到饼图的标签
fraces=[item[1] for item in lst_total] #饼图中的数据源
pit.rcParams[\'font.family\']=[\'SimHei\'] #单独的表格乱码的处理方式
pit.scatter(labels,fraces)
pit.plot(labels,fraces,color=\'green\')
pit.bar(labels,fraces,width=5,color=\'red\')
z1=np.polyfit(labels,fraces,2)
p1=np.poly1d(z1)
x = np.linspace(0, 500, 50)
y=-0.00024*(x**2)+0.1013*(x)+10.23
pit.plot(x,y,color=\'purple\')
#pit.savefig(\'图.jpg\')
yre=[]
for item in labels:
    y=-0.00024*(item**2)+0.1013*(item)+10.23
    yre.append(round(y,6))
print(fraces)
print(yre)
result=[]
a=0
mse=0
mae=0
for i in range(0,10):
    a+=round(fraces[i]-yre[i],6)
    mae+=round(math.fabs(fraces[i]-yre[i]),6)
for i in range(0,10):
    result.append(round(fraces[i] - yre[i]-round(a/10,6), 6))
    mse += round((fraces[i] - yre[i]-round(a/10,6)) * (fraces[i] - yre[i]-round(a/10,6)), 6)
print(result)
print(\'均值\',round(a/10,6))
print(\'均方误差\',round(mse/10,6))
rmse=math.sqrt(round(mse/10,6))
print(\'均方根误差\',round(rmse,6))
print(\'平均绝对误差\',round(mae/10,6))
print(\'R平方的数值\',1-((round(a/10,6))*round(a/10,6))/round(mse/10,6))
print(p1)
#pit.show()
以上是关于通过python读取xlsx中的数据生成各种图标的主要内容,如果未能解决你的问题,请参考以下文章