python图形化界面开发学习
Posted 这不是粥
tags:
篇首语:本文由小常识网(cha138.com)小编为大家整理,主要介绍了python图形化界面开发学习相关的知识,希望对你有一定的参考价值。
主要内容
在GUI添加小部件
布局小部件
Pyqt5的几种布局技术
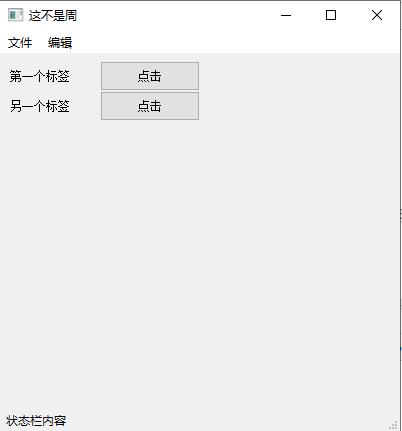
位置部件布局
效果如图
代码如下
from PyQt5.QtWidgets import QApplication,QMainWindow,QAction
from PyQt5.QtGui import QIcon
from PyQt5.Qt import QLabel ,QPushButton
import sys

class GUI(QMainWindow):#inherit from QMainwindow
    def __init__(self):
        super().__init__()#initialize super class,which creates the window
        self.initGUI() #refer to window as self

    def initGUI(self):#add widgets and change properties
        self.setWindowTitle(\'这不是周\')#refer to window as self
        self.resize(400,400) #resize(width,height)
        self.add_menu_and_status()

        self.positional_widget_layout()

    def positional_widget_layout(self):
        label_1 =QLabel(\'第一个标签\',self)
        print(self.menuBar().size()) #default size :PyQt5.Qtcore(100,30)
        mbar_height =self.menuBar().height()
        print(mbar_height)
        label_1.move(10,mbar_height) #position label below menubar

        label_2 =QLabel(\'另一个标签\',self)#create another label
        label_2.move(10,mbar_height*2)#align and position below label_1

        button_1 =QPushButton(\'点击\',self)
        button_2 =QPushButton(\'点击\',self)

        button_1.move(label_1.width(),label_1.height())
        button_2.move(label_1.width(),label_1.height()*2)


    def add_menu_and_status(self):
        self.statusBar().showMessage(\'状态栏内容\')

        menubar =self.menuBar() #create menu bar

        file_menu =menubar.addMenu(\'文件\') #add menu to menu bar

        new_icon =QIcon(\'file.png\') #create icon
        new_action =QAction(new_icon,\'创建\',self) #crteate an Action
        new_action.setStatusTip(\'创建新文件\')#statusbar pdated
        file_menu.addAction(new_action)  # add Action to menu

        file_menu.addSeparator() #add separator line between menu

        exit_icon = QIcon(\'exit.png\')  # create icon
        exit_action = QAction(exit_icon, \'退出\', self)  # crteate an Action
        exit_action.setStatusTip(\'点击退出系统\')  # statusbar pdated
        exit_action.triggered.connect(self.close)#close application when clicked
        exit_action.setShortcut(\'Ctrl+Q\') #keyboard shortcut to close application
        file_menu.addAction(exit_action)  # add Action to menu
        #-------------------------------------

        edit_menu =menubar.addMenu(\'编辑\')#add second menu to menu bar
        self.resize(400,400)

if __name__==\'__main__\':
    app =QApplication(sys.argv) #create Application
    gui =GUI() #create instance of class
    gui.show()#show the constructed Qt window
    sys.exit(app.exec_())#execute the application
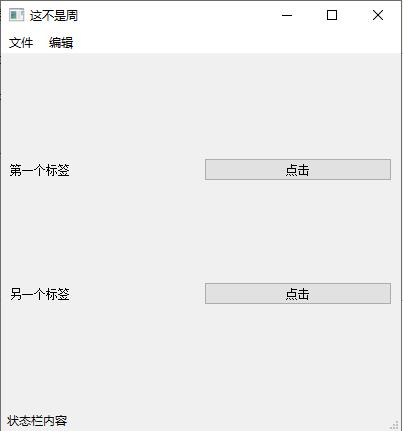
水平垂直布局
效果如图
代码如下
    def horizontal_vertical_box_layout(self):
        label_1 =QLabel(\'第一个标签\',self)
        label_2 =QLabel(\'另一个标签\', self)  # create another label
        button_1 =QPushButton(\'点击\',self)
        button_2 =QPushButton(\'点击\',self)

        hbox_1 =QHBoxLayout()
        hbox_2 =QHBoxLayout()

        hbox_1.addWidget(label_1)
        hbox_1.addWidget(button_1)

        hbox_2.addWidget(label_2)
        hbox_2.addWidget(button_2)

        vbox =QVBoxLayout()
        vbox.addLayout(hbox_1)
        vbox.addLayout(hbox_2)
        layout_widget =QWidget()
        layout_widget.setLayout(vbox)
        self.setCentralWidget(layout_widget)
注意:
from PyQt5.QtWidgets import QApplication,QMainWindow,QAction,QWidget from PyQt5.QtGui import QIcon from PyQt5.Qt import QLabel ,QPushButton,QHBoxLayout,QVBoxLayout
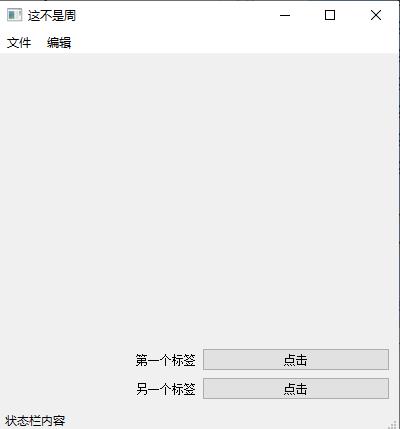
网格布局
效果如图
代码如下
    def layout_using_grid(self):
        label_1 = QLabel(\'第一个标签\', self)
        label_2 = QLabel(\'另一个标签\', self)  # create another label
        button_1 = QPushButton(\'点击\', self)
        button_2 = QPushButton(\'点击\', self)

        grid_layout =QGridLayout()
        grid_layout.addWidget(label_1,0,0)# row =0,col=0
        grid_layout.addWidget(button_1,0, 1)
        grid_layout.addWidget(label_2, 1, 0)
        grid_layout.addWidget(button_2, 1, 1)
        grid_layout.setAlignment(Qt.AlignBottom)
        grid_layout.setAlignment(label_1,Qt.AlignRight)
        grid_layout.setAlignment(label_2,Qt.AlignRight)

        layout_widget = QWidget()  # create Qwidget object
        layout_widget.setLayout(grid_layout)  # set layout

        self.setCentralWidget(layout_widget)
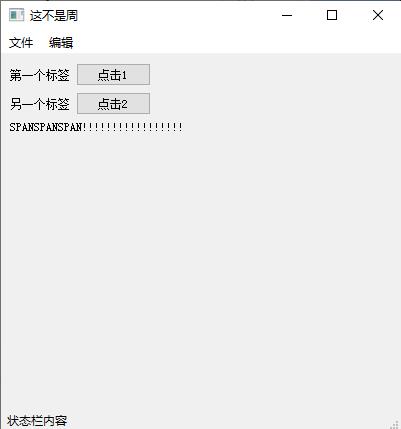
效果如图
代码如下
    def layout_using_grid(self):
        label_1 = QLabel(\'第一个标签\')
        label_2 = QLabel(\'另一个标签\')  # create another label
        label_span =QLabel(\'SPANSPANSPAN!!!!!!!!!!!!!!!!!\')

        button_1 = QPushButton(\'点击1\', self)
        button_2 = QPushButton(\'点击2\', self)

        grid_layout =QGridLayout()

        grid_layout.addWidget(label_1, 0, 0)# row =0,col=0
        grid_layout.addWidget(button_1, 0, 1)
        grid_layout.addWidget(label_2, 1, 0)
        grid_layout.addWidget(button_2, 1, 1)

        grid_layout.addWidget(label_span,2,0,1,3)

        grid_layout.setAlignment(Qt.AlignTop|Qt.AlignLeft)
        grid_layout.setAlignment(label_1,Qt.AlignRight)
        grid_layout.setAlignment(label_2,Qt.AlignRight)

        layout_widget = QWidget()  # create Qwidget object
        layout_widget.setLayout(grid_layout)  # set layout

        self.setCentralWidget(layout_widget)
注意:
from PyQt5.QtWidgets import QApplication,QGridLayout,QMainWindow,QAction,QWidget
from PyQt5.QtGui import QIcon
from PyQt5.Qt import *
import sys
以上是关于python图形化界面开发学习的主要内容,如果未能解决你的问题,请参考以下文章


