spring batch简单使用(基于xml)
Posted 不忘初心2021
tags:
篇首语:本文由小常识网(cha138.com)小编为大家整理,主要介绍了spring batch简单使用(基于xml)相关的知识,希望对你有一定的参考价值。
首先说下spring batch是个啥
他是轻量级,完善的批处理框架,
他是基于spring框架开发的框架,
他提供了大量可重复使用的组件,包含日志,追踪,事务,任务作业统计,任务重启,跳过,重复,资管管理
他的调用需要额外引入调度框架
他的优势
面向chunk的处理
事务管理能力
元数据管理
易监控的批处理应用
易拓展,可复用
先来个效果图
我是项目中使用到了spring batch,而且不是基于springboot的spring batch,而是使用tomcat容器,基于xml形式的批处理项目,因而有了本篇博客,本次只写最简单的介绍和使用
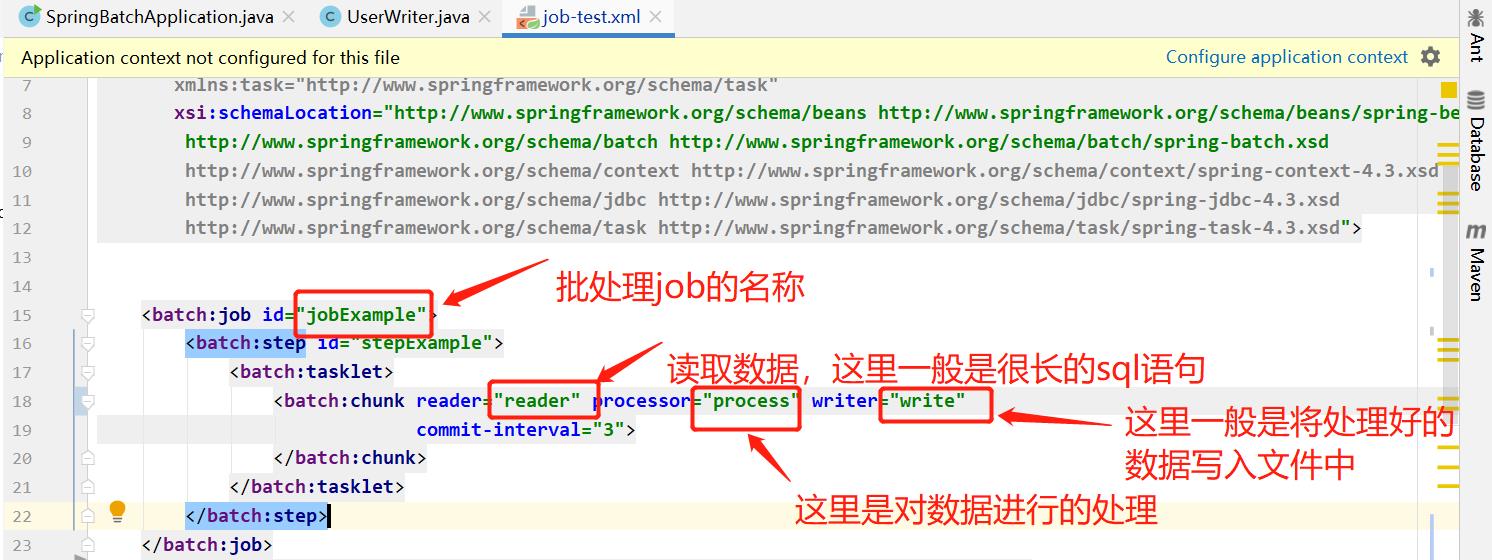
这是最基础的结构,下面对于单个模块分别说明
<bean id="reader" class="org.springframework.batch.item.file.FlatFileItemReader">
        <property name="resource" value="data/User.txt"></property>
        <!--将一条记录转换为java对象,一般使用LineTokenizer和FieldSetMapper组合来实现,默认DefaultLineMapper-->
        <property name="lineMapper" ref="lineMapper"></property>
        <!--将一条记录分割为多个字段-->
        <property name="linesToSkip" value="1"></property>
        <!--FieldSetMapper可以将多个字段值转化为java对象-->
        <!--LineCallbackHandler用于处理文件中记录回调操作-->
    </bean>
 <bean id="lineMapper" class="org.springframework.batch.item.file.mapping.DefaultLineMapper">
        <!--作用是将一条记录转换成FieldSet对象-->
        <property name="lineTokenizer" ref="lineTokenizer"></property>
        <!--将FieldSet对象转化为领域对象-->
        <property name="fieldSetMapper" ref="fieldSetMapper"></property>
    </bean>
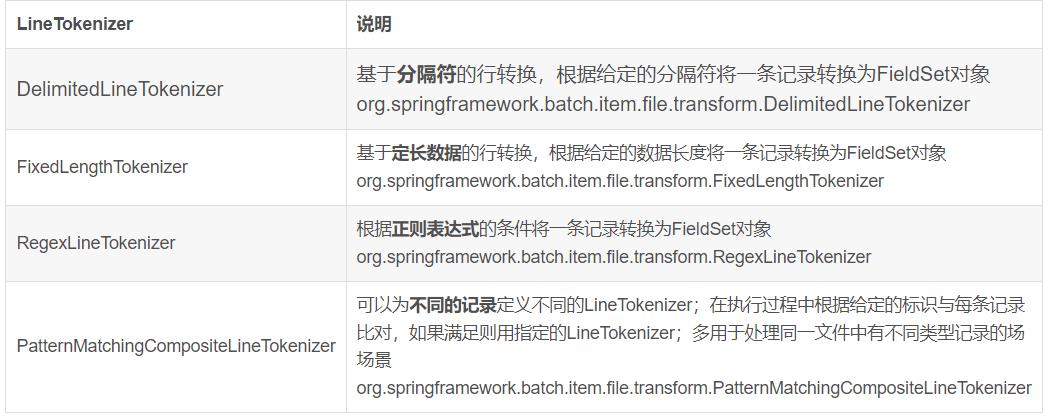
先看下lineTokenizer到底用了什么样的实现
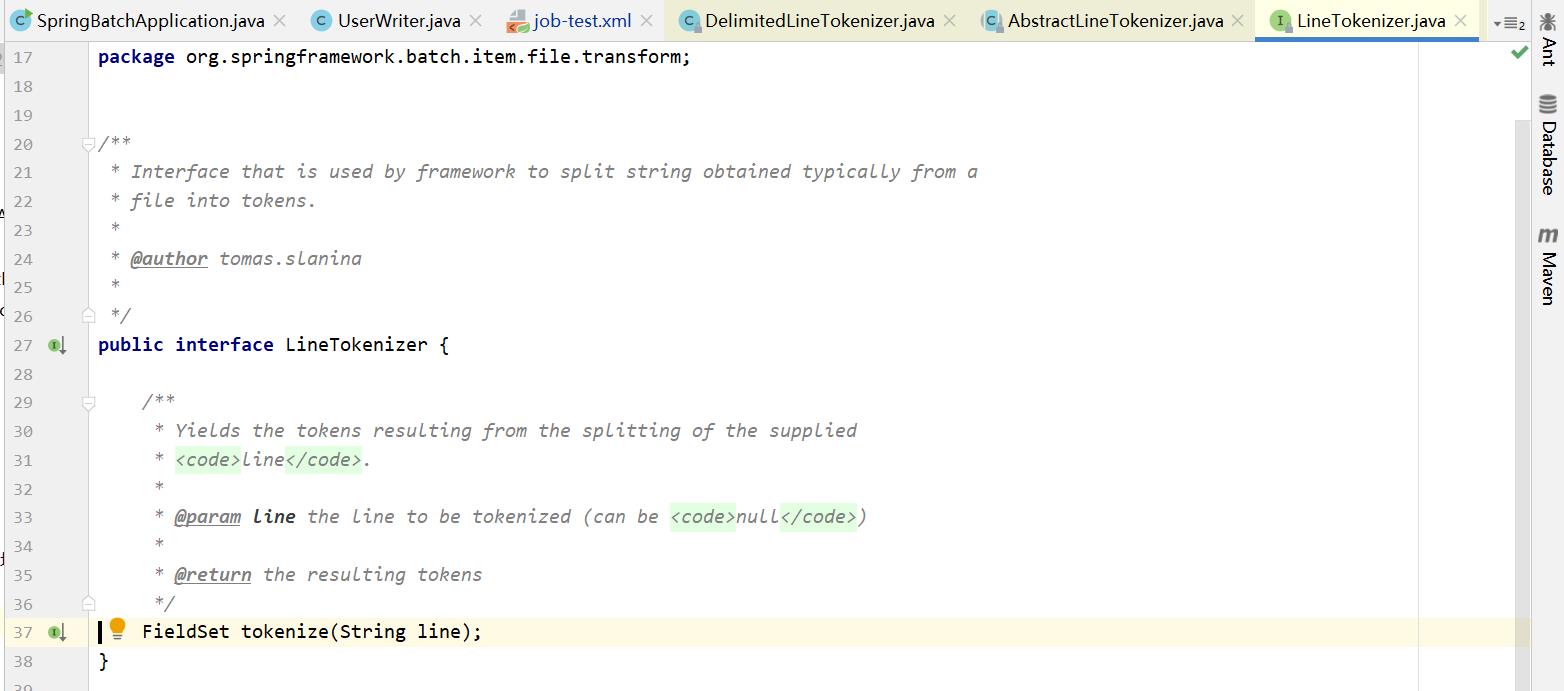
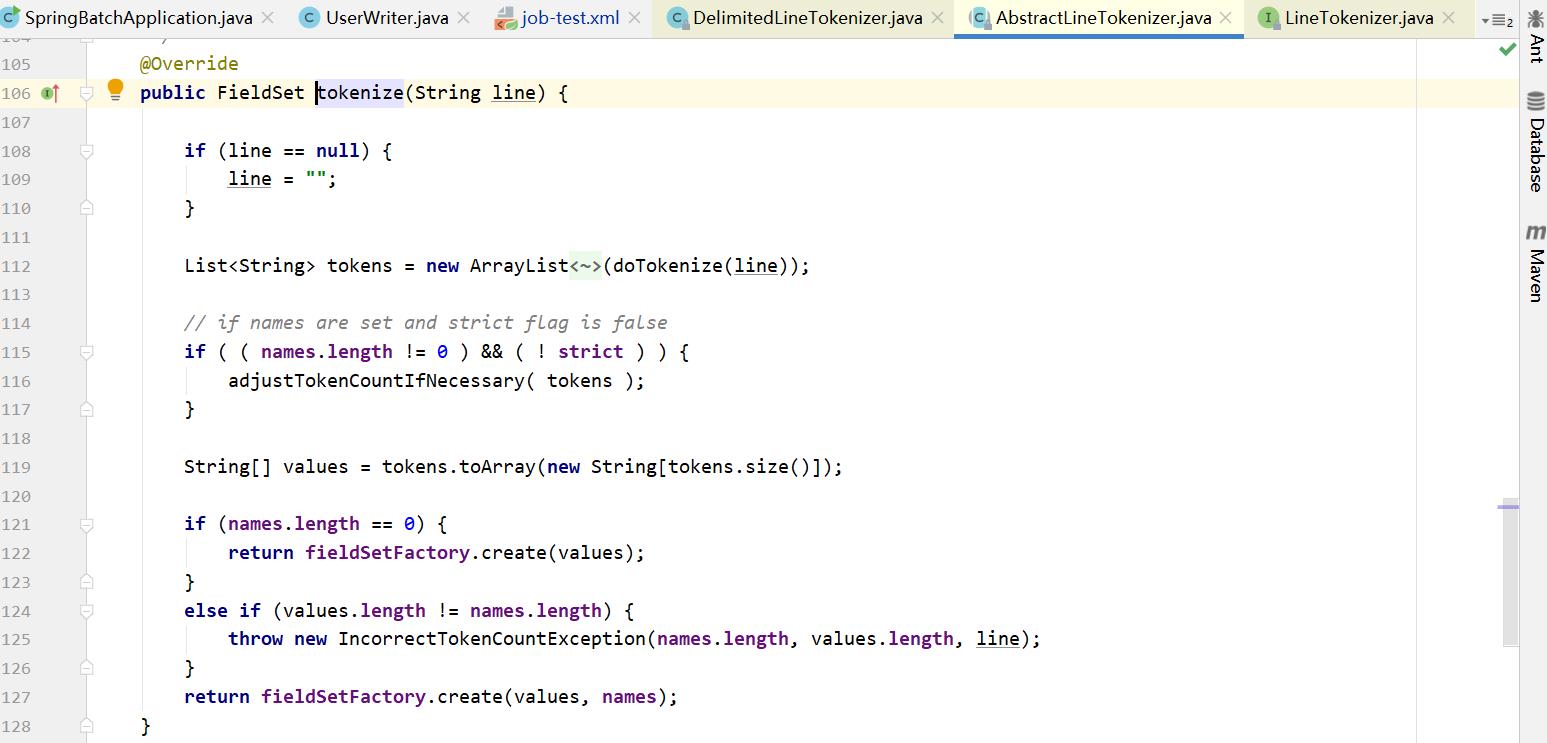
其实对于lineTokenizer,spring batch提供了四种实现
<!--这里是数据的一些处理逻辑,可以进行数据加工操作-->
    <bean id="process" class="com.java.batch.UserItemProcessor"></bean>
 <!--处理好的数据写入操作,一般是存放到文件中-->
    <bean id="write" class="com.java.batch.UserWriter">
下面给出完整代码


<?xml version="1.0" encoding="UTF-8"?>
<project xmlns="http://maven.apache.org/POM/4.0.0"
         xmlns:xsi="http://www.w3.org/2001/XMLSchema-instance"
         xsi:schemaLocation="http://maven.apache.org/POM/4.0.0 http://maven.apache.org/xsd/maven-4.0.0.xsd">
    <modelVersion>4.0.0</modelVersion>

    <groupId>com.java</groupId>
    <artifactId>springbatch-service</artifactId>
    <version>1.0-SNAPSHOT</version>


    <parent>
        <groupId>org.springframework.boot</groupId>
        <artifactId>spring-boot-starter-parent</artifactId>
        <version>1.5.10.RELEASE</version>
        <relativePath/> <!-- lookup parent from repository -->
    </parent>


    <dependencies>
        <dependency>
            <groupId>org.springframework</groupId>
            <artifactId>spring-context-support</artifactId>
        </dependency>
        <dependency>
            <groupId>org.springframework.boot</groupId>
            <artifactId>spring-boot-starter-batch</artifactId>
        </dependency>
        <dependency>
            <groupId>org.springframework</groupId>
            <artifactId>spring-oxm</artifactId>
        </dependency>
        <dependency>
            <groupId>org.projectlombok</groupId>
            <artifactId>lombok</artifactId>
        </dependency>
        <dependency>
            <groupId>com.h2database</groupId>
            <artifactId>h2</artifactId>
            <version>1.4.196</version>
        </dependency>
        <dependency>
            <groupId>org.springframework.boot</groupId>
            <artifactId>spring-boot-starter-test</artifactId>
            <scope>test</scope>
        </dependency>
        <dependency>
            <groupId>org.springframework.batch</groupId>
            <artifactId>spring-batch-test</artifactId>
            <scope>test</scope>
        </dependency>
        <dependency>
            <groupId>org.projectlombok</groupId>
            <artifactId>lombok</artifactId>
            <version>1.18.26</version>
        </dependency>
    </dependencies>

    <build>
        <plugins>
            <plugin>
                <groupId>org.springframework.boot</groupId>
                <artifactId>spring-boot-maven-plugin</artifactId>
            </plugin>
        </plugins>
    </build>


</project>
package com.java.bean;
import lombok.Builder;
import lombok.Data;
/**
* @Description:
* @Author: qiuxie
* @Create: 2023/4/26 0:42
*/
@Data
@Builder
public class User
private String id;
private String name;
private String age;
package com.java.batch;
import com.java.bean.User;
import org.springframework.batch.item.file.mapping.FieldSetMapper;
import org.springframework.batch.item.file.transform.FieldSet;
import org.springframework.validation.BindException;
/**
* @Description:
* @Author: qiuxie
* @Create: 2023/4/26 0:45
*/
public class UserFieldSetMapper implements FieldSetMapper<User>
@Override
public User mapFieldSet(FieldSet fieldSet) throws BindException
User user = User.builder().id(fieldSet.readString("ID")).name(fieldSet.readString("NAME")).age(fieldSet.readString("AGE")).build();
return user;
package com.java.batch;
import com.java.bean.User;
import org.springframework.batch.item.ItemProcessor;
/**
* @Description: 对每条数据进行处理
* @Author: qiuxie
* @Create: 2023/4/26 0:48
*/
public class UserItemProcessor implements ItemProcessor<User, User>
@Override
public User process(User user) throws Exception
if (Integer.parseInt(user.getAge()) % 2 == 0)
return user;
return null;
package com.java.batch;
import com.java.bean.User;
import lombok.extern.slf4j.Slf4j;
import org.springframework.batch.item.ItemWriter;
import java.util.List;
/**
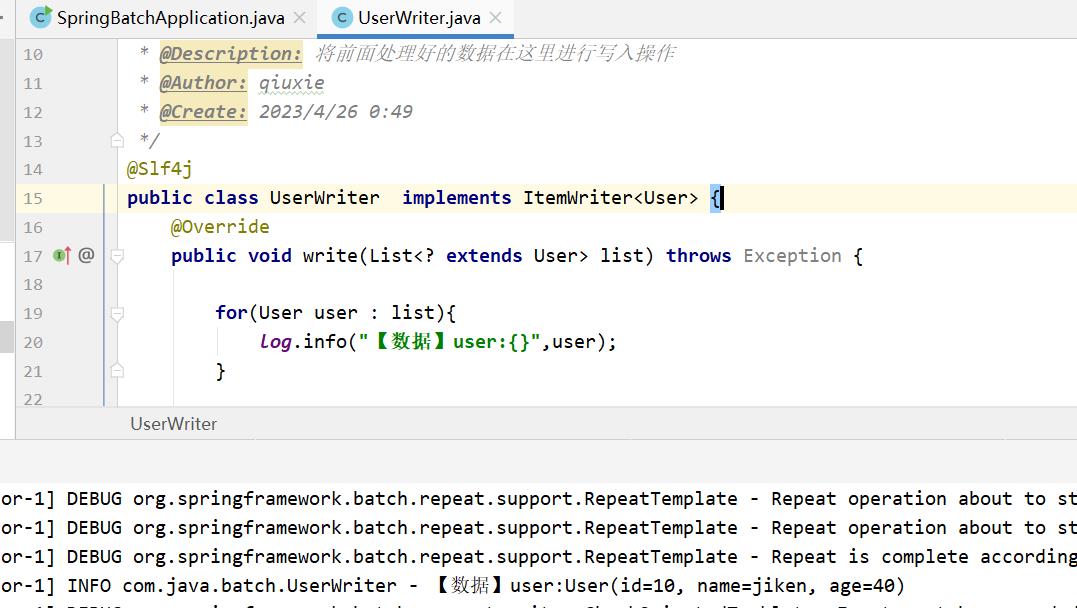
* @Description: 将前面处理好的数据在这里进行写入操作
* @Author: qiuxie
* @Create: 2023/4/26 0:49
*/
@Slf4j
public class UserWriter implements ItemWriter<User>
@Override
public void write(List<? extends User> list) throws Exception
for(User user : list)
log.info("【数据】user:",user);
job-test.xml
<?xml version="1.0" encoding="UTF-8"?>
<beans xmlns="http://www.springframework.org/schema/beans"
       xmlns:xsi="http://www.w3.org/2001/XMLSchema-instance"
       xmlns:batch="http://www.springframework.org/schema/batch"
       xmlns:context="http://www.springframework.org/schema/context"
       xmlns:jdbc="http://www.springframework.org/schema/jdbc"
       xmlns:task="http://www.springframework.org/schema/task"
       xsi:schemaLocation="http://www.springframework.org/schema/beans http://www.springframework.org/schema/beans/spring-beans.xsd
        http://www.springframework.org/schema/batch http://www.springframework.org/schema/batch/spring-batch.xsd
        http://www.springframework.org/schema/context http://www.springframework.org/schema/context/spring-context-4.3.xsd
        http://www.springframework.org/schema/jdbc http://www.springframework.org/schema/jdbc/spring-jdbc-4.3.xsd
        http://www.springframework.org/schema/task http://www.springframework.org/schema/task/spring-task-4.3.xsd">


    <batch:job id="jobExample">
        <batch:step id="stepExample">
            <batch:tasklet>
                <batch:chunk reader="reader" processor="process" writer="write"
                             commit-interval="3">
                </batch:chunk>
            </batch:tasklet>
        </batch:step>
    </batch:job>
    <bean id="reader" class="org.springframework.batch.item.file.FlatFileItemReader">
        <property name="resource" value="data/User.txt"></property>
        <!--将一条记录转换为java对象,一般使用LineTokenizer和FieldSetMapper组合来实现,默认DefaultLineMapper-->
        <property name="lineMapper" ref="lineMapper"></property>
        <!--将一条记录分割为多个字段-->
        <property name="linesToSkip" value="1"></property>
        <!--FieldSetMapper可以将多个字段值转化为java对象-->
        <!--LineCallbackHandler用于处理文件中记录回调操作-->
    </bean>


    <bean id="lineMapper" class="org.springframework.batch.item.file.mapping.DefaultLineMapper">
        <!--作用是将一条记录转换成FieldSet对象-->
        <property name="lineTokenizer" ref="lineTokenizer"></property>
        <!--将FieldSet对象转化为领域对象-->
        <property name="fieldSetMapper" ref="fieldSetMapper"></property>
    </bean>


    <bean id="lineTokenizer" class="org.springframework.batch.item.file.transform.DelimitedLineTokenizer">
        <property name="names" value="ID,NAME,AGE"></property>
    </bean>

    <bean id="fieldSetMapper" class="com.java.batch.UserFieldSetMapper"></bean>

    <!--这里是数据的一些处理逻辑,可以进行数据加工操作-->
    <bean id="process" class="com.java.batch.UserItemProcessor"></bean>

    <!-- 写CSV文件 -->
<!--    <bean id="csvItemWriter" scope="step" class="com.java.batch.CsvItemWriter">-->
<!--        <property name="resource" value="D:\\software\\idea2022\\spring-batch\\src\\main\\resources\\test.csv"/>-->
<!--          <property name="lineAggregator" ref="lineAggregator"/>-->
<!--    </bean>-->

<!--    <bean id="lineAggregator" scope="step" class="com.java.batch.UserAggregator">-->

<!--    </bean>-->

    <!--处理好的数据写入操作,一般是存放到文件中-->
    <bean id="write" class="com.java.batch.UserWriter">

    </bean>

    <!-- 选用内存级别的数据库,不在需要用oracle、mysql等数据库,采用h2数据库,不需要手动配置,只需要的pom.xml文件中引入h2即可 -->
    <bean id="jobRepository" class="org.springframework.batch.core.repository.support.MapJobRepositoryFactoryBean">
        <property name="transactionManager" ref="transactionManager"></property>
    </bean>
    <bean id="executor" class="org.springframework.core.task.SimpleAsyncTaskExecutor"></bean>
    <bean id="laucher" class="org.springframework.batch.core.launch.support.SimpleJobLauncher">
        <property name="jobRepository" ref="jobRepository"></property>
        <property name="taskExecutor" ref="executor"></property>
    </bean>
    <bean id="transactionManager" class="org.springframework.batch.support.transaction.ResourcelessTransactionManager"/>


</beans>
User.txt
ID,NAME,AGE
1,lzj,28
2,tom,20
3,terry,30
4,lerry,18
5,bob,25
6,linda,27
7,marry,39
8,long,22
9,kin,33
10,jiken,40
package com.java;

import org.springframework.batch.core.Job;
import org.springframework.batch.core.JobParameters;
import org.springframework.batch.core.JobParametersInvalidException;
import org.springframework.batch.core.launch.support.SimpleJobLauncher;
import org.springframework.batch.core.repository.JobExecutionAlreadyRunningException;
import org.springframework.batch.core.repository.JobInstanceAlreadyCompleteException;
import org.springframework.batch.core.repository.JobRestartException;
import org.springframework.context.support.ClassPathXmlApplicationContext;
/**
 * @Description:
 * @Author: qiuxie
 * @Create: 2023/4/26 0:33
 */
public class SpringBatchApplication
    public static void main(String[] args) throws Exception
        ClassPathXmlApplicationContext ctx = new ClassPathXmlApplicationContext("job-test.xml");

        SimpleJobLauncher launcher = (SimpleJobLauncher) ctx.getBean("laucher");
        Job job = (Job) ctx.getBean("jobExample");
        System.out.println(launcher);
        System.out.println(job);
        launcher.run(job, new JobParameters());
        ctx.close();
以上基于jdk 1.8环境
下面将实现从数据库中查询数据,将查询的数据写入txt文件中
效果图
db脚本部分
USE spring_batch

CREATE TABLE tutorials(
   tutorial_id INT(10) PRIMARY KEY AUTO_INCREMENT COMMENT \'主键\',
   tutorial_author VARCHAR(20) COMMENT \'作者\',
   tutorial_title  VARCHAR(20) COMMENT \'题目\',
   submission_date VARCHAR(20) COMMENT \'提交时间\'
);
SELECT  *  FROM  tutorials;

INSERT INTO tutorials(tutorial_author,tutorial_title,submission_date)
VALUES
(\'Sanjay\',\'Learn Java\',NOW()),
(\'Abdul S\',\'Learn MySQL\',NOW()),
(\'Krishna Kasyap\',\'Learn JavaFX\',NOW())
java代码部分
<?xml version="1.0" encoding="UTF-8"?>
<project xmlns="http://maven.apache.org/POM/4.0.0"
         xmlns:xsi="http://www.w3.org/2001/XMLSchema-instance"
         xsi:schemaLocation="http://maven.apache.org/POM/4.0.0 http://maven.apache.org/xsd/maven-4.0.0.xsd">
    <modelVersion>4.0.0</modelVersion>

    <groupId>com.java</groupId>
    <artifactId>springbatch-service</artifactId>
    <version>1.0-SNAPSHOT</version>
    <properties>
        <jdk.version>1.8</jdk.version>
        <spring.version>4.3.8.RELEASE</spring.version>
        <spring.batch.version>3.0.7.RELEASE</spring.batch.version>
        <mysql.driver.version>5.1.25</mysql.driver.version>
        <junit.version>4.11</junit.version>
    </properties>

    <dependencies>
        <dependency>
            <groupId>log4j</groupId>
            <artifactId>log4j</artifactId>
            <version>1.2.17</version>
        </dependency>
        <!-- Spring Core -->
        <dependency>
            <groupId>org.springframework</groupId>
            <artifactId>spring-core</artifactId>
            <version>$spring.version</version>
        </dependency>
        <!-- Spring jdbc, for database -->
        <dependency>
            <groupId>org.springframework</groupId>
            <artifactId>spring-jdbc</artifactId>
            <version>$spring.version</version>
        </dependency>

        <!-- Spring XML to/back object -->
        <dependency>
            <groupId>org.springframework</groupId>
            <artifactId>spring-oxm</artifactId>
            <version>$spring.version</version>
        </dependency>

        <!-- MySQL database driver -->
        <dependency>
            <groupId>mysql</groupId>
            <artifactId>mysql-connector-java</artifactId>
            <version>$mysql.driver.version</version>
        </dependency>

        <!-- Spring Batch dependencies -->
        <dependency>
            <groupId>org.springframework.batch</groupId>
            <artifactId>spring-batch-core</artifactId>
            <version>$spring.batch.version</version>
        </dependency>

        <dependency>
            <groupId>org.springframework.batch</groupId>
            <artifactId>spring-batch-infrastructure</artifactId>
            <version>$spring.batch.version</version>
        </dependency>

        <!-- Spring Batch unit test -->
        <dependency>
            <groupId>org.springframework.batch</groupId>
            <artifactId>spring-batch-test</artifactId>
            <version>$spring.batch.version</version>
        </dependency>

        <!-- Junit -->
        <dependency>
            <groupId>junit</groupId>
            <artifactId>junit</artifactId>
            <version>$junit.version</version>
            <scope>test</scope>
        </dependency>
    </dependencies>

    <build>
        <finalName>spring-batch</finalName>
        <plugins>
            <plugin>
                <groupId>org.apache.maven.plugins</groupId>
                <artifactId>maven-eclipse-plugin</artifactId>
                <version>2.9</version>
                <configuration>
                    <downloadSources>true</downloadSources>
                    <downloadJavadocs>false</downloadJavadocs>
                </configuration>
            </plugin>

            <plugin>
                <groupId>org.apache.maven.plugins</groupId>
                <artifactId>maven-compiler-plugin</artifactId>
                <version>2.3.2</version>
                <configuration>
                    <source>$jdk.version</source>
                    <target>$jdk.version</target>
                </configuration>
            </plugin>
        </plugins>
    </build>

</project>
log4j.properties
#将等级为DEBUG的日志信息输出到console和file这两个目的地,console和file的定义在下面的代码
log4j.rootLogger=info,console,file

#控制台输出的相关设置
log4j.appender.console = org.apache.log4j.ConsoleAppender
log4j.appender.console.Target = System.out
log4j.appender.console.Threshold=DEBUG
log4j.appender.console.layout = org.apache.log4j.PatternLayout
log4j.appender.console.layout.ConversionPattern=[%c]-%m%n

#文件输出的相关设置
log4j.appender.file = org.apache.log4j.RollingFileAppender
log4j.appender.file.File=./log/kuang.log
log4j.appender.file.MaxFileSize=10mb
log4j.appender.file.Threshold=DEBUG
log4j.appender.file.layout=org.apache.log4j.PatternLayout
log4j.appender.file.layout.ConversionPattern=[%p][%dyy-MM-dd][%c]%m%n

#日志输出级别
log4j.logger.org.mybatis=DEBUG
log4j.logger.java.sql=DEBUG
log4j.logger.java.sql.Statement=DEBUG
log4j.logger.java.sql.ResultSet=DEBUG
log4j.logger.java.sql.PreparedStatement=DEBUG
jobcconfig.xml
<beans xmlns = "http://www.springframework.org/schema/beans"
       xmlns:batch = "http://www.springframework.org/schema/batch"
       xmlns:xsi = "http://www.w3.org/2001/XMLSchema-instance"
       xmlns:util = "http://www.springframework.org/schema/util"
       xsi:schemaLocation = "http://www.springframework.org/schema/batch

      http://www.springframework.org/schema/batch/spring-batch-2.2.xsd
      http://www.springframework.org/schema/beans
      http://www.springframework.org/schema/beans/spring-beans-3.2.xsd">


    <import resource = "context.xml" />
    <bean id = "tutorial" class = "com.java.tutorials.batch.Tutorial" scope = "prototype" />

    <batch:job id = "helloWorldJob">
        <batch:step id = "step1">
            <batch:tasklet>
                <batch:chunk reader = "mysqlItemReader"
                             writer = "flatFileItemWriter" processor = "itemProcessor"
                             commit-interval = "10">
                </batch:chunk>
            </batch:tasklet>
        </batch:step>
    </batch:job>

    <bean id = "mysqlItemReader"
          class = "org.springframework.batch.item.database.JdbcCursorItemReader" >
        <property name = "dataSource" ref = "dataSource" />
        <property name = "sql" value = "select * from tutorials" />
        <property name = "rowMapper">
            <bean class = "com.java.tutorials.batch.TutorialRowMapper" />
        </property>
    </bean>

    <bean id = "itemProcessor" class = "com.java.tutorials.batch.CustomItemProcessor" />

    <bean id = "flatFileItemWriter"
          class = " org.springframework.batch.item.file.FlatFileItemWriter">
        <property name = "resource" value = "file:target/outputfiles/employee_output.txt"/>
        <property name = "lineAggregator">
            <bean class = " org.springframework.batch.item.file.transform.PassThroughLineAggregator"/>
        </property>
    </bean>
</beans>
context.xml
<beans xmlns = "http://www.springframework.org/schema/beans"
       xmlns:xsi = "http://www.w3.org/2001/XMLSchema-instance"
       xmlns:jdbc = "http://www.springframework.org/schema/jdbc"
       xsi:schemaLocation = "http://www.springframework.org/schema/beans
      http://www.springframework.org/schema/beans/spring-beans-3.2.xsd
      http://www.springframework.org/schema/jdbc
      http://www.springframework.org/schema/jdbc/spring-jdbc-3.2.xsd ">

    <!-- stored job-meta in database -->
    <bean id = "jobRepository"
          class = "org.springframework.batch.core.repository.support.JobRepositoryFactoryBean">
        <property name = "dataSource" ref = "dataSource" />
        <property name = "transactionManager" ref = "transactionManager" />
        <property name = "databaseType" value = "mysql" />
    </bean>

    <bean id = "transactionManager"
          class = "org.springframework.batch.support.transaction.ResourcelessTransactionManager" />

    <bean id = "dataSource"
          class = "org.springframework.jdbc.datasource.DriverManagerDataSource">
        <property name = "driverClassName" value = "com.mysql.jdbc.Driver" />
        <property name = "url" value = "jdbc:mysql://127.0.0.1:3310/spring_batch?useUnicode=true&characterEncoding=utf-8&useSSL=false" />
        <property name = "username" value = "spring" />
        <property name = "password" value = "123456" />
    </bean>

    <bean id = "jobLauncher"
          class = "org.springframework.batch.core.launch.support.SimpleJobLauncher">
        <property name = "jobRepository" ref = "jobRepository" />
    </bean>

    <!-- create job-meta tables automatically -->
    <jdbc:initialize-database data-source = "dataSource">
        <jdbc:script location = "org/springframework/batch/core/schema-drop-mysql.sql" />
        <jdbc:script location = "org/springframework/batch/core/schema-mysql.sql" />
    </jdbc:initialize-database>
</beans>
package com.java.tutorials.batch;


/**
 * @Description:
 * @Author: qiuxie
 * @Create: 2023/4/30 15:25
 */
public class Tutorial

    private int tutorial_id;
    private String tutorial_title;
    private String tutorial_author;
    private String submission_date;

    public int getTutorial_id()
        return tutorial_id;


    public void setTutorial_id(int tutorial_id)
        this.tutorial_id = tutorial_id;


    public String getTutorial_title()
        return tutorial_title;


    public void setTutorial_title(String tutorial_title)
        this.tutorial_title = tutorial_title;


    public String getTutorial_author()
        return tutorial_author;


    public void setTutorial_author(String tutorial_author)
        this.tutorial_author = tutorial_author;


    public String getSubmission_date()
        return submission_date;


    public void setSubmission_date(String submission_date)
        this.submission_date = submission_date;


    @Override
    public String toString()
        return "Tutorial" +
                "tutorial_id=" + tutorial_id +
                ", tutorial_title=\'" + tutorial_title + \'\\\'\' +
                ", tutorial_author=\'" + tutorial_author + \'\\\'\' +
                ", submission_date=\'" + submission_date + \'\\\'\' +
                \'\';


package com.java.tutorials.batch;


import org.apache.log4j.Logger;
import org.springframework.batch.item.ItemProcessor;

/**
 * @Description:
 * @Author: qiuxie
 * @Create: 2023/4/30 15:24
 */
public class CustomItemProcessor  implements ItemProcessor<Tutorial, Tutorial>

    private final Logger logger=Logger.getLogger(CustomItemProcessor.class);


    @Override
    public Tutorial process(Tutorial tutorial) throws Exception
        logger.info("【处理获取到的数据】tutorial:"+tutorial);
        return tutorial;


package com.java.tutorials.batch;


import org.springframework.jdbc.core.RowMapper;

import java.sql.ResultSet;
import java.sql.SQLException;

/**
 * @Description:
 * @Author: qiuxie
 * @Create: 2023/4/30 15:33
 */
public class TutorialRowMapper implements RowMapper<Tutorial>

    @Override
    public Tutorial mapRow(ResultSet rs, int i) throws SQLException
        Tutorial tutorial = new Tutorial();
        tutorial.setTutorial_id(rs.getInt("tutorial_id"));
        tutorial.setTutorial_title(rs.getString("tutorial_title"));
        tutorial.setTutorial_author(rs.getString("tutorial_author"));
        tutorial.setSubmission_date(rs.getString("submission_date"));
        return tutorial;
package com.java;
import org.springframework.batch.core.Job;
import org.springframework.batch.core.JobExecution;
import org.springframework.batch.core.JobParameters;
import org.springframework.batch.core.JobParametersInvalidException;
import org.springframework.batch.core.launch.JobLauncher;
import org.springframework.batch.core.repository.JobExecutionAlreadyRunningException;
import org.springframework.batch.core.repository.JobInstanceAlreadyCompleteException;
import org.springframework.batch.core.repository.JobRestartException;
import org.springframework.context.ApplicationContext;
import org.springframework.context.support.ClassPathXmlApplicationContext;
/**
* @Description:
* @Author: qiuxie
* @Create: 2023/4/30 15:35
*/
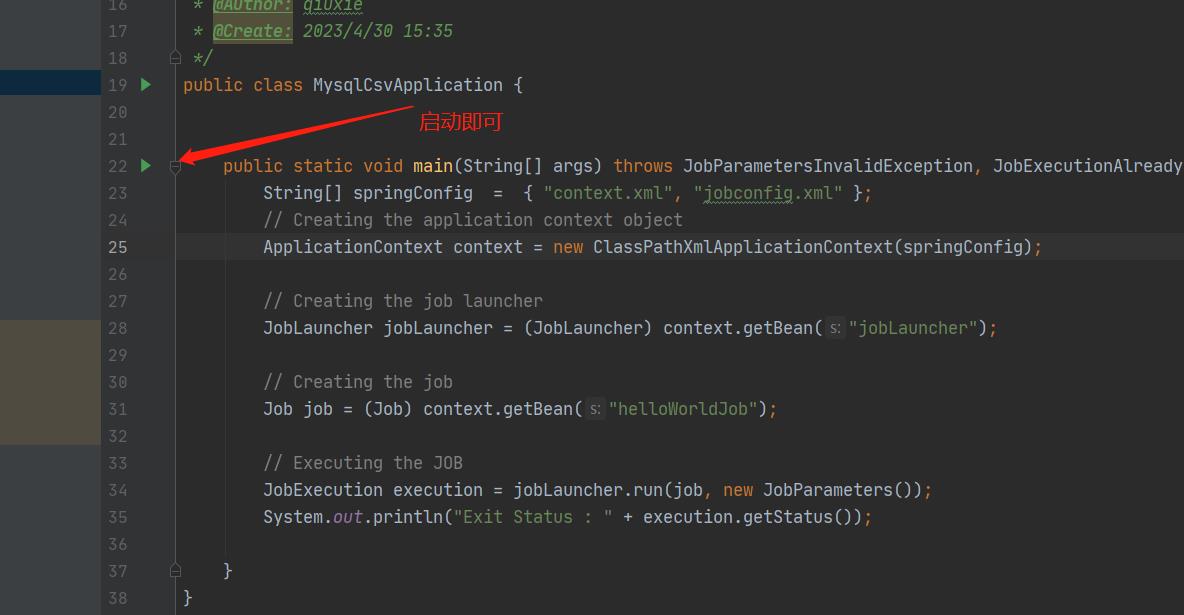
public class MysqlCsvApplication
public static void main(String[] args) throws JobParametersInvalidException, JobExecutionAlreadyRunningException, JobRestartException, JobInstanceAlreadyCompleteException
String[] springConfig = "context.xml", "jobconfig.xml" ;
// Creating the application context object
ApplicationContext context = new ClassPathXmlApplicationContext(springConfig);
// Creating the job launcher
JobLauncher jobLauncher = (JobLauncher) context.getBean("jobLauncher");
// Creating the job
Job job = (Job) context.getBean("helloWorldJob");
// Executing the JOB
JobExecution execution = jobLauncher.run(job, new JobParameters());
System.out.println("Exit Status : " + execution.getStatus());
Spring Batch 简单应用 (Hello World)
通过前面两篇关于Spring Batch文章的介绍,大家应该已经对Spring Batch有个初步的概念了。这篇文章,将通过一个”Hello World!”实例,和大家一起探讨关于Spring Batch的一些基本配置和实现。使大家从开发的角度对Spring Batch有一个真切的体会。
说明:1,本实例使用的是spring-batch 2.1.8
2,本实例没有像前面讲的那样配置ItemReader、ItemProcessor和ItemWriter,而是之间在Step中调用Tasklet,由Tasklet完成”Hello World!”的输出。
工程结构如下图:
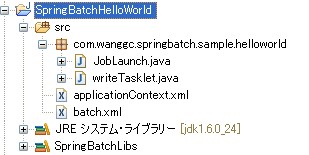
JobLaunch.java类用来启动Bath,writeTasklet.java用来完成输出工作。application.xml用来配置一些Spring信息,batch.xml配置Job信息。
application.xml文件配置如下:

<?xml version="1.0" encoding="UTF-8"?>
<beans xmlns="http://www.springframework.org/schema/beans"
    xmlns:xsi="http://www.w3.org/2001/XMLSchema-instance" xmlns:p="http://www.springframework.org/schema/p"
    xmlns:tx="http://www.springframework.org/schema/tx" xmlns:aop="http://www.springframework.org/schema/aop"
    xmlns:context="http://www.springframework.org/schema/context"
    xsi:schemaLocation="http://www.springframework.org/schema/beans
http://www.springframework.org/schema/beans/spring-beans-3.0.xsd
http://www.springframework.org/schema/tx
http://www.springframework.org/schema/tx/spring-tx-3.0.xsd
http://www.springframework.org/schema/aop
http://www.springframework.org/schema/aop/spring-aop-3.0.xsd
http://www.springframework.org/schema/context
http://www.springframework.org/schema/context/spring-context-2.5.xsd"
    default-autowire="byName">

    <bean id="jobLauncher"class="org.springframework.batch.core.launch.support.SimpleJobLauncher">
        <property name="jobRepository" ref="jobRepository"/>
    </bean>

    <bean id="jobRepository"class="org.springframework.batch.core.repository.support.MapJobRepositoryFactoryBean">
    </bean>

    <bean id="transactionManager"
        class="org.springframework.batch.support.transaction.ResourcelessTransactionManager"/>
</beans>
jobLauncher负责batch的启动工作,jobRepository负责job的整个运行过程中的CRUD操作,transactionManager负责事务的管理操作。
batch.xml文件配置如下:
<?xml version="1.0" encoding="UTF-8"?>
<bean:beans xmlns="http://www.springframework.org/schema/batch"
    xmlns:bean="http://www.springframework.org/schema/beans" xmlns:xsi="http://www.w3.org/2001/XMLSchema-instance"
    xmlns:p="http://www.springframework.org/schema/p" xmlns:tx="http://www.springframework.org/schema/tx"
    xmlns:aop="http://www.springframework.org/schema/aop" xmlns:context="http://www.springframework.org/schema/context"
    xsi:schemaLocation="http://www.springframework.org/schema/beans
http://www.springframework.org/schema/beans/spring-beans-3.0.xsd
http://www.springframework.org/schema/tx
http://www.springframework.org/schema/tx/spring-tx-3.0.xsd
http://www.springframework.org/schema/aop
http://www.springframework.org/schema/aop/spring-aop-3.0.xsd
http://www.springframework.org/schema/context
http://www.springframework.org/schema/context/spring-context-2.5.xsd
http://www.springframework.org/schema/batch
http://www.springframework.org/schema/batch/spring-batch-2.1.xsd">

    <bean:import resource="applicationContext.xml"/>

    <job id="helloWorldJob">
        <step id="step_hello" next="step_world">
            <tasklet ref="hello" transaction-manager="transactionManager"></tasklet>
        </step>
        <step id="step_world">
            <tasklet ref="world" transaction-manager="transactionManager"></tasklet>
        </step>
    </job>

    <bean:bean id="hello" class="com.wanggc.springbatch.sample.helloworld.writeTasklet">
        <bean:property name="message" value="Hello "></bean:property>
    </bean:bean>

    <bean:bean id="world" class="com.wanggc.springbatch.sample.helloworld.writeTasklet">
        <bean:property name="message" value=" World!"></bean:property>
    </bean:bean>
</bean:beans>
配置了一个ID为helloWorldJob的job,此job有两个Step : step_hello和step_world,前者负责输出“Hello ”,后者负责输出“World!”,当第一个Step完成以后,执行第二个Step。
writeTasklet类的代码如下:
public class writeTasklet implements Tasklet {

    /** Message */
    private String message;

    /**
     * @param message
     *            the message to set
     */
    public void setMessage(String message) {
        this.message = message;
    }

    @Override
    public RepeatStatus execute(StepContribution arg0, ChunkContext arg1)
            throws Exception {
        System.out.println(message);
        return RepeatStatus.FINISHED;
    }

}
此类中定义了一个message属性,通过batch.xml的“hello”和“world” Bean为其注入值。 execute方法,是由Tasklet接口继承而来的,是Tasklet实现业务逻辑的地方。此实例中只是简单的输出Message信息后,直接返回。
启动类JobLaunch类的代码如下:
public class JobLaunch {

    /**
     * @param args
     */
    public static void main(String[] args) {
        ApplicationContext context = new ClassPathXmlApplicationContext(
                "batch.xml");
        JobLauncher launcher = (JobLauncher) context.getBean("jobLauncher");
        Job job = (Job) context.getBean("helloWorldJob");

        try {
            /* 运行Job */
            JobExecution result = launcher.run(job, new JobParameters());
            /* 处理结束,控制台打印处理结果 */
            System.out.println(result.toString());
        } catch (Exception e) {
            e.printStackTrace();
        }
    }
}
本例通过Spring配置的方式取得JobLauncher和Job对象,然后由JobLauncher的run方法启动job,参数JobParameters是标志job的一些参数,处理结束后,控制台输出处理结果。
上面就是通过SpringBatch运行一个"Hello World”程序所需要的基本配置。由于其优势是处理大批量的数据,所以仅仅为了输出"Hello World"而编写这么多代码和配置文件,确实显得有些笨拙,也体现不出其优越性。
下次,将通过读取一个CSV文件,经过简单的处理,再写入另外一个CSV文件的实例,与大家共同探讨SpringBatch的应用。
如果您对本文有意见或者建议,欢迎留言,哪怕是拍砖(^_^)!
欢迎转载,请注明出处!
感谢您的阅读,请关注后续博客!
以上是关于spring batch简单使用(基于xml)的主要内容,如果未能解决你的问题,请参考以下文章