使用 SpringCache 简化缓存代码实现
Posted 天道酬勤 Jobs
tags:
篇首语:本文由小常识网(cha138.com)小编为大家整理,主要介绍了使用 SpringCache 简化缓存代码实现相关的知识,希望对你有一定的参考价值。
SpriingCache 实现了基于注解的缓存功能,只需要在方法上添加注解即可实现常用的缓存功能,大大简化了的业务代码的实现。SpringCache 默认集成于 SpringContext 中,这意味着对于使用 SpringBoot 框架来说,不需要引入额外的 jar 包即可使用。
SpringCache 通过 CacheManager 接口来统一不同的缓存技术,底层可以切换不同的 cache 实现。默认采用 ConcurrentMapCacheManager 实现缓存功能。如果想使用 Redis 作为缓存,只需要在 Springboot 程序中引入 Redis 的起步依赖即可自动切换到 RedisCacheManager。
下面就让我们体验一下 SpringCache 的具体功能吧,在博客的最后会提供源代码下载。
一、搭建工程
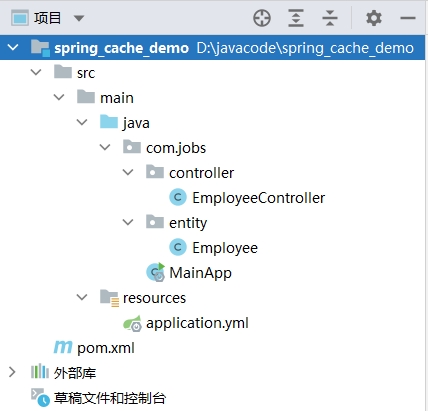
搭建一个 SpringBoot 程序,结构如下所示:
pom 文件的具体内容如下:
<?xml version="1.0" encoding="UTF-8"?>
<project xmlns="http://maven.apache.org/POM/4.0.0"
         xmlns:xsi="http://www.w3.org/2001/XMLSchema-instance"
         xsi:schemaLocation="http://maven.apache.org/POM/4.0.0
         http://maven.apache.org/xsd/maven-4.0.0.xsd">
    <modelVersion>4.0.0</modelVersion>
    <parent>
        <groupId>org.springframework.boot</groupId>
        <artifactId>spring-boot-starter-parent</artifactId>
        <version>2.7.10</version>
    </parent>

    <groupId>com.jobs</groupId>
    <artifactId>spring_cache_demo</artifactId>
    <version>1.0-SNAPSHOT</version>

    <properties>
        <java.version>1.8</java.version>
    </properties>

    <dependencies>

        <dependency>
            <groupId>org.springframework.boot</groupId>
            <artifactId>spring-boot-starter-web</artifactId>
            <scope>compile</scope>
        </dependency>

        <dependency>
            <groupId>org.projectlombok</groupId>
            <artifactId>lombok</artifactId>
            <version>1.18.20</version>
        </dependency>

    </dependencies>
    <build>
        <plugins>
            <plugin>
                <groupId>org.springframework.boot</groupId>
                <artifactId>spring-boot-maven-plugin</artifactId>
            </plugin>
        </plugins>
    </build>
</project>
可以发现除了 web 实现必须要引用的 spring-boot-starter-web 起步依赖和 lombok 之外,没有引入额外的 jar 包。其中 lombok 不是必须要引入的,之所以引入是为了简化实体对象的创建,以及使用其 lombok 自带的日志打印功能。
本博客的 Demo 使用的实体类 Employee 细节如下:
package com.jobs.entity;

import lombok.Data;
import java.io.Serializable;

//每个实体类,最好实现 Serializable 接口,否则可能会出错
@Data
public class Employee implements Serializable

    private String name;

    private int age;
这里需要注意的是:所有实体类最好实现 Serializable 接口,比如对于大部分的 CacheManager 的实现是基于 jdk 的序列化,要求实体类必须实现 Serializable 接口,否则在使用 SpringCache 的过程中就会报错。
对于 application.yml 配置文件,内容很简单,只配置了启动端口,如下所示:
server:
  port: 8888
二、使用默认的缓存功能
SpringCache 是基于注解的缓存实现,常用的注解有:
- @EnableCaching 这个注解需要在 SpringBoot 启动类上添加后,才能使用 SpringCache 的其它注解
- @Cacheable 在方法执行前先查看是否有相应缓存,有则直接返回缓存,无则调用方法并将方法返回值放到缓存中
- @CachePut 方法执行完毕后,将结果添加到缓存中
- @CacheEvict 删除一条或所有缓存
首先我们需要在 SpringBoot 的启动类上,添加 @EnableCaching 注解。
package com.jobs;

import org.springframework.boot.SpringApplication;
import org.springframework.boot.autoconfigure.SpringBootApplication;
import org.springframework.cache.annotation.EnableCaching;

@EnableCaching
@SpringBootApplication
public class MainApp
    public static void main(String[] args)
        SpringApplication.run(MainApp.class, args);
然后在 EmployeeController 中编写用于测试的接口,具体细节如下:
package com.jobs.controller;

import com.jobs.entity.Employee;
import lombok.extern.slf4j.Slf4j;
import org.springframework.beans.factory.annotation.Autowired;
import org.springframework.cache.Cache;
import org.springframework.cache.CacheManager;
import org.springframework.cache.annotation.CacheEvict;
import org.springframework.cache.annotation.CachePut;
import org.springframework.cache.annotation.Cacheable;
import org.springframework.web.bind.annotation.*;

import java.util.Random;

@Slf4j
@RequestMapping("/employee")
@RestController
public class EmployeeController

    @SuppressWarnings("SpringJavaInjectionPointsAutowiringInspection")
    @Autowired
    private CacheManager cacheManager;

    //当接收到的参数封装的实体不为 null 时,添加缓存。(condition 表示满足条件时,对执行结果进行缓存)
    // key 不存在时,添加缓存,如果 key 存在时,则更新缓存
    // #emp.name 表示使用接收到的实体对象的 name 作为 key
    // #result.name 表示使用返回的结果对象的 name 作为 key
    //@CachePut(value = "employee", key = "#emp.name", condition = "#emp != null")
    @CachePut(value = "employee", key = "#result.name", condition = "#emp != null")
    @PostMapping
    public Employee addEmployee(@RequestBody Employee emp)
        log.info("addEmployee 传入的参数:" + emp);
        if (emp != null)
            return emp;
         else
            return null;


    //使用接收到的参数 name 作为 key
    //当返回结果不是 null 时,进行缓存。(unless 表示不满足条件时,对执行结果进行缓存)。
    //当 key 存在时,直接返回缓存中的数据
    @Cacheable(value = "employee", key = "#name", unless = "#result == null")
    @GetMapping("/name")
    public Employee getEmployee(@PathVariable String name)
        log.info("getEmployee 传入的参数:" + name);
        if (name == null || name.length() == 0)
            return null;
         else
            Employee emp = new Employee();
            emp.setName(name);
            emp.setAge(new Random().nextInt(100));
            return emp;


    //删除缓存,使用接收到的参数 name 作为 key 进行删除
    @CacheEvict(value = "employee", key = "#name")
    @DeleteMapping
    public void deleteEmployee(String name)
        log.info("deleteEmployee 传入的参数:" + name);


    //查看缓存(对于 Redis 来说,该方法不可用,
    //因为基于 redis 的 Cache 具体实现类,没有实现 Serializable 接口)
    @GetMapping("/cache")
    public Cache viewCache(String key)
        Cache cache = cacheManager.getCache("employee");
        if (cache != null)
            return cache;
         else
            return null;
这里需要注意的是:@Cacheable 、@CachePut、@CacheEvict 这些注解的 value 值表示的是缓存的类别。
然后启动 SpringBoot 程序,使用 Postman 工具模拟 http 请求接口来测试,想要查看缓存,可以请求 localhost:8888/employee/cache 接口进行验证,由于 SpringCache 默认使用 ConcurrentMapCacheManager 在内存中保存缓存数据,因此重启 SpringBoot 程序后,缓存就消失了。
三、使用 Redis 缓存
上面的代码不需要进行任何更改,只需要引入 Redis 的起步依赖,然后在 application.yml 增加 Redis 的配置即可。
1 在 pom 文件中添加 Redis 的起步依赖
<dependency>
    <groupId>org.springframework.boot</groupId>
    <artifactId>spring-boot-starter-data-redis</artifactId>
</dependency>
2 在 application.yml 中添加 Redis 的配置
spring:
  redis:
    host: 192.168.216.128
    port: 6379
    # redis 的连接密码,如果没有密码,可以省略
    password: redis123
    # redis 默认 16 个库,可选编号为 0 到 15,默认就是 0
    database: 0
  cache:
    redis:
      # 缓存有效期,单位是毫秒,此处设置 30 分钟
      time-to-live: 1800000
然后继续使用 Postman 工具进行接口测试,此时直接在 Redis 中查看结果进行验证。
本篇博客的源代码下载地址:https://files.cnblogs.com/files/blogs/699532/spring_cache_demo.zip
Day413.SpringCache -谷粒商城
SpringCache
每次都那样写缓存太麻烦了,spring从3.1开始定义了Cache、CacheManager接口来统一不同的缓存技术。并支持使用JCache(JSR-107)注解简化我们的开发Cache接口的实现包括RedisCache、EhCacheCache、ConcurrentMapCache等每次调用需要缓存功能的方法时,spring会检查检查指定参数的指定的目标方法是否已经被调用过;
如果有就直接从缓存中获取方法调用后的结果,如果没有就调用方法并缓存结果后返回给用户。下次调用直接从缓存中获取。
- 使用Spring缓存抽象时我们需要关注以下两点:
1、确定方法需要缓存以及他们的缓存策略
2、从缓存中读取之前缓存存储的数据
一、配置
- 依赖
<dependency>
    <groupId>org.springframework.boot</groupId>
    <artifactId>spring-boot-starter-cache</artifactId>
</dependency>

<!--使用redis作为缓存-->
<dependency>
    <groupId>org.springframework.boot</groupId>
    <artifactId>spring-boot-starter-data-redis</artifactId>
    <exclusions>
        <exclusion>
            <groupId>io.lettuce</groupId>
            <artifactId>lettuce-core</artifactId>
        </exclusion>
    </exclusions>
</dependency>
<dependency>
    <groupId>redis.clients</groupId>
    <artifactId>jedis</artifactId>
</dependency>
- 指定缓存类型并在主配置类上加上注解
@EnableCaching
@EnableCaching//开启缓存注解
public class AchangmallProductApplication {

    public static void main(String[] args) {
        SpringApplication.run(AchangmallProductApplication.class, args);
    }

}
spring:
  cache:
  	#指定缓存类型为redis
    type: redis
    redis:
      # 指定redis中的过期时间为1h
      time-to-live: 3600000
      key-prefix: CACHE_   #缓存key前缀
      use-key-prefix: true #是否开启缓存key前缀
      cache-null-values: true #缓存空值,解决缓存穿透问题
默认使用jdk进行序列化(可读性差),默认ttl为-1永不过期,自定义序列化方式为JSON需要编写配置类
- 配置类
com.achang.achangmall.product.conf.MyCacheConfig
自定义缓存管理器,保存为JSON格式
@Configuration
@EnableConfigurationProperties(CacheProperties.class)//拿到Redis在配置文件的配置
public class MyCacheConfig {
    @Bean
    public RedisCacheConfiguration redisCacheConfiguration(CacheProperties cacheProperties) {
        //获取到配置文件中的配置信息
        CacheProperties.Redis redisProperties = cacheProperties.getRedis(); org.springframework.data.redis.cache.RedisCacheConfiguration config = org.springframework.data.redis.cache.RedisCacheConfiguration.defaultCacheConfig();
        //指定缓存序列化方式为json
        config = config.serializeValuesWith(
            RedisSerializationContext.SerializationPair.fromSerializer(new GenericJackson2JsonRedisSerializer()));
        //设置配置文件中的各项配置,如过期时间
        if (redisProperties.getTimeToLive() != null) {
            config = config.entryTtl(redisProperties.getTimeToLive());
        }

        if (redisProperties.getKeyPrefix() != null) {
            config = config.prefixKeysWith(redisProperties.getKeyPrefix());
        }
        if (!redisProperties.isCacheNullValues()) {
            config = config.disableCachingNullValues();
        }
        if (!redisProperties.isUseKeyPrefix()) {
            config = config.disableKeyPrefix();
        }
        return config;
    }
}
二、缓存自动配置
// 缓存自动配置源码
@Configuration(proxyBeanMethods = false)
@ConditionalOnClass(CacheManager.class)
@ConditionalOnBean(CacheAspectSupport.class)
@ConditionalOnMissingBean(value = CacheManager.class, name = "cacheResolver")
@EnableConfigurationProperties(CacheProperties.class)
@AutoConfigureAfter({ CouchbaseAutoConfiguration.class, HazelcastAutoConfiguration.class,
                     HibernateJpaAutoConfiguration.class, RedisAutoConfiguration.class })
@Import({ CacheConfigurationImportSelector.class, // 看导入什么CacheConfiguration
         CacheManagerEntityManagerFactoryDependsOnPostProcessor.class })
public class CacheAutoConfiguration {

    @Bean
    @ConditionalOnMissingBean
    public CacheManagerCustomizers cacheManagerCustomizers(ObjectProvider<CacheManagerCustomizer<?>> customizers) {
        return new CacheManagerCustomizers(customizers.orderedStream().collect(Collectors.toList()));
    }

    @Bean
    public CacheManagerValidator cacheAutoConfigurationValidator(CacheProperties cacheProperties,
                                                                 ObjectProvider<CacheManager> cacheManager) {
        return new CacheManagerValidator(cacheProperties, cacheManager);
    }

    @ConditionalOnClass(LocalContainerEntityManagerFactoryBean.class)
    @ConditionalOnBean(AbstractEntityManagerFactoryBean.class)
    static class CacheManagerEntityManagerFactoryDependsOnPostProcessor
        extends EntityManagerFactoryDependsOnPostProcessor {

        CacheManagerEntityManagerFactoryDependsOnPostProcessor() {
            super("cacheManager");
        }

    }


    @Configuration(proxyBeanMethods = false)
    @ConditionalOnClass(RedisConnectionFactory.class)
    @AutoConfigureAfter(RedisAutoConfiguration.class)
    @ConditionalOnBean(RedisConnectionFactory.class)
    @ConditionalOnMissingBean(CacheManager.class)
    @Conditional(CacheCondition.class)
    class RedisCacheConfiguration {
        @Bean // 放入缓存管理器
        RedisCacheManager cacheManager(CacheProperties cacheProperties,
                                       CacheManagerCustomizers cacheManagerCustomizers,
                                       ObjectProvider<org.springframework.data.redis.cache.RedisCacheConfiguration> redisCacheConfiguration,
                                       ObjectProvider<RedisCacheManagerBuilderCustomizer> redisCacheManagerBuilderCustomizers,
                                       RedisConnectionFactory redisConnectionFactory, ResourceLoader resourceLoader) {
            RedisCacheManagerBuilder builder = RedisCacheManager.builder(redisConnectionFactory).cacheDefaults(
                determineConfiguration(cacheProperties, redisCacheConfiguration, resourceLoader.getClassLoader()));
            List<String> cacheNames = cacheProperties.getCacheNames();
            if (!cacheNames.isEmpty()) {
                builder.initialCacheNames(new LinkedHashSet<>(cacheNames));
            }
            redisCacheManagerBuilderCustomizers.orderedStream().forEach((customizer) -> customizer.customize(builder));
            return cacheManagerCustomizers.customize(builder.build());
        }
三、缓存使用@Cacheable&@CacheEvict

- 第一个方法存放缓存,第二个方法清空缓存
// 调用该方法时会将结果缓存,缓存名为category,key为方法名
// sync表示该方法的缓存被读取时会加锁
// value等同于cacheNames 【缓存分区名】
// key如果是字符串"''",【请加上单引号】
@Cacheable(value = {"category"},key = "#root.methodName",sync = true)
public Map<String, List<Catalog2Vo>> getCatalogJsonDbWithSpringCache() {
    return getCategoriesDb();
}
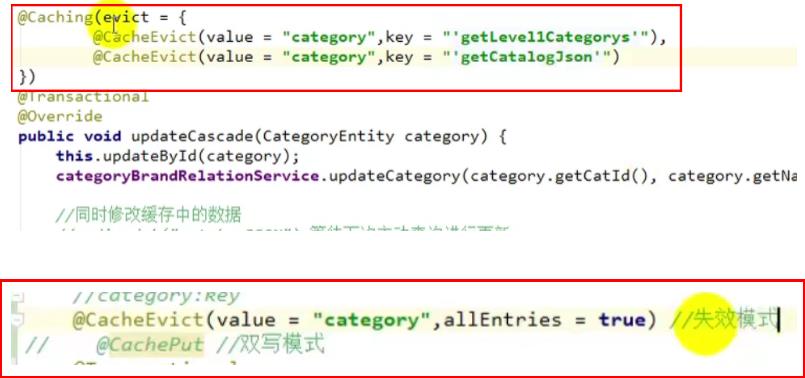
//调用该方法会删除缓存category下的所有cache,如果要删除某个具体,用key="''"
//allEntries = true,value中分区删除里的所有数据
//更新操作
@Override
@CacheEvict(value = {"category"},allEntries = true)
public void updateCascade(CategoryEntity category) {
    this.updateById(category);
    if (!StringUtils.isEmpty(category.getName())) {
        categoryBrandRelationService.updateCategory(category);
    }
}
如果要清空多个缓存,用@Caching(evict={@CacheEvict(value=""),xxxxxxxx})
四、SpringCache原理与不足
1、读模式
-
缓存穿透:
- 查询一个null数据。解决方案:缓存空数据,可通过
spring.cache.redis.cache-null-values=true
- 查询一个null数据。解决方案:缓存空数据,可通过
-
缓存击穿:
- 大量并发进来同时查询一个正好过期的数据。解决方案:加锁 ? 默认是无加锁的;
使用sync = true来解决击穿问题
- 大量并发进来同时查询一个正好过期的数据。解决方案:加锁 ? 默认是无加锁的;
-
缓存雪崩:
- 大量的key同时过期。解决:
加随机时间。
- 大量的key同时过期。解决:
2、写模式:(缓存与数据库一致)
-
读写加锁。
-
引入Canal,感知到MySQL的更新去更新Redis
-
读多写多,直接去数据库查询就行
3、总结
- 常规数据(读多写少,即时性,一致性要求不高的数据,完全可以使用Spring-Cache):
- 写模式(只要缓存的数据有过期时间就足够了)
- 特殊数据:
- 特殊设计(读写锁等)
以上是关于使用 SpringCache 简化缓存代码实现的主要内容,如果未能解决你的问题,请参考以下文章