搭建ElasticSearch7.4.2集群
Posted bigBing
tags:
篇首语:本文由小常识网(cha138.com)小编为大家整理,主要介绍了搭建ElasticSearch7.4.2集群相关的知识,希望对你有一定的参考价值。
推荐阅读
Helm3(K8S 资源对象管理工具)视频教程:https://edu.csdn.net/course/detail/32506
Helm3(K8S 资源对象管理工具)博客专栏:https://blog.csdn.net/xzk9381/category_10895812.html
本文原文链接:https://blog.csdn.net/xzk9381/article/details/117465038,转载请注明出处。如有发现文章中的任何问题,欢迎评论区留言。
本次搭建的集群使用 7.4.2 版本,源码包可以到官网中下载
下载链接:https://artifacts.elastic.co/downloads/elasticsearch/elasticsearch-7.4.2-linux-x86_64.tar.gz
首先说一下搭建过程中使用的机器和角色分配:
IP 地址 角色 备注
10.19.74.53 Master、Ingest
10.19.74.54 Master、Data
10.19.74.55 Master、Data
10.19.74.56 Data、Ingest
由于机器有限,所以每个机器中均启动两个 ES 节点,实际使用中可以将每个角色分配到单独的机器中。
一、服务器环境初始化
在安装集群之前,首先对集群的环境进行配置。
1. 创建用户
管理 ES 集群最好使用非 root 用户,这里我们创建一个 es 用户,并将其家目录设置在 /opt 目录下:
useradd es -m /opt/es
1
将 elasticsearch-7.4.2-linux-x86_64.tar.gz 压缩包拷贝到 es 用户的家目录下并解压缩,将解压后的文件和目录的属主和属组均设置为 es:
chown -R es.es elasticsearch-7.4.2
1
2. 优化系统和内核
ES 集群对于系统性能要求比较高,所以需要对系统和内核做一些调优。
首先是在 /etc/sysctl.conf 文件中添加如下配置项,配置完成后使用 sysctl -p 生效:
# 设置系统最大打开文件描述符数量
fs.file-max=655360
# 设置一个进程拥有虚拟内存区域的大小
vm.max_map_count=655360
# 尽量减少 swap 内存交换的使用,但是不是禁用
vm.swappiness=1
1
2
3
4
5
6
接下来在 /etc/security/limits.conf 文件中添加如下内容:
# 设置最大文件打开数
* soft nofile 265535
* hard nofile 265535
# 设置最大用户进程数
* soft nproc 216384
* hard nproc 232768
# 设置最大锁定内存空间
es soft memlock unlimited
es hard memlock unlimited
1
2
3
4
5
6
7
8
9
在 /etc/security/limits.d/20-nproc.conf 文件中添加如下内容:
# 修改用户最大线程数
es soft nproc unlimited
root soft nproc unlimited
1
2
3
如果有条件的,建议卸载 swap 内存交换分区:
swapoff -a ; sed -i \'/ swap / s/^\\(.*\\)$/#\\1/g\' /etc/fstab
1
二、搭建 Master 节点
根据我们的规划,需要在 10.19.74.53 - 10.19.74.55 这三台机器中启动 Master 节点,所以这里以 10.19.74.53 机器为例进行演示,其他两台机器操作步骤一样:
注意,所有步骤都使用 es 用户来执行
首先将 /opt/es 目录下解压后的源码包复制到当前路径下,并重命名为 esmaster。编辑 esmaster/config/elasticsearch.yml 文件,修改如下内容:
# ---------------------------------- Cluster -----------------------------------
# 集群名称,所有节点必须保持一致
cluster.name: skywalking-es-cluster
# ------------------------------------ Node ------------------------------------
# 当前节点的名称,一般命名规则是:业务-角色-ip地址
node.name: master-10.19.74.53
#
# Add custom attributes to the node, node.ingest set true only on client node
#node.attr.rack: r1
# 这里将 node.master 设置为 true,代表当前节点为 master 角色
node.master: true
node.voting_only: false
node.data: false
node.ingest: false
node.ml: false
xpack.ml.enabled: true
#
# ----------------------------------- Paths ------------------------------------
# 设置日志路径和数据存储路径
path.data: /opt/es/data/esmaster
path.logs: /opt/es/log/esmaster
#
# ----------------------------------- Memory -----------------------------------
bootstrap.memory_lock: true
#
# ---------------------------------- Network -----------------------------------
#
# 设置当前节点的 IP 地址
network.host: 10.19.74.53
# 设置 api 端口
http.port: 9201
# 设置数据通信端口
transport.port: 9301
#
# --------------------------------- Discovery ----------------------------------
#
# 这里填写所有的 Master 节点和 data 节点
discovery.seed_hosts:
- 10.19.74.53:9301
- 10.19.74.54:9301
- 10.19.74.55:9301
- 10.19.74.54:9300
- 10.19.74.55:9300
- 10.19.74.56:9300
# Bootstrap the cluster using an initial set of master-eligible nodes:
# 设置集群的 master 节点的 node.name 名称,也可以是 ip 地址或者域名
cluster.initial_master_nodes:
- master-10.19.74.53
- master-10.19.74.54
- master-10.19.74.55
#
# ---------------------------------- Gateway -----------------------------------
#
# Block initial recovery after a full cluster restart until N nodes are started:
gateway.recover_after_nodes: 3
#
# ---------------------------------- Various -----------------------------------
#
# Require explicit names when deleting indices:
#action.destructive_requires_name: true
#
# ---------------------------------- x-pack ------------------------------------
#x-pack setting
xpack.monitoring.collection.enabled: true
1
2
3
4
5
6
7
8
9
10
11
12
13
14
15
16
17
18
19
20
21
22
23
24
25
26
27
28
29
30
31
32
33
34
35
36
37
38
39
40
41
42
43
44
45
46
47
48
49
50
51
52
53
54
55
56
57
58
59
60
61
62
63
64
65
另外两个节点也按照上面的内容进行配置,修改 IP 地址和节点名称即可。
编辑 esmaster/config/jvm.options 文件,修改如下内容:
-Xms31g
-Xmx31g
1
2
最后创建数据目录和日志目录:
mkdir -p /opt/es/data/esmaster,log/esmaster
1
三、搭建 Data 节点
搭建 Data 节点和搭建 Master 节点的过程一致,这里以 10.19.74.54 机器为例。首先是将解压后的源码包复制一份到当前路径下并重命名为 esdatanode,接下来修改 esdatanode/config/elasticsearch.yml 文件,内容如下:
# ---------------------------------- Cluster -----------------------------------
cluster.name: skywalking-es-cluster
# ------------------------------------ Node ------------------------------------
node.name: data-10.19.74.54
#
# Add custom attributes to the node, node.ingest set true only on client node
#node.attr.rack: r1
node.master: false
node.voting_only: false
node.data: true
node.ingest: false
node.ml: false
xpack.ml.enabled: true
#
# ----------------------------------- Paths ------------------------------------
path.data: /opt/es/data/esdatanode
path.logs: /opt/es/log/esdatanode
#
# ----------------------------------- Memory -----------------------------------
bootstrap.memory_lock: true
#
# ---------------------------------- Network -----------------------------------
#
network.host: 10.19.74.54
http.port: 9200
transport.port: 9300
#
# --------------------------------- Discovery ----------------------------------
#
discovery.seed_hosts:
- 10.19.74.53:9301
- 10.19.74.54:9301
- 10.19.74.55:9301
- 10.19.74.54:9300
- 10.19.74.55:9300
- 10.19.74.56:9300
# Bootstrap the cluster using an initial set of master-eligible nodes:
cluster.initial_master_nodes:
- master-10.19.74.53
- master-10.19.74.54
- master-10.19.74.55
#
# ---------------------------------- Gateway -----------------------------------
#
# Block initial recovery after a full cluster restart until N nodes are started:
gateway.recover_after_nodes: 3
#
# ---------------------------------- Various -----------------------------------
#
# Require explicit names when deleting indices:
#action.destructive_requires_name: true
#
# ---------------------------------- x-pack ------------------------------------
#x-pack setting
xpack.monitoring.collection.enabled: true
1
2
3
4
5
6
7
8
9
10
11
12
13
14
15
16
17
18
19
20
21
22
23
24
25
26
27
28
29
30
31
32
33
34
35
36
37
38
39
40
41
42
43
44
45
46
47
48
49
50
51
52
53
54
55
56
内容基本与 Master 节点一致,只需要修改节点 IP 地址、节点名称和节点角色即可,其他 data 节点的配置方式一致(注意使用 es 用户配置)。
接下来修改 jvm.option 文件,配置与 Master 节点一致。
最后创建数据目录和日志目录:
mkdir -p /opt/es/data/esdatanode,log/esdatanode
1
本文原文链接:https://blog.csdn.net/xzk9381/article/details/117465038,转载请注明出处。如有发现文章中的任何问题,欢迎评论区留言。
四、搭建 Ingest 节点
根据我们的规划,Ingest 部署在 10.19.74.53 和 10.19.74.56 节点中,这里以 10.19.74.53 为例。首先是将解压后的源码包复制一份到当前路径下并重命名为 esclient,接下来修改 esclient/config/elasticsearch.yml 文件,内容如下:
# ---------------------------------- Cluster -----------------------------------
cluster.name: skywalking-es-cluster
# ------------------------------------ Node ------------------------------------
node.name: ingest-10.19.74.53
#
# Add custom attributes to the node, node.ingest set true only on client node
#node.attr.rack: r1
node.master: false
node.voting_only: false
node.data: false
node.ingest: true
node.ml: false
xpack.ml.enabled: true
#
# ----------------------------------- Paths ------------------------------------
path.data: /opt/es/data/esclient
path.logs: /opt/es/log/esclient
#
# ----------------------------------- Memory -----------------------------------
bootstrap.memory_lock: true
#
# ---------------------------------- Network -----------------------------------
#
network.host: 10.19.74.53
http.port: 9202
transport.port: 9302
#
# --------------------------------- Discovery ----------------------------------
#
discovery.seed_hosts:
- 10.19.74.53:9301
- 10.19.74.54:9301
- 10.19.74.55:9301
- 10.19.74.54:9300
- 10.19.74.55:9300
- 10.19.74.56:9300
# Bootstrap the cluster using an initial set of master-eligible nodes:
cluster.initial_master_nodes:
- master-10.19.74.53
- master-10.19.74.54
- master-10.19.74.55
#
# ---------------------------------- Gateway -----------------------------------
#
# Block initial recovery after a full cluster restart until N nodes are started:
gateway.recover_after_nodes: 3
#
# ---------------------------------- Various -----------------------------------
#
# Require explicit names when deleting indices:
#action.destructive_requires_name: true
#
# ---------------------------------- x-pack ------------------------------------
#x-pack setting
xpack.monitoring.collection.enabled: true
1
2
3
4
5
6
7
8
9
10
11
12
13
14
15
16
17
18
19
20
21
22
23
24
25
26
27
28
29
30
31
32
33
34
35
36
37
38
39
40
41
42
43
44
45
46
47
48
49
50
51
52
53
54
55
56
还是主要修改节点 IP 地址、节点名称和节点角色即可,另一个 ingest 节点的配置方式一致。内存配置也和 master 和 data 节点保持一致。
最后创建数据目录和日志目录:
mkdir -p /opt/es/data/esclient,log/esclient
1
五、启动 ES 集群
启动 ES 集群需要使用 es 用户执行,分别进入各个节点角色的目录中的 bin 目录下,执行如下命令即可启动:
./elasticsearch -d
1
六、检查集群状态
在浏览器中输入如下地址即可查看集群各个节点的状态:
http://10.19.74.53:9202/_cat/nodes?v
1
返回的结果如下:
ip heap.percent ram.percent cpu load_1m load_5m load_15m node.role master name
10.19.74.55 69 97 23 3.28 3.36 3.18 d - data-10.19.74.55
10.19.74.54 60 92 10 4.11 3.90 3.48 m * master-10.19.74.54
10.19.74.53 36 65 0 0.01 0.02 0.05 i - ingest-10.19.74.53
10.19.74.53 46 65 0 0.01 0.02 0.05 m - master-10.19.74.53
10.19.74.55 13 97 23 3.28 3.36 3.18 m - master-10.19.74.55
10.19.74.54 64 92 10 4.11 3.90 3.48 d - data-10.19.74.54
10.19.74.56 63 96 17 2.98 3.31 3.36 i - ingest-10.19.74.56
10.19.74.56 16 96 17 2.98 3.31 3.36 d - data-10.19.74.56
1
2
3
4
5
6
7
8
9
也可以直接访问 http://10.19.74.53:9202 获取集群的信息,返回的结果如下:
"name" : "ingest-10.19.74.53",
"cluster_name" : "skywalking-es-cluster",
"cluster_uuid" : "zXpOHN29Q5yiJ7MOMY9S7g",
"version" :
"number" : "7.4.2",
"build_flavor" : "default",
"build_type" : "tar",
"build_hash" : "2f90bbf7b93631e52bafb59b3b049cb44ec25e96",
"build_date" : "2019-10-28T20:40:44.881551Z",
"build_snapshot" : false,
"lucene_version" : "8.2.0",
"minimum_wire_compatibility_version" : "6.8.0",
"minimum_index_compatibility_version" : "6.0.0-beta1"
,
"tagline" : "You Know, for Search"
1
2
3
4
5
6
7
8
9
10
11
12
13
14
15
16
17
返回以上信息就代表集群已经部署成功,这里我们规划了两个 ingest 节点,所以可以使用其中一个 ingest 来接收 filebeat 或者 logstash 发送过来的数据,另一个 ingest 节点可以作为 Kibana 连接集群的入口。
七、搭建 Kibana
接下来就是搭建 Kibana 服务,这里使用的 Kibana 版本也是 7.4.2。
下载地址为:https://artifacts.elastic.co/downloads/kibana/kibana-7.4.2-linux-x86_64.tar.gz
在 10.19.74.53 机器中下载安装包并解压到 /opt/es 目录下重命名为 kibana。修改 kibana/config/kibana.yml 文件,内容如下:
# Kibana is served by a back end server. This setting specifies the port to use.
server.port: 5601
# Specifies the address to which the Kibana server will bind. IP addresses and host names are both valid values.
# The default is \'localhost\', which usually means remote machines will not be able to connect.
# To allow connections from remote users, set this parameter to a non-loopback address.
server.host: "10.19.74.53"
# Enables you to specify a path to mount Kibana at if you are running behind a proxy.
# Use the `server.rewriteBasePath` setting to tell Kibana if it should remove the basePath
# from requests it receives, and to prevent a deprecation warning at startup.
# This setting cannot end in a slash.
server.basePath: "/es7/kibana"
# Specifies whether Kibana should rewrite requests that are prefixed with
# `server.basePath` or require that they are rewritten by your reverse proxy.
# This setting was effectively always `false` before Kibana 6.3 and will
# default to `true` starting in Kibana 7.0.
server.rewriteBasePath: true
# The maximum payload size in bytes for incoming server requests.
server.maxPayloadBytes: 1048576
# The Kibana server\'s name. This is used for display purposes.
server.name: "10.19.74.31"
# The URLs of the Elasticsearch instances to use for all your queries.
elasticsearch.hosts: ["http://10.19.74.53:9202"]
# Set the value of this setting to true to suppress all logging output.
logging.silent: false
# Set the value of this setting to true to suppress all logging output other than error messages.
logging.quiet: false
# Set the value of this setting to true to log all events, including system usage information
# and all requests.
#logging.verbose: false
# Set the interval in milliseconds to sample system and process performance
# metrics. Minimum is 100ms. Defaults to 5000.
ops.interval: 5000
# Specifies locale to be used for all localizable strings, dates and number formats.
# Supported languages are the following: English - en , by default , Chinese - zh-CN .
i18n.locale: "zh-CN"
1
2
3
4
5
6
7
8
9
10
11
12
13
14
15
16
17
18
19
20
21
22
23
24
25
26
27
28
29
30
31
32
33
34
35
36
37
38
39
40
41
42
43
44
45
46
修改完成后,进入 kibana/bin 目录下,执行如下命令启动 kibana 即可:
nohup ./kibana &
1
本文原文链接:https://blog.csdn.net/xzk9381/article/details/117465038,转载请注明出处。如有发现文章中的任何问题,欢迎评论区留言。
————————————————
版权声明:本文为CSDN博主「店伙计」的原创文章,遵循CC 4.0 BY-SA版权协议,转载请附上原文出处链接及本声明。
原文链接:https://blog.csdn.net/xzk9381/article/details/117465038
ElasticSearch集群的搭建
文章目录
ES集群是一个P2P类型(使用 gossip 协议)的分布式系统,除了集群状态管理以外,其他所有的请求都可以发送到集群内任意一台节点上,这个节点可以自己找到需要转发给哪些节点,并且直接跟这些节点通信。
所以,从网络架构及服务配置上来说,构建集群所需要的配置极其简单。在 Elasticsearch 2.0 之前,无阻碍的网络下,所有配置了相同 cluster.name 的节点都自动归属到一个集群中。
2.0 版本之后,基于安全的考虑避免开发环境过于随便造成的麻烦,从 2.0 版本开始,默认的自动发现方式改为了单播(unicast)方式。
配置里提供几台节点的地址,ES 将其视作gossip router 角色,借以完成集群的发现。
由于这只是 ES 内一个很小的功能,所以 gossip router 角色并不需要单独配置,每个 ES 节点都可以担任。所以,采用单播方式的集群,各节点都配置相同的几个节点列表作为 router即可。
7.1 集群节点
ELasticsearch的集群是由多个节点组成的,通过cluster.name设置集群名称,并且用于区分其它的集群,每个节点通过node.name指定节点的名称。
在Elasticsearch中,节点的类型主要有4种:
-
master节点
配置文件中node.master属性为true(默认为true),就有资格被选为master节点。master节点用于控制整个集群的操作。比如创建或删除索引,管理其它非master节点等。 -
data节点
配置文件中node.data属性为true(默认为true),就有资格被设置成data节点。data节点主要用于执行数据相关的操作。比如文档的CRUD。 -
客户端节点
- 配置文件中node.master属性和node.data属性均为false。
- 该节点不能作为master节点,也不能作为data节点。
- 可以作为客户端节点,用于响应用户的请求,把请求转发到其他节点
-
部落节点
当一个节点配置tribe.*的时候,它是一个特殊的客户端,它可以连接多个集群,在所有连接的集群上执行 搜索和其他操作。
7.2 集群的搭建
7.2.1 windows环境下es集群的搭建
1.准备三台elasticsearch服务器
我们只需要将我们的es目录复制三份即可

2.修改每台服务器的配置
修改\\conf\\elasticsearch.yml配置文件:
# Node节点1:

http.cors.enabled: true
http.cors.allow-origin: "*"
#节点1的配置信息:
#集群名称,保证唯一
cluster.name: my-elasticsearch
#节点名称,必须不一样
node.name: node-1
#必须为本机的ip地址
network.host: 127.0.0.1
#服务端口号,在同一机器下必须不一样
http.port: 9201
#集群间通信端口号,在同一机器下必须不一样
transport.tcp.port: 9301
#设置集群自动发现机器ip集合
discovery.zen.ping.unicast.hosts: ["127.0.0.1:9301","127.0.0.1:9302","127.0.0.1:9303"]
# 默认先以node-1作为master结点
cluster.initial_master_nodes: ["node-1"]


#Node节点2:

http.cors.enabled: true
http.cors.allow-origin: "*"
#节点2的配置信息:
#集群名称,保证唯一
cluster.name: my-elasticsearch
#节点名称,必须不一样
node.name: node-2
#必须为本机的ip地址
network.host: 127.0.0.1
#服务端口号,在同一机器下必须不一样
http.port: 9202
#集群间通信端口号,在同一机器下必须不一样
transport.tcp.port: 9302
#设置集群自动发现机器ip集合
discovery.zen.ping.unicast.hosts: ["127.0.0.1:9301","127.0.0.1:9302","127.0.0.1:9303"]

#Node节点3:

http.cors.enabled: true
http.cors.allow-origin: "*"
#节点3的配置信息:
#集群名称,保证唯一
cluster.name: my-elasticsearch
#节点名称,必须不一样
node.name: node-3
#必须为本机的ip地址
network.host: 127.0.0.1
#服务端口号,在同一机器下必须不一样
http.port: 9203
#集群间通信端口号,在同一机器下必须不一样
transport.tcp.port: 9303
#设置集群自动发现机器ip集合
discovery.zen.ping.unicast.hosts: ["127.0.0.1:9301","127.0.0.1:9302","127.0.0.1:9303"]
在启动之前,请确保将data目录下的内容清空
可以分别启动每个服务器下的elasticsearch.bat
也可以使用批处理指令,新建一个elasticsearch_cluster_start.bat文件,然后添加下面内容:
start "elasticsearch.bat" "D:\\soft\\es集群\\cluster01\\bin\\elasticsearch.bat" &
start "elasticsearch.bat" "D:\\soft\\es集群\\cluster02\\bin\\elasticsearch.bat" &
start "elasticsearch.bat" "D:\\soft\\es集群\\cluster03\\bin\\elasticsearch.bat"
7.2.2 linux环境下搭建es集群
目前手上没有linux相关的环境,后面会同步
7.3 集群测试
只要连接集群中的任意节点,其操作方式与单机版本基本相同,改变的仅仅是存储的结构。

如果在图形化界面上连接其中一个结点,显示出以上信息则表示你的集群创建成功,你也可以通过访问:http://127.0.0.1:9201/_cluster/health?pretty进行查看

我们直接在Head图形化界面上新建一个索引,看看是否会同步至其他节点上

下面我们连接到Node-2节点
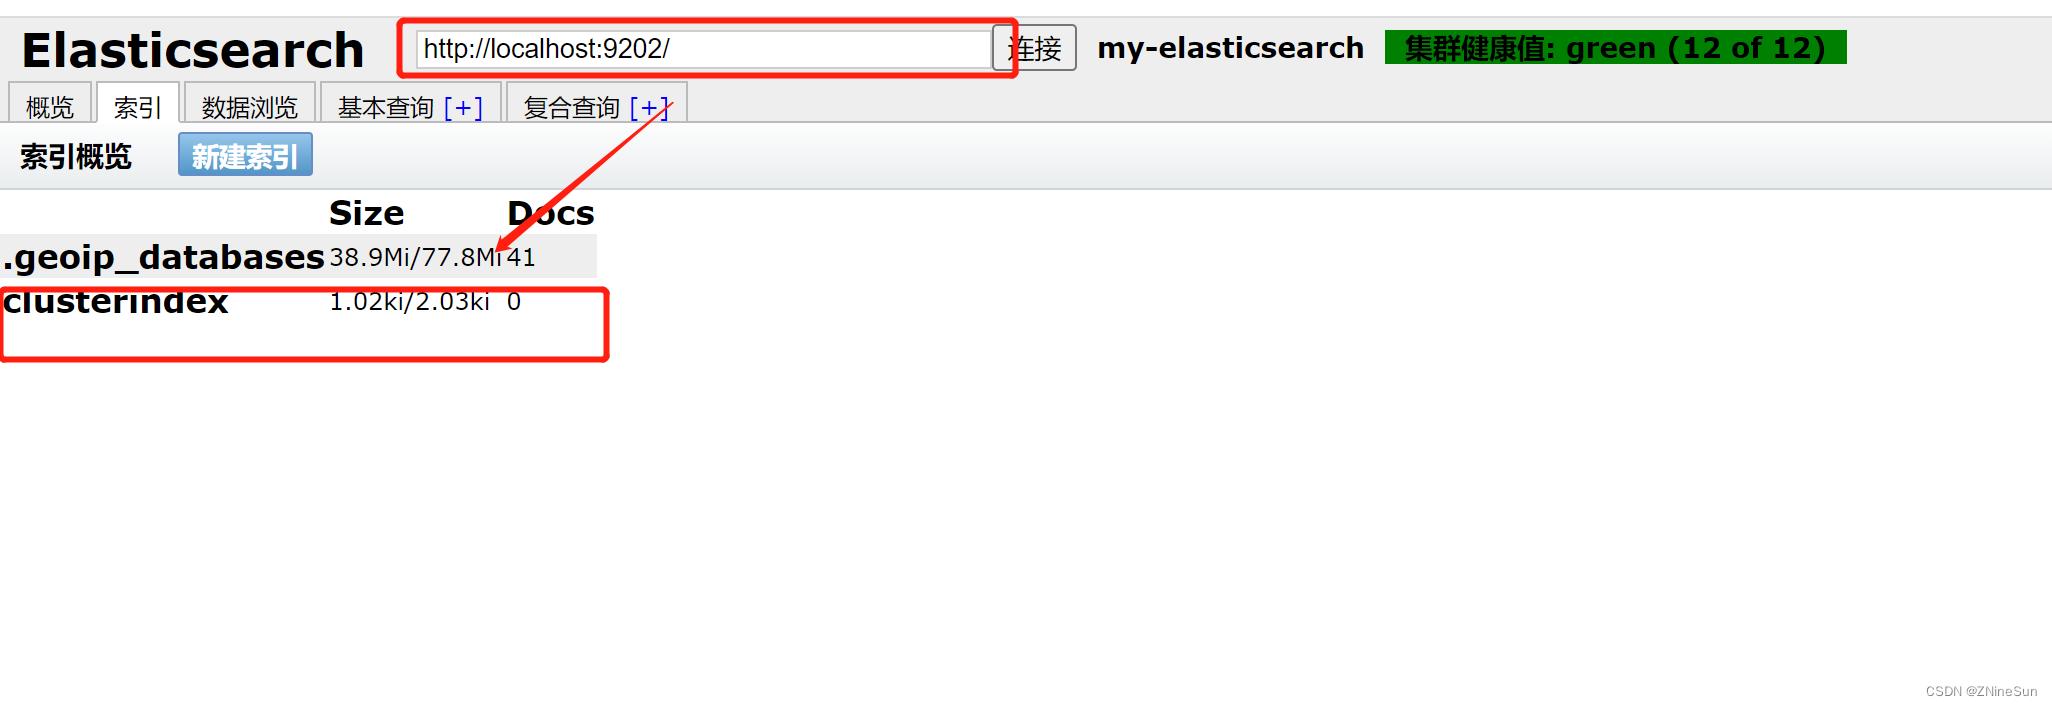
可以看到数据已经同步过来
下面我们和SpringBoot集成一下看看集群中数据会不会同步
7.4 springboot集成客户端使用
7.4.1 配置文件增加配置项
elasticSearch.hosts=127.0.0.1:9201,127.0.0.1:9202,127.0.0.1:9203
elasticSearch.userName=
elasticSearch.password=
用户名和密码有就写,没有就空着
7.4.2 新增config配置
import org.apache.http.HttpHost;
import org.apache.http.auth.AuthScope;
import org.apache.http.auth.UsernamePasswordCredentials;
import org.apache.http.client.CredentialsProvider;
import org.apache.http.client.config.RequestConfig;
import org.apache.http.impl.client.BasicCredentialsProvider;
import org.apache.http.impl.nio.client.HttpAsyncClientBuilder;
import org.elasticsearch.client.RestClient;
import org.elasticsearch.client.RestClientBuilder;
import org.elasticsearch.client.RestHighLevelClient;
import org.springframework.beans.factory.annotation.Autowired;
import org.springframework.beans.factory.annotation.Value;
import org.springframework.context.annotation.Bean;
import org.springframework.context.annotation.Configuration;

@Configuration
public class EsConfiguration

    @Value("$elasticSearch.hosts")
    String hosts;

    @Value("$elasticSearch.userName")
    private String userName;

    @Value("$elasticSearch.password")
    private String password;

    @Bean(name = "highLevelClient")
    public RestHighLevelClient highLevelClient(@Autowired RestClientBuilder restClientBuilder)
        String[] hosts = this.hosts.split(",");
        HttpHost[] httpHosts = new HttpHost[hosts.length];
        for (int i = 0; i < hosts.length; i++)
            String host = hosts[i].split(":")[0];
            int port = Integer.parseInt(hosts[i].split(":")[1]);
            httpHosts[i] = new HttpHost(host, port, "http");


        final CredentialsProvider credentialsProvider = new BasicCredentialsProvider();
        credentialsProvider.setCredentials(AuthScope.ANY, new UsernamePasswordCredentials(userName, password));

        RestClientBuilder builder = RestClient.builder(httpHosts).setRequestConfigCallback(new RestClientBuilder.RequestConfigCallback()
            @Override
            public RequestConfig.Builder customizeRequestConfig(RequestConfig.Builder requestConfigBuilder)
                requestConfigBuilder.setConnectTimeout(-1);
                requestConfigBuilder.setSocketTimeout(-1);
                requestConfigBuilder.setConnectionRequestTimeout(-1);
                return requestConfigBuilder;

        ).setHttpClientConfigCallback(new RestClientBuilder.HttpClientConfigCallback()

            @Override
            public HttpAsyncClientBuilder customizeHttpClient(HttpAsyncClientBuilder httpClientBuilder)
                httpClientBuilder.disableAuthCaching();
                return httpClientBuilder.setDefaultCredentialsProvider(credentialsProvider);

        );
        RestHighLevelClient client = new RestHighLevelClient(builder);
        return client;
如果之前有过其他的配置文件记得注释或者直接删除
7.4.3 编写接口
import org.elasticsearch.action.admin.indices.create.CreateIndexRequest;
import org.elasticsearch.action.admin.indices.create.CreateIndexResponse;
import org.elasticsearch.action.admin.indices.delete.DeleteIndexRequest;
import org.elasticsearch.action.support.master.AcknowledgedResponse;
import org.elasticsearch.client.RequestOptions;
import org.elasticsearch.client.RestHighLevelClient;
import org.elasticsearch.client.indices.GetIndexRequest;
import org.springframework.beans.factory.annotation.Autowired;
import org.springframework.web.bind.annotation.GetMapping;
import org.springframework.web.bind.annotation.PostMapping;
import org.springframework.web.bind.annotation.RequestParam;
import org.springframework.web.bind.annotation.RestController;

import java.io.IOException;

@RestController
public class IndexOperationController7
    @Autowired
    private RestHighLevelClient restHighLevelClient;

    /**
     * 创建索引
     *
     * @return
     * @throws IOException
     */
    @PostMapping("/indexSeven/createIndex")
    public Object createIndex(@RequestParam(value = "indexName") String indexName) throws IOException
        //1.创建索引请求
        CreateIndexRequest request = new CreateIndexRequest(indexName);
        //2.客户端执行请求IndicesClient,执行create方法创建索引,请求后获得响应
        CreateIndexResponse response =
                restHighLevelClient.indices().create(request, RequestOptions.DEFAULT);
        return response;


    /**
     * 查询索引
     *
     * @return
     * @throws IOException
     */
    @GetMapping("/indexSeven/searchIndex")
    public Object searchIndex(@RequestParam(value = "indexName") String indexName) throws IOException
        //1.查询索引请求
        GetIndexRequest request = new GetIndexRequest(indexName);
        //2.执行exists方法判断是否存在
        boolean exists = restHighLevelClient.indices().exists(request, RequestOptions.DEFAULT);
        return exists;

然后我们将node-1服务停止,然后查询索引,看看是否能成功
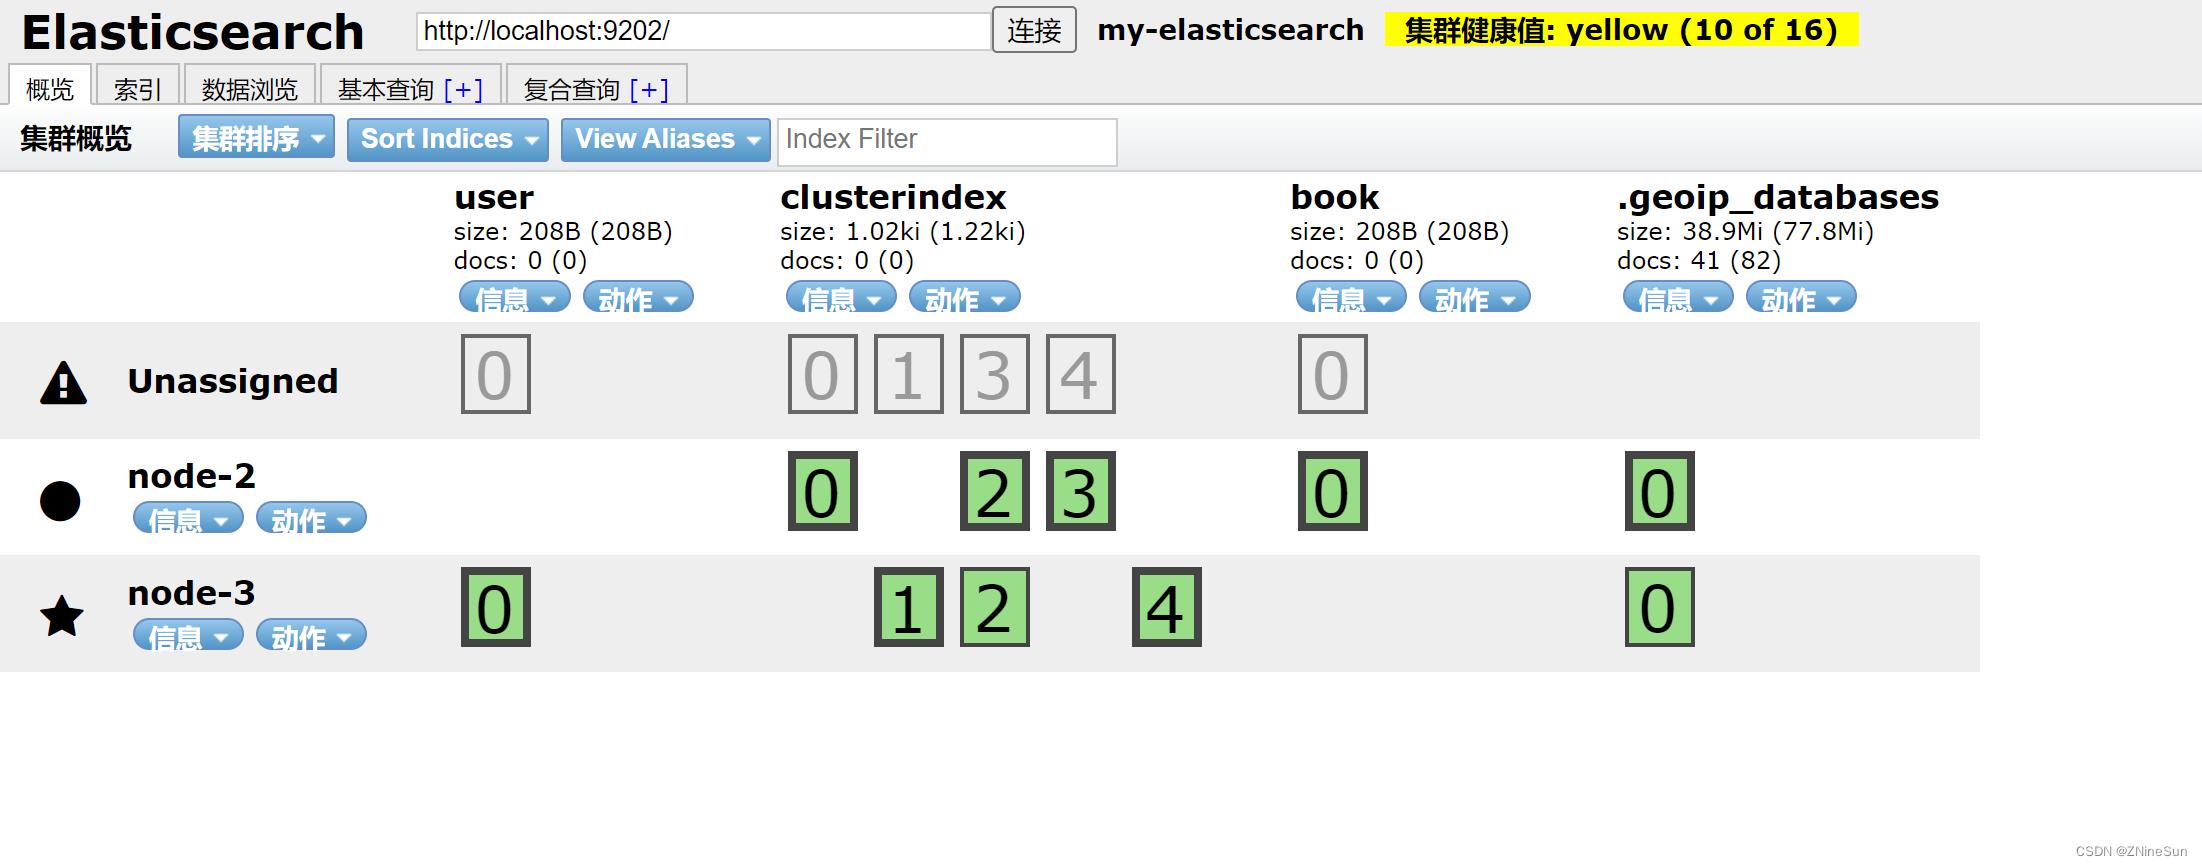
可以发现目前还有两个节点提供服务
通过测试

我们的es仍然能够正常运行,说明我们的高可用集群已经搭建成功
git地址:https://gitee.com/ninesuntec/es-better.git
PS:本章git上的代码如果有被注释掉的,只是为了防止和后面的章节不冲突,并无错误,大家自行解注查看即可
下一章:《SpringBoot 整合 ES 进行各种高级查询搜索》
以上是关于搭建ElasticSearch7.4.2集群的主要内容,如果未能解决你的问题,请参考以下文章