一、jQuery事件
常用事件
   blur([[data],fn])   失去焦点
   focus([[data],fn])  获取焦点( 搜索框例子)
   change([[data],fn]) 当select下拉框中的元素发生改变的时候触发change事件(select例子)
   click([[data],fn])  点击
   dblclick([[data],fn]) 双击
   scroll([[data],fn])   滚动
   submit([[data],fn])   提交

不常用事件
   error([[data],fn])
   focusin([data],fn)
   focusout([data],fn)
   keydown([[data],fn])   按下
   keypress([[data],fn])  按键
   keyup([[data],fn])     键松开
   mousedown([[data],fn]) 鼠标按下
   mouseenter([[data],fn])  鼠标移进去
   mouseleave([[data],fn])  鼠标离开:只有鼠标离开被选元素的时候,才会触发mouseleave事件
   mousemove([[data],fn])   鼠标移动
   mouseout([[data],fn])    鼠标离开:无论鼠标离开被选元素还是任何子元素,都会触发mouseout事件
   mouseover([[data],fn]    鼠标悬停
   mouseup([[data],fn])     鼠标弹起
   resize([[data],fn])  元素窗口发生变化
   select([[data],fn])
   unload([[data],fn])
   补充:
      文档树加载完之后绑定事件(绝大多数情况下)
      第一种:吧script放在后面。
      第二种:
      $(document).ready(function(){
         // 绑定事件的代码
         ....
      })

      简写:
      $(function($){
         // 绑定事件的代码
         ....
      });
事件练习


 1 <!DOCTYPE html>
 2 <html lang="en">
 3 <head>
 4     <meta charset="UTF-8">
 5     <title>常用事件</title>
 6 </head>
 7 <body>
 8 <input type="text" name="search" value="苹果手机" data-show ="">
 9 <button>搜索</button>
10 <select name="" id="s1">
11     <option value="gansu">甘肃</option>
12     <option value="wuwei">武威</option>
13     <option value="dingxi">定西</option>
14     <option value="longxi">陇西</option>
15     <option value="dalian">大连</option>
16 </select>
17 <script src="jquery-3.2.1.min.js"></script>
18 <script>
19 //    focus和blur事件
20 $(document).ready(function () {
21     //文档加载完之后执行下面的代码
22      $(":input").focus(function () {
23         var data = $(this).val();
24         $(this).val("");
25         $(this).attr("data-show", data);
26
27     });
28     $(":input").blur(function () {
29         $(this).val($(this).attr("data-show"));
30     });
31     $("#s1").change(function () {
32 //        当你的下拉框改变的时候就触发这个事件,就会执行下面的代码
33         console.log($(this).val())
34     })
35 });
36
37 </script>
38 </body>
39 </html>
 1 <!DOCTYPE html>
 2 <html lang="en">
 3 <head>
 4     <meta charset="UTF-8">
 5     <title>onmouse事件</title>
 6     <style>
 7         .box{
 8             width: 300%;
 9             height: 200px;
10         }
11         .title{
12             background: steelblue;
13             line-height: 40px;
14         }
15         .con{
16             background: slategray;
17             line-height: 30px;
18         }
19         .hide{
20             display: none;
21         }
22     </style>
23 </head>
24 <body>
25 <div class="box">
26     <div class="title">onmouse</div>
27     <div class="con hide">
28         <div><a href="" class="item">你好吗?</a></div>
29         <div><a href="" class="item">我好啊</a></div>
30         <div><a href="" class="item">好就好呗</a></div>
31     </div>
32 </div>
33 <script>
34     var ele_title = document.getElementsByClassName(\'title\')[0];
35     var ele_box = document.getElementsByClassName(\'box\')[0];
36     //鼠标指上去的事件
37     ele_title.onmouseover = function () {
38         this.nextElementSibling.classList.remove(\'hide\');
39     };
40     //鼠标移走的事件的两种方式
41 //    方式一(推荐)
42      ele_box.onmouseleave= function () {
43         ele_title.nextElementSibling.classList.add(\'hide\');
44     };
45 //    方式二
46 //    ele_title.onmouseout = function () {
47 //       this.nextElementSibling.classList.add(\'hide\');
48 //    }
49 //    方式一和方式二的区别:
50 //    不同点
51 //      onmouseout:不论鼠标指针离开被选元素还是任何子元素,都会触发onmouseout事件
52 //      onmouseleave:只有在鼠标指针离开被选元素时,才会触发onmouseleave事件
53 //    相同点:都是鼠标移走触发事件
54 </script>
55 </body>
56 </html>
二、jQuery扩展(很重要!!)
1、jQuery扩展语法
把扩展的内容就可以写到xxxx.js文件了,在主文件中直接导入就行了。
用法1、$.xxx()
   $.extend({
      "GDP": function () {
         console.log("戴小红花");
      }
   });
   - 给jQuery添加扩展
   - $.GDP()

用法2、$("").xxx()
   $.fn.extend({
      "BJG": function () {
         console.log("英语八级就是好!");
      }
   })
   - 给jQuery对象添加扩展
   - $(":input").BJG()
2、练习1
第一步:不完美
extend.js文件
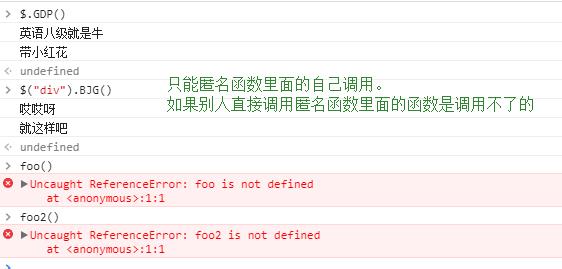
$.extend({
       "GDP":function () {
           foo();
        console.log("带小红花")
    }
});
那么如果这样定义一个函数,其他的扩展都可以调用这个函数了
这个函数只想在自己调用。不想让它公共的调用,不让他起冲突
那么定义一个私有的。用一个匿名函数
function foo() {
    console.log("英语八级就是牛")
}
$.fn.extend({
    "BJG":function () {
        foo()
        console.log("就这样吧")
    }
});
继续第二步:加上匿名函数
匿名函数:foo方法只想自己用,不想让别人调用
(function () {
    $.extend({
       "GDP":function () {
           foo();
        console.log("带小红花")
    }
});
    function foo() {  函数的内部可以调用,外部就不可以调用了
    console.log("英语八级就是牛")
    }
})();


(function () {
    $.fn.extend({
    "BJG":function () {
        foo2();
        console.log("就这样吧")
    }
});
    function foo2() {
        console.log("哎哎呀")
    }
})();
第三步、越趋于完美:既不可以让别人在外部随意调用,也可以避免别人修改$
// 如果怕$被别人改,那么就传个参数进去
(function (jq) {
    jq.extend({
       "GDP":function () {
           foo();
          console.log("带小红花")
       },   //可以扩展多个(加上逗号在写几个)
        "SGS":function () {
          console.log("你蛤蟆")
    }
});
    function foo() {
    console.log("英语八级就是牛")
    }
})(jQuery);


(function (jq) {
    jq.fn.extend({
    "BJG":function () {
        foo2();
        console.log("就这样吧")
    }
});
    function foo2() {
        console.log("哎哎呀")
    }
})(jQuery);
extend.html文件

3、具体示例练习(登录校验)
login.html文件
 1 <!DOCTYPE html>
 2 <html lang="en">
 3 <head>
 4     <meta charset="UTF-8">
 5     <title>作业1</title>
 6     <link rel="stylesheet" href="bootstrap-3.3.7-dist/css/bootstrap.min.css">
 7     <style>
 8         .container {
 9             margin-top: 50px;
10         }
11     </style>
12 </head>
13 <body>
14 <div class="container">
15     <div class="row">
16         <div class="col-md-4 col-md-offset-4">
17             <form action="" novalidate>
18                 <div class="form-group">
19                     <label for="username">用户名</label>
20                     <input type="text" class="form-control" id="username" placeholder="username">
21                     <span id="helpBlock" class="help-block"></span>
22                 </div>
23                 <div class="form-group">
24                     <label for="Password">密码</label>
25                     <input type="password" class="form-control" id="Password" placeholder="Password">
26                     <span id="helpBlock2" class="help-block"></span>
27                 </div>
28                 <button type="submit" class="btn btn-default submit">提交</button>
29             </form>
30         </div>
31     </div>
32 </div>
33 <!--jQuery导入一定要放到js的上面-->
34 <script src="jquery-3.2.1.min.js"></script>
35 <script src="bootstrap-3.3.7-dist/js/bootstrap.min.js"></script>
36 <script>
37 //    var span =$("span");
38     $(".submit").on("click",function () {
39         //先清空状态
40         $("form .form-group").removeClass("has-error");
41         $("form span").text("");
42         $(":input").each(function () {
43             if ($(this).val().length===0){
44                 var name =  $(this).prev().text();
45                 $(this).parent().addClass("has-error");
46                 $(this).next().text(name+"不能为空");
47                 return false
48             }
49         });
50     return false
51     })
52
53
54 </script>
55 </body>
56 </html>
loginextend.js 文件
// 匿名函数
(function (jq) {  //jq就相当于$
    jq.extend({
        "myValidate": function (form) {
            var formObj = jq(form) ;//赋一个变量,因为我们经常用到
这里的form参数就指的是在html文件里面传进去的"#login",也就是找到的form标签
            formObj.find(":submit").on("click", function () {
                //先清空状态
            formObj.find(".form-group").removeClass("has-error");
            formObj.find("span").text("");

                formObj.find(":input").each(function () {
                    if ($(this).val().length === 0) {
                        var name = $(this).prev().text();
                        $(this).parent().addClass("has-error");
                        $(this).next().text(name + "不能为空");
                        return false
                    }
                });
                return false
            });
        }
    })
})(jQuery);


loginextend2.js 文件
/**
 * Created by Administrator on 2017/10/17.
 */
// 匿名函数
(function (jq) {
    jq.fn.extend({
        "myValidate": function (arg) {
            console.log(this);  //就是当前的.前面的jQuery对象 $("#login")  ----->也就是[form#login]
            var formObj = this;//赋一个变量,因为我们经常用到
            formObj.find(":submit").on("click", function () {
                // this --->提交的submit
                //先清空状态
            formObj.find(".form-group").removeClass("has-error");
            formObj.find("span").text("");

            //each循环
            var flag = true;  //设置一个标志位
                // 找到input的属性[required=true]的,然后设置相关的操作
            formObj.find("input[required=true]").each(function () {
                var inputID = jq(this).attr("id");  //获取input的id属性值  "username"
                var minlength = arg[inputID]["min-length"];  //arg[inputID]["min-length"]--->arg["username"]["min-length"]--->得到6
                if ($(this).val().length === 0) {
                    //而这里的this是当前的input框,和上面的不是同一个
                    var name = $(this).prev().text();
                    $(this).parent().addClass("has-error");
                    $(this).next().text(name + "不能为空");
                    flag =  false;
                    return flag
                }
                if (minlength!==undefined){
                    if (jq(this).val().length<minlength){
                        var name = $(this).prev().text();
                        $(this).parent().addClass("has-error");
                        $(this).next().text(name + "长度太短");
                        flag =  false;
                        return flag
                     }
                }
            });
            return flag
          });
        }
    })
})(jQuery);
三、表格的添加 | 删除 | 编辑示例
第一种:点击编辑没有模态框,是input框编辑修改
1 <!DOCTYPE html> 2 <html lang="en"> 3 <head> 4 <meta charset="UTF-8"> 5 <title>增删改</title> 6 <link rel="stylesheet" href="bootstrap-3.3.7-dist/css/bootstrap.min.css"> 7 <style> 8 .addBtn { 9 margin-top: 30px; 10 margin-bottom: 15px; 11 } 12 </style> 13 </head> 14 <body> 15 <div class="container"> 16 <div class="row"> 17 <div class="col-md-9 col-md-offset-2"> 18 <!-- Button trigger modal --> 19 <button type="button" class="btn btn-primary btn-mg addBtn" data-toggle="modal" data-target="#myModal"> 20 添加学生的信息 21 </button> 22 <table class="table table-striped"> 23 <tbody> 24 <tr> 25 <th>姓名</th> 26 <th>年龄</th> 27 <th>性别</th> 28 <th>操作</th> 29 </tr> 30 <tr> 31 <td class="col-md-3">六点</td> 32 <td class="col-md-3">23</td> 33 <td class="col-md-3">女</td> 34 <td> 35 <button class="btn btn-success editBtn">编辑</button> 36 <button class="btn btn-danger delBtn">删除</button> 37 </td> 38 </tr> 39 <tr> 40 <td>时时彩</td> 41 <td>24</td> 42 <td>女</td> 43 <td> 44 <button class="btn btn-success editBtn">编辑</button> 45 <button class="btn btn-danger delBtn">删除</button> 46 </td> 47 </tr> 48 <tr> 49 <td>刚强</td> 50 <td>13</td> 51 <td>男</td> 52 <td> 53 <button class="btn btn-success editBtn">编辑</button> 54 <button class="btn btn-danger delBtn">删除</button> 55 </td> 56 </tr> 57 </tbody> 58 </table> 59 </div> 60 </div> 61 </div> 62 63 64 <!-- Modal模态框 --> 65 <div class="modal fade" id="myModal" tabindex="-1" role="dialog" aria-labelledby="myModalLabel"> 66 <div class="modal-dialog" role="document"> 67 <div class="modal-content"> 68 <div class="modal-header"> 69 <button type="button" class="close" data-dismiss="modal" aria-label="Close"><span aria-hidden="true">×</span> 70 </button> 71 <h4 class="modal-title" id="myModalLabel">Modal title</h4> 72 </div> 73 <div class="modal-body"> 74 <form> 75 <div class="form-group"> 76 <label for="username">姓名</label> 77 <input type="text" class="form-control item" id="username" placeholder="username"> 78 </div> 79 <div class="form-group"> 80 <label for="age">年龄</label> 81 <input type="text" class="form-control item" id="age" placeholder="age"> 82 </div> 83 <div class="form-group"> 84 <label for="gender">性别</label> 85 <input type="text" class="form-control item" id="gender" placeholder="gender"> 86 </div> 87 </form> 88 </div> 89 <div class="modal-footer"> 90 <button type="button" class="btn btn-default" data-dismiss="modal">Close</button> 91 <button type="button" class="btn btn-primary queding">确定</button> 92 </div> 93 </div> 94 </div> 95 </div> 96 <script src="jquery-3.2.1.min.js"></script> 97 <script src="bootstrap-3.3.7-dist/js/bootstrap.min.js"></script> 98 <script> 99 //添加信息 100 $(".queding").on("click",function () { 101 arr=[]; 102 $(".item").each(function () { 103 // console.log($(this).val()) //返回的是input框里面输入的内容 104 var ele_v = $(this).val(); 105 arr.push(ele_v); //吧拿到的值添加到数组 106 }); 107 var s =\'<tr><td>\'+arr[0]+\'</td><td>\'+arr[1]+\'</td><td>\'+arr[2]+\'</td><td><button class="btn btn-success editBtn">编辑</button><button class="btn btn-danger delBtn">删除</button></td></tr>\'; 108 $("tbody").append(s); 109 $("#myModal").modal("hide") 110 }); 111 112 //删除信息 113 // 方式一 114 $("tbody").on("click",".delBtn",function (e) { //事件委派 115 if (e.target.className==\'btn btn-danger delBtn\'){ 116 //找到要删除的行 117 // console.log(e.target.parentElement.parentElement); 118 e.target.parentElement.parentElement.remove() 119 } 120 }); 121 122 // 方式二 123 $("tbody").on("click",".delBtn",function () { //事件委派 124 $(this).parent().parent().remove() //这里的 125 }); 126 127 //编辑信息 128 129 $("tbody").on("click",".editBtn",function () { 130 var tds = $(this).parent().prevAll(); 131 tds.each(function () { 132 $(this).html(\'<input type="text" value=\'+ $(this).text()+ \'>\') 133 }); 134 135 $(this).text("保存"); 136 $(this).removeClass("btn btn-success editBtn"); 137 $(this).addClass("btn btn-info saveBtn") 138 }); 139 140 $("tbody").on("click",".saveBtn",function () { 141 var tds = $(this).parent().prevAll(); 142 console.log(tds); 143 tds.each(function (){ 144 // $(this).text(this.firstElementChild.value); 145 $(this).text($(this).children().first().val()); 146 console.log() 147 }); 148 $(this).text("编辑"); 149 $(this).removeClass("btn btn-info saveBtn"); 150 $(this).addClass("btn btn-success editBtn"); 151 }); 152 153 154 </script> 155 </body> 156 </html>
第二种:点击编辑有模态框
1 <!DOCTYPE html> 2 <!-- saved from url=(0041)http://v3.bootcss.com/examples/dashboard/ --> 3 <html lang="zh-CN"> 4 <head> 5 <meta http-equiv="Content-Type" content="text/html; charset=UTF-8"> 6 7 <meta http-equiv="X-UA-Compatible" content="IE=edge"> 8 <meta name="viewport" content="width=device-width, initial-scale=1"> 9 <!-- 上述3个meta标签*必须*放在最前面,任何其他内容都*必须*跟随其后! --> 10 <meta name="description" content=""> 11 <meta name="author" content=""> 12 <link rel="icon" href="http://v3.bootcss.com/favicon.ico"> 13 14 <title>Dashboard Template for Bootstrap</title> 15 16 <!-- Bootstrap core CSS --> 17 <link href="./Dashboard_files/bootstrap.min.css" rel="stylesheet"> 18 19 <!-- IE10 viewport hack for Surface/desktop Windows 8 bug --> 20 <link href="./Dashboard_files/ie10-viewport-bug-workaround.css" rel="stylesheet"> 21 22 <!-- Custom styles for this template --> 23 <link href="./Dashboard_files/dashboard.css" rel="stylesheet"> 24 25 <!-- Just for debugging purposes. Don\'t actually copy these 2 lines! --> 26 <!--[if lt IE 9]> 27 <script src="../../assets/js/ie8-responsive-file-warning.js"></script><![endif]--> 28 <script src="Dashboard_files/ie-emulation-modes-warning.js"></script> 29 30 <!-- HTML5 shim and Respond.js for IE8 support of HTML5 elements and media queries --> 31 <!--[if lt IE 9]> 32 //cdn导入css样式 33 <script src="https://cdn.bootcss.com/html5shiv/3.7.3/html5shiv.min.js"></script> 34 <script src="https://cdn.bootcss.com/respond.js/1.4.2/respond.min.js"></script> 35 <![endif] 36 <!--<link rel="stylesheet" href="bootstrap-3.3.7-dist/css/bootstrap.min.css">--> 37 38 39 <style> 40 .menu { 41 margin: 0 -20px; 42 border-bottom: 1px solid #336699; 43 } 44 45 .head { 46 padding: 15px; 47 } 48 49 .my-table-tool { 50 margin-bottom: 15px; 51 } 52 53 .menu .nav-sidebar > li > a { 54 padding-right: 40px; 55 padding-left: 40px; 56以上是关于python实战——网络爬虫之request的主要内容,如果未能解决你的问题,请参考以下文章