[SDR] GNU Radio 系列教程(十四) —— GNU Radio 低阶到高阶用法的分水岭 ZMQ 的使用详解
Posted beautifulzzzz
tags:
篇首语:本文由小常识网(cha138.com)小编为大家整理,主要介绍了[SDR] GNU Radio 系列教程(十四) —— GNU Radio 低阶到高阶用法的分水岭 ZMQ 的使用详解相关的知识,希望对你有一定的参考价值。
1、前言
学会使用 GNU Radio 中的 ZMQ,是从低阶使用者向高阶迈进的第一步!
因为学会了 ZMQ,就可以将 GNU Radio 中的实时数据流通过 socket 引到外面的 python/c 等大型应用程序中,做数据分析、展示、人工智能等。
来自 ZeroMQ 官方介绍:ZeroMQ (0MQ, ZMQ),看起来像是一个可嵌入的网络库,同时起到了并发框架的作用。它为您提供了在进程内、进程间、TCP和多播等各种传输中承载原子消息的 socket 。
2、ZMQ 块的类型
| SINK | SOURCE | 特征 |
|---|---|---|
| PUB | SUB | 广播,可一对多 |
| PUSH | PULL | 点播,点对点对等网络 |
| REQ | REP | 点对点链路,一个请求一个回复,类似客户端服务器 |
Data Blocks:
ZMQ data blocks 传输原始流数据;没有格式化。数据类型和采样率由馈送 ZMQSink 的流程图确定。因此,接收数据的流程图或程序必须知道这些参数,以便正确地解释数据。
Message Blocks
不像普通的 ZeroMQ 字符串,GNU Radio ZMQ Message Blocks 使用 PMT 对数据进行编码和解码。
3、ZMQ 块的使用
- ZMQ 块的用户应该对ZeroMQ有一些熟悉。特别是,应该认识到ZMQ套接字和BSD套接字之间的区别。有关概述,请参阅 ZMQ Socket API。
- ZMQ 块使用 endpoints 来描述 ZMQ 应该如何传递数据。常见 endpoints 使用 TCP 传输数据,当然也可以采用其他协议。想要了解不同协议的 endpoints,可以参阅
zmq_tcp和zmq_ipc。 - 可以在49152–65535范围内分配专用端口。
- 不建议在单个流程图中使用ZMQ块,因为
Virtual_Source和Virtual_Sink块的效率要高得多。
TCP Bind vs Connect
一些用户可能会想直接连接到GNU Radio ZMQ Blocks。虽然这是可能的,但需要谨慎。
首先要注意,在任何拓扑中,必须有一个到给定端点的绑定,而可能有多个到同一端点的连接。(A-B 之间绑定一次,可能会出现多个连接)
在 GNU Radio 中,stream sinks bind and stream sources connect。Message blocks 取决于参数设置。
还要注意:TCP端点的语义在绑定和连接之间有所不同。
TCP Bind
当绑定一个 TCP 端点时,您可以指定要侦听的连接点。
如果您指定了一个IP地址,则说明 socket 只接受与该地址相关联的网络上的连接(例如:127.0.0.1 or 192.168.1.123)
在某些情况下,您可能希望在连接到节点的所有网络上进行侦听。对于 GNU Radio,您应该使用 0.0.0.0 作为通配符地址;尽管 ZMQ 接受 * 作为通配符,但它并不是在所有情况下都能很好地工作。因此,您可以选择绑定到 tcp://0.0.0.0:54321
请注意,如果您没有输入IP地址,bind 会将该值视为网络适配器名称(例如 eth0)。详细信息参阅:zmq_tcp
TCP Connect
连接 TCP 端点时,您可以指定要连接的远程端点。您可以指定 IP 地址或 DNS 可解析名称。
Wire Format
ZMQ stream blocks 具有传递标记的选项。此外,PUB/SUB块支持过滤。这两个选项都会影响 ZMQ-wire 协议。
当过滤器字符串被提供给 PUB/SUB 块时,GNU Radio 使用多部分消息来发送过滤器字符串,然后是有效载荷。尝试与 GNU Radio ZMQ 块接口的非 GNU 无线电代码必须为此部分准备好,并将其丢弃。请注意,只有在指定了非空筛选器的情况下,发送方才会发送此消息部分。
接下来,如果启用了发送标签,则要发送的数据窗口内的任何标签都将以特殊格式编码,并在有效载荷数据之前进行预处理。如果未启用标记,则会忽略此标头。
这两个特征使得发送器配置与接收器配置的匹配变得至关重要。否则将导致流程图中出现运行时错误。
4、DEMO
4.1 同一台电脑上的两个流程图
在同一个电脑上时,localhost 的 IP 地址应为 127.0.0.1。它的开销比完整的IP要小。
下面使用 PUB/SUB 的流程图来自 Simulation_example:_AM_transmitter_and_receiver:
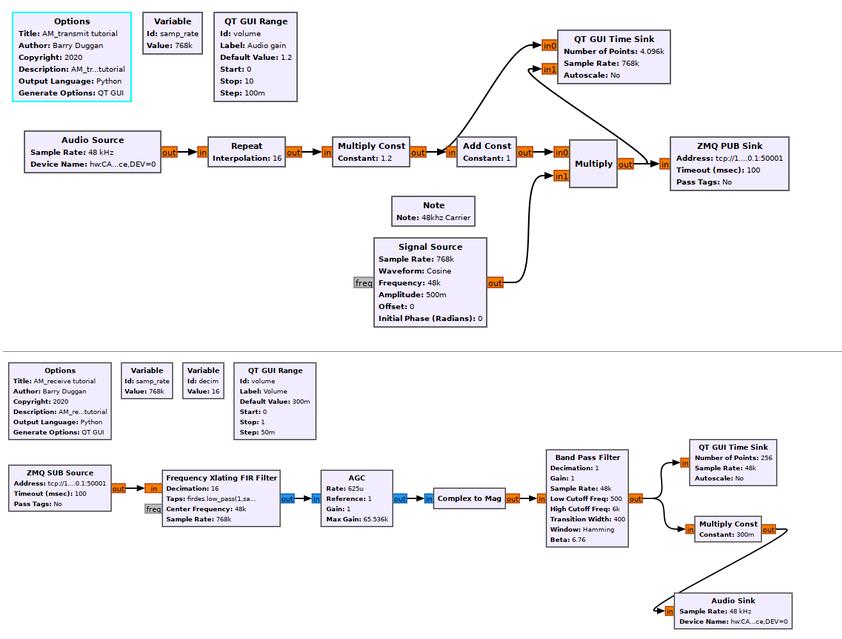
这个流程图我也在 B 站上面有详细的视频介绍:GNU Radio 系列教程(十二)-- 窄带 FM 收发系统(基于ZMQ模拟射频发送)
4.2 不同电脑上的两个流程图
在不同电脑上时,则必须在该连接的每一端指定接收块(sink block) 的 IP 和端口号。例如,如果 Sink 位于 IP 192.168.1.194:50241,Source 位于 IP 192.168.1.85,则 Source 和 Sink 块都必须指定 Sink IP 和端口 192.168.1.194:00241。
4.3 作为 REQ/REP 服务器的 Python 程序
下面的 Python 程序在其 REQ socket 上接收字符串消息,将文字变成大写,然后在其 REP socket 上发送出去。术语在这里变得混乱,因为传入的 REQ 来自 GR ZMQ_REP_Message_Sink,并返回到 ZMQ_REQ_Message_Source。
只需记住: sink 是流程图的终点,source 是流程图的起点。
#!/usr/bin/python3
# -*- coding: utf-8 -*-

# zmq_REQ_REP_server.py

# This server program capitalizes received strings and returns them.
# NOTES:
#   1) To comply with the GNU Radio view, messages are received on the REQ socket and sent on the REP socket.
#   2) The REQ and REP messages must be on separate port numbers.

import pmt
import zmq

_debug = 0          # set to zero to turn off diagnostics

# create a REQ socket
_PROTOCOL = "tcp://"
_SERVER = "127.0.0.1"          # localhost
_REQ_PORT = ":50246"
_REQ_ADDR = _PROTOCOL + _SERVER + _REQ_PORT
if (_debug):
    print ("\'zmq_REQ_REP_server\' version 20056.1 connecting to:", _REQ_ADDR)
req_context = zmq.Context()
if (_debug):
    assert (req_context)
req_sock = req_context.socket (zmq.REQ)
if (_debug):
    assert (req_sock)
rc = req_sock.connect (_REQ_ADDR)
if (_debug):
    assert (rc == None)

# create a REP socket
_PROTOCOL = "tcp://"
_SERVER = "127.0.0.1"          # localhost
_REP_PORT = ":50247"
_REP_ADDR = _PROTOCOL + _SERVER + _REP_PORT
if (_debug):
    print ("\'zmq_REQ_REP_server\' version 20056.1 binding to:", _REP_ADDR)
rep_context = zmq.Context()
if (_debug):
    assert (rep_context)
rep_sock = rep_context.socket (zmq.REP)
if (_debug):
    assert (rep_sock)
rc = rep_sock.bind (_REP_ADDR)
if (_debug):
    assert (rc == None)

while True:
    #  Wait for next request from client
    data = req_sock.recv()
    message = pmt.to_python(pmt.deserialize_str(data))
    print("Received request: %s" % message)

    output = message.upper()

    #  Send reply back to client
    rep_sock.send (pmt.serialize_str(pmt.to_pmt(output)))
安装 NetCat:方便我们测试 TCP
-《NetCat使用指南》
-《Sending TCP/UDP packets using Netcat》
-《Simple client / server with nc not working》
注意,这鬼软件有好几个不同的软件,我用的是 openbsd-netcat
sudo pacman -S openbsd-netcat
上面代码:
| kind | port | method | func | C/S |
|---|---|---|---|---|
| REQ | 50246 | connect | recv() | server |
| REP | 50247 | bind | send() | client |
while 循环中用 REQ 等待接收,然后转为大写,用 REP 发送出去:(比较坑的是,我用 netcat 建立 tcp 服务器和客户端,无法与上面 python 脚本通信,似乎一启动,建立连接,server 就异常退出了,最终还是得用 GNN Radio 开启两个 ZMQ 工程,然后与这个 python 脚本通信,整体信息流如下:)

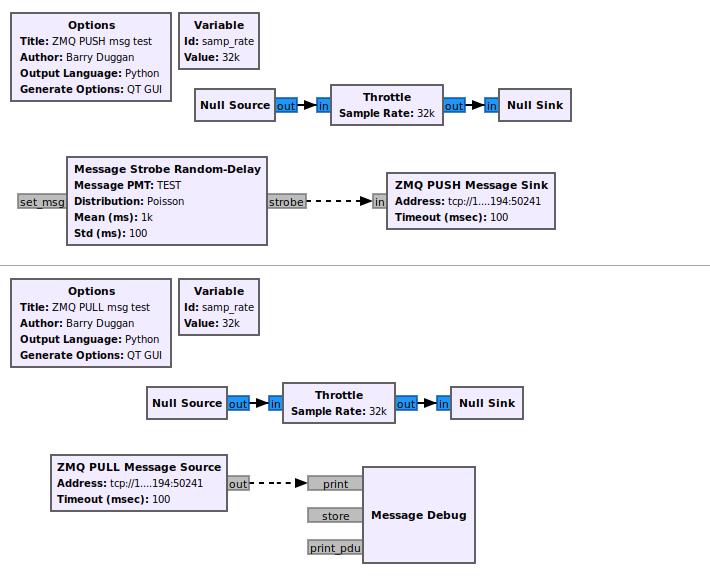
4.4 作为 PUSH/PULL 服务器的 Python 程序
与上面 demo 类似,是基于 PUSH/PULL 传递消息。
#!/usr/bin/python3
# -*- coding: utf-8 -*-

# zmq_PUSH_PULL_server.py

import sys
import pmt
import zmq

_debug = 0          # set to zero to turn off diagnostics

# create a PUSH socket
_PROTOCOL = "tcp://"
_SERVER = "127.0.0.1"          # localhost
_PUSH_PORT = ":50252"
_PUSH_ADDR = _PROTOCOL + _SERVER + _PUSH_PORT
if (_debug):
    print ("\'zmq_PUSH_PULL_server\' version 20068.1 binding to:", _PUSH_ADDR)
push_context = zmq.Context()
if (_debug):
    assert (push_context)
push_sock = push_context.socket (zmq.PUSH)
if (_debug):
    assert (push_sock)
rc = push_sock.bind (_PUSH_ADDR)
if (_debug):
    assert (rc == None)

# create a PULL socket
_PROTOCOL = "tcp://"
_SERVER = "127.0.0.1"          # localhost
_PULL_PORT = ":50251"
_PULL_ADDR = _PROTOCOL + _SERVER + _PULL_PORT
if (_debug):
    print ("\'zmq_PUSH_PULL_server\' connecting to:", _PULL_ADDR)
pull_context = zmq.Context()
if (_debug):
    assert (pull_context)
pull_sock = pull_context.socket (zmq.PULL)
if (_debug):
    assert (pull_sock)
rc = pull_sock.connect (_PULL_ADDR)
if (_debug):
    assert (rc == None)

while True:
    #  Wait for next request from client
    data = pull_sock.recv()
    message = pmt.to_python(pmt.deserialize_str(data))
    # print("Received request: %s" % message)

    output = message.upper()    # capitalize message

    #  Send reply back to client
    push_sock.send (pmt.serialize_str(pmt.to_pmt(output)))
4.5 处理流程图数据的 Python 程序
个 demo 是几乎贯穿后面 GNU Radio 高阶用法的最重要的 DEMO。 因为,通常情况下我们会使用 GNU Radio 进行信号处理,但希望数据流流入普通 python 程序,然后做丰富的数据分析等逻辑。这里,PUB 和 PUSH 可以让应用程序获得这些数据流。(这里我们将 127.0.0.1 换成了 *,这样能够让同一局域网内的设备都能访问)
一般的,流程图中采用 PUB/PUSH Sink,将数据送出:
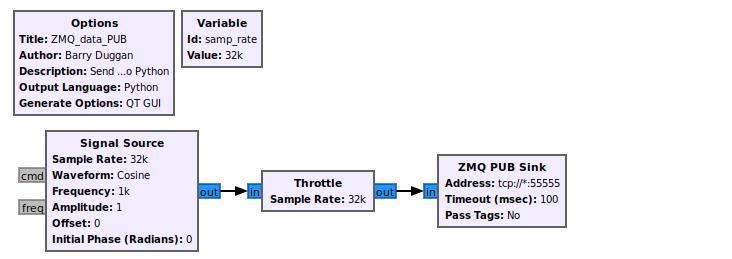
然后,普通 python 脚本就可以对其进行 recv:
#!/usr/bin/python3
# -*- coding: utf-8 -*-

# zmq_SUB_proc.py
# Author: Marc Lichtman

import zmq
import numpy as np
import time
import matplotlib.pyplot as plt

context = zmq.Context()
socket = context.socket(zmq.SUB)
socket.connect("tcp://127.0.0.1:55555") # connect, not bind, the PUB will bind, only 1 can bind
socket.setsockopt(zmq.SUBSCRIBE, b\'\') # subscribe to topic of all (needed or else it won\'t work)

while True:
    if socket.poll(10) != 0: # check if there is a message on the socket
        msg = socket.recv() # grab the message
        print(len(msg)) # size of msg
        data = np.frombuffer(msg, dtype=np.complex64, count=-1) # make sure to use correct data type (complex64 or float32); \'-1\' means read all data in the buffer
        print(data[0:10])
        # plt.plot(np.real(data))
        # plt.plot(np.imag(data))
        # plt.show()
    else:
        time.sleep(0.1) # wait 100ms and try again
参考链接
[1]. GNU Radio 系列教程(一) —— 什么是 GNU Radio
[2]. GNU Radio 系列教程(二) —— 绘制第一个信号分析流程图
[3]. GNU Radio 系列教程(三) —— 变量的使用
[4]. GNU Radio 系列教程(四) —— 比特的打包与解包
[5]. GNU Radio 系列教程(五) —— 流和向量
[6]. GNU Radio 系列教程(六) —— 基于层创建自己的块
[7]. GNU Radio 系列教程(七)—— 创建第一个块
[8]. GNU Radio 系列教程(八)—— 创建能处理向量的 Python 块
[9]. GNU Radio 系列教程(九)—— Python 块的消息传递
[10]. GNU Radio 系列教程(十)—— Python 块的 Tags
[11]. GNU Radio 系列教程(十一)—— 低通滤波器
[12]. GNU Radio 系列教程(十二)—— 窄带 FM 收发系统(基于ZMQ模拟射频发送)
[13]. GNU Radio 系列教程(十三)—— 用两个 HackRF 实现 FM 收发
[14]. SDR 教程实战 —— 利用 GNU Radio + HackRF 做 FM 收音机
[15]. SDR 教程实战 —— 利用 GNU Radio + HackRF 做蓝牙定频测试工具(超低成本)
: 如果觉得不错,帮忙点个支持哈~

Ubuntu18.04离线安装UHD + GNU Radio
2020-04-16
此教程专为Ubuntu系统中没有网或网速较慢时安装UHD + GRC。
主要过程是先在win10下网络情况较好,下载好需要用到的依赖包及安装包,然后再去ubuntu系统下安装即可。
本页总结了设置UHD和GNU Radio的脱机安装所涉及的分步过程。
前期准备
在win10下安装一个Ubuntu的虚拟机,在虚拟机中先下载好需要用到的依赖包和安装包。
安装虚拟机并在虚拟机上安装Ubuntu18.04系统
此过程不赘述,自行百度即可。
下载依赖包及安装包
在新的虚拟机Ubuntu下执行:
sudo apt clean
# 确保在/var/cache.apt/archives下没有安装包:
ls -al /var/cache.apt/archives
下载依赖包:
在虚拟机中打开终端:
sudo apt-get --download-only install git swig cmake doxygen build-essential libboost-all-dev libtool libusb-1.0-0 libusb-1.0-0-dev libudev-dev libncurses5-dev libfftw3-bin libfftw3-dev libfftw3-doc libcppunit-1.14-0 libcppunit-dev libcppunit-doc ncurses-bin cpufrequtils python-numpy python-numpy-doc python-numpy-dbg python-scipy python-docutils qt4-bin-dbg qt4-default qt4-doc libqt4-dev libqt4-dev-bin python-qt4 python-qt4-dbg python-qt4-dev python-qt4-doc python-qt4-doc libqwt6abi1 libfftw3-bin libfftw3-dev libfftw3-doc ncurses-bin libncurses5 libncurses5-dev libncurses5-dbg libfontconfig1-dev libxrender-dev libpulse-dev swig g++ automake autoconf libtool python-dev libfftw3-dev libcppunit-dev libboost-all-dev libusb-dev libusb-1.0-0-dev fort77 libsdl1.2-dev python-wxgtk3.0 git libqt4-dev python-numpy ccache python-opengl libgsl-dev python-cheetah python-mako python-lxml doxygen qt4-default qt4-dev-tools libusb-1.0-0-dev libqwtplot3d-qt5-dev pyqt4-dev-tools python-qwt5-qt4 cmake git wget libxi-dev gtk2-engines-pixbuf r-base-dev python-tk liborc-0.4-0 liborc-0.4-dev libasound2-dev python-gtk2 libzmq3-dev libzmq5 python-requests python-sphinx libcomedi-dev python-zmq libqwt-dev libqwt6abi1 python-six libgps-dev libgps23 gpsd gpsd-clients python-gps python-setuptools screen sshfs
在虚拟机终端中输入:
$ mkdir -p ~/offline
$ mkdir -p ~/offline/debs
$ mkdir -p ~/offline/src
将刚刚下载的.deb安装包移动到*~/offline/debs文件夹下:
$ cd ~/offline/debs
$ cp -v /var/cache/apt/archives/*.deb .
clone UHD和GNU Radio源文件:
clone时需要用到git命令,先下载git命令,再clone源文件:
$ sudo apt install git
# Then you can clone the UHD and GNU Radio repositories:
$ cd ~/offline/src
$ git clone --recursive https://github.com/EttusResearch/uhd
$ git clone --recursive https://github.com/gnuradio/gnuradio
# Optionally, if you‘re using RFNoC, fetch gr-ettus:
$ git clone https://github.com/EttusResearch/gr-ettus.git
压缩offline文件夹
$ cd ~/
$ tar zcvf offline.tgz offline/
把压缩包复制到离线环境中去,安装时候使用。
在离线环境中安装
重新配置默认Shell
将主机上的默认Shell从Dash切换到Bash。在某些Linux发行版中(例如Ubuntu),Dash设置为默认外壳程序,这可能会导致一些问题。 建议通过在终端中运行以下命令将shell设置为Bash。 在第一个命令提示时选择“No”,第二个命令将验证将使用Bash。
$ sudo dpkg-reconfigure dash
# Verify Bash is the default shell.
$ ll /bin/sh
# Expected Output:
# lrwxrwxrwx 1 root root 4 Apr 2 22:00 /bin/sh -> bash*
解压缩安装源
$ tar zxvf offline.tgz
注意:本教程中默认解压后的路径为~/offline/。如果你解压到别的地方,下文中相应的位置也要改变。
安装DEB安装包
$ cd ~/offline/debs
$ sudo dpkg -i *.deb
当有些安装包安装失败时,重新执行:
$ sudo dpkg -i *.deb
安装UHD
$ cd ~/offline/src/uhd
选择uhd版本:
# Example for UHD 3.9.5:
$ git checkout release_003_009_005
# or example for UHD 3.13.0.2:
$ git checkout v3.13.0.2
在签出带标签的分支后更新git子模块:
$ git submodule update
最后build UHD
$ cd host
$ mkdir build
$ cd build
$ cmake ../
$ make -j4
$ sudo make install
$ sudo ldconfig
配置USB
在Linux上,udev处理USB插拔事件。以下命令将安装udev规则,以便非root用户可以访问设备。仅对于使用USB连接到主机的设备(例如B200,B210和B205mini),才需要执行此步骤。此设置应立即生效,不需要重新启动或注销/登录。运行这些命令时,请确保没有通过USB连接USRP设备。
cd ~/offline/src/uhd/host/utils
sudo cp uhd-usrp.rules /etc/udev/rules.d/
sudo udevadm control --reload-rules
sudo udevadm trigger
配置线程优先级
当UHD产生新线程时,它可能会尝试提高线程的调度优先级。如果设置新的优先级失败,UHD软件将向控制台打印警告,如下所示。该警告是无害的。它只是意味着线程将保留正常或默认的调度优先级。
UHD Warning:
Unable to set the thread priority. Performance may be negatively affected.
Please see the general application notes in the manual for instructions.
EnvironmentError: OSError: error in pthread_setschedparam
要解决此问题,需要为非特权(非root)用户授予特殊权限以更改计划优先级。
为此,首先创建一个Linux组usrp:
sudo groupadd usrp
添加你的用户到这个组里:
sudo usermod -aG usrp $USER
在/etc/security/limits.conf文件的末尾添加:
@usrp - rtprio 99
Build GNU Radio
$ cd ~/offline/src/gnuradio
选择GNU Radio版本:
$ git checkout v3.7.10.2
# or
$ git checkout v3.7.13.4
更新子模块:
$ git submodule update
最后build GNU Radio:
$ mkdir build
$ cd build
$ cmake ../
$ make -j4
$ sudo make install
$ sudo ldconfig
提取UHD FPGA images
现在,您需要为UHD安装下载相应的FPGA images。
识别要下载的FPGA映像包
运行命令(在离线计算机上):
对于<3.11.x.x的UHD版本,它将打印出要下载到输出中的FPGA图像的确切URL。
$ uhd_images_downloader
$ sudo uhd_images_downloader
Images destination: /usr/local/share/uhd/images
Downloading images from: http://files.ettus.com/binaries/images/uhd-images_003.009.005-release.zip
Downloading images to: /tmp/tmpySQA9q/uhdimages_003.009.005-release.zip
Downloader raised an unhandled exception:HTTPConnectionPool(host=‘files.ettus.com‘, port=80): Max retries exceeded with url:/binaries/images/uhd-images_003.009.005-release.zip (Caused by NewConnectionError(‘<requests.packages.urllib3.connection.HTTPConnection object at 0x7f207225fe90>: Failed to establish a new connection: [Errno -3] Temporary failure in name resolution‘,))
You can run this again with the ‘--verbose‘ flag to see more information
If the problem persists, please email the output to: support@ettus.com
对于UHD版本>3.11.x.x,您将需要附加命令行参数-l列出目标:
$ sudo uhd_images_downloader -l
[INFO] Images destination: /usr/local/share/uhd/images
[INFO] Potential targets in manifest file:
TARGET:RELATIVE_URL
b2xx_b200_fpga_default : b2xx/fpga-494ae8bb/b2xx_b200_fpga_default-g494ae8bb.zip
b2xx_b200mini_fpga_default : b2xx/fpga-494ae8bb/b2xx_b200mini_fpga_default-g494ae8bb.zip
b2xx_b205mini_fpga_default : b2xx/fpga-494ae8bb/b2xx_b205mini_fpga_default-g494ae8bb.zip
b2xx_b210_fpga_default : b2xx/fpga-494ae8bb/b2xx_b210_fpga_default-g494ae8bb.zip
b2xx_common_fw_default : b2xx/uhd-3ff4186b/b2xx_common_fw_default-g3ff4186b.zip
e3xx_e310_fpga_default : e3xx/fpga-494ae8bb/e3xx_e310_fpga_default-g494ae8bb.zip
e3xx_e310_fpga_rfnoc : e3xx/fpgad6a878b/e3xx_e310_fpga_rfnoc-gd6a878b.zip
e3xx_e320_fpga_aurora : e3xx/fpga-494ae8bb/e3xx_e320_fpga_aurora-g494ae8bb.zip
e3xx_e320_fpga_default : e3xx/fpga-494ae8bb/e3xx_e320_fpga_default-g494ae8bb.zip
e3xx_e320_mender_default : e3xx/meta-ettusv3.13.1.0/e3xx_e320_mender_default-v3.13.1.0.zip
e3xx_e320_sdimg_default : e3xx/meta-ettusv3.13.1.0/e3xx_e320_sdimg_default-v3.13.1.0.zip
e3xx_e320_sdk_default : e3xx/meta-ettusv3.13.1.0/e3xx_e320_sdk_default-v3.13.1.0.zip
n230_n230_fpga_default : n230/fpga-494ae8bb/n230_n230_fpga_default-g494ae8bb.zip
n3xx_common_mender_default : n3xx/meta-ettusv3.13.1.0/n3xx_common_mender_defaultv3.13.1.0.zip
n3xx_common_sdimg_default : n3xx/meta-ettusv3.13.1.0/n3xx_common_sdimg_default-v3.13.1.0.zip
n3xx_common_sdk_default : n3xx/meta-ettusv3.13.1.0/n3xx_common_sdk_default-v3.13.1.0.zip
n3xx_n300_fpga_default : n3xx/fpga-494ae8bb/n3xx_n300_fpga_default-g494ae8bb.zip
n3xx_n310_fpga_default : n3xx/fpga-494ae8bb/n3xx_n310_fpga_default-g494ae8bb.zip
octoclock_octoclock_fw_default : octoclock/uhd-14000041/octoclock_octoclock_fw_defaultg14000041.zip
usb_common_windrv_default : usb/uhd-14000041/usb_common_windrv_default-g14000041.zip
usrp1_b100_fpga_default : usrp1/fpga-6bea23d/usrp1_b100_fpga_default-g6bea23d.zip
usrp1_b100_fw_default : usrp1/fpga-6bea23d/usrp1_b100_fw_default-g6bea23d.zip
usrp1_usrp1_fpga_default : usrp1/fpga-6bea23d/usrp1_usrp1_fpga_default-g6bea23d.zip
usrp2_n200_fpga_default : usrp2/fpga-6bea23d/usrp2_n200_fpga_default-g6bea23d.zip
usrp2_n200_fw_default : usrp2/fpga-6bea23d/usrp2_n200_fw_default-g6bea23d.zip
usrp2_n210_fpga_default : usrp2/fpga-6bea23d/usrp2_n210_fpga_default-g6bea23d.zip
usrp2_n210_fw_default : usrp2/fpga-6bea23d/usrp2_n210_fw_default-g6bea23d.zip
usrp2_usrp2_fpga_default : usrp2/fpga-6bea23d/usrp2_usrp2_fpga_default-g6bea23d.zip
usrp2_usrp2_fw_default : usrp2/fpga-6bea23d/usrp2_usrp2_fw_default-g6bea23d.zip
x3xx_x300_fpga_default : x3xx/fpga-494ae8bb/x3xx_x300_fpga_default-g494ae8bb.zip
x3xx_x310_fpga_default : x3xx/fpga-494ae8bb/x3xx_x310_fpga_default-g494ae8bb.zip
注意:上面的示例使用UHD3.13.0.2,RELATIVE_URL值将针对不同的UHD版本而更改。
将设备的RELATIVE_URL值附加到以下URL:
http://files.ettus.com/binaries/cache/
例如,用于X310的FPGA映像将位于:
http://files.ettus.com/binaries/cache/x3xx/fpga-494ae8bb/x3xx_x310_fpga_defaultg494ae8bb.zip
对于UHD版本>=3.13.1.0,可以使用命令行选项--list-targets --url-only可打印出以下网址 FPGA软件包:
$ uhd_images_downloader --url-only --list-targets
[INFO] Images destination: /usr/local/share/uhd/images
http://files.ettus.com/binaries/cache/usrp1/fpga-6bea23d/usrp1_b100_fw_default-g6bea23d.zip
http://files.ettus.com/binaries/cache/x3xx/fpgad0360f7/x3xx_x310_fpga_default-gd0360f7.zip
http://files.ettus.com/binaries/cache/usrp2/fpga-6bea23d/usrp2_n210_fpga_default-g6bea23d.zip
http://files.ettus.com/binaries/cache/n230/fpgad0360f7/n230_n230_fpga_default-gd0360f7.zip
http://files.ettus.com/binaries/cache/n3xx/fpga-494ae8bb/n3xx_n300_fpga_aurora-g494ae8bb.zip
http://files.ettus.com/binaries/cache/usrp1/fpga-6bea23d/usrp1_b100_fpga_default-g6bea23d.zip
http://files.ettus.com/binaries/cache/e3xx/fpga-494ae8bb/e3xx_e320_fpga_aurora-g494ae8bb.zip
http://files.ettus.com/binaries/cache/e3xx/metaettus-v3.13.1.0/e3xx_e320_sdk_defaultv3.13.1.0.zip
http://files.ettus.com/binaries/cache/b2xx/fpgad0360f7/b2xx_b200_fpga_default-gd0360f7.zip
http://files.ettus.com/binaries/cache/usrp2/fpga-6bea23d/usrp2_n200_fpga_default-g6bea23d.zip
http://files.ettus.com/binaries/cache/e3xx/fpgad0360f7/e3xx_e320_fpga_default-gd0360f7.zip
http://files.ettus.com/binaries/cache/n3xx/fpgad0360f7/n3xx_n310_fpga_default-gd0360f7.zip
http://files.ettus.com/binaries/cache/b2xx/fpgad0360f7/b2xx_b205mini_fpga_default-gd0360f7.zip
http://files.ettus.com/binaries/cache/x3xx/fpgad0360f7/x3xx_x300_fpga_default-gd0360f7.zip
http://files.ettus.com/binaries/cache/octoclock/uhd-14000041/octoclock_octoclock_fw_defaultg14000041.zip
http://files.ettus.com/binaries/cache/e3xx/metaettus-v3.13.1.0/e3xx_e320_sdimg_defaultv3.13.1.0.zip
http://files.ettus.com/binaries/cache/n3xx/fpga-6bea23d/n3xx_n310_cpld_default-g6bea23d.zip
http://files.ettus.com/binaries/cache/usrp2/fpga-6bea23d/usrp2_usrp2_fw_default-g6bea23d.zip
http://files.ettus.com/binaries/cache/usrp2/fpga-6bea23d/usrp2_n200_fw_default-g6bea23d.zip
http://files.ettus.com/binaries/cache/usrp2/fpga-6bea23d/usrp2_usrp2_fpga_default-g6bea23d.zip
http://files.ettus.com/binaries/cache/b2xx/uhd-3ff4186b/b2xx_common_fw_default-g3ff4186b.zip
http://files.ettus.com/binaries/cache/n3xx/fpga-494ae8bb/n3xx_n310_fpga_aurora-g494ae8bb.zip
http://files.ettus.com/binaries/cache/b2xx/fpgad0360f7/b2xx_b200mini_fpga_default-gd0360f7.zip
http://files.ettus.com/binaries/cache/usrp1/fpga-6bea23d/usrp1_usrp1_fpga_default-g6bea23d.zip
http://files.ettus.com/binaries/cache/n3xx/metaettus-v3.13.1.0/n3xx_common_mender_defaultv3.13.1.0.zip
http://files.ettus.com/binaries/cache/e3xx/metaettus-v3.13.1.0/e3xx_e320_mender_defaultv3.13.1.0.zip
http://files.ettus.com/binaries/cache/usb/uhd-14000041/usb_common_windrv_default-g14000041.zip
http://files.ettus.com/binaries/cache/e3xx/fpgad6a878b/e3xx_e310_fpga_rfnoc-gd6a878b.zip
http://files.ettus.com/binaries/cache/usrp2/fpga-6bea23d/usrp2_n210_fw_default-g6bea23d.zip
http://files.ettus.com/binaries/cache/n3xx/fpgad0360f7/n3xx_n300_fpga_default-gd0360f7.zip
http://files.ettus.com/binaries/cache/n3xx/metaettus-v3.13.1.0/n3xx_common_sdk_defaultv3.13.1.0.zip
http://files.ettus.com/binaries/cache/e3xx/fpgad0360f7/e3xx_e310_fpga_default-gd0360f7.zip
http://files.ettus.com/binaries/cache/b2xx/fpgad0360f7/b2xx_b210_fpga_default-gd0360f7.zip
http://files.ettus.com/binaries/cache/n3xx/metaettus-v3.13.1.0/n3xx_common_sdimg_defaultv3.13.1.0.zip
在连接了互联网的主机上,使用wget获取FPGA映像:
#Example for<UHD 3.11.x.x:
$ wget http://files.ettus.com/binaries/images/uhd-images_003.009.005-release.zip
#Example for>UHD 3.11.x.x.
$ wget http://files.ettus.com/binaries/cache/x3xx/fpga-494ae8bb/x3xx_x310_fpga_defaultg494ae8bb.zip
将下载的ZIP文件传输到您的离线环境。
Installing the FPGA Images to the UHD Images Directory
在~/offline目录中创建一个名为fpga_images的文件夹。该目录名称是任意的,并且仅在以下步骤中用作参考。将包含FPGA映像的zip文件放入此目录,然后解压缩。
解压到同一个文件夹下:
mkdir ~/images #最后解压完的文件都在这里
cd fpga_images
unzip -o ‘*.zip‘ -d ~/images
接下来,在UHD安装前缀中创建images/文件夹。
 cd /usr/local/share/uhd/
 mkdir images
 cd images
将上面解压缩的FPGA映像复制到对应的位置。
sudo cp -v ~/images/* .
参考链接:
Building and Installing UHD and GNU Radio in an Offline Environment
以上是关于[SDR] GNU Radio 系列教程(十四) —— GNU Radio 低阶到高阶用法的分水岭 ZMQ 的使用详解的主要内容,如果未能解决你的问题,请参考以下文章