cesium高程tif数据转化成terrain
Posted
tags:
篇首语:本文由小常识网(cha138.com)小编为大家整理,主要介绍了cesium高程tif数据转化成terrain相关的知识,希望对你有一定的参考价值。
参考技术A (1)地理空间数据云: http://www.gscloud.cn/使用工具cesiumlab: https://www.cesiumlab.com/
转化后的数据
(1)将terrain文件夹和layer.json复制到tomcat下,并启动tomcat服务。
(2)cesium中展示高程数据
1、在cesium的沙盒中直接展示:
2、在vue工程中展示
Cesium源码解析一(terrain文件的加载解析与渲染全过程梳理)
快速导航(持续更新中…)
Cesium源码解析一(terrain文件的加载、解析与渲染全过程梳理)
Cesium源码解析二(metadataAvailability的含义)
Cesium源码解析三(metadata元数据拓展中行列号的分块规则解析)
Cesium源码解析四(Quantized-Mesh(.terrain)格式文件在CesiumJS和UE中加载情况的对比)
目录
1.前言
目前市场上三维比较火的实现方案主要有两种,b/s 的方案主要是 Cesium,c/s 的方案主要是 ue(skyline 和 unity 也占一部分份额)。他们分别对应的是 WebGL 和 OpenGL,其最终都是通过 Shader 来实现的,通过图形学来实现的,所以又回到了代码界永远不变的真理,不论什么语言,修炼内功才是王道,修炼数据结构与算法才是王道。b/s 的好处显而易见,不用客户端怎么配置,但是缺点是对于大数据量的加载,存在性能瓶颈。而 c/s 的方案,主要是为了快,但是需要一堆环境配置。所以就可以解释了,为什么 UE 占主流,因为 UE 是C++ 写的,它的速度可比用 C# 写的 skyline 和 unity 快多了。
2.本篇的由来
本篇博文起源于我们加载 terrain 文件时遇到的一个问题,terrain文件不能正常解析。最开始是加载 terrain 会导致影像图层也出不来了,后来是影像出来了,但是地形一直出不来。因此,我们决定看一看源码,就有了这一篇博文。
3.terrain文件的加载
这是我们这一篇的核心,因为这里面的代码量非常大,涉及的细节非常多,所以,最终我们要通过图形化的方式,来对这一过程进行逐步解析。我们首先来看一下terrain 文件的加载,代码非常简单:
 var terrain=new Cesium.CesiumTerrainProvider(
   url:"http://localhost:8090/geoserver/terrain/globe",//有水面
   requestVertexNormals : false,
   requestWaterMask : true,
 );
 viewer.terrainProvider=terrain;
接着,一步步的向下跟踪,我们就得到了这样一张总体调用流程图:

由此,我们就得出了这样一个结论:Cesium 中的渲染,是由 startRenderLoop 这个函数来开启的,而 requestAnnimationFrame 的作用就是每一帧都去调用 render 函数,且 requestAnnimationFrame 能够保证渲染刷新的频率和浏览器的频率保持一致,当页面切换到后台时,就会停止渲染以提升性能。而 render 函数最终调用的地方则是 Scene.render ,这是整个渲染机制的控制中枢。我们来看看这个控制中枢都干了些什么:
1.更新环境
scene.updateEnvironment();
2.更新和执行渲染命令
scene.updateAndExecuteCommands();
3.数据优化
scene.resolveFramebuffers();
4.结束当前帧
scene.globe.endFrame();
Context.endFrame();
看到这里,应该会发现,逻辑还是十分清晰的吧。但是细心的读者,应该会发现,第2步执行渲染命令,为什么会在第3步解析当前帧数据之前?第2步还没有数据呢,要渲染什么数据呢?我在这里先给出结论,后面我们会详细展开,结论就是:Cesium渲染的是上一帧的数据,因为上一帧的数据解析完成后,并没有真正的去执行,只是转为了 Shader 命令并加入到了渲染的队列中去,真正的去执行 Shader 命令,是在下一帧进行的。所以,Cesium 的渲染是具有滞后性的。
3.1 更新环境
这一步的代码并不复杂,主要是为了更新天体和地球环境的影响。比如大气、天空、太阳、月亮,以及是否使用 WebVR 等,我们来看一下这个函数。
Scene.prototype.updateEnvironment = function ()
  var frameState = this._frameState;
  var view = this._view;

  // Update celestial and terrestrial environment effects.
  var environmentState = this._environmentState;
  var renderPass = frameState.passes.render;
  var offscreenPass = frameState.passes.offscreen;
  var skyAtmosphere = this.skyAtmosphere;
  var globe = this.globe;
  var globeTranslucencyState = this._globeTranslucencyState;

  if (
    !renderPass ||
    (this._mode !== SceneMode.SCENE2D &&
      view.camera.frustum instanceof OrthographicFrustum) ||
    !globeTranslucencyState.environmentVisible
  )
    environmentState.skyAtmosphereCommand = undefined;
    environmentState.skyBoxCommand = undefined;
    environmentState.sunDrawCommand = undefined;
    environmentState.sunComputeCommand = undefined;
    environmentState.moonCommand = undefined;
   else
    if (defined(skyAtmosphere))
      if (defined(globe))
        skyAtmosphere.setDynamicAtmosphereColor(
          globe.enableLighting && globe.dynamicAtmosphereLighting,
          globe.dynamicAtmosphereLightingFromSun
        );
        environmentState.isReadyForAtmosphere =
          environmentState.isReadyForAtmosphere ||
          globe._surface._tilesToRender.length > 0;

      environmentState.skyAtmosphereCommand = skyAtmosphere.update(
        frameState,
        globe
      );
      if (defined(environmentState.skyAtmosphereCommand))
        this.updateDerivedCommands(environmentState.skyAtmosphereCommand);

     else
      environmentState.skyAtmosphereCommand = undefined;


    environmentState.skyBoxCommand = defined(this.skyBox)
      ? this.skyBox.update(frameState, this._hdr)
      : undefined;
    var sunCommands = defined(this.sun)
      ? this.sun.update(frameState, view.passState, this._hdr)
      : undefined;
    environmentState.sunDrawCommand = defined(sunCommands)
      ? sunCommands.drawCommand
      : undefined;
    environmentState.sunComputeCommand = defined(sunCommands)
      ? sunCommands.computeCommand
      : undefined;
    environmentState.moonCommand = defined(this.moon)
      ? this.moon.update(frameState)
      : undefined;


  var clearGlobeDepth = (environmentState.clearGlobeDepth =
    defined(globe) &&
    globe.show &&
    (!globe.depthTestAgainstTerrain || this.mode === SceneMode.SCENE2D));
  var useDepthPlane = (environmentState.useDepthPlane =
    clearGlobeDepth &&
    this.mode === SceneMode.SCENE3D &&
    globeTranslucencyState.useDepthPlane);
  if (useDepthPlane)
    // Update the depth plane that is rendered in 3D when the primitives are
    // not depth tested against terrain so primitives on the backface
    // of the globe are not picked.
    this._depthPlane.update(frameState);


  environmentState.renderTranslucentDepthForPick = false;
  environmentState.useWebVR =
    this._useWebVR && this.mode !== SceneMode.SCENE2D && !offscreenPass;

  var occluder =
    frameState.mode === SceneMode.SCENE3D &&
    !globeTranslucencyState.sunVisibleThroughGlobe
      ? frameState.occluder
      : undefined;
  var cullingVolume = frameState.cullingVolume;

  // get user culling volume minus the far plane.
  var planes = scratchCullingVolume.planes;
  for (var k = 0; k < 5; ++k)
    planes[k] = cullingVolume.planes[k];

  cullingVolume = scratchCullingVolume;

  // Determine visibility of celestial and terrestrial environment effects.
  environmentState.isSkyAtmosphereVisible =
    defined(environmentState.skyAtmosphereCommand) &&
    environmentState.isReadyForAtmosphere;
  environmentState.isSunVisible = this.isVisible(
    environmentState.sunDrawCommand,
    cullingVolume,
    occluder
  );
  environmentState.isMoonVisible = this.isVisible(
    environmentState.moonCommand,
    cullingVolume,
    occluder
  );

  var envMaps = this.specularEnvironmentMaps;
  var envMapAtlas = this._specularEnvironmentMapAtlas;
  if (
    defined(envMaps) &&
    (!defined(envMapAtlas) || envMapAtlas.url !== envMaps)
  )
    envMapAtlas = envMapAtlas && envMapAtlas.destroy();
    this._specularEnvironmentMapAtlas = new OctahedralProjectedCubeMap(envMaps);
   else if (!defined(envMaps) && defined(envMapAtlas))
    envMapAtlas.destroy();
    this._specularEnvironmentMapAtlas = undefined;


  if (defined(this._specularEnvironmentMapAtlas))
    this._specularEnvironmentMapAtlas.update(frameState);

;
3.2 更新和执行渲染命令
这一步的代码量是很大的,但主要的核心思想就是会去执行当前帧对象 frameState 的 commandList 中的多个或一个 DrawCommand。这一步的执行过程我们可以用这样一张图来表示:
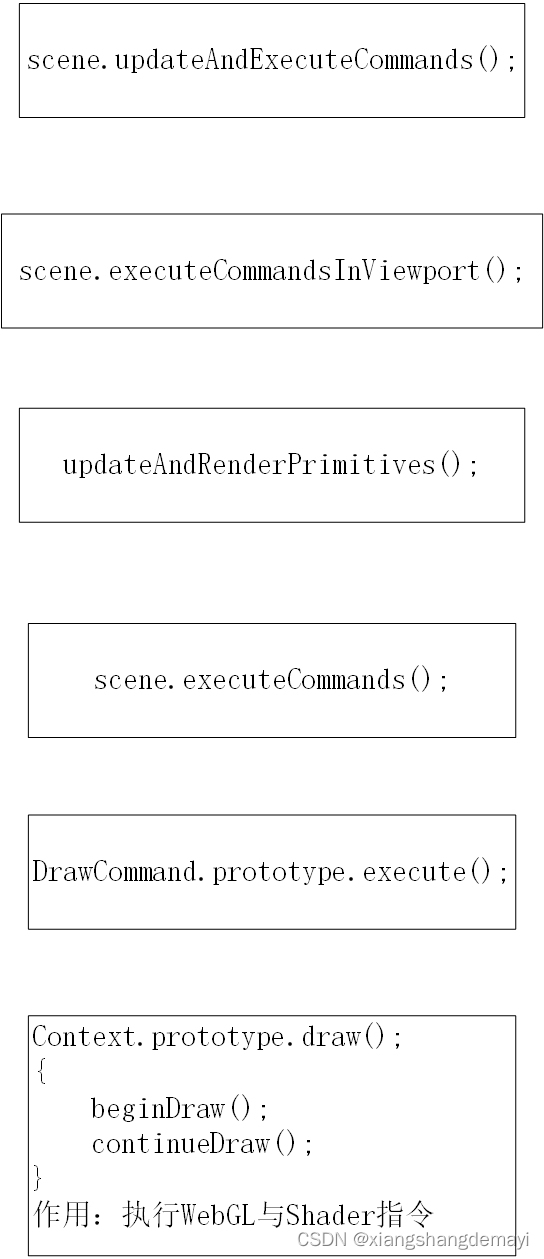
通过上图我们可以发现,最终是在 Context.prototype.draw() 函数中去执行 beginDraw() 和 continueDraw() 方法来实现执行 WebGL 和 Shader 命令的。
然后在执行到 updateAndRenderPrimitives(); 时又会去走另外一个分支,此时,上面这样图就变成了这样:
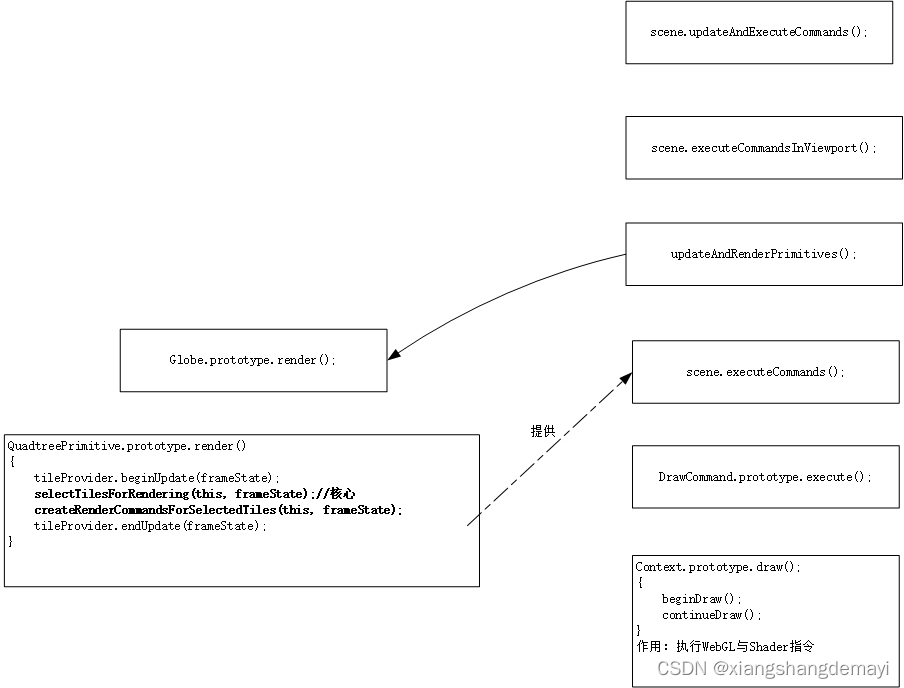
发现了什么?这里会根据当前帧对象 frameState 去选择要渲染哪些切片,然后再去创建命令。这两部分别对应的是图中加黑的两行,即 selectTilesForRendering(this, frameState); 和 createRenderCommandsForSelectedTiles(this, frameState); 然而,这样还没完,在执行 selectTilesForRendering(this, frameState); 时,还会去走一个分支,上面这样图的左边就会变成:
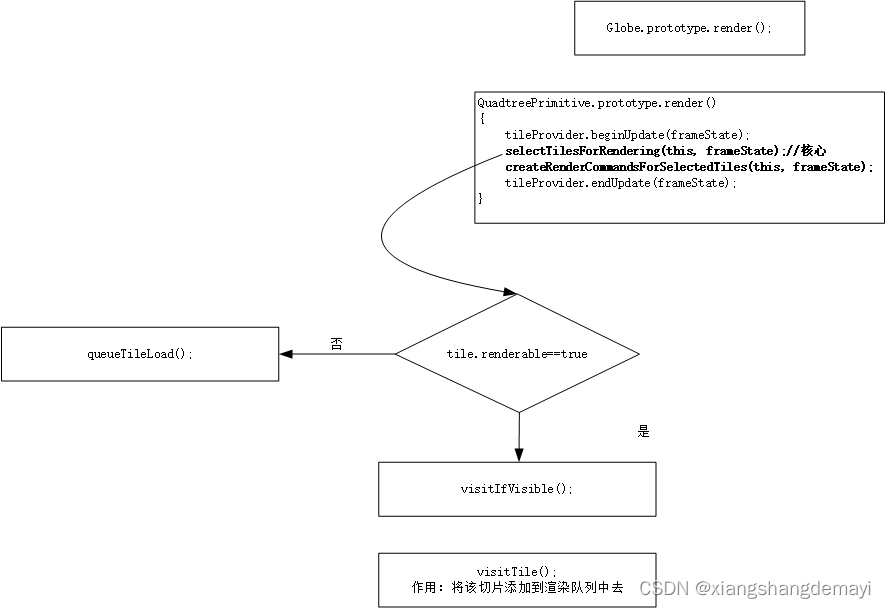
所以,当 tile 可见时,就会被加入到渲染队列中去,等待后面的渲染,否则就会进入加载队列等待加载。
3.3 数据优化
这一步主要是判断是否使用 OIT(半透明渲染算法)、全球深度和后期处理,来进行一系列的优化,代码也不复杂,我们来看一下。
Scene.prototype.resolveFramebuffers = function (passState)
  var context = this._context;
  var environmentState = this._environmentState;
  var view = this._view;
  var globeDepth = view.globeDepth;

  var useOIT = environmentState.useOIT;
  var useGlobeDepthFramebuffer = environmentState.useGlobeDepthFramebuffer;
  var usePostProcess = environmentState.usePostProcess;

  var defaultFramebuffer = environmentState.originalFramebuffer;
  var globeFramebuffer = useGlobeDepthFramebuffer
    ? globeDepth.framebuffer
    : undefined;
  var sceneFramebuffer = view.sceneFramebuffer.getFramebuffer();
  var idFramebuffer = view.sceneFramebuffer.getIdFramebuffer();

  if (environmentState.separatePrimitiveFramebuffer)
    // Merge primitive framebuffer into globe framebuffer
    globeDepth.executeMergeColor(context, passState);


  if (useOIT)
    passState.framebuffer = usePostProcess
      ? sceneFramebuffer
      : defaultFramebuffer;
    view.oit.execute(context, passState);


  var translucentTileClassification = view.translucentTileClassification;
  if (
    translucentTileClassification.hasTranslucentDepth &&
    translucentTileClassification.isSupported()
  )
    translucentTileClassification.execute(this, passState);


  if (usePostProcess)
    var inputFramebuffer = sceneFramebuffer;
    if (useGlobeDepthFramebuffer && !useOIT)
      inputFramebuffer = globeFramebuffer;


    var postProcess = this.postProcessStages;
    var colorTexture = inputFramebuffer.getColorTexture(0);
    var idTexture = idFramebuffer.getColorTexture(0);
    var depthTexture = defaultValue(globeFramebuffer, sceneFramebuffer)
      .depthStencilTexture;
    postProcess.execute(context, colorTexture, depthTexture, idTexture);
    postProcess.copy(context, defaultFramebuffer);


  if (!useOIT && !usePostProcess && useGlobeDepthFramebuffer)
    passState.framebuffer = defaultFramebuffer;
    globeDepth.executeCopyColor(context, passState);

;
这一步让人难以理解的是,干的工作都是优化,但是函数名翻译过来却叫做解析当前帧数据,这就令人费解了,因为真正的解析 terrain 数据,是在下一步干的,真是令人百思不得其解。
3.4 结束当前帧
这一步是重点中的重点,因为会在这一步去解析 terrain 文件,在此之前,我们先来看下这一步调用的流程图:
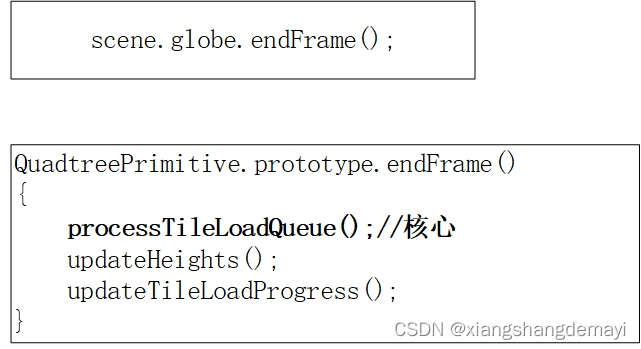
可以看到这一步可以简单概括为三行代码,处理切片加载队列、更新高度、更新切片加载过程。但是图中的第一行代码又进行了其他的一系列操作,其中就有我们非常关心的 terrain 文件的解析,所以,这张图就变成了这样:
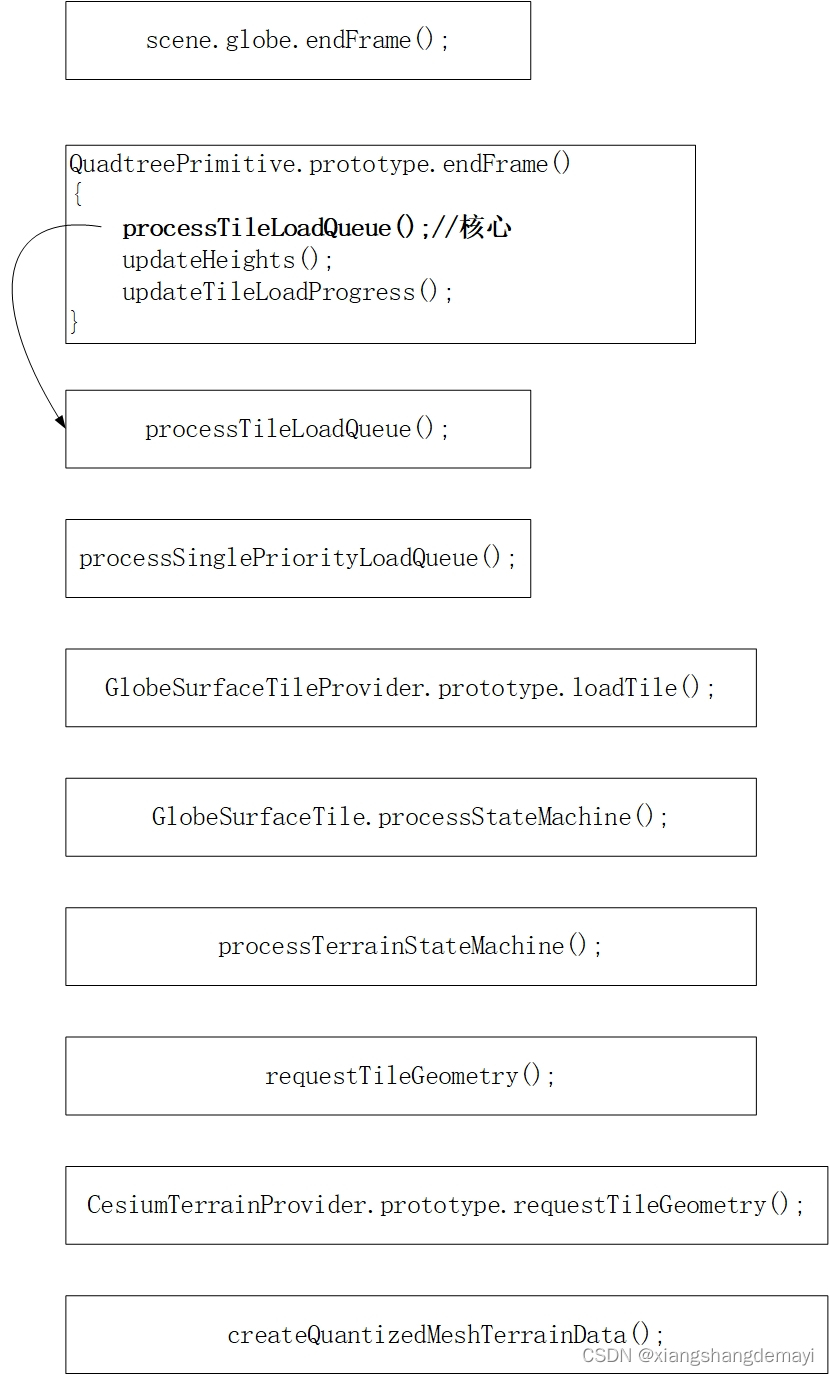
可以看到最后一步就是去创建 terrain 数据对象,这种数据类型是 Cesium 定义的,类型就叫做 QuantizedMesh。那么重点就来了,我们就是要看看它到底是怎么解析的,直接上代码:
function createQuantizedMeshTerrainData(provider, buffer, level, x, y, layer)
  var littleEndianExtensionSize = layer.littleEndianExtensionSize;
  var pos = 0;
  var cartesian3Elements = 3;
  var boundingSphereElements = cartesian3Elements + 1;
  var cartesian3Length = Float64Array.BYTES_PER_ELEMENT * cartesian3Elements;
  var boundingSphereLength =
    Float64Array.BYTES_PER_ELEMENT * boundingSphereElements;
  var encodedVertexElements = 3;
  var encodedVertexLength =
    Uint16Array.BYTES_PER_ELEMENT * encodedVertexElements;
  var triangleElements = 3;
  var bytesPerIndex = Uint16Array.BYTES_PER_ELEMENT;
  var triangleLength = bytesPerIndex * triangleElements;

  var view = new DataView(buffer);
  //中心
  var center = new Cartesian3(
    view.getFloat64(pos, true),
    view.getFloat64(pos + 8, true),
    view.getFloat64(pos + 16, true)
  );
  pos += cartesian3Length;
  //最大高度最小高度
  var minimumHeight = view.getFloat32(pos, true);
  pos += Float32Array.BYTES_PER_ELEMENT;
  var maximumHeight = view.getFloat32(pos, true);
  pos += Float32Array.BYTES_PER_ELEMENT;

  //外接球面
  var boundingSphere = new BoundingSphere(
    new Cartesian3(
      view.getFloat64(pos, true),
      view.getFloat64(pos + 8, true),
      view.getFloat64(pos + 16, true)
    ),
    view.getFloat64(pos + cartesian3Length, true)
  );
  pos += boundingSphereLength;
  //水平遮挡点
  var horizonOcclusionPoint = new Cartesian3(
    view.getFloat64(pos, true),
    view.getFloat64(pos + 8, true),
    view.getFloat64(pos + 16, true)
  );
  pos += cartesian3Length;
  //顶点数量
  var vertexCount = view.getUint32(pos, true);
  pos += Uint32Array.BYTES_PER_ELEMENT;
  var encodedVertexBuffer = new Uint16Array(buffer, pos, vertexCount * 3);
  pos += vertexCount * encodedVertexLength;

  if (vertexCount > 64 * 1024)
    // More than 64k vertices, so indices are 32-bit.
    bytesPerIndex = Uint32Array.BYTES_PER_ELEMENT;
    triangleLength = bytesPerIndex * triangleElements;


  // Decode the vertex buffer.
  var uBuffer = encodedVertexBuffer.subarray(0, vertexCount);
  var vBuffer = encodedVertexBuffer.subarray(vertexCount, 2 * vertexCount);
  var heightBuffer = encodedVertexBuffer.subarray(
    vertexCount * 2,
    3 * vertexCount
  );

  AttributeCompression.zigZagDeltaDecode(uBuffer, vBuffer, heightBuffer);

  // skip over any additional padding that was added for 2/4 byte alignment
  if (pos % bytesPerIndex !== 0)
    pos += bytesPerIndex - (pos % bytesPerIndex);

  //三角形的数量
  var triangleCount = view.getUint32(pos, true);
  pos += Uint32Array.BYTES_PER_ELEMENT;
  var indices = IndexDatatype.createTypedArrayFromArrayBuffer(
    vertexCount,
    buffer,
    pos,
    triangleCount * triangleElements
  );
  pos += triangleCount * triangleLength;

  // High water mark decoding based on decompressIndices_ in webgl-loader's loader.js.
  // https://code.google.com/p/webgl-loader/source/browse/trunk/samples/loader.js?r=99#55
  // Copyright 2012 Google Inc., Apache 2.0 license.
  var highest = 0;
  var length = indices.length;
  for (var i = 0; i < length; ++i)
    var code = indices[i];
    indices[i] = highest - code;
    if (code === 0)
      ++highest;


  //东南西北顶点的解析
  var westVertexCount = view.getUint32(pos, true);
  pos += Uint32Array.BYTES_PER_ELEMENT;
  var westIndices = IndexDatatype.createTypedArrayFromArrayBuffer(
    vertexCount,
    buffer,
    pos,
    westVertexCount
  );
  pos += westVertexCount * bytesPerIndex;

  var southVertexCount = view.getUint32(pos, true);
  pos += Uint32Array.BYTES_PER_ELEMENT;
  var southIndices = IndexDatatype.createTypedArrayFromArrayBuffer(
    vertexCount,
    buffer,
    pos,
    southVertexCount
  );
  pos += southVertexCount * bytesPerIndex;

  var eastVertexCount = view.getUint32(pos, true);
  pos += Uint32Array.BYTES_PER_ELEMENT;以上是关于cesium高程tif数据转化成terrain的主要内容,如果未能解决你的问题,请参考以下文章