python15-day11 队列和rabbitmq
Posted
tags:
篇首语:本文由小常识网(cha138.com)小编为大家整理,主要介绍了python15-day11 队列和rabbitmq相关的知识,希望对你有一定的参考价值。
python15-day11
进程提供一个程序运行的所有数据,CPU需要处理多任务,所以需要多进程。
进程是一个资源的集合
每个进程的数据是独立的,每个进程至少有一个线程。线程数据是共享的。
一个进程的多个线程可以充分利用多核CPU
python只能在单核进行线程切换。
manager实现了多进程间数据共享,进程间共享数据的代价是高昂的,所以尽量避免进程间的数据共享。线程间数据本来就是共享的,不存在共享数据代价问题,线程要修改同一份数据。必须要加锁。互斥锁mutex
生产者和消费者模型,主要目的是解耦。
队列的三种类型:FIFO,LIFO,优先级
线程主要用于处理同一个程序的多个任务,IO密集型,socket、爬虫、web等
进程主要用于CPU运算密集型。主要利用CPU进程运算。几乎不读IO,大数据分析。
1. greenlet
from greenlet import greenlet
def test1():
print(1)
gr2.switch()
print(3)
gr2.switch()
def test2():
print(2)
gr1.switch()
print(4)
gr1.switch()
gr1 = greenlet(test1)
gr2 = greenlet(test2)
gr2.switch()
2. gevent
import gevent
def func1():
print("1111")
gevent.sleep(1)
print("2222")
def func2():
print("3333")
gevent.sleep(1)
print("444444")
def func3():
print("55555")
gevent.sleep(2)
print("666666")
gevent.joinall([
gevent.spawn(func1),
gevent.spawn(func2),
gevent.spawn(func3)
])
3. 同步和异步
import gevent
def task(pid):
gevent.sleep(0.5)
print(‘Task %s done‘ % pid)
def synchronous():
for i in range(1, 10):
task(i)
def asynchronous():
threads = [gevent.spawn(task, i) for i in range(10)]
gevent.joinall(threads)
print(‘Synchronous:‘)
synchronous()
print(‘Asynchronous:‘)
asynchronous()
3.2 异步爬虫
import time
# from gevent import monkey;
# monkey.patch_all()
import gevent
from urllib.request import urlopen
def f(url):
print(‘GET: %s‘ % url)
resp = urlopen(url)
data = resp.read()
print(‘%d bytes received
from %s.‘ % (len(data), url))
t1 = time.time()
gevent.joinall([
gevent.spawn(f, ‘https://www.python.org/‘),
gevent.spawn(f, ‘https://www.yahoo.com/‘),
gevent.spawn(f, ‘https://github.com/‘),
])
print(time.time()-t1)
3.3 select模型
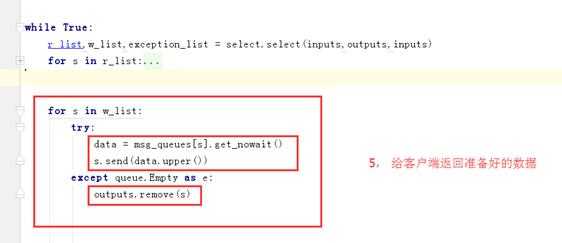
消费者:
import socket
HOST = ‘localhost‘ # The remote host
PORT = 9999 # The same port as used by the server
s = socket.socket(socket.AF_INET, socket.SOCK_STREAM)
s.connect((HOST, PORT))
while True:
msg = bytes(input(">>:"), encoding="utf8")
s.sendall(msg)
data = s.recv(1024)
# print(data)
print(‘Received‘, repr(data))
s.close()
3. rabbitmq
3.1 连接rabbitmq
生产者:
import pika
connection = pika.BlockingConnection(pika.ConnectionParameters(
‘192.168.56.15‘))
channel = connection.channel()
# 声明queue
channel.queue_declare(queue=‘liangkai‘)
# n RabbitMQ a message can never
be sent directly to the queue, it always needs to go through an exchange.
channel.basic_publish(exchange=‘‘,
routing_key=‘liangkai‘,
body=‘liangkai & xiaoqing‘)
print(" [x] Sent ‘Hello World!‘")
connection.close()
消费者:
import pika
connection = pika.BlockingConnection(pika.ConnectionParameters(‘192.168.56.15‘))
channel = connection.channel()
channel.queue_declare(queue=‘liangkai‘)
def callback(ch,method,properties,body):
print(ch,method,property)
print("[x] Recived
%r"%body)
channel.basic_consume(callback,queue="liangkai",no_ack=True)
print("[*] Wating for message.TO exit press
CTRL+C")
channel.start_consuming()
3.2 添加认证以及消息持久化:
生产者端:
import pika
#connection =
pika.BlockingConnection(pika.ConnectionParameters(
# ‘192.168.56.15‘))
# 添加认证
username = ‘python‘ #指定远程rabbitmq的用户名密码
pwd = ‘python‘
user_pwd = pika.PlainCredentials(username, pwd)
connection = pika.BlockingConnection(pika.ConnectionParameters(‘192.168.56.15‘, credentials=user_pwd))#创建连接
channel = connection.channel()
# 声明queue
channel.queue_declare(queue=‘kaige‘,durable=True) #队列的持久化
# n RabbitMQ a message can never
be sent directly to the queue, it always needs to go through an exchange.
channel.basic_publish(exchange=‘‘,
routing_key=‘kaige‘,
body=‘liangkai & xiaoqing‘,
properties = pika.BasicProperties(
delivery_mode=2
#消息的持久化
))
print(" [x] Sent ‘Hello World!‘")
connection.close()
消费者端:
import pika
username = ‘python‘ #指定远程rabbitmq的用户名密码
pwd = ‘python‘
user_pwd = pika.PlainCredentials(username, pwd)
connection = pika.BlockingConnection(pika.ConnectionParameters(‘192.168.56.15‘, credentials=user_pwd))#创建连接
channel = connection.channel()
#注意这里发送端要和接收端定义的连接相同
channel.queue_declare(queue=‘kaige‘,durable=True)
def callback(ch,method,properties,body):
print(ch,method,property)
print("[x] Recived
%r"%body)
channel.basic_consume(callback,queue="kaige",no_ack=True)
print("[*] Wating for message.TO exit press
CTRL+C")
channel.start_consuming()
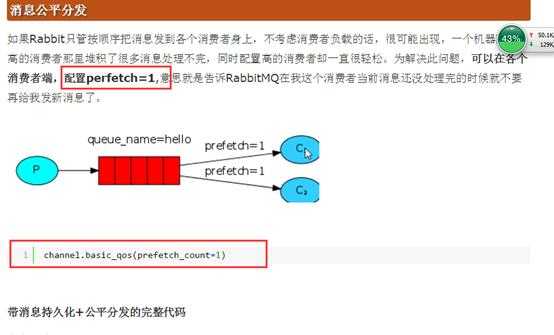
3.3 消息公平分发
附件列表
以上是关于python15-day11 队列和rabbitmq的主要内容,如果未能解决你的问题,请参考以下文章