vue3组合式API介绍
Posted huangchengpei
tags:
篇首语:本文由小常识网(cha138.com)小编为大家整理,主要介绍了vue3组合式API介绍相关的知识,希望对你有一定的参考价值。
为什么要使用Composition API?
根据官方的说法,vue3.0的变化包括性能上的改进、更小的 bundle 体积、对 TypeScript 更好的支持、用于处理大规模用例的全新 API,全新的api指的就是本文主要要说的组合式api。
在 vue3 版本之前,我们复用组件(或者提取和重用多个组件之间的逻辑),通常有以下几种方式:
- Mixin:命名空间冲突 & 渲染上下文中暴露的 property 来源不清晰。例如在阅读一个运用了多个 mixin 的模板时,很难看出某个 property 是从哪一个 mixin 中注入的。
- Renderless Component:无渲染组件需要额外的有状态的组件实例,从而使得性能有所损耗
- Vuex:就会变得更加复杂,需要去定义 Mutations 也需要去定义 Actions
上述提到的几种方式,也是我们项目中正在使用的方式。对于提取和重用多个组件之间的逻辑似乎并不简单。我们甚至采用了 extend 来做到最大化利用已有组件逻辑,因此使得代码逻辑依赖严重,难以阅读和理解。
Vue3 中的 Composition API 便是解决这一问题;且完美支持类型推导,不再是依靠一个简单的 this 上下文来暴露 property(比如 methods 选项下的函数的 this 是指向组件实例的,而不是这个 methods 对象)。其是一组低侵入式的、函数式的 API,使得我们能够更灵活地「组合」组件的逻辑。
业务实践
组合式api的出现就能解决以上两个问题,此外,它也对TypeScript类型推导更加友好。
在具体使用上,对vue单文件来说,模板部分和样式部分基本和以前没有区别,组合式api主要影响的是逻辑部分。下面是一个经典的vue2的计数器案例.:
vue2 实现
//Counter.vue
export default
  data: () => (
    count: 0
  ),
  methods:
    increment()
      this.count++;

  ,
  computed:
    double ()
      return this.count * 2;
vue3 composition api
当我们在组件间提取并复用逻辑时,组合式API 是十分灵活的。一个组合函数仅依赖它的参数和 Vue 全局导出的 API,而不是依赖其微妙的 this 上下文。你可以将组件内的任何一段逻辑导出为函数以复用它。
- 基于响应式
- 提供 vue 的生命周期钩子
- 组件销毁时自动销毁依赖监听
- 可复用的逻辑
// Counter.vue
import  ref, computed  from "vue";

export default
  setup()
    const count = ref(0);
    const double = computed(() => count * 2)
    function increment()
      count.value++;

    return
      count,
      double,
      increment
代码提取
Composition API的第一个明显优点是提取逻辑很容易。使用Composition提取上面Counter.vue组件代码。
//useCounter.js 组合函数
import  ref, computed  from "vue";

export default function ()
  const count = ref(0);
  const double = computed(() => count * 2)
  function increment()
    count.value++;

  return
    count,
    double,
    increment
代码重用
要在组件中使用该函数,我们只需将模块导入组件文件并调用它(注意导入是一个函数)。这将返回我们定义的变量,随后我们可以从 setup 函数中返回它们。
// MyComponent.js
import useCounter from "./useCounter.js";

export default
  setup()
    const  count, double, increment  = useCounter();
    return
      count,
      double,
      increment
相比而言,组合式 API:
- 暴露给模板的 property 来源十分清晰,因为它们都是被组合逻辑函数返回的值
- 不存在命名空间冲突,可以通过解构任意命名
- 不再需要仅为逻辑复用而创建新的组件实例


常用api介绍
setup
export default
  setup(props, context)
    console.log(context); //  attrs, slots, emit
    //context.emit(\'emitFun\', emit: true)
    return  privateMsg: props.msg ;
setup函数是组件内使用 component API 的入口。是在组件实例被创建时, 初始化了 props 之后调用,处于 created 前。还有以下特点:
1.可以返回一个对象或函数,对象的属性会合并到模板渲染的上下文中;
2.第一个参数是响应式的props对象,注意不能解构 props 对象,会使其失去响应性。 **
也不可直接修改 props,会触发警告
3.第二个参数是一个上下文对象,暴露了 attrs,slots,emit 对象
4.this 在 setup 函数中不可用。**因为它不会找到组件实例。setup 的调用发生在 data、computed 和 methods 被解析之前,所以它们无法在 setup 中被获取。
props与上下文对象attrs的区别:
1、props 要先声明才能取值,attrs 不用先声明
2、props 声明过的属性,attrs 里不会再出现
3、props 不包含事件,attrs 包含。vue2中的$listeners 被整合到 $attrs
reactive
<template>
  <div>
    <p>data.msg</p>
    <button @click="updateData">更新数据</button>
  </div>
</template>

<script>
import  reactive  from "vue";

export default
  name: "ReactiveObject",
  setup()
    const data = reactive( msg: "hello world" );
    const updateData = () =>
      data.msg= "hello world " + new Date().getTime();
    ;
    return  data, updateData ;
  ,
;
</script>
reactive函数接收一个普通对象然后返回对象的响应式代理,同 Vue.observable。
原理:通过proxy对数据进行封装,当数据变化时,触发模板等内容的更新。
ref
<template>
  <div>
    <p>msg</p>
    <button @click="updateMessage">更新数据</button>
  </div>
</template>

<script>
import  ref  from "vue";

export default
  name: "ReactiveSingleValue",
  setup()
    const msg= ref("hello world");
    const updateMessage = () =>
      msg.value = "hello world " + new Date().getTime();
    ;
    return  msg, updateMessage ;
  ,
;
</script>
ref和reactive存在一定的相似性,所以需要完全理解它们才能高效的在各种场景下选择不同的方式,它们之间最明显的区别是ref使用的时候需要通过.value来取值,reactive不用。ref是property而reactive是proxy,reactive能够深度监听各种类型对象的变化,ref是处理诸如number,string之类的基本数据类型。
它们的区别也可以这么理解,ref是使某一个数据提供响应能力,而reactive是为包含该数据的一整个对象提供响应能力。
在模板里使用ref和嵌套在响应式对象里时不需要通过.value,会自己解开:
除了响应式ref还有一个引用DOM元素的ref,2.x里面是通过this.$refs.xxx来引用,但是在setup里面没有this,所以也是通过创建一个ref来使用:
<template>
    <div ref="node"></div>
</template>
<script>
import  ref, onMounted  from \'vue\'
export default
    setup()
        const node = ref(null)
        onMounted(() =>
            console.log(node.value)  // 此处就是dom元素 <div ref="node"></div>
        )
        return
            node


</script>
computed
传入一个 getter 函数,返回一个默认不可修改的 ref 对象,同 vue 2.x 中的计算属性 computed
const count = ref(0)
const sum = computed(() => count.value + 1)
console.log(sum.value) // 1
sum.value = 3 // 错误
也可传入一个 get 和 set 函数对象,创建一个可修改的计算状态
const count = ref(0)

const sum = computed(
  get: () => count.value + 1,
  set: (value) =>
    count.value = value - 1

)

sum.value = 55
console.log(sum, count) // 1, 54
watchEffect
import  reactive, watchEffect  from "vue";
export default
  name: "WatchEffect",
  setup()
    const data = reactive( count: 1 );
    watchEffect(() => console.log(`侦听器:$data.count`));
    setInterval(() =>
      data.count++;
    , 1000);
    return  data ;
  ,
;
watchEffect用来监听数据的变化,它会立即执行一次,之后会追踪函数里面用到的所有响应式状态,当变化后会重新执行该回调函数。
watch
完全等效于 2.x 中 watch 选项,对比 watchEffect,watch 允许我们:
- 懒执行副作用;
- 更明确哪些状态的改变会触发侦听器重新运行副作用;
- 访问侦听状态变化前后的值。
// 监听一个 getter
const state = reactive( count: 0 )
watch(
  () => state.count,
  (count, prevCount) =>
    console.log(count, prevCount)

)

// 直接监听一个 ref
const count = ref(0)
watch(count, (count, prevCount) =>
  console.log(count, prevCount)
,
  deep: true, // 深度监听
  immediate: true // 初始化执行一次
)

// 监听多个数据
watch([fooRef, barRef], ([foo, bar], [prevFoo, prevBar]) =>
  console.log([foo, bar], [prevFoo, prevBar])
)
toRefs
把一个响应式对象转换成普通对象,该普通对象的每个 property 都是一个 ref,和响应式对象 property 一一对应。可以被解构且保持响应性
<template>
  <div>
    <h1>解构响应式对象数据</h1>
    <p>Username: username</p>
    <p>Age: age</p>
  </div>
</template>

<script>
import  reactive, toRefs  from "vue";
export default
  name: "DestructReactiveObject",
  setup()
    const user = reactive(
      username: "haihong",
      age: 10000,
    );
    return  ...toRefs(user) ;
  ,
;
</script>
toRef
toRef 可以用来为一个 reactive 对象的属性创建一个 ref。这个 ref 可以被传递并且能够保持响应性。
setup()
  const user = reactive( age: 1 );
  const age = toRef(user, "age");

  age.value++;
  console.log(user.age); // 2

  user.age++;
  console.log(age.value); // 3
Provide/Inject
为了增加 provide 值和 inject 值之间的响应性,我们可以在 provide 值时使用 ref 或 reactive。
当使用响应式 provide / inject 值时,建议尽可能将对响应式 property 的所有修改限制在定义 provide 的组件内部。然而,有时我们需要在注入数据的组件内部更新 inject 的数据。在这种情况下,我们建议 provide 一个方法来负责改变响应式 property。
最后,如果要确保通过 provide 传递的数据不会被 inject 的组件更改,我们建议对提供者的 property 使用 readonly。
<!-- src/components/MyMap.vue -->
<template>
  <MyMarker />
</template>

<script>
import  provide, reactive, readonly, ref  from \'vue\'
import MyMarker from \'./MyMarker.vue\'

export default
  components:
    MyMarker
  ,
  setup()
    const location = ref(\'North Pole\')
    const geolocation = reactive(
      longitude: 90,
      latitude: 135
    )

    const updateLocation = () =>
      location.value = \'South Pole\'


    provide(\'location\', readonly(location))
    provide(\'geolocation\', readonly(geolocation))
    provide(\'updateLocation\', updateLocation)


</script>
<!-- src/components/MyMarker.vue -->
<script>
import  inject  from \'vue\'

export default
  setup()
    const userLocation = inject(\'location\', \'The Universe\')
    const userGeolocation = inject(\'geolocation\')
    const updateUserLocation = inject(\'updateLocation\')

    return
      userLocation,
      userGeolocation,
      updateUserLocation


</script>
生命周期函数
与 2.x 版本生命周期相对应的组合式 API
~~beforeCreate~~ -> 使用 setup()
~~created~~ -> 使用 setup()
beforeMount -> onBeforeMount
mounted -> onMounted
beforeUpdate -> onBeforeUpdate
updated -> onUpdated
beforeDestroy -> onBeforeUnmount
destroyed -> onUnmounted
errorCaptured -> onErrorCaptured
只需要将之前的生命周期改成onXXX的形式即可,需要注意的是created、beforeCreate两个钩子被删除了,生命周期函数只能在setup函数里使用。
总结
使用组合式api还是需要一点时间来适应的,首先需要能区分ref和reactive,不要在基本类型和引用类型、响应式和非响应式对象之间搞混,其次就是如何拆分好每一个use函数,组合式api带来了更好的代码组织方式,但也更容易把代码写的更难以维护,比如setup函数巨长。
简单总结一下升级思路,data选项里的数据通过reactive进行声明,通过...toRefs()返回;computed、mounted等选项通过对应的computed、onMounted等函数来进行替换;methods里的函数随便在哪声明,只要在setup函数里返回即可。
vue3组合式API之setup()介绍与reactive()函数的使用

==>😉博主:初映CY的前说(前端领域) ,📒本文核心:setup()概念、 reactive()的使用
【前言】vue3作为vue2的升级版,有着很多的新特性,其中就包括了组合式API,也就是是 Composition API。学习组合式API有什么优点呢?之前的vue2中结构不是挺不错的吗?那么接下来的事件,我将带着你从浅到深分析为什么我们需要学习组合式API以及我们的setup()函数作为入口函数的一个基本的使用方式。
目录
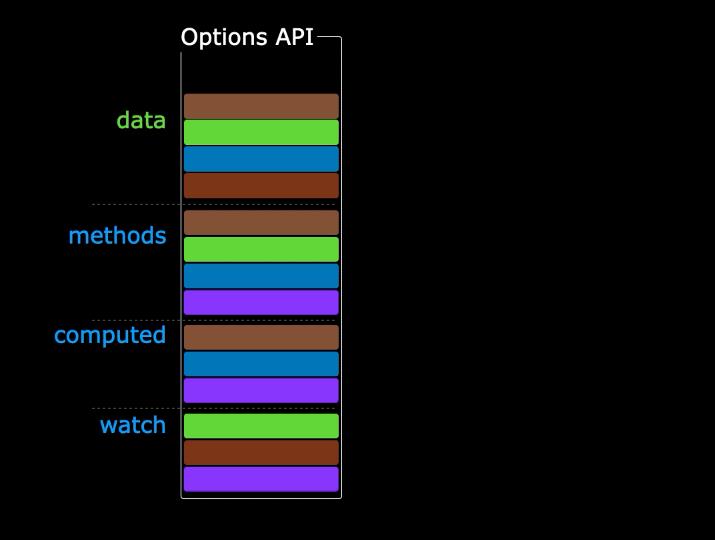
⭐一、组合式API对比vue2项目结构
在vue2当中
-
1.优点:易于学习和使用,写代码的位置已经约定好。
-
2.缺点:对于大型项目,不利于代码的复用、不利于管理和维护。
-
3.解释:同一功能的数据和业务逻辑分散在同一个文件的 N 个地方,随着业务复杂度的上升,我们需要经常在类似于data()以及methods中进行来回的处理
在vue3当中
-
1.优点:可以把同一功能的数据和业务逻辑组织到一起,方便复用和维护。
-
2.缺点:需要有良好的代码组织和拆分能力,相对没有 Vue2 容易上手。
-
3.解释:注意:为了能让大家较好的过渡到 Vue3.0 版本,目前也是支持 Vue2.x 选项 API 的写法。
⭐二、setup()函数的使用
2.1setup()函数的基础概念
Vue3 中的 setup() 是 Vue3 新增的组件配置项,用于替代 Vue2 中的 data()、methods()、computed() 等配置项。setup() 提供了更简洁的编写方式,且能够更好地利用 Vue3 提供的 Composition API。setup() 函数接受两个参数,分别是 props 和 context。其中,props 是组件接收的属性值,context 包含了一些组件的配置信息。
-
1.是什么:setup 是 Vue3 中新增的组件配置项,作为组合 API 的入口函数。
-
2.执行时机:实例创建前调用,甚至早于 Vue2 中的 beforeCreate。
-
3.注意点:由于执行 setup 的时候实例还没有 created,所以在 setup 中是不能直接使用 data 和 methods 中的数据的,所以 Vue3 setup 中的 this 也被绑定为了 undefined。
虽然 Vue2 中的 data 和 methods 配置项虽然在 Vue3 中也能使用,但不建议了,建议数据和方法都写在 setup 函数中,并通过 return 进行返回可在模版中直接使用(一般情况下 setup 不能为异步函数)。
2.2.setup()初体验
App.vue
<template>
    <h1 @click="say()"> msg </h1>
</template>
<script>
    export default
        setup()
            const msg = 'Hello Vue3'
            const say = () =>
                console.log(msg)

            return  msg, say
        ,

</script>
效果查看:
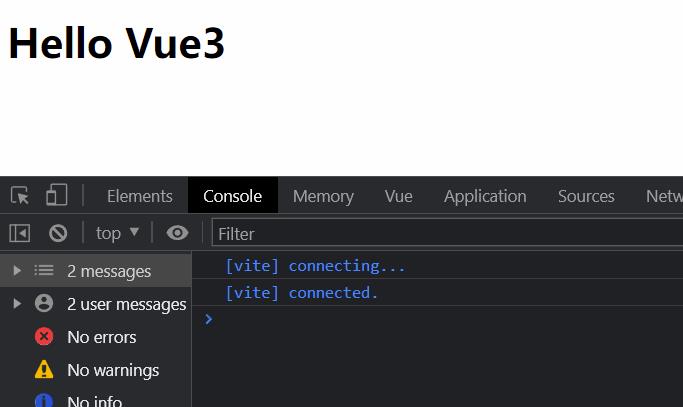
注意:酷似于vue2中的data()与methods都是需要写在return才可作为结果进行调用。
【小小面试题补充】setup 中 return 的一定只能是一个对象吗?(setup 也可以返回一个渲染函数)
App.vue
<script>
    import  h  from 'vue'
    export default
        name: 'App',
        setup()
            return () => h('h2', 'Hello Vue3')
        ,

</script>
控制台则是打印出了h2标签的Hello Vue3。
2.3.reactive()函数
使用 reactive 函数包装数组为响应式数据。reactive 是一个函数,用来将普通对象/数组包装成响应式式数据使用,无法直接处理基本数据类型(因为它是基于 Proxy 的,而 Proxy 只能代理的是对象)。
比如当我有一个需求:点击删除当前行信息
App.vue
<template>
    <ul>
        <li v-for="(item, index) in arr" :key="item" @click="removeItem(index)"> item </li>
    </ul>
</template>

<script>
    export default
        name: 'App',
        setup()
            const arr = ['a', 'b', 'c']
            const removeItem = (index) =>
                arr.splice(index, 1)

            return
                arr,
                removeItem,

        ,

</script>
通过vueTools查看,我点击过后数据是被删除了,但页面上并没有事实的渲染出来
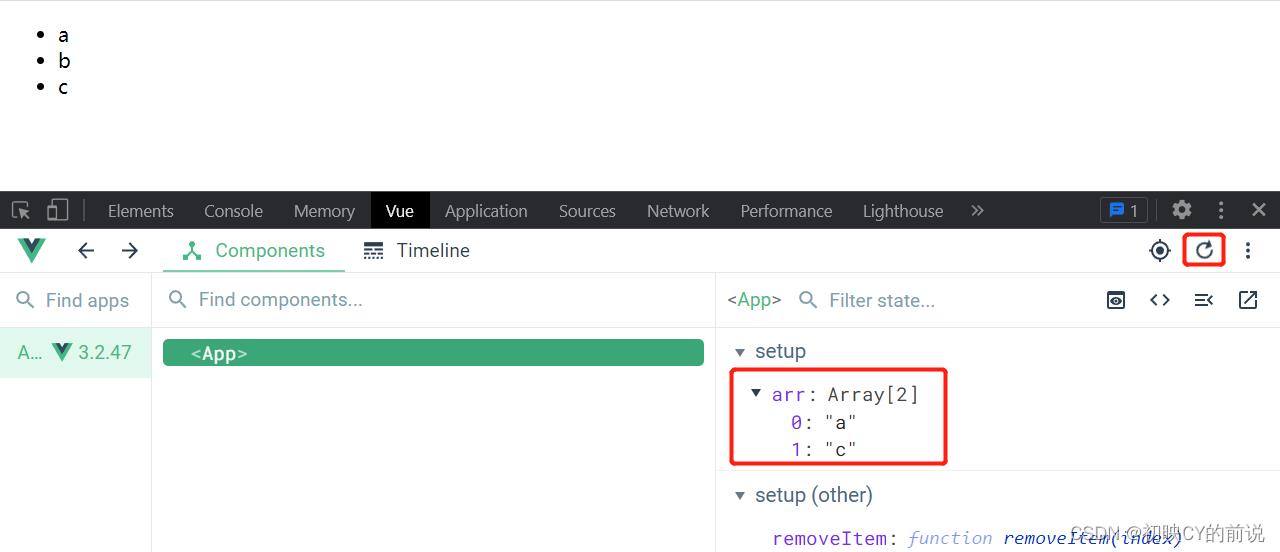
此时,使用 reactive()包装数组使变成响应式数据,别忘了导入
<template>
    <ul>
        <li v-for="(item, index) in arr" :key="item" @click="removeItem(index)"> item </li>
    </ul>
</template>

<script>
    import  reactive  from 'vue'
    export default
        name: 'App',
        setup()
            const arr = reactive(['a', 'b', 'c'])
            const removeItem = (index) =>
                arr.splice(index, 1)

            return
                arr,
                removeItem,

        ,

</script>
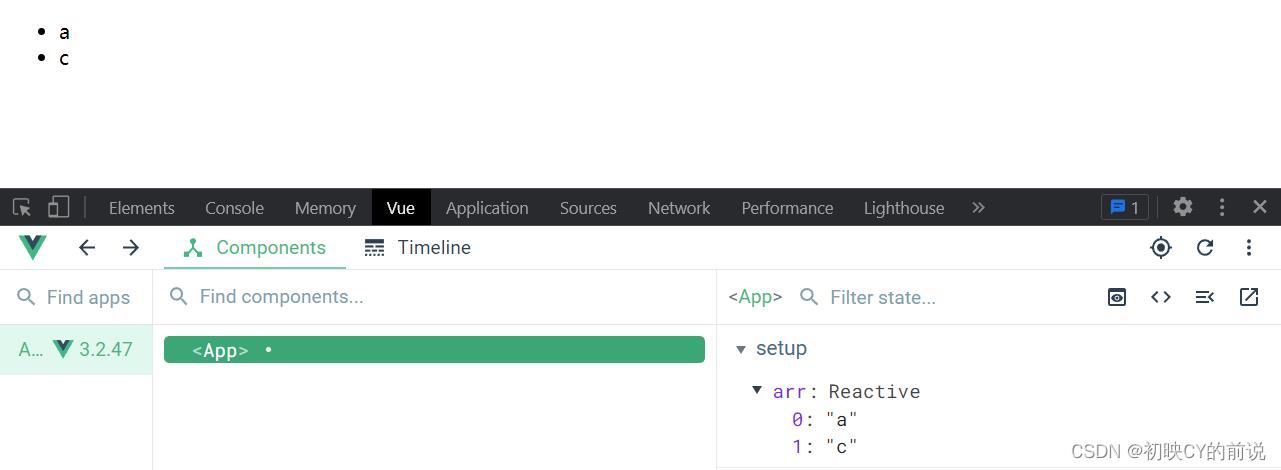
此刻页面也就具有了响应式,点击时删除,页面则是响应式的
同理:我们用reactive()来包裹我们的对象来使用
<template>
    <form @submit.prevent="handleSubmit">
        <input type="text" v-model="user.id" />
        <input type="text" v-model="user.name" />
        <input type="submit" />
    </form>
    <ul>
        <li v-for="(item, index) in state.arr" :key="item.id" @click="removeItem(index)"> item.name </li>
    </ul>
</template>

<script>
    import  reactive  from 'vue'
    export default
        name: 'App',
        setup()
            const state = reactive(
                arr: [

                        id: 0,
                        name: 'ifer',
                    ,

                        id: 1,
                        name: 'elser',
                    ,

                        id: 2,
                        name: 'xxx',
                    ,
                ],
            )
            const removeItem = (index) =>
                // 默认是递归监听的,对象里面任何一个数据的变化都是响应式的
                state.arr.splice(index, 1)


            const user = reactive(
                id: '',
                name: '',
            )
            const handleSubmit = () =>
                state.arr.push(
                    id: user.id,
                    name: user.name,
                )
                user.id = ''
                user.name = ''

            return
                state,
                removeItem,
                user,
                handleSubmit,

        ,

</script>

上述代码的解意:
我定义了输入框,定义了删除、添加事件的操作,通过v-model打到双向绑定数据来完成对我的数据进行增加与删除。
到目前你是不是对setup()的使用有了更加清晰的认识呢?下面再来简化一下我们的写法。
2.3.1reactive()的进一步抽离
优化:将同一功能的数据和业务逻辑抽离为一个函数,代码更易读,更容易复用。
<template>
    <form @submit.prevent="handleSubmit">
        <input type="text" v-model="user.id" />
        <input type="text" v-model="user.name" />
        <input type="submit" />
    </form>
    <ul>
        <li v-for="(item, index) in state.arr" :key="item.id" @click="removeItem(index)"> item.name </li>
    </ul>
</template>

<script>
    import  reactive  from 'vue'
    function useRemoveItem()
        const state = reactive(
            arr: [

                    id: 0,
                    name: 'ifer',
                ,

                    id: 1,
                    name: 'elser',
                ,

                    id: 2,
                    name: 'xxx',
                ,
            ],
        )
        const removeItem = (index) =>
            state.arr.splice(index, 1)

        return  state, removeItem

    function useAddItem(state)
        const user = reactive(
            id: '',
            name: '',
        )
        const handleSubmit = () =>
            state.arr.push(
                id: user.id,
                name: user.name,
            )
            user.id = ''
            user.name = ''

        return
            user,
            handleSubmit,


    export default
        name: 'App',
        setup()
            const  state, removeItem  = useRemoveItem()
            const  user, handleSubmit  = useAddItem(state)
            return
                state,
                removeItem,
                user,
                handleSubmit,

        ,

</script>
将方法抽离出来,用类似于导入的方式进行一个抽离,将数据与方法放在一起,便于我们的统一管理。
2.3.2reactive()再进行进一步文件拆分并且引入
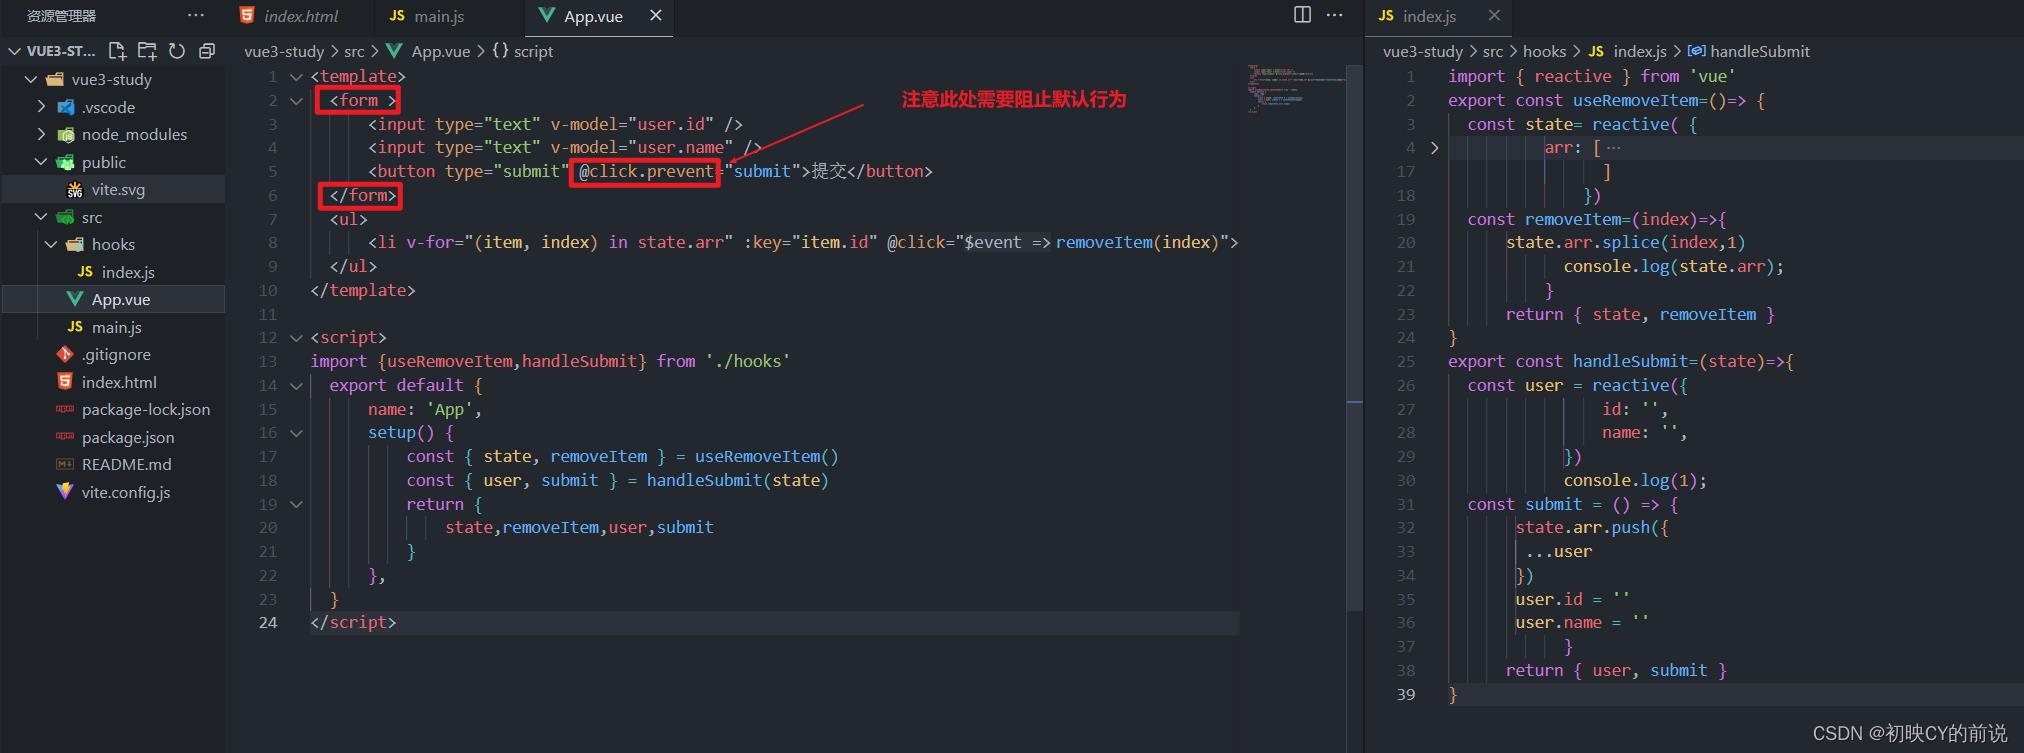
App.vue
<template>
  <form >
      <input type="text" v-model="user.id" />
      <input type="text" v-model="user.name" />
      <button type="submit" @click.prevent="submit">提交</button>
  </form>
  <ul>
      <li v-for="(item, index) in state.arr" :key="item.id" @click="removeItem(index)"> item.name </li>
  </ul>
</template>

<script>
import useRemoveItem,handleSubmit from './hooks'
  export default
      name: 'App',
      setup()
          const  state, removeItem  = useRemoveItem()
          const  user, submit  = handleSubmit(state)
          return
              state,removeItem,user,submit

      ,

</script>
hooks/index.js
import  reactive  from 'vue'
export const useRemoveItem=()=>
  const state= reactive(
          arr: [

                        id: 0,
                        name: 'ifer',
                    ,

                        id: 1,
                        name: 'elser',
                    ,

                        id: 2,
                        name: 'xxx',
                    ,
                ]
              )
  const removeItem=(index)=>
      state.arr.splice(index,1)
            console.log(state.arr);

      return  state, removeItem

export const handleSubmit=(state)=>
  const user = reactive(
                id: '',
                name: '',
            )
            console.log(1);
  const submit = () =>
       state.arr.push(
        ...user
       )
       user.id = ''
       user.name = ''

      return  user, submit
至此本文结束,愿你有所收获!
期待大家的关注与支持! 你的肯定是我更新的最大动力!!!
以上是关于vue3组合式API介绍的主要内容,如果未能解决你的问题,请参考以下文章