Kaggle上使用Tensorboard
Posted 镜花月-冷月
tags:
篇首语:本文由小常识网(cha138.com)小编为大家整理,主要介绍了Kaggle上使用Tensorboard相关的知识,希望对你有一定的参考价值。
 Kaggle上使用Tensorboard
Kaggle上使用Tensorboard
1. 前言
- 想在Kaggle上使用Tensorboard,找了一圈。
- 参考了Kaggle上的一个Code:Tensorboard on Kaggle
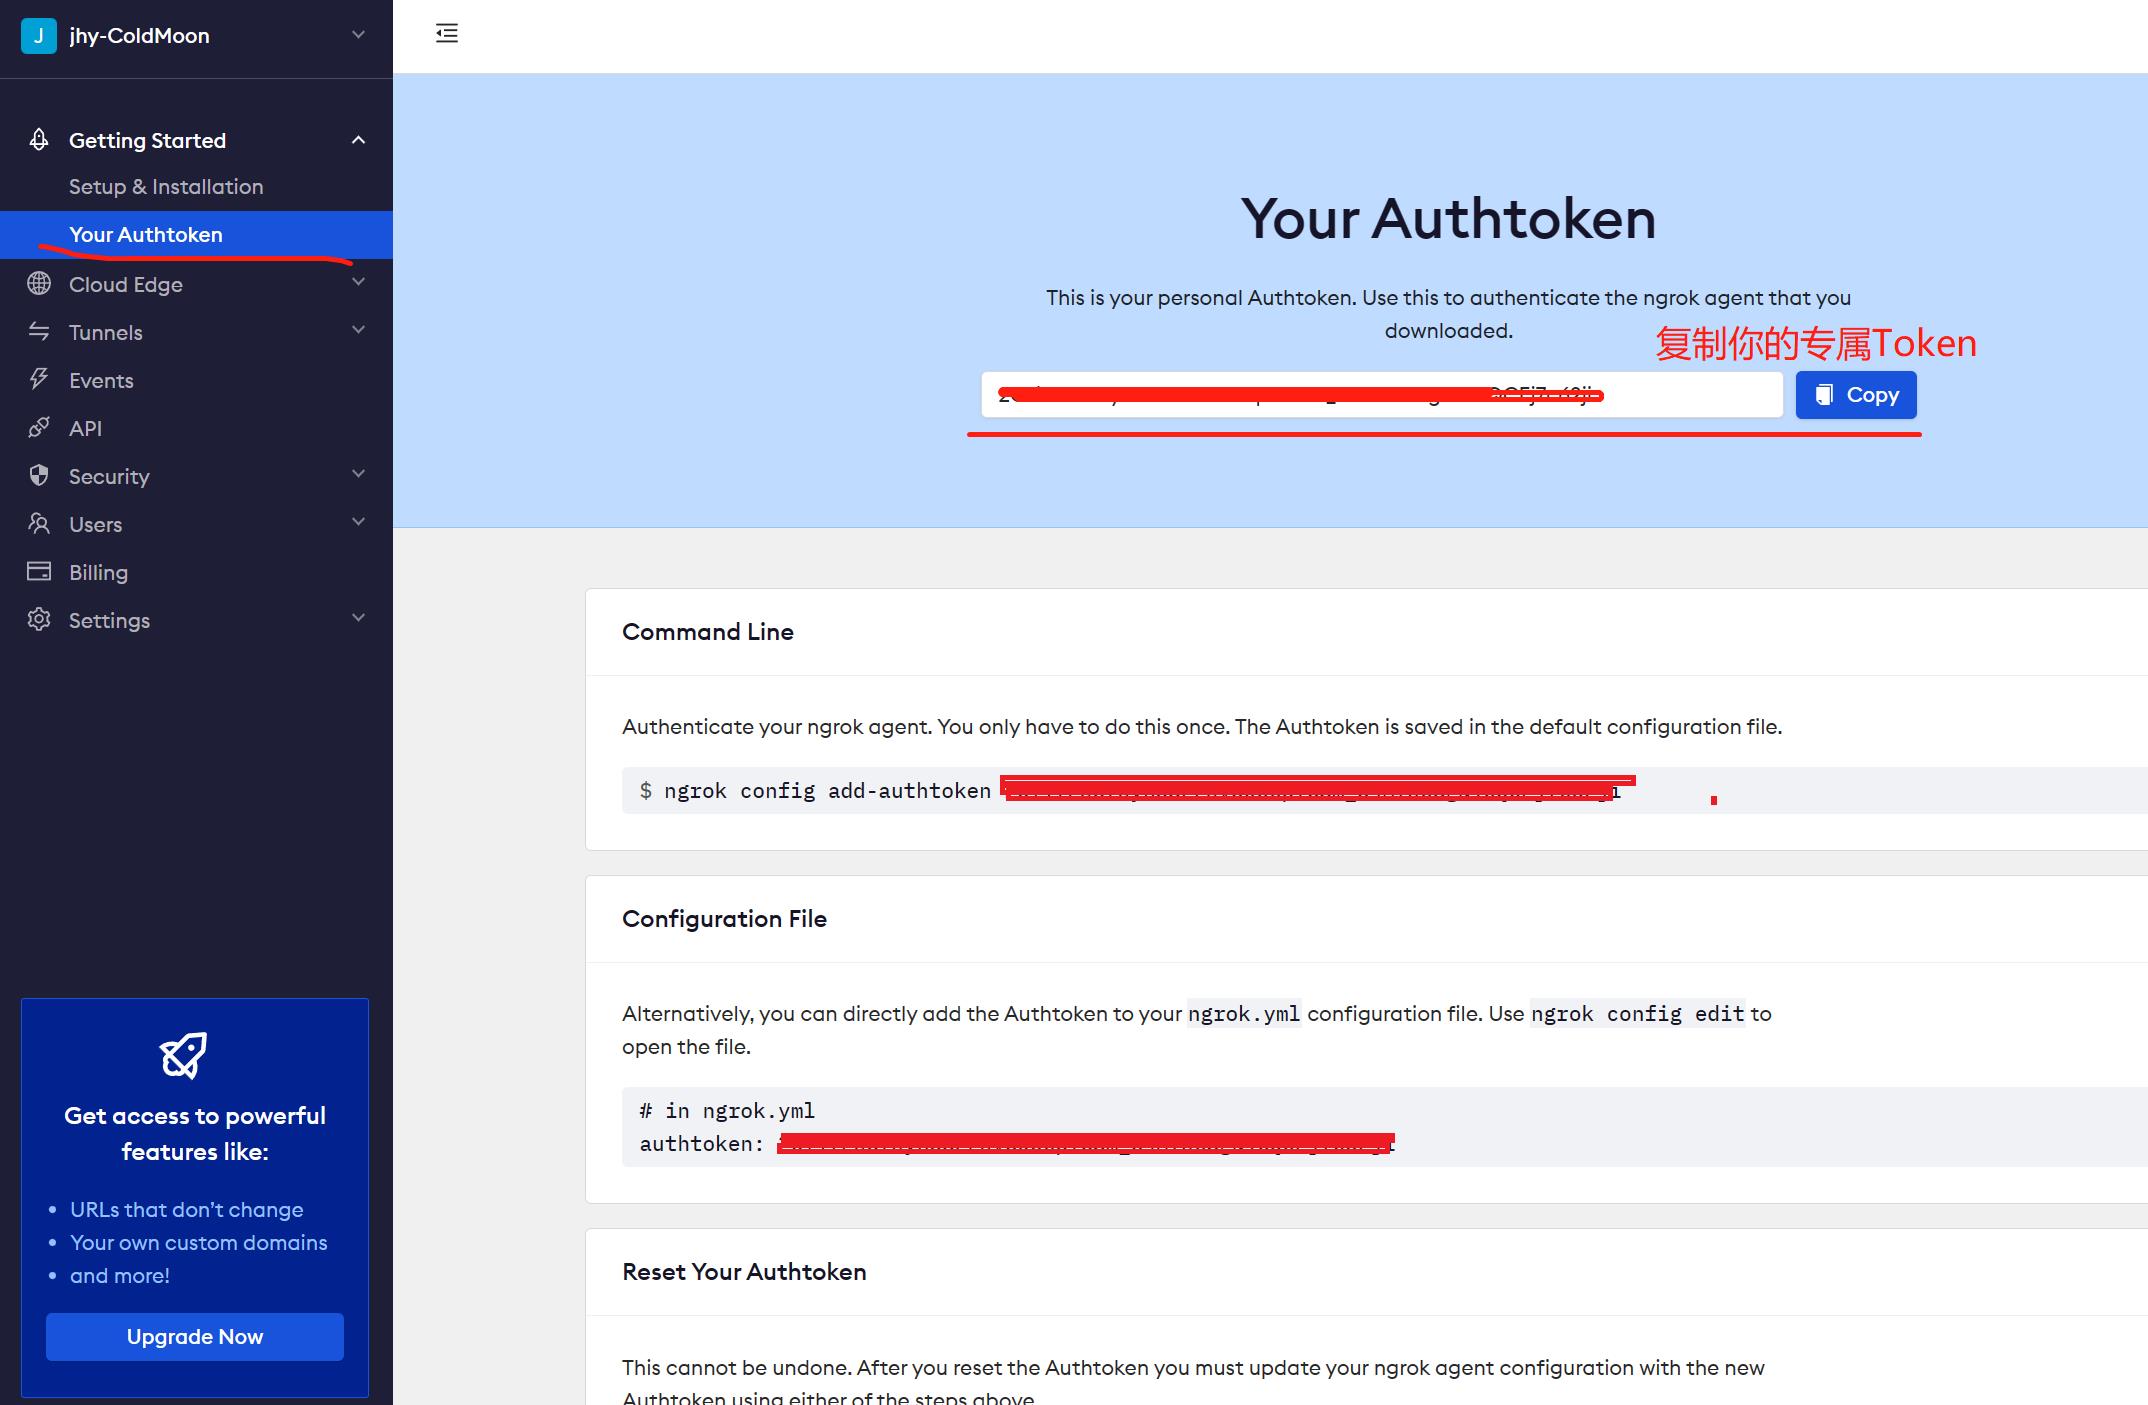
- 但发现有些变化,Code中用到的内网穿透工具Ngrok需要加一个Token,所以需要注册一个
Ngrok账号,免费获取一个通道的Token。
2. Kaggle上使用Tensorboard
2.1. 方法一
- 其实直接把在Kaggle上跑出来的Tensorboard日志文件下载到本地,在本地启动Tensorboard即可查看。
- 当然,这里主要讲在线的方法。
2.2. 方法二
- 在线使用Tensorboard
2.2.1. 获取一个Ngrok的免费通道
- 访问Ngrok,注册一个账号并登录
- 登录后界面如下,复制并保存你的Token

2.2.2. 调试运行代码
- 主要参考Kaggle上的一个Code:Tensorboard on Kaggle
- 建议分段运行,以避免中间出错,全部重新运行一次
- 以下代码在Kaggle的Notebook中运行
(1) 环境准备
import tensorflow as tf # This is how we import tf
# Clear any logs from previous runs
# 清除以前运行的所有日志
!rm -rf ./logs/
!mkdir ./logs/
(2) 启动Tensorboard
# Download Ngrok to tunnel the tensorboard port to an external port
# 下载 Ngrok 以将 tensorboard 端口隧道传输到外部端口
!wget https://bin.equinox.io/c/4VmDzA7iaHb/ngrok-stable-linux-amd64.zip
!unzip ngrok-stable-linux-amd64.zip
# 添加自己在 Ngrok 上获取的专属Token
!./ngrok authtoken 粘贴你的专属Token
- 注意这一步需要添加自己在 Ngrok 上获取的专属Token

# Run tensorboard as well as Ngrok (for tunneling as non-blocking processes)
# 运行 tensorboard 和 Ngrok(用于作为非阻塞进程的隧道)
import os
import multiprocessing

pool = multiprocessing.Pool(processes = 10)
# --logdir ./logs/ 是 TensorBoard 的日志文件(log)路径
# 你可以修改为你训练时的log保存路径(可以用绝对/相对路径),但相关的代码路径也要记得修改
results_of_processes = [pool.apply_async(os.system, args=(cmd, ), callback = None )
                        for cmd in [
                        f"tensorboard --logdir ./logs/ --host 0.0.0.0 --port 6006 &",
                        "./ngrok http 6006 &"
                        ]]
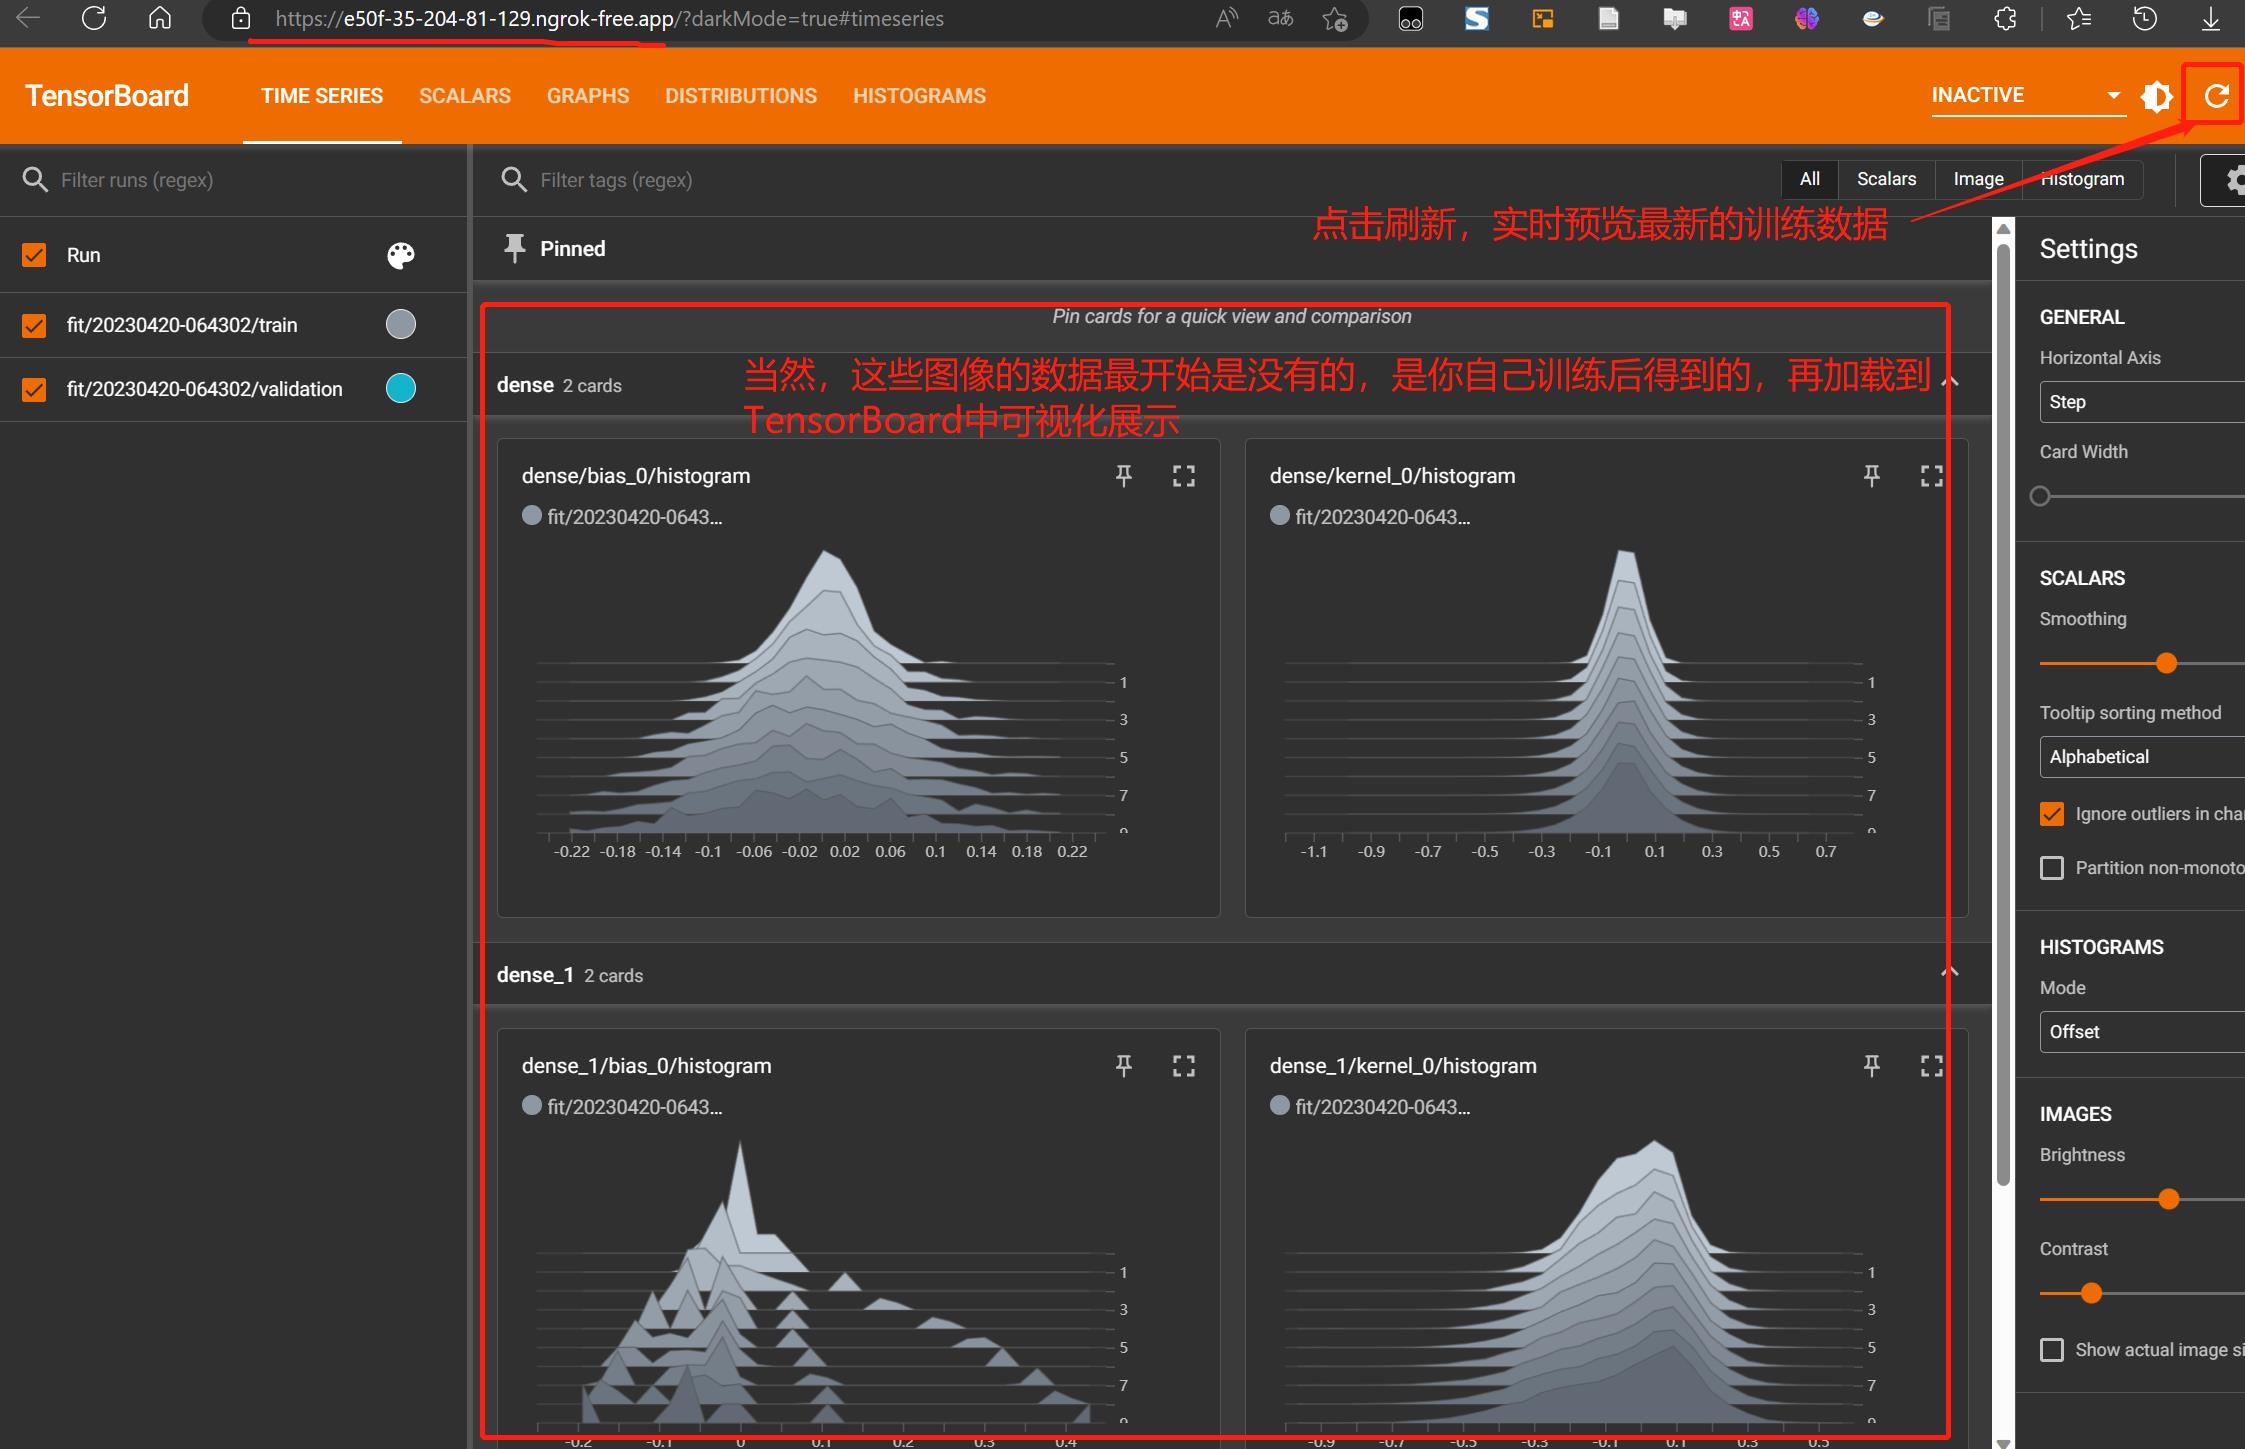
- 获取访问 Tensorload 的
URL,访问生成的URL即可看到 Tensorload 界面 - 但还没有产生日志文件,所以现在还看不到有图形
! curl -s http://localhost:4040/api/tunnels | python3 -c \\
    "import sys, json; print(json.load(sys.stdin)[\'tunnels\'][0][\'public_url\'])"


(3) 创建和训练模型
(x_train, y_train),(x_test, y_test) = mnist.load_data()
x_train, x_test = x_train / 255.0, x_test / 255.0

def create_model():
  return tf.keras.models.Sequential([
    tf.keras.layers.Flatten(input_shape=(28, 28)),
    tf.keras.layers.Dense(512, activation=\'relu\'),
    tf.keras.layers.Dropout(0.2),
    tf.keras.layers.Dense(10, activation=\'softmax\')
  ])
import datetime
model = create_model()
model.compile(optimizer=\'adam\',
              loss=\'sparse_categorical_crossentropy\',
              metrics=[\'accuracy\'])

log_dir = "logs/fit/" + datetime.datetime.now().strftime("%Y%m%d-%H%M%S")
tensorboard_callback = tf.keras.callbacks.TensorBoard(log_dir=log_dir, histogram_freq=1)

model.fit(x=x_train,
          y=y_train,
          epochs=10,
          validation_data=(x_test, y_test),
          callbacks=[tensorboard_callback])
- 产生日志文件后,就可以在打开的 Tensorboard 界面点击刷新,看到实时训练趋势了

到底了
[Kaggle] dogs-vs-cats之建立模型
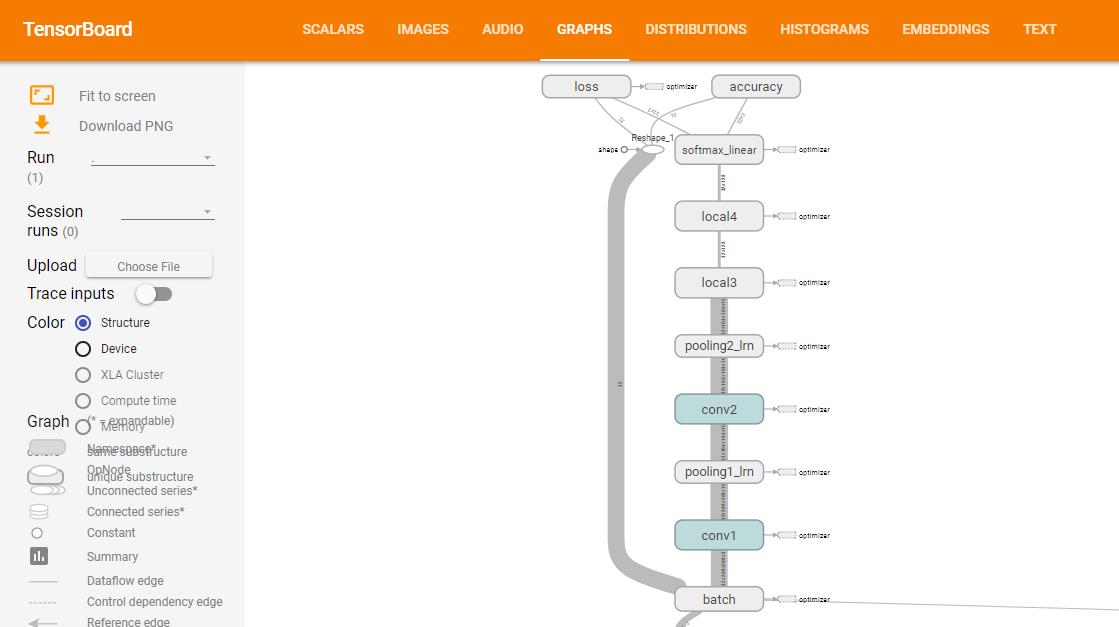
建立神经网络模型,下面要建立的模型如下:
(上图来源:训练网络时,打开tensorboard即可观察网络结构,在下一节模型训练的时候会讲到)
下面为具体步骤:
Step 0:导入相关库
import tensorflow as tfStep 1:定义网络结构
def inference(images, batch_size, n_classes):
    \'\'\'Build the model
    Args:
        images: image batch, 4D tensor, tf.float32, [batch_size, width, height, channels]
    Returns:
        output tensor with the computed logits, float, [batch_size, n_classes]
    \'\'\'
    #conv1, shape = [kernel size, kernel size, channels, kernel numbers]
    #卷积层1
    with tf.variable_scope(\'conv1\') as scope:
        #变量初始化
        weights = tf.get_variable(\'weights\',
                                  shape = [3,3,3, 16],
                                  dtype = tf.float32,
                                  initializer=tf.truncated_normal_initializer(stddev=0.1,dtype=tf.float32))
        biases = tf.get_variable(\'biases\',
                                 shape=[16],
                                 dtype=tf.float32,
                                 initializer=tf.constant_initializer(0.1))
        conv = tf.nn.conv2d(images, weights, strides=[1,1,1,1], padding=\'SAME\')
        pre_activation = tf.nn.bias_add(conv, biases)#加上偏置
        conv1 = tf.nn.relu(pre_activation, name= scope.name)#relu激活函数

    #pool1 and norm1
    with tf.variable_scope(\'pooling1_lrn\') as scope:
        pool1 = tf.nn.max_pool(conv1, ksize=[1,3,3,1],strides=[1,2,2,1],
                               padding=\'SAME\', name=\'pooling1\')
        norm1 = tf.nn.lrn(pool1, depth_radius=4, bias=1.0, alpha=0.001/9.0,
                          beta=0.75,name=\'norm1\')

    #conv2
    with tf.variable_scope(\'conv2\') as scope:
        weights = tf.get_variable(\'weights\',
                                  shape=[3,3,16,16],
                                  dtype=tf.float32,
                                  initializer=tf.truncated_normal_initializer(stddev=0.1,dtype=tf.float32))
        biases = tf.get_variable(\'biases\',
                                 shape=[16],
                                 dtype=tf.float32,
                                 initializer=tf.constant_initializer(0.1))
        conv = tf.nn.conv2d(norm1, weights, strides=[1,1,1,1],padding=\'SAME\')
        pre_activation = tf.nn.bias_add(conv, biases)
        conv2 = tf.nn.relu(pre_activation, name=\'conv2\')


    #pool2 and norm2
    with tf.variable_scope(\'pooling2_lrn\') as scope:
        norm2 = tf.nn.lrn(conv2, depth_radius=4, bias=1.0, alpha=0.001/9.0,
                          beta=0.75,name=\'norm2\')
        pool2 = tf.nn.max_pool(norm2, ksize=[1,3,3,1], strides=[1,1,1,1],
                               padding=\'SAME\',name=\'pooling2\')


    #local3 #全连接层1
    with tf.variable_scope(\'local3\') as scope:
        reshape = tf.reshape(pool2, shape=[batch_size, -1])#转换为一维
        dim = reshape.get_shape()[1].value#获取第二维的长度
        weights = tf.get_variable(\'weights\',
                                  shape=[dim,128],
                                  dtype=tf.float32,
                                  initializer=tf.truncated_normal_initializer(stddev=0.005,dtype=tf.float32))
        biases = tf.get_variable(\'biases\',
                                 shape=[128],
                                 dtype=tf.float32,
                                 initializer=tf.constant_initializer(0.1))
        local3 = tf.nn.relu(tf.matmul(reshape, weights) + biases, name=scope.name)

    #local4
    with tf.variable_scope(\'local4\') as scope:
        weights = tf.get_variable(\'weights\',
                                  shape=[128,128],
                                  dtype=tf.float32,
                                  initializer=tf.truncated_normal_initializer(stddev=0.005,dtype=tf.float32))
        biases = tf.get_variable(\'biases\',
                                 shape=[128],
                                 dtype=tf.float32,
                                 initializer=tf.constant_initializer(0.1))
        local4 = tf.nn.relu(tf.matmul(local3, weights) + biases, name=\'local4\')


    # softmax
    with tf.variable_scope(\'softmax_linear\') as scope:
        weights = tf.get_variable(\'softmax_linear\',
                                  shape=[128, n_classes],
                                  dtype=tf.float32,
                                  initializer=tf.truncated_normal_initializer(stddev=0.005,dtype=tf.float32))
        biases = tf.get_variable(\'biases\',
                                 shape=[n_classes],
                                 dtype=tf.float32,
                                 initializer=tf.constant_initializer(0.1))
        softmax_linear = tf.add(tf.matmul(local4, weights), biases, name=\'softmax_linear\')

    return softmax_linear
函数介绍:
1)tf.variable_scope
通过
tf.get_variable()为变量名指定命名空间。
2)tf.get_variable
通过所给的名字,创建或者返回一个变量。
以上两个函数详情参考:共享变量:http://wiki.jikexueyuan.com/project/tensorflow-zh/how_tos/variable_scope.html
3)tf.nn.conv2d
conv2d(
input,
filter,
strides,
padding,
use_cudnn_on_gpu=True,
data_format=\'NHWC\',
name=None
)作用:对给定的4-D输入和卷积核(filter)做2-D的卷积。
输入的张量(tensor)大小为[batch, in_height, in_width, in_channels],卷积核(filter/kernel)的大小为[filter_height, filter_width, in_channels, out_channels]。
Strides一般为[1, stride, stride, 1];
padding,取值"SAME", "VALID"。
4)tf.nn.bias_add
bias_add(

    value,

    bias,

    data_format=None,

    name=None

)
作用:将bias添加至value。
tf.nn.bias_add 是 tf.add 的一个特例,也即 tf.add 支持的操作比 tf.nn.bias_add 更多。二者均支持 broadcasting(广播机制),也即两个操作数最后一个维度保持一致。除了支持最后一个维度保持一致的两个操作数相加外,tf.add 还支持第二个操作数是一维的情况。
5)tf.nn.relu
relu(

    features,

    name=None

)
作用:是计算激活函数relu,即max(features, 0)。
6)tf.nn.max_pool
max_pool(

    value,

    ksize,

    strides,

    padding,

    data_format=\'NHWC\',

    name=None

)
作用:计算池化区域中元素的最大值
输入参数:
value: 一个四维的Tensor。数据维度是 [batch, height, width, channels]。数据类型是float32,float64,qint8,quint8,qint32。
ksize: 一个长度不小于4的整型数组。每一位上面的值对应于输入数据张量中每一维的窗口对应值。
strides: 一个长度不小于4的整型数组。该参数指定滑动窗口在输入数据张量每一维上面的步长。
padding: 一个字符串,取值为 SAME 或者 VALID 。
name: (可选)为这个操作取一个名字。
7)tf.nn.lrn
作用:局部响应归一化
Step 2:定义损失函数
def losses(logits, labels):
    \'\'\'Compute loss from logits and labels
    Args:
        logits: logits tensor, float, [batch_size, n_classes]
        labels: label tensor, tf.int32, [batch_size]

    Returns:
        loss tensor of float type
    \'\'\'
    with tf.variable_scope(\'loss\') as scope:#sparse  不需要one hot encoding
        cross_entropy = tf.nn.sparse_softmax_cross_entropy_with_logits\\
                        (logits=logits, labels=labels, name=\'xentropy_per_example\')
        loss = tf.reduce_mean(cross_entropy, name=\'loss\')
        tf.summary.scalar(scope.name+\'/loss\', loss)
    return loss
函数介绍:
1) tf.nn.sparse_softmax_cross_entropy_with_logits
sparse_softmax_cross_entropy_with_logits(

    _sentinel=None,

    labels=None,

    logits=None,

    name=None

)
作用:计算logits和labels之间的softmax交叉熵。
第一个参数logits:就是神经网络最后一层的输出,如果有batch的话,它的大小就是[batchsize,num_classes],单样本的话,大小就是num_classes。
第二个参数labels以前也必须是[batch_size, num_classes]否则无法做Cross Entropy(softmax_cross_entropy_with_logits的用法),这个函数改为限制更强的[batch_size],而值必须是从0开始编码的int32或int64,而且值范围是[0, num_class)。
2) tf.reduce_mean
作用:计算输入tensor的均值
3)tf.summary.scalar
scalar(

    name,

    tensor,

    collections=None,

    family=None

)
作用:输出一个包含单个标量值的
Summaryprotocol buffer 。
Step 3:定义训练方法
def trainning(loss, learning_rate):
    \'\'\'Training ops, the Op returned by this function is what must be passed to
        \'sess.run()\' call to cause the model to train.

    Args:
        loss: loss tensor, from losses()

    Returns:
        train_op: The op for trainning
    \'\'\'
    with tf.name_scope(\'optimizer\'):
        optimizer = tf.train.AdamOptimizer(learning_rate= learning_rate)
        global_step = tf.Variable(0, name=\'global_step\', trainable=False)
        train_op = optimizer.minimize(loss, global_step= global_step)
    return train_op
函数介绍:
1)tf.train.AdamOptimizer
__init__(

    learning_rate=0.001,

    beta1=0.9,

    beta2=0.999,

    epsilon=1e-08,

    use_locking=False,

    name=\'Adam\'

)
作用:利用Adam algorithm来
2)optimizer.minimize
minimize(

    loss,

    global_step=None,

    var_list=None,

    gate_gradients=GATE_OP,

    aggregation_method=None,

    colocate_gradients_with_ops=False,

    name=None,

    grad_loss=None

)
作用:最小化loss。
global_step: Optional Variable to increment by one after the variables have been updated.
Step4:定义评估方法
def evaluation(logits, labels):
  """Evaluate the quality of the logits at predicting the label.
  Args:
    logits: Logits tensor, float - [batch_size, NUM_CLASSES].
    labels: Labels tensor, int32 - [batch_size], with values in the
      range [0, NUM_CLASSES).
  Returns:
    A scalar int32 tensor with the number of examples (out of batch_size)
    that were predicted correctly.
  """
  with tf.variable_scope(\'accuracy\') as scope:
      correct = tf.nn.in_top_k(logits, labels, 1)
      correct = tf.cast(correct, tf.float16)
      accuracy = tf.reduce_mean(correct)
      tf.summary.scalar(scope.name+\'/accuracy\', accuracy)
  return accuracy
函数介绍:
1)tf.nn.in_top_k
in_top_k(

    predictions,

    targets,

    k,

    name=None

)
作用:返回targets是否位于前K个predictions中,True或者False。
Predictions:float32类型的Tensor,大小为batch_sizexclasses
Targets:必须是int32或者int64的Tensor。类id组成的batch_size大小的向量。
说明:
代码来自:https://github.com/kevin28520/My-TensorFlow-tutorials,略有修改
函数作用主要参考tensorflow官网。https://www.tensorflow.org/versions/master/api_docs/
以上是关于Kaggle上使用Tensorboard的主要内容,如果未能解决你的问题,请参考以下文章
