. Zabbix监控-系统基础监控配置
Posted Jesson
tags:
篇首语:本文由小常识网(cha138.com)小编为大家整理,主要介绍了. Zabbix监控-系统基础监控配置相关的知识,希望对你有一定的参考价值。
47 监控系统基础及zabbix介绍zabbix工作原理及安装配置zabbix on CentOS7zabbix配置
02 zabbix工作原理及安装配置
配置环境
node1192.168.1.120CentOS6.7
node2192.168.1.121CentOS6.7
1、安装配置zabbix
#安装前准备
[[email protected] ~]#yum -y install mysql-server mysq
[[email protected] ~]# mysql
mysql> CREATE DATABASE zabbix CHARACTER SET utf8;
mysql> GRANT ALL on zabbix.* TO ‘zbxuser‘@‘192.168.1.%‘ IDENTIFIED BY ‘zbxpass‘;
mysql>GRANT ALL on zabbix.* TO ‘zbxuser‘@‘node1‘ IDENTIFIED BY ‘zbxpass‘;
mysql> FLUSH PRIVILEGES;
mysql> \q
#安装zabbix
[[email protected] ~]# cd zabbix-2.4/
[[email protected] zabbix-2.4]# ls
zabbix-2.4.0-1.el6.x86_64.rpm
zabbix-agent-2.4.0-1.el6.x86_64.rpm
zabbix-get-2.4.0-1.el6.x86_64.rpm
zabbix-java-gateway-2.4.0-1.el6.x86_64.rpm
zabbix-proxy-2.4.0-1.el6.x86_64.rpm
zabbix-proxy-mysql-2.4.0-1.el6.x86_64.rpm
zabbix-proxy-pgsql-2.4.0-1.el6.x86_64.rpm
zabbix-proxy-sqlite3-2.4.0-1.el6.x86_64.rpm
zabbix-release-2.4-1.el6.noarch.rpm
zabbix-sender-2.4.0-1.el6.x86_64.rpm
zabbix-server-2.4.0-1.el6.x86_64.rpm
zabbix-server-mysql-2.4.0-1.el6.x86_64.rpm
zabbix-server-pgsql-2.4.0-1.el6.x86_64.rpm
zabbix-web-2.4.0-1.el6.noarch.rpm
zabbix-web-japanese-2.4.0-1.el6.noarch.rpm
zabbix-web-mysql-2.4.0-1.el6.noarch.rpm
zabbix-web-pgsql-2.4.0-1.el6.noarch.rpm
[[email protected] zabbix-2.4]# yum -y install zabbix-release-2.4-1.el6.noarch.rpm
[[email protected] zabbix-2.4]# yum install zabbix-server-2.4.0-1.el6.x86_64.rpm \
zabbix-server-mysql-2.4.0-1.el6.x86_64.rpm zabbix-get-2.4.0-1.el6.x86_64.rpm \
zabbix-2.4.0-1.el6.x86_64.rpm zabbix-web-2.4.0-1.el6.noarch.rpm \
zabbix-web-mysql-2.4.0-1.el6.noarch.rpm zabbix-agent-2.4.0-1.el6.x86_64.rpm \
zabbix-sender-2.4.0-1.el6.x86_64.rpm -y
#配置zabbix服务端
[[email protected] zabbix-2.4]# cd /etc/zabbix/
[[email protected] zabbix]# ls
web zabbix_agentd.conf zabbix_agentd.d zabbix_server.conf
[[email protected] zabbix]# service httpd start
[[email protected] zabbix]# ls /etc/httpd/conf.d/
php.conf README welcome.conf zabbix.conf
[[email protected] zabbix]# cd /usr/share/doc/zabbix-server-mysql-2.4.0/
[[email protected] zabbix-server-mysql-2.4.0]# ls
create upgrades
[[email protected] zabbix-server-mysql-2.4.0]# cd create/
[[email protected] create]# ls
data.sql images.sql schema.sql
[[email protected] create]# mysql zabbix < schema.sql
[[email protected] create]# mysql zabbix < images.sql
[[email protected] create]# mysql zabbix < data.sql
[[email protected] create]# cd /etc/zabbix/
[[email protected] zabbix]# vim zabbix_server.conf
修改
# DBHost=localhost
为
DBHost=192.168.1.120
修改
DBUser=zabbix
为
DBUser=zbxuser
修改
# DBPassword=
为
DBPassword=zbxpass
修改
DBSocket=/var/lib/mysql/mysql.sock
为
DBSocket=/tmp/mysql.sock
[[email protected] zabbix]# service zabbix-server start
配置zabbix web
[[email protected] zabbix]# cd
[[email protected] ~]# vim /etc/php.ini
修改
;date.timezone =
为
date.timezone = Asia/Shanghai
[[email protected] ~]# service httpd restart
登录
http://192.168.1.120/zabbix/setup.php
配置Configure DB connection
Database type:MySQL
Database host:192.168.1.120
Database name:zabbix
User:zbxuser
Password:zbxpass
Zabbix server details
Host:192.168.1.120
Name:node1
默认登录用户名密码:admin/zabbix
2、监控主机
配置监控主机监控自己
[[email protected] ~]# cd /etc/zabbix/
[[email protected] zabbix]# vim zabbix_agentd.conf
修改
Server=127.0.0.1
为
Server=127.0.0.1,192.168.1.120
修改
ServerActive=127.0.0.1
为
ServerActive=127.0.0.1,192.168.1.120
修改
Hostname=Zabbix server
为
Hostname=node1#主机名要使用DNS解析的域名,最好局域网中唯一
[[email protected] zabbix]# service zabbix-agent start
添加监控主机
1、Agentd端配置
[[email protected] ~]# scp -r zabbix-2.4/ node2:/root
[[email protected] zabbix-2.4]# yum -y install zabbix-2.4.0-1.el6.x86_64.rpm zabbix-agent-2.4.0-1.el6.x86_64.rpm zabbix-sender-2.4.0-1.el6.x86_64.rpm
[[email protected] zabbix-2.4]# cd /etc/zabbix/
[[email protected] zabbix]# vim zabbix_agentd.conf
修改
Server=127.0.0.1
为
Server=192.168.1.120
修改
ServerActive=127.0.0.1
为
ServerActive=192.168.1.120
修改
Hostname=Zabbix server
为
Hostname=node2
[[email protected] zabbix]# service zabbix-agent start
2、登录zaggix-agent配置
网址:http://192.168.1.131/zabbix/
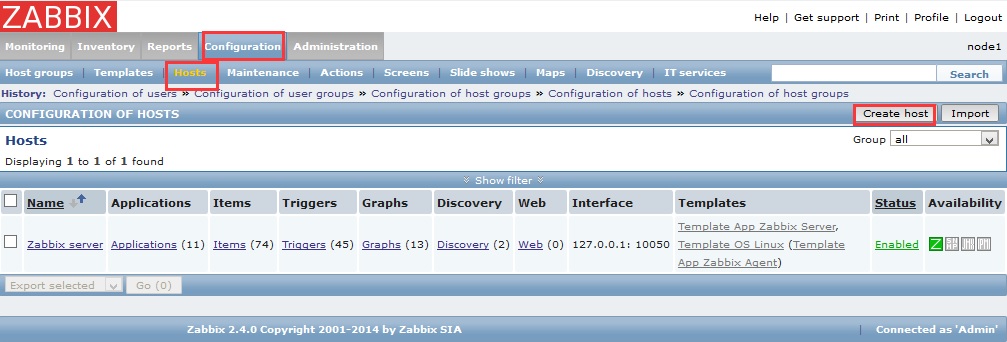
2.1、Create host
Configuration->Hosts=>Create host
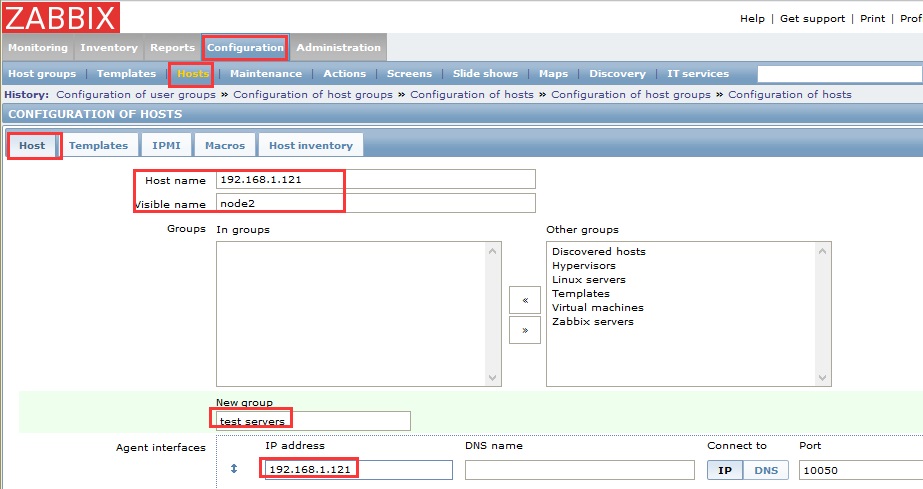
2.2、配置Hosts
2.2.1、Hosts=>Host
点击“Add”,完成添加主机!
03 zabbix on CentOS 7
1、安装zabbix
[[email protected] ~]# rpm -ivh epel-release-latest-7.noarch.rpm
[[email protected] ~]# yum -y install mariadb-server
[[email protected] ~]# vim /etc/my.cnf
添加
innodb_file_per_table = 1
skip_name_resolve = 1
[[email protected] ~]# systemctl start mariadb.service
[[email protected] ~]# ls *rpm
epel-release-latest-7.noarch.rpm
zabbix-2.4.6-1.el7.x86_64.rpm
zabbix-agent-2.4.6-1.el7.x86_64.rpm
zabbix-get-2.4.6-1.el7.x86_64.rpm
zabbix-java-gateway-2.4.6-1.el7.x86_64.rpm
zabbix-sender-2.4.6-1.el7.x86_64.rpm
zabbix-server-2.4.6-1.el7.x86_64.rpm
zabbix-server-mysql-2.4.6-1.el7.x86_64.rpm
zabbix-web-2.4.6-1.el7.noarch.rpm
[[email protected] ~]# yum install *rpm -y
2、配置zabbix
[[email protected] ~]# mysql
MariaDB [(none)]> CREATE DATABASE zabbix CHARACTER SET utf8 COLLATE utf8_bin;
MariaDB [(none)]> GRANT ALL ON zabbix.* TO ‘zbxuser‘@‘192.168.1.%‘ IDENTIFIED BY ‘zbxpass‘;
MariaDB [(none)]> FLUSH PRIVILEGES;
MariaDB [(none)]> \q
[[email protected] ~]# cd /usr/share/doc/zabbix-server-mysql-2.4.6/create/
[[email protected] create]# ls
data.sql images.sql schema.sql
[[email protected] create]# mysql zabbix < schema.sql
[[email protected] create]# mysql zabbix < images.sql
[[email protected] create]# mysql zabbix < data.sql
[[email protected] create]# cd /etc/zabbix/
[[email protected] zabbix]# ls
web zabbix_agentd.d zabbix_server.conf
zabbix_agentd.conf zabbix_java_gateway.conf
[[email protected] zabbix]# vim zabbix_server.conf
修改
# DBHost=localhost
为
DBHost=192.168.1.131
修改
DBUser=zabbix
为
DBUser=zbxuser
修改
# DBPassword=
为
DBPassword=zbxpass
[[email protected] zabbix]# systemctl start zabbix-server.service
3、配置zabbix-web
[[email protected] zabbix]# cd /etc/httpd/conf.d/
[[email protected] conf.d]# vim zabbix.conf
修改
# php_value date.timezone Europe/Riga
为
php_value date.timezone Asia/Shanghai
[[email protected] conf.d]# systemctl start httpd.service
访问
http://192.168.1.131/zabbix/setup.php
Configure DB connection
Database type MySQL
Database host 192.168.1.131
Database namezabbix
userzbxuser
passwordzbxpass
默认登录用户名密码:Admin/zabbix
4、监控服务器本机启用监控
[[email protected] conf.d]# cd /etc/zabbix/
[[email protected] zabbix]# vim zabbix_agentd.conf
[[email protected] zabbix]# systemctl start zabbix-agent.service
04 zabbix配置入门
1、添加监控主机
[[email protected] ~]# ls *rpm
zabbix-2.4.6-1.el7.x86_64.rpm zabbix-sender-2.4.6-1.el7.x86_64.rpm
zabbix-agent-2.4.6-1.el7.x86_64.rpm
[[email protected] ~]# yum -y install *rpm
[[email protected] ~]# cd /etc/zabbix/
[[email protected] zabbix]# vim zabbix_agentd.conf
修改
Server=127.0.0.1
为
Server=192.168.1.120
修改
ServerActive=127.0.0.1
为
ServerActive=192.168.1.120
修改
Hostname=Zabbix server
为
Hostname=node2
[[email protected] zabbix]# service zabbix-agent start
#添加SNMP监控
[[email protected] zabbix]# yum -y install net-snmp
[[email protected] zabbix]# service snmpd start
2、监控项
#查找所有可用的Key
MariaDB [zabbix]> use zabbix;
MariaDB [zabbix]> SELECT key_,type FROM items;
注:type值为0的为zabbix_agent提供的
#获取指定主机的system.uname
[[email protected] ~]# zabbix_get -s 192.168.1.132 -k "system.uname"
Linux node2 3.10.0-327.el7.x86_64 #1 SMP Thu Nov 19 22:10:57 UTC 2015 x86_64
#获取指定主机的网卡流出流量
[[email protected] ~]# zabbix_get -s 192.168.1.132 -k "net.if.out[eno16777736]"
1375696
#获取指定主机的网卡流入流量
[[email protected] ~]# zabbix_get -s 192.168.1.132 -k "net.if.in[eno16777736]"
36396519
#获取指定主机的CPU中断次数
[[email protected] ~]# zabbix_get -s 192.168.1.132 -k "system.cpu.intr"
7804460
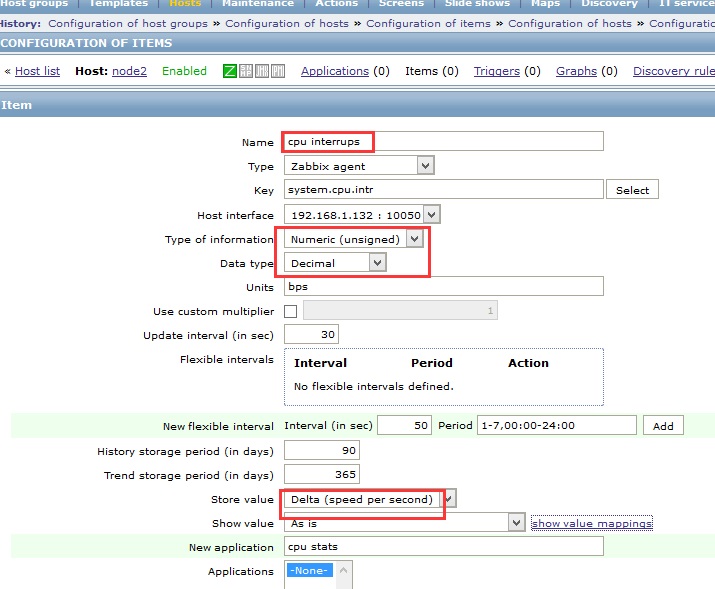
1、添加items
1.1、Configuration=>Hosts,在主机中点击“items”=>"Create item",录入相关属性,“Add”
1.3、添加items属性
单击“Add”
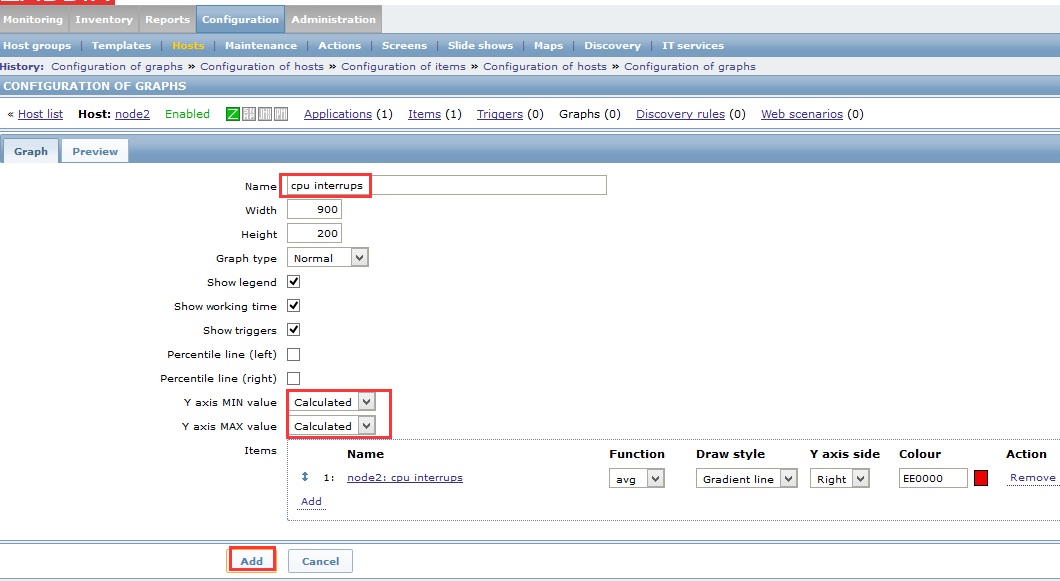
2、添加Graphs
2.1、 Configuration=>Hosts
2.2、Create graph
2.3、填写Graphs的各属性
3、创建Triggers
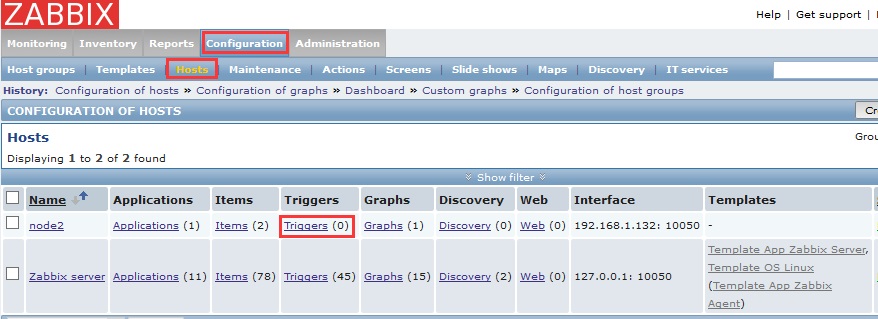
3.1、Configuration=>Hosts=>Triggers
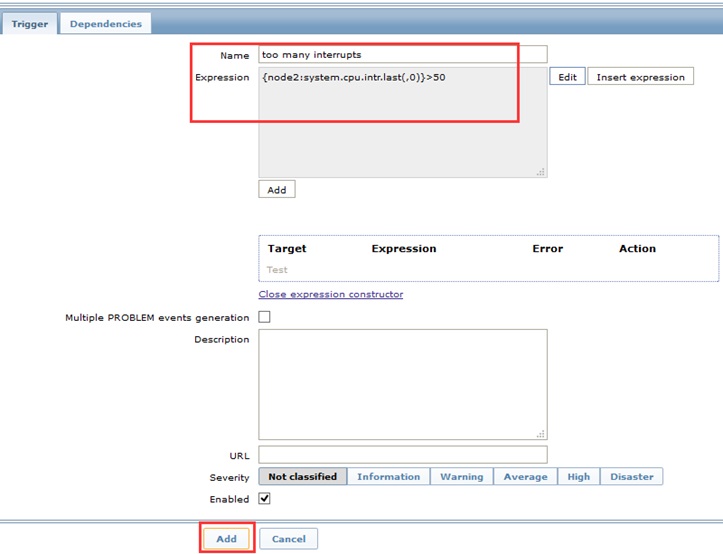
3.2、Create Trigger
3.3、填写Triggers属性
4、配置通知方式
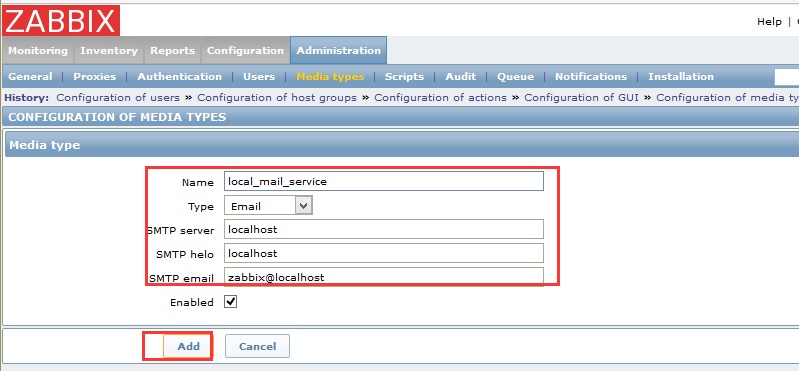
4.1、Administration=>Media types=>Createmedia type
4.2、配置通知属性
5、创建接收邮件用户
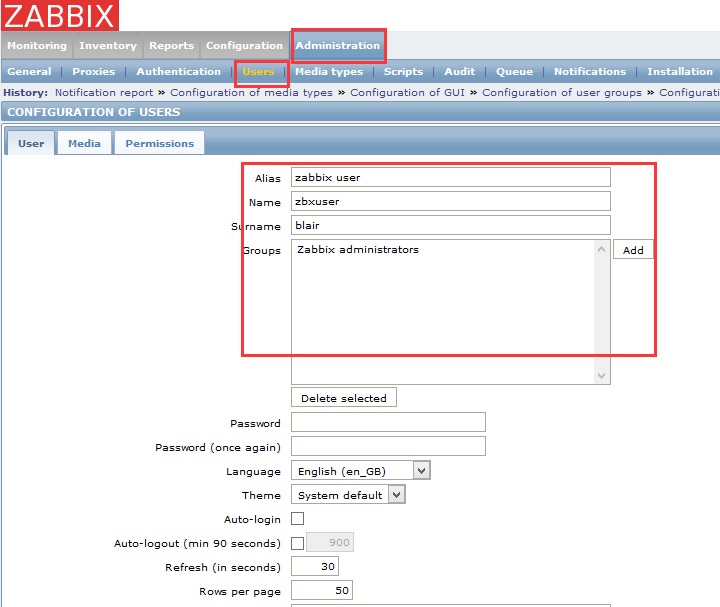
5.1、Administration=>Users=>users
5.2、Administration=>Users=>user
5.3、Administration=>Users=>Media
6、配置报警功能
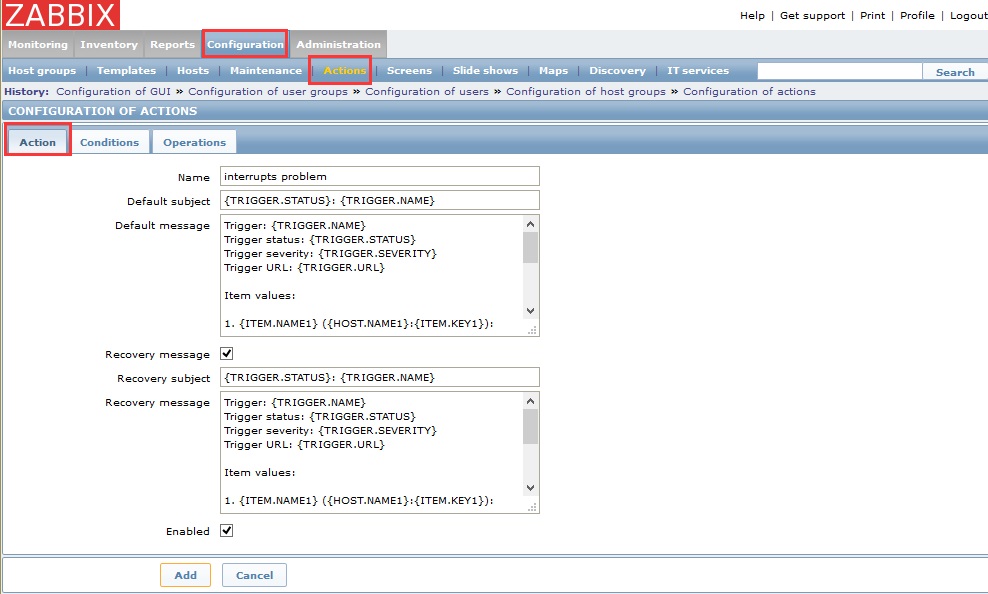
6.1、Configuration=>Actions=>Creat eaction
6.2.1、Configuration=>Actions=>Action
Name: interrupts problem
Default message:
Trigger: {TRIGGER.NAME}
Trigger status: {TRIGGER.STATUS}
Trigger severity: {TRIGGER.SEVERITY}
Trigger URL: {TRIGGER.URL}
Item values:
1. {ITEM.NAME1} ({HOST.NAME1}:{ITEM.KEY1}):{ITEM.VALUE1}
2. {ITEM.NAME2} ({HOST.NAME2}:{ITEM.KEY2}):{ITEM.VALUE2}
3. {ITEM.NAME3} ({HOST.NAME3}:{ITEM.KEY3}):{ITEM.VALUE3}
Original event ID: {EVENT.ID}
FROM: mail.magedu.com
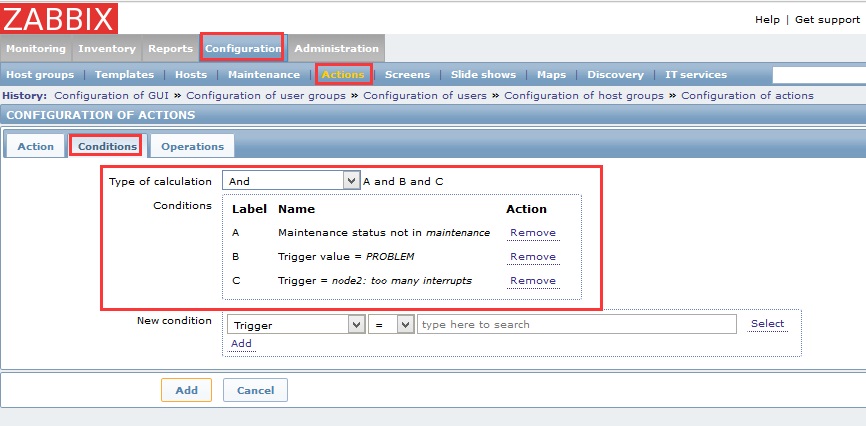
6.2.2、Configuration=>Actions=>Conditions
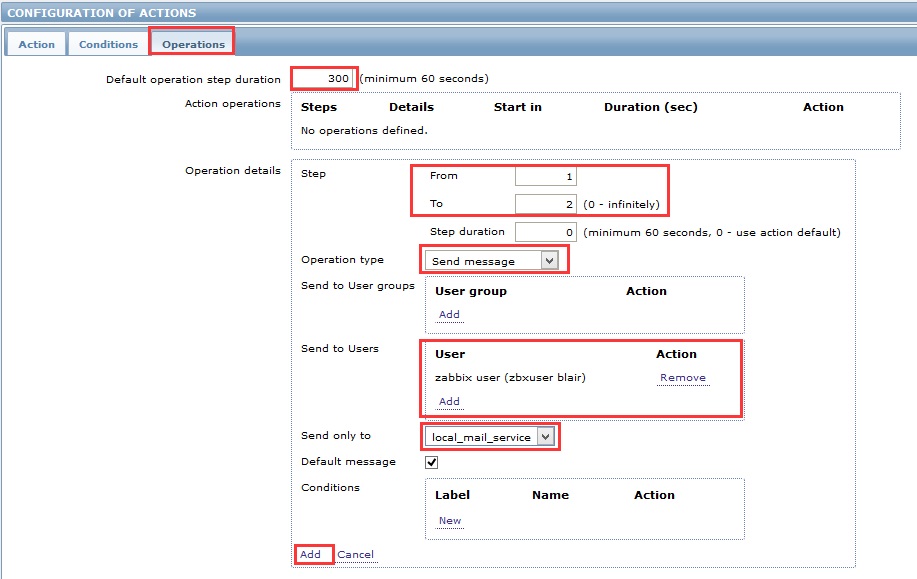
6.3.1、Configuration=>Actions=>Operations=New
6.3.2、配置New属性
[[email protected] ~]# yum -y install hping3
[[email protected] ~]# hping 192.168.1.132 --faster
05 zabbix基本配置入门
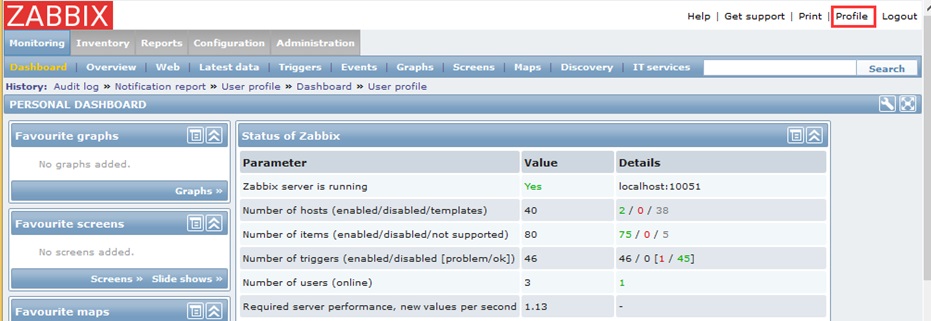
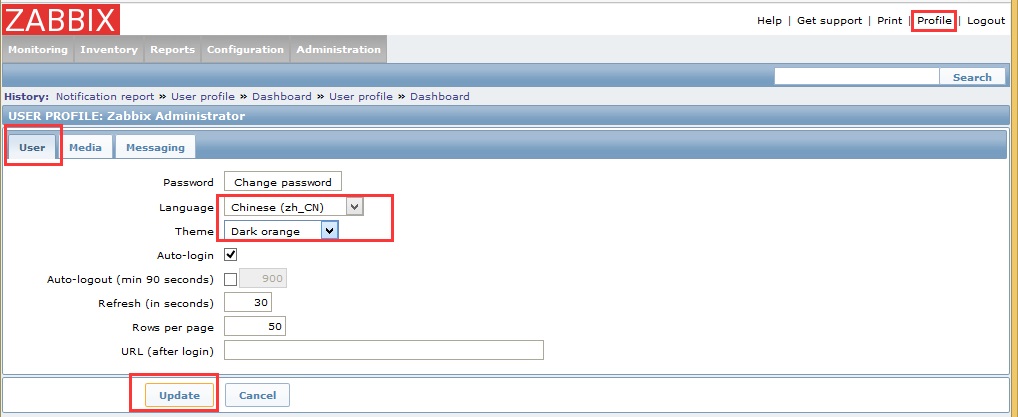
1、修改zabbix显示语言
1.1、点击屏幕右上角的“Profile”
1.2、修改显示语言
[[email protected] ~]# vim /etc/zabbix/zabbix_agentd.conf
本文出自 “追梦” 博客,请务必保留此出处http://sihua.blog.51cto.com/377227/1883587
以上是关于. Zabbix监控-系统基础监控配置的主要内容,如果未能解决你的问题,请参考以下文章
