axiom——一款基于云的分布式网络安全扫描工具框架
Posted tech_lee
tags:
篇首语:本文由小常识网(cha138.com)小编为大家整理,主要介绍了axiom——一款基于云的分布式网络安全扫描工具框架相关的知识,希望对你有一定的参考价值。
分布式信息收集扫描工具框架,一键创建云上多实例分布式扫描。
github:https://github.com/pry0cc/axiom/
安装
官网上提供了四种方式,分别是Docker、Easy Install、Using Git Clone、Manual
我喜欢使用Git CLone的方式(可以在本地搭建也可以在VPS上搭建):
-
Ensure that ~/.axiom/ does not exist
rm -rf ~/.axiom/ -
Clone the axiom repository
git clone https://github.com/pry0cc/axiom ~/.axiom/ -
Run configure script
$HOME/.axiom/interact/axiom-configure
执行axiom-configure会自动安装依赖,需要填入云平台的key(这里支持多个云平台,我选择的AWS)
填入key和secret后再选择region,填写需要创建的镜像类型(如果是结合reconftw使用,就选择reconftw,常规保持默认default)
We currently offer three different base provisioner files, and 2 custom provisioner file to build images.
- Default is our latest iteration of axiom provisioners. It comes with all tools installed and has been optimized for readability. Recommended for axiom-fleet.
- ReconFTW provisioner includes all tools in ReconFTW and works with most modules. Recommended for ReconFTW.
- Barebones is our decently secure base install, comes with Docker, Go-lang, Interlace and nmap installed. Recommended for templating.
Custom Images:
之后就会自动在你所在的云平台创建image(之后分布式任务都是基于该image镜像,从image创建多个实例然后分布式的跑任务)
在安装成功后,基本如下这样:
Your build completed successfully in xx minutes! You should run axiom-update && axiom-build weekly to get the latest and greatest updates!
To initialize an instance, run axiom-init
You may need to restart your shell: /usr/bin/bash
然后重启下shell,尝试axiom-init创建一个实例,如果可以成功创建,会出现以下回显:
Initializing \'gates22\' at \'us-west-2\' with image \'axiom-default-1681197876\'
INITIALIZING IN 5 SECONDS, CTRL+C to quit...
Initialized instance \'gates22\' at \'54.202.75.136\'!
To connect, run \'axiom-ssh gates22\' or \'axiom-connect\'
然后就可以使用axiom-ssh gates22 or axiom-connect进行ssh连接:
ubuntu@ip-172-26-12-147:~/.axiom$ axiom-connect
The authenticity of host \'[54.202.75.136]:2266 ([54.202.75.136]:2266)\' can\'t be established.
ECDSA key fingerprint is SHA256:7Jwl55zMmk0RVuTaFpVkcXh0avGNSvUpK1J8zEc/GXo.
Are you sure you want to continue connecting (yes/no/[fingerprint])? yes
Warning: Permanently added \'[54.202.75.136]:2266\' (ECDSA) to the list of known hosts.

 ▄▄▄      ▒██   ██▒ ██▓ ▒█████   ███▄ ▄███▓
▒████▄    ▒▒ █ █ ▒░▓██▒▒██▒  ██▒▓██▒▀█▀ ██▒
▒██  ▀█▄  ░░  █   ░▒██▒▒██░  ██▒▓██    ▓██░
░██▄▄▄▄██  ░ █ █ ▒ ░██░▒██   ██░▒██    ▒██
 ▓█   ▓██▒▒██▒ ▒██▒░██░░ ████▓▒░▒██▒   ░██▒
 ▒▒   ▓▒█░▒▒ ░ ░▓ ░░▓  ░ ▒░▒░▒░ ░ ▒░   ░  ░
  ▒   ▒▒ ░░░   ░▒ ░ ▒ ░  ░ ▒ ▒░ ░  ░      ░

Public IP: 54.202.75.136 - Instance: ip-172-31-22-71
这样就表示已经安装好了。
基本使用
axiom-images
管理镜像、快照
axiom-images ls # List available images
axiom-images use <image name> # Replace image used for axiom-init/axiom-fleet with user provided image name
axiom-images rm <image name> # Delete image by name
axiom-init
初始化一个实例
axiom-init <name> # Init
axiom-init <name> --deploy <profile> --restore <box> # Init & deploy & restore
#Note: profile argument is file name is without .json
axiom-ls
列出当前运行的实例
axiom-ls
axiom-exec
在实例上运行命令
  axiom-exec id # Execute command id across all instances currently selected.conf (located in ~/.axiom/selected.conf)
  axiom-exec ifconfig --fleet testy # Execute ifconfig on testy fleet. Automatically select all instances in fleet testy
  axiom-exec sleep "$(($RANDOM % 10))" "&& id &&" echo $HOSTNAME --fleet stok # Evaluate complex one-liners on fleet stok
  axiom-exec \'sudo apt dist-upgrade -y\' -q --cache --fleet OtherFleet --tmux MySession01 # Quietly execute command(s) inside a detacted tmux session on the remote instances with custom session name
  axiom-exec whoami -q --cache --sshconfig ~/.axiom/log/exec/axiom-exec+1234567890/sshconfig --fleet oldfleet --tmux # Specify the axiom SSH config to use (default is ~/.axiom/.sshconfig)
axiom-ssh
通过ssh连接到实例
axiom-connect #automatically connects to list initialized instance
axiom-connect <name>
axiom-ssh <name> <ssh args>
axiom-ssh <name> --tmux # 使用该参数,结合ctrl+a d 可以实现退出ssh窗口但会话依然运行
axiom-ssh <name> -m -t <tmux session> # Connect with mosh and attach to tmux session
axiom-ssh <name> -m -t main-15
axiom-ssh <name> -L 8080:127.0.0.1:8080 -D 4040 # All additional SSH args are passed to SSH
axiom-ssh <name> --cache # Don\'t generate ssh config, just connect with cache
axiom-ssh --just-generate # Generate an SSH config at ~/.axiom/.sshconfig
axiom-backup
将一个初始化的实例备份到云端
axiom-rm
删除一个或多个实例
axiom-rm <name> # Delete box by specifying the name
axiom-rm <name> -f # Forcibly delete box by specifying the
axiom-rm <name>\\* # Delete all instances that start with <name>. You must escape the asterisk.
axiom-rm <name>\\* -f # Forcibly delete all instances that start with <name>. You must escape the asterisk.
axiom-rm \'\\*\' # Delete all instances on the account. Must be wrapped in single quote and escape the asterisk.
axiom-rm \'\\*\' -f # Forcibly delete all instances on the account. Must be wrapped in single quote and escape the asterisk.
axiom-power
实例/集群 开启/关闭/重启
axiom-power on \'rez\\*\' # Power on all instances in fleet named rez
axiom-power off \'rez\\*\' # Power off rez fleet
axiom-power reboot \'rez\\*\' # Reboot rez fleet
axiom-boxes
列出所有备份box
axiom-boxes ls # List boxes
axiom-boxes ls --archive # List archived boxes
axiom-boxes new <box> # Create a blank box backup
axiom-boxes rm <box> # Delete a box backup
axiom-boxes archive <box>  # Archive a box (tarball & gpg -e)
axiom-boxes unarchive <box> # Unarchive (from ~/.axiom/archives/), gpg decrypts
axiom-boxes get pry0cc/lazy # Get a box from  github, username/repo
axiom-region
切换到新的region
axiom-region ls # lists regions
axiom-region select <region> # select region

axiom-region select ams2
axiom-account
设置新账号和切换账号
axiom-account-setup # Setup a new account
axiom-account # No args, list available accounts
axiom-account <account> # Select/Switch to the specified account
axiom-scp
双向复制文件
- 从集群所有实例中复制文件到本地(
$name必须使用单引号)axiom-scp \'myfleet*\':/home/op/myfile.txt \'~/local/folder/$name.txt\' - 从集群所有实例中复制文件到本地文件夹(
$name必须使用单引号)axiom-scp \'myfleet*\':/home/op/myfile/ \'~/local/folder/$name\' - 从实例中复制文件到本地
axiom-scp myfleet05:/home/op/myfile-from-myfleet05.txt \'~/local/folder/myfile-from-myfleet05.txt\' - 从本地复制文件到集群
axiom-scp myfile.txt \'myfleet*\':/home/op/myfile.txt - 从本地复制文件夹到集群
axiom-scp mytemplates/ \'myfleet*\':/home/op/custom-templates
axiom-select
- 部署一个profile
axiom-select \'<instance>\' axiom-select \'testy*\' # Testy is an example of a fleet axiom-deploy openvpn \'<instance>\' # Install openvpn against host or fleet axiom-deploy covenant \'<instance>\' # Install covenant - 连接到远程的axom实例Docker(通过ssh),实际测试会报错Permission denied publickey
axiom-select <instance>
. axiom-docker # Not a typo, the . means source
docker ps
axiom-vpn
连接到在axiom部署的openVPN
axiom-vpn <instance>
axiom-proxy
使用ssh隧道搭建socks代理,本地端口5000-50100之间,会在当前目录生成一个proxychains.conf配置文件。
axiom-proxy \'<fleet>*\'
axiom-proxy \'<instance>\'
axiom-proxy \'testy*\'
proxychains4 curl -s ipinfo.io
axiom-dns
仅支持Digital Ocean VPS,创建一个DNS A记录
axiom-dns ls # List domains
axiom-dns ls <domain> # List records for domain
axiom-dns add <subdomain> <domain> <ip address>
axiom-dns add cisco navisec.xyz 167.71.89.136 # Example, this will create a record cisco.navisec.xyz pointing to 167.71.89.136
axiom-fleet
初始化一个集群
axiom-fleet -i 13 # Initialize a fleet, name it randomly
axiom-fleet testy -i 8 # Initialize a fleet named \'testy\', instances will be named, testy01, test02 etc
axiom-fleet testy -i 10 --regions nyc1,lon1,ams3,fra1 # Initialize a fleet using round-robin region distribution
axiom-scan
集群扫描
axiom-select \'fleet*\' # fleets should be already selected, but just in case, select can be a good idea

# Format
axiom-scan <input> -m <module> -o <text outfile> <any other args>

# Examples
axiom-scan subs.txt -m httpx -o http.txt # httpx module
axiom-scan http.txt -m nuclei -o nuclei.txt # nuclei module, find vulns
axiom-scan http.txt -m gowitness -o screenshots # gowitness, take screenshots
axiom-scan subs.txt -m dnsprobe -o dns.txt # Run dnsprobe

axiom-scan ips.txt -m nmap -oG portscan.txt # nmap
axiom-scan ips.txt -m nmap -oX portscan # Will create both portscan.xml & portscan.html
axiom-scan ips.txt -m nmap -oX full -p- -T5 -sV --script=vulners # Will create full.xml, will pass all args to nmap command

axiom-scan ips.txt -m masscan -oG masscan.txt # Run masscan
集群
Description:
  Spin up fleets of axiom instances in one or multiple regions.
  Specify the name of your fleet (fleet prefix) or have axiom choose for you.
Examples:
  axiom-fleet # Spin up three instances, let axiom decide on the fleet prefix
  axiom-fleet javis -i 10 # Spin up 10 instances with fleet prefix javis from javis01 to javis10
  axiom-fleet jerry -i 25 --regions nyc1,lon1,ams3,fra1 # Spin up 25 instances using Round-robin region distribution
Usage:
  -i/--instances <integer>
    The number of instances to spin up
  -r/--regions <regions> (optional)
    Supply comma-separated regions to cycle through (default is region in ~/.axiom/axiom.json)
  --help (optional)
    Display this help menu
一对多vs多对一
一对多:一个包含多个目标的文件被拆分到集群各个实例中进行工作。
多对一:集群多个实例对同一目标进行分布式工作(将字典拆分后同时进行)
一对多
举例说明:
puredns-bruteforce模块如下:
[
    "command":"/home/op/go/bin/puredns bruteforce /home/op/lists/seclist/Discovery/DNS/dns-Jhaddix.txt --domains input --resolvers /home/op/lists/resolvers.txt | tee output",
    "ext":"txt"
]
这里targets.txt就会进行拆分和上传到各个实例,并在命令中替代到input位置
axiom-scan targets.txt -m puredns-bruteforce -o result.txt
多对一
puredns-bruteforce模块如下:
[
    "command":"/home/op/go/bin/puredns bruteforce input tesla.com --resolvers /home/op/lists/resolvers.txt | tee output",
    "ext":"txt"
]
可见相比之前对module进行了修改,input位置是字典文件,目标则硬编码到module中。
axiom-scan bitquark-subdomains-top100000.txt -m puredns-single -o my-horizontal-results
也可以不将目标硬编码到module,如下:
[
    "command":"/home/op/go/bin/puredns bruteforce input --resolvers /home/op/lists/resolvers.txt | tee output",
    "ext":"txt"
]
axiom-scan bitquark-subdomains-top100000.txt -m puredns-single tesla.com -o myoutput.txt
这里,tesla.com目标作为额外参数,传入命令中了。
分布式扫描
axiom-scan
help
              _
  ____ __  __(_)___  ____ ___        ______________ _____
 / __ `/ |/_/ / __ \\/ __ `__ \\______/ ___/ ___/ __ `/ __ \\
/ /_/ />  </ / /_/ / / / / / /_____(__  ) /__/ /_/ / / / /
\\__,_/_/|_/_/\\____/_/ /_/ /_/     /____/\\___/\\__,_/_/ /_/

                                    @pry0cc
                                 & @0xtavian

axiom-scan provides easy distribution of arbitrary binaries and scripts.
axiom-scan splits user-provided input files (target lists), wordlists and configuration files and uploads them to a unique scan working directory on the remote instance.
axiom-scan combines user-provided command-line arguments with commands in the module and executes the final command on the remote instance.
axiom-scan downloads and merges scan output in a variety of differnet formats, specified by the extention in the module (dir, txt, csv, xml).
individual scanning operations are executed from a detacted tmux session (\\$module+\\$timestamp) inside a unique scan working directory (/home/op/scan/\\$module+\\$timestamp) on the remote instances.
Usage:
   axiom-scan inputfile.txt -m ffuf -w /home/op/wordlist-on-remote-instance
   axiom-scan inputfile.txt -m ffuf -wL /home/localuser/local-wordlist-to-upload
   axiom-scan inputfile.txt -m ffuf -wD /home/localuser/local-wordlist-to-split-and-upload
   axiom-scan inputfile.txt -m nuclei -w /home/op/nuclei-templates -o outputfile.txt
   axiom-scan inputfile.txt -m nuclei --nuclei-templates /home/localuser/local-custom-nuclei-template-folder/ -anew outputfile.txt
   axiom-scan inputfile.txt -m gowitness --spinup 10 -oD gowitness-screenshots
   axiom-scan inputfile.txt -m nmapx -p- -sV -T4 -v --open -oA nampx-scan
Flags:
INPUT:
   string[]              required positional first argument must always be an input file, this can be a list of URLs, IPs, hostnames, etc
   --dont-split          do not split input file, upload entire input file to every instance (default is to split the input file)
   --dont-shuffle        do not randomize input file before uploading (default is to randomize)
MODULE:
   -m string[]           the axiom-scan module to use with the scan
   --list                print all available modules
WORDLIST:
   -w string[]                           replace _wordlist_ in module with user-provided wordlist (must be a path to a remote wordlist)
   -wL string[]                          replace _wordlist_ in module with user-provided local wordlist ( must be a path to a local wordlist)
   -wD,--distribute-wordlist string[]    replace _wordlist_ in module with user-provided local wordlist to split and upload (default does not split the wordlist)
   --nuclei-templates string[]           replace _wordlist_ in module with user-provided local folder
CONFIGURATIONS:
   --config string[]           replace _config_ in module with user-provided configuration file (must be a configuration file on the remote instances)
   --local-config string[]     replace _config_ in module with user-provided local configuration file to upload ( must be a local configuration file)
OPTIMIZATIONS:
   --skip-preflight            do not automatically remove instances that cant be reached (default removes instances from the queue that cant be reached)
   --preflight-timeout int[]   specifies the timeout (in seconds) used when connecting to the SSH server, instead of using the default 10 seconds
   --max-runtime DURATION[]    kill scan if still running after DURATION. DURATION is a floating point number with an optional suffix: \'s\' for seconds (the default), \'m\' for minutes, \'h\' for hours or \'d\' for days.
   --disable-oneshot           by default, if a module contains the string _target_ it is executed as a one-shot module. Use this flag to force disable
OUTPUT:
   -o string[]          output as default (the first ext mentioned in the module)
   -oD/-oA string[]     output as directory (must also be supplied in the module using "ext":"dir" or "ext":"")
   -oX string[]         output as XML/HTML (supported for nmap and masscan)(must also be supplied in the module using "ext":"xml")
   -oG string[]         output as greppable, merge and sort unique (must also be supplied in the module using "ext":"oG")
   -csv string []       output as csv, extract csv header, merge and sort unique (must also be supplied in the module using "ext":"csv")
   -anew string[]       pipe the output to anew before creating the final output file
   --quiet              do not display findings to terminal
   --rm-logs            delete remote and local logs after scan completes
FLEET:
   --fleet string[]            supply fleet prefix to use (default uses instances in $HOME/.axiom/selected.conf)
   --spinup int[]              number of instances to spin up prior to scanning (default uses instances in $HOME/.axiom/selected.conf)
   --rm-when-done              delete the selected instances after the scan completes
   --shutdown-when-done        shutdown the selected instance after the scan completes
   -F string[]                 path to custom SSH config file (default is located at $HOME/.axiom/.sshconfig)
   --cache                     do not regenerate SSH config prior to scan, instead use cached config (located at $HOME/.axiom/.sshconfig)
DEBUG:
   --debug              run with set -xv, warning: very verbose
EXTRA ARGS:
   string[]             supply additional arguments to be passed to the module
工作流举例
# 获取子域名
axiom-scan roots.txt -m subfinder -o subs.txt --threads 3
# 通过子域名解析IP
axiom-scan subs.txt -m dnsx -resp -o dns.txt
# 提取IP
cat dns.txt | awk \' print $2 \' | anew ips.txt
# 去除掉CloudFlare的IP
cat ips.txt | cf-check > ips.txt
# 端口扫描
axiom-scan ips.txt -m masscan -oX masscan.xml -rate=100000
axiom-scan ips.txt -m nmap -oG nmap.txt -T4 -p- -sV
axiom-scan ips.txt -m nmap -oX nmap.xml -T4 -p- -sV
# 解析nmap.xml,输出为ip:host
ports.py nmap.xml | anew hosts.txt
# httpx发送http请求测试存活
axiom-scan hosts.txt -m httpx -o http.txt
# web截图
axiom-scan http.txt -m gowitness -o screenshots
# 扫目录
axiom-scan http.txt -m ffuf -o content.csv --threads 2
使用masscan扫描
axiom-scan ips.txt -m masscan -p80,443 -o masscan.txt
提供给axom-scan的任何参数都会自动传递给底层命令,比如:
axiom-scan ips.txt -m masscan -p80,443,8080 --rate=100000 --banners -o masscan-banners-fast.txt
一旦你有了一个集群,并且选择了它(axiom-select),你就可以使用axiom-scan。axiom-scan是一个工具,允许你在你的集群中执行类似扫描的操作。它至少需要一个参数,这个参数应该是一个可以在本地目录下访问的输入文件,其中有一个目标列表。
你的输入文件中的内容取决于你要运行的扫描的类型。您可以通过使用不同的axom-scan模块来修改扫描行为,这些模块位于~/.axom/modules/,是详细说明扫描行为的简单JSON文件。
Modules
你可以使用-m <module>标志来使用axiom-scan。让我们演示一下针对一个域的列表运行subfinder:
axiom-scan domains.txt -m subfinder -o subf.txt --threads 1
假设你的域名列表大于你的集群中的实例数量,它将把域名拆开,无论你在一个集群中有多少个实例。如果你有3个实例,它将把你的infile拆成3个并全部上传。
一旦上传,它将运行你的模块代码,下载输出,然后分类并将输出合并到一个单一的输出文件。
axiom-scan subsf.txt -m httpx -o http.txt
使用上述命令,我们可以对我们的子域运行httpx,并得到一个URLS的列表。
SZhe_Scan碎遮:一款基于Flask框架的web漏洞扫描神器
天幕如遮,唯我一刀可碎千里华盖,纵横四海而无阻,是谓碎遮
——取自《有匪》
碎遮SZhe_Scan Web漏洞扫描器,基于python flask框架,对输入的域名或IP进行自动化信息搜集与漏洞扫描,支持添加POC进行漏洞检测。
0x01 前言
网络空间已成为继陆、海、空、天四个疆域之后的第五疆域,没有网络安全就没有国家安全。而web是互联网的核心,Web网站上的每一个漏洞,都影响着成千上万的网络用户。碎遮Web漏洞扫描系统是
一款企业政府用于自检自查网站漏洞的运维工具
一款白帽子挖掘各大漏洞平台的辅助利器
一款安全人员对授权项目完成测试工作和学习交流使用的渗透工具
温馨提示:本项目仅进行信息搜集,漏洞探测工作,无漏洞利用、攻击性行为,开发初衷为仅为方便安全人员对授权项目完成测试工作和学习交流使用。
请使用者遵守当地相关法律,勿用于非授权测试,勿用于非授权测试,勿用于非授权测试~~(重要的事情说三遍)~~,如作他用所承受的法律责任一概与作者无关!!!
咳咳,欲知详情,就往下划拉吧~

0x02 工具安装(择其一即可)
源码安装
Python版本:3.X,数据库:MySQL,Redis
Git bash界面输入 git clone https://github.com/Cl0udG0d/SZhe_Scan 进行下载(或者直接下载源代码)
安装python类库
pip3 install-r requirements.txt修改config.py中数据库的账号密码为本地账号密码,将config.py 中 HOSTNAME='mysql' 修改为 HOSTNAME='127.0.0.1',HOST = 'redis' 修改为 HOST = '127.0.0.1'
在phpmyadmin界面导入init.sql.zip文件,自动初始化数据库和表,以及初始用户
运行python3 index.py,浏览器输入127.0.0.1:5000访问漏洞扫描系统
Docker安装
在服务器或本机上安装docker,正所谓工欲善其事,必先利其器~~(网上很多安装文章,此处不再赘述)~~
依次输入以下三条命令
git clone https://github.com/Cl0udG0d/SZhe_Scancd SZhe_Scandocker-compose up -d
运行结束后访问 http://ip:5000
0x03 工具启动
源码安装方式
在开启MySQL和Redis的情况下命令行运行
python3 index.py
浏览器访问 127.0.0.1:5000即可
Docker安装方式
在SZhe_Scan文件夹下,使用
docker-compose up-d
启动docker服务,访问 http://ip:5000 登录进行访问
关于启动登录,你还需要了解 ↓ ↓ ↓
默认账户登录邮箱为:springbird@qq.com,密码为:springbird
登录之后请第一时间修改密码,奥利给!!!
0x04 项目框架
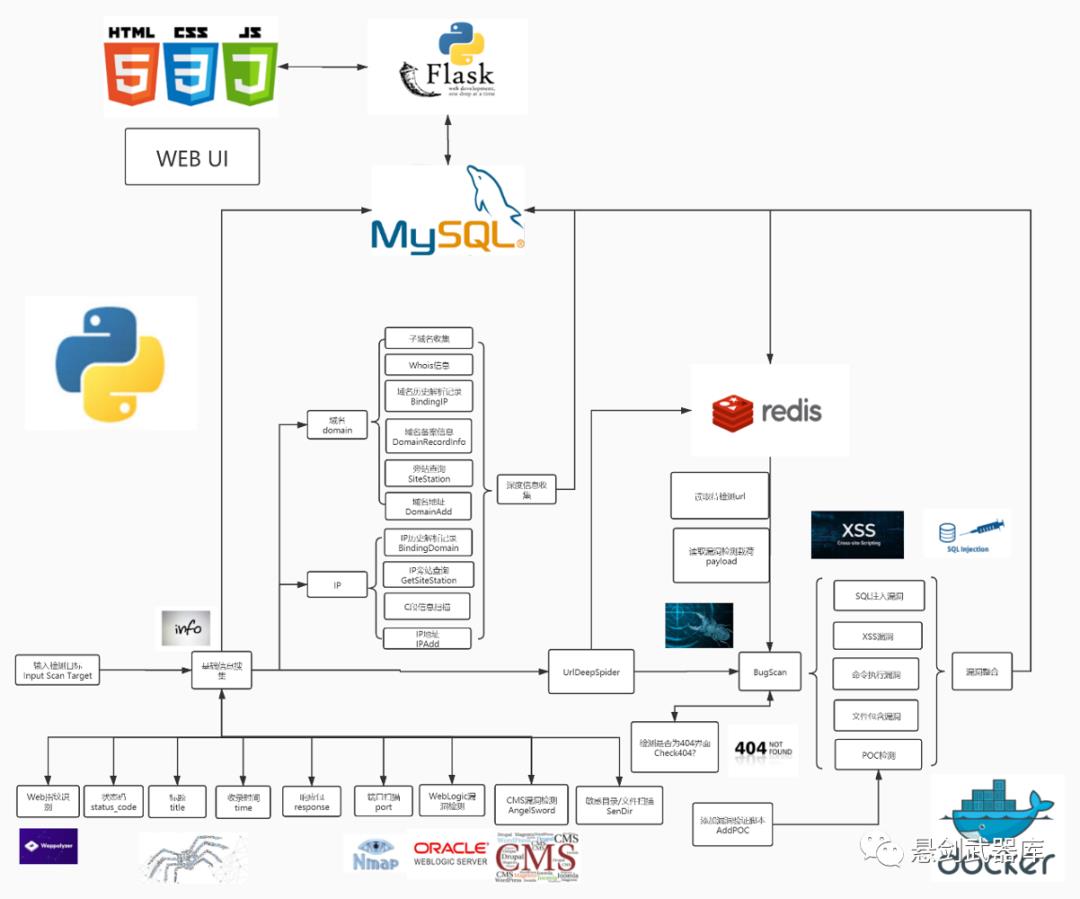
本项目前端使用html+css+javascript进行漏洞扫描系统的可视化,后端基于python-flask框架,
数据库使用到了MySQL和Redis数据库,
持久化存储使用MySQL数据库,存储如用户账号密码,漏洞列表等信息,
Redis数据库用来作为消息队列和攻击载荷payload等会大量重复使用到的数据的存储,
为方便安装,将项目Docker化实现快速部署。
0x05 功能介绍
登录与注册界面

注册界面需要使用系统管理员生成的36位邀请码进行相应注册,防止扫描系统被滥用以及恶意注册,利于打造国内良好的安全生态环境.

~~超爱这两个界面背景图,有深度,有内涵,有思想!!~~
信息收集
基础信息收集
Web指纹识别
目标状态码
标题
响应头
收录时间
端口扫描
WebLogic漏洞检测,整合WeblogicScan项目中的WebLogic模块
https://github.com/rabbitmask/WeblogicScan
CMS漏洞检测,整合AngelSword项目中的几百个POC
https://github.com/Lucifer1993/AngelSword
敏感目录/文件扫描
深度信息收集
域名domain
子域名收集(主动+被动)
Whois信息
域名历史解析记录
域名备案信息
旁站查询
IP
IP历史解析记录
IP旁站查询
C段信息扫描
页面URL深度爬取
多线程+广度优先搜索+深度爬取(默认两层)
漏洞扫描 BugScan
SQL注入漏洞检测
XSS漏洞检测
命令执行漏洞检测
文件包含漏洞检测
自添加POC漏洞检测
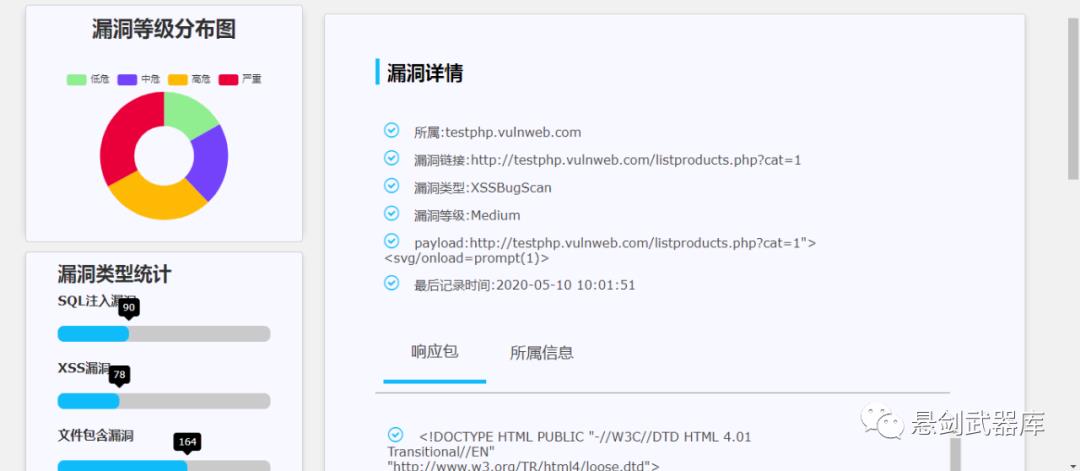
0x06 运行截图
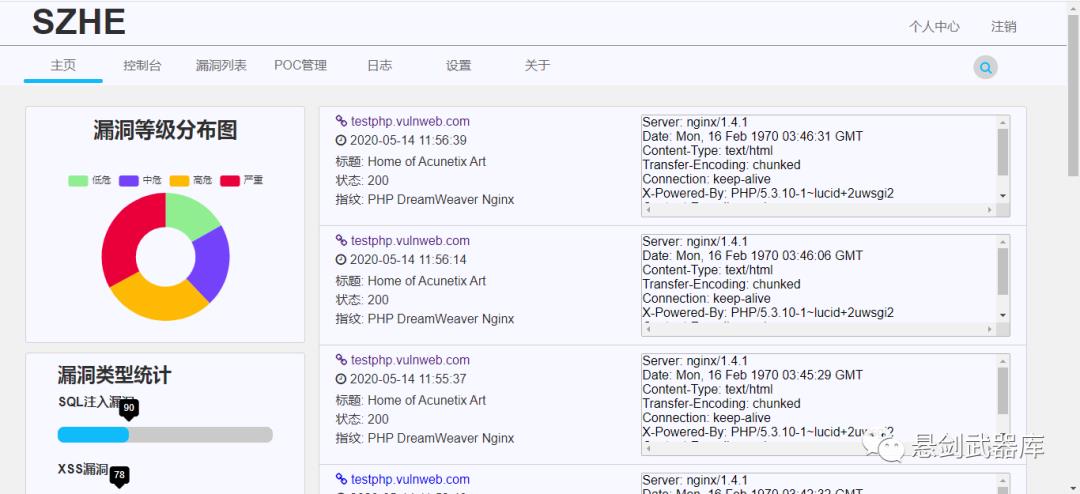
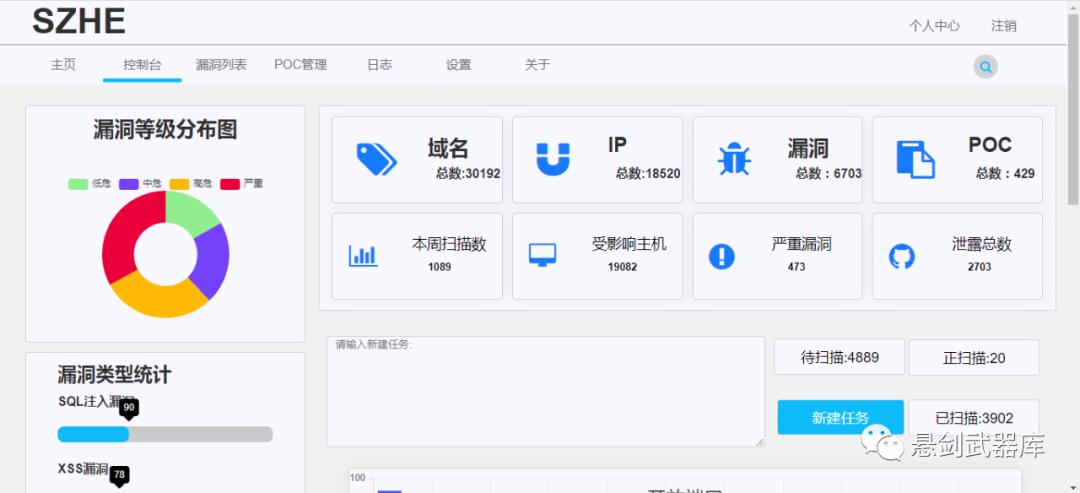
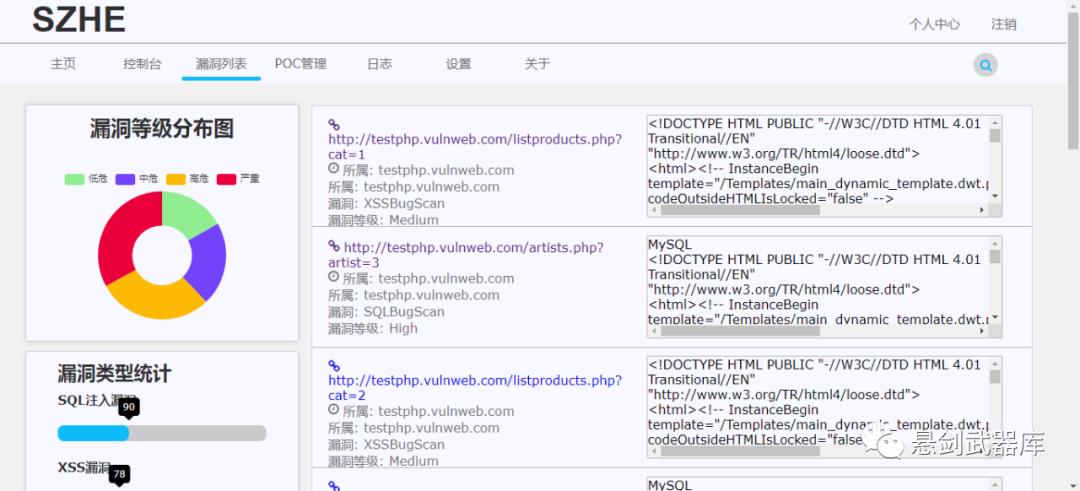
0x07 扫描器未来规划
不为明天做准备的人永远不会有未来, 未来的还需要努力, 但需要及早地做出规划 ~~(盆友们干了这碗鸡汤)~~
把已知不足的地方完善,修bug,完善自带POC和指纹信息
增加fuzz漏洞发现模块等
考虑分布式部署
如果作者们想不开的话或许会使用Go语言重写整个项目
0x08 作者简介
重庆某大学某三个大二学生
春告鳥: 低配韩商言 七叔: 我特别好,特别值得 不董: 普通小孩,惟适之安
最重要的是,有两个妹子.........
0x09 项目地址
https://github.com/Cl0udG0d/SZhe_Scan
~~如果爱我,你就点点我~~~ 嘿!嘿!~~如果爱我,你就看看我~~~嘿!嘿!
0x10 致谢
参考借鉴并整合了github上很多优秀的开源扫描模块,包括但不限于: https://github.com/AttackandDefenceSecurityLab/AD_WebScanner https://github.com/b4ubles/python3-Wappalyzer https://github.com/rabbitmask/WeblogicScan https://github.com/Lucifer1993/AngelSword 在此对这些前辈师傅们表示由衷的感谢
向每个为我国安全事业默默做贡献的白帽子致敬!!!

进群获取悬剑武器库内部日报!
点个赞,证明你还爱我
以上是关于axiom——一款基于云的分布式网络安全扫描工具框架的主要内容,如果未能解决你的问题,请参考以下文章