vmware虚拟机linux怎么扩展硬盘大小
Posted
tags:
篇首语:本文由小常识网(cha138.com)小编为大家整理,主要介绍了vmware虚拟机linux怎么扩展硬盘大小相关的知识,希望对你有一定的参考价值。
1、在vmware启动界面中选择VM菜单下的Settings来增加磁盘,然后选择add,选择hard disk,点击Next。2、选中create a new virtual disk,点击下一步,选择scsi,继续下一步。选择要新增磁盘的大小,勾选Allocate all disk space now立即分配空间,下一步,在你的硬盘上选择一个目录来创建,点击完成结束。这样,一个新增的空间就创建好了。
3、进入Linux系统,使用fdisk -l可以看到新添加的硬盘,给新的硬盘分区、格式化磁盘,最后在用户主目录下新建一个文件, 如/home/linux/newdisk。把新增的分区mount到这个目录下即可。 参考技术A vmware安装目录下有个vmware-vdiskmanager.exe, 用这个命令可以增加磁盘空间,我以前用过,但是一旦增加了貌似不能缩小了具体命令,百度下吧,有详细流程说明
虚拟机中Opensuse扩展分区大小
一、Virtual Machine 扩展硬盘大小
在vmware虚拟机中设置 硬盘大小,扩展至需要的大小。这里简要略去。
然后进入系统;
sudo parted     //启动parted

(parted) print list
Model: VMware, VMware Virtual S (scsi)
Disk /dev/sda: 129GB
Sector size (logical/physical): 512B/512B
Partition Table: msdos
Disk Flags:

Number Start End Size Type File system Flags
1 1049kB 2155MB 2154MB primary linux-swap(v1) type=82
2 2155MB 27.3GB 25.2GB primary btrfs boot, type=83
3 27.3GB 64.4GB 37.1GB primary xfs type=83
(parted) help
align-check TYPE N check partition N for TYPE(min|opt) alignment
help [COMMAND] print general help, or help on COMMAND
mklabel,mktable LABEL-TYPE create a new disklabel (partition table)
mkpart PART-TYPE [FS-TYPE] START END make a partition
name NUMBER NAME name partition NUMBER as NAME
print [devices|free|list,all|NUMBER] display the partition table, available devices, free space, all found partitions, or a particular partition
quit exit program
rescue START END rescue a lost partition near START and END
resize NUMBER END change end sector of partition NUMBER
rm NUMBER delete partition NUMBER
select DEVICE choose the device to edit
disk_set FLAG STATE change the FLAG on selected device
disk_toggle [FLAG] toggle the state of FLAG on selected device
set NUMBER FLAG STATE change the FLAG on partition NUMBER
toggle [NUMBER [FLAG]] toggle the state of FLAG on partition NUMBER
unit UNIT set the default unit to UNIT
version display the version number and copyright information of GNU Parted
(parted) print devices
/dev/sda (129GB)
(parted) print all
Model: VMware, VMware Virtual S (scsi)
Disk /dev/sda: 129GB
Sector size (logical/physical): 512B/512B
Partition Table: msdos
Disk Flags:

Number Start End Size Type File system Flags
1 1049kB 2155MB 2154MB primary linux-swap(v1) type=82
2 2155MB 27.3GB 25.2GB primary btrfs boot, type=83
3 27.3GB 64.4GB 37.1GB primary xfs type=83
parted之后执行print free ,会发现多出来的空间Free Space.
(parted) print free
Model: VMware, VMware Virtual S (scsi)
Disk /dev/sda: 129GB
Sector size (logical/physical): 512B/512B
Partition Table: msdos
Disk Flags:

Number Start End Size Type File system Flags
32.3kB 1049kB 1016kB Free Space
1 1049kB 2155MB 2154MB primary linux-swap(v1) type=82
2 2155MB 27.3GB 25.2GB primary btrfs boot, type=83
3 27.3GB 64.4GB 37.1GB primary xfs type=83
64.4GB 129GB 64.4GB Free Space
(parted) resize 3
Error: Partition /dev/sda3 is being used. You must unmount it before you modify it with Parted.
(parted) quit
suse@linux-nhtn:~> sudo umount /dev/sda3
umount: /home: target is busy
(In some cases useful info about processes that
use the device is found by lsof(8) or fuser(1).)

suse@linux-nhtn:~> sudo parted
GNU Parted 3.1
Using /dev/sda
Welcome to GNU Parted! Type \'help\' to view a list of commands.
(parted) resize 3
Error: Partition /dev/sda3 is being used. You must unmount it before you modify it with Parted.
(parted) quit
suse@linux-nhtn:~> sudo umount /dev/sda3
umount: /home: target is busy
(In some cases useful info about processes that
use the device is found by lsof(8) or fuser(1).)
由于 umount: /home: target is busy,所以利用GParted Live CD来进行分区,有点像WIN PE.
当然如果能够umount /home;也可以利用 parted 进行resize。ref:用parted调整分区大小
二、操作系统扩展分区
1. 下载GParted Live CD 0.25.0-3; (因为必须在分区被umount的情况下才能扩展分区)
2. Vmware 启动后 按F2 从光盘加载GParted Live CD
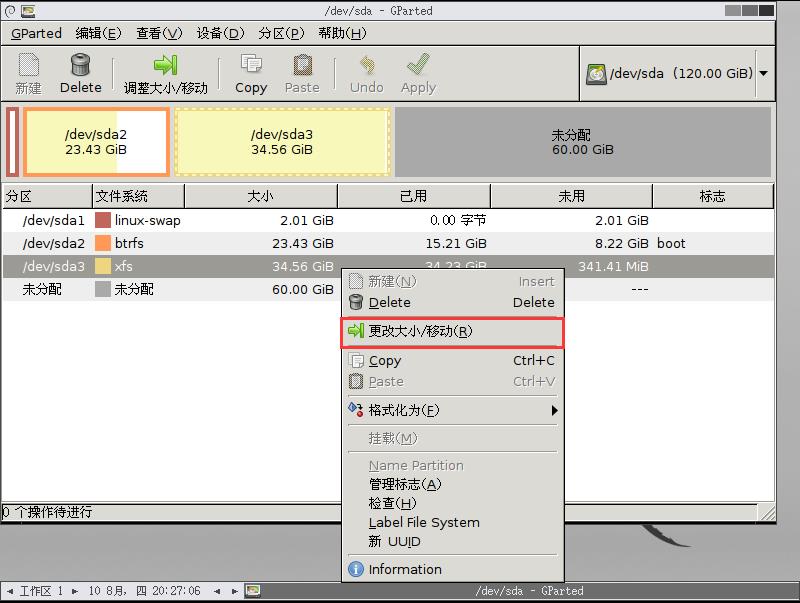
3. 选择Simplified Chinese语言,进入Live系统,启动GParted 软件;选择中需要调整的分区---->右键-更改大小---->调整分区--->点击工具栏Apply执行。

点击Apply执行结果如下:

异常情况处理:
xfs_repair
ERROR: The filesystem has valuable metadata changes in a log which needs to
be replayed.  Mount the filesystem to replay the log, and unmount it before
re-running xfs_repair.  If you are unable to mount the filesystem, then use
the -L option to destroy the log and attempt a repair.
Note that destroying the log may cause corruption -- please attempt a mount
of the filesystem before doing this.
参考:xfs文件系统元数据损坏修复 http://3402313.blog.51cto.com/3392313/1739830
修改包括三步:卸载,修复和检查


[root@gpsg32 ~]# xfs_repair /dev/sda3
Phase 1 - find and verify superblock...
Phase 2 - using internal log
        - zero log...
ERROR: The filesystem has valuable metadata changes in a log which needs to
be replayed.  Mount the filesystem to replay the log, and unmount it before
re-running xfs_repair.  If you are unable to mount the filesystem, then use
the -L option to destroy the log and attempt a repair.
Note that destroying the log may cause corruption -- please attempt a mount
of the filesystem before doing this.
mount: 结构需要清理

[root@gpsg32 ~]# xfs_repair -L /dev/sdd
Phase 1 - find and verify superblock...
Phase 2 - using internal log
        - zero log...
ALERT: The filesystem has valuable metadata changes in a log which is being
destroyed because the -L option was used.
        - scan filesystem freespace and inode maps...
sb_icount 128, counted 4922112
sb_ifree 123, counted 25707
sb_fdblocks 731556628, counted 438595794
        - found root inode chunk
Phase 3 - for each AG...
[root@gpsg32 ~]# mkdir /mnt/sda3 //创建挂载目录
[root@gpsg32 ~]# mount /dev/sda3 /mnt/sda3 //挂载成功
检查后重新挂载OK
[root@gpsg32 ~]# xfs_ncheck /dev/sda3

这里会将该盘上的文件检查一遍,你会看到熟悉的文件。

[root@gpsg32 ~]# df -h

文件系统 容量 已用 可用 已用%% 挂载点
 ...
这时候再重新启动GParted,按照正常步骤操作。
祝好运!
参考:
Resizing a Linux Partition (Running in VirtualBox)
以上是关于vmware虚拟机linux怎么扩展硬盘大小的主要内容,如果未能解决你的问题,请参考以下文章