分享一个生产者-消费者的真实场景
Posted 我从二院来
tags:
篇首语:本文由小常识网(cha138.com)小编为大家整理,主要介绍了分享一个生产者-消费者的真实场景相关的知识,希望对你有一定的参考价值。
0.背景
现在有一个大数据平台,我们需要通过spark对hive里的数据读取清洗转换(etl)再加其它的业务操作的过程,然后需要把这批数据落地到tbase数据库(腾讯的一款分布式数据库)。
数据导入的特点是不定时,但量大。每次导入的数据量在几亿到几十亿上百亿之间。
如果使用dataset.write的方式写入,spark内部也是使用的sql connection以jdbc的方式进行写入。在这样的数据量之下,会非常慢,慢到完全无法接受。
经研究,tbase底层为pgsql,支持以文件的方式copy写入。
语法为:
COPY table FROM \'/mnt/g/file.csv\' WITH CSV HEADER;
这样效率高了很多。
经过测试,十亿级别的数据在半小时单位就能够写入。当然,建立了索引,以及随着表数据量的增大,写入效率会降低,但完全能够接受。
那么,现在就是使用spark读取hive,经过处理,再dataset.repartion(num)重分区,将数据写入HDFS形成num个文件。再将这些小文件多线程批量copy到tbds。
hdfs小文件数量nums从几千到几万,而批量写入的连接数connections不可能无限大,
把文件抽象成生产者,数据库连接抽象成消费者。生产者源源不断生产,消费者能力有限跟不上生产者的速率,就需要阻塞在消费端。

1.实现方式
生产者-消费者模式的实现,不论是自己使用锁,还是使用阻塞队列,其核心都是阻塞。
1.1 方式1 线程池自带阻塞队列
我们批量写入是通过多线程来的,实现一个线程池的其中之一方法是通过Executors,并指定一个带线程数的参数。
这样的方式在线上7*24小时运行的业务系统中是绝对不推荐使用的,但在一些大数据平台的定时任务也不是完全禁止,看自身情况。
使用Executors构建线程池最大问题在于它底层也是通过ThreadPoolExecutor来构建线程池,核心线程和最大线程相同,且阻塞队列默认为LinkedBlockingQueue,这个阻塞队列
没有设置长度,那么它的最大长度为Integer.MAX_VALUE。
这样就可能造成内存的无限增长,内存耗尽导致OOM。


但具体到我们现在的这个场景下,文件数为几千到几万,那么线程池阻塞队列的长度在这个范围以内,如果平台资源能够接受,也不是不可以。
同时,刚好可以利用线程池的阻塞队列来构建消费者-生产者。
public static void main(String[] args) throws Exception
        List<File> fileList = cn.hutool.core.io.FileUtil.loopFiles(new File("测试路径"));
        ExecutorService executorService = Executors.newFixedThreadPool(10);
        LongAdder longAdder = new LongAdder();
        for(File file : fileList)
            try
                executorService.execute(new TestRun(fileList, longAdder));
             catch (Exception exception)
                exception.printStackTrace();


        executorService.shutdown();


    public static class TestRun implements Runnable
        private List<File> fileList;
        LongAdder longAdder;

        public TestRun(List<File> fileList, LongAdder longAdder)
            this.fileList = fileList;
            this.longAdder = longAdder;


        @SneakyThrows
        @Override
        public void run()
            try
                // 可通过连接池
                longAdder.increment();
                ConnectionUtils.getConnection();
                System.out.println(Thread.currentThread() + "第"+ longAdder.longValue() + "/"+ fileList.size() +"个文件获取连接正在入库");
                Random random = new Random();
                Thread.sleep(random.nextInt(1000));
                System.out.println(Thread.currentThread() + "第"+ longAdder.longValue() + "/"+ fileList.size() +"个文件完成入库归还连接");
             finally
运行输出:
数据库驱动加载成功
数据库驱动加载成功
数据库驱动加载成功
数据库驱动加载成功
数据库驱动加载成功
数据库驱动加载成功
数据库驱动加载成功
数据库驱动加载成功
数据库驱动加载成功
数据库驱动加载成功
Thread[pool-1-thread-5,5,main]第10/33个文件获取连接正在入库
Thread[pool-1-thread-9,5,main]第10/33个文件获取连接正在入库
Thread[pool-1-thread-1,5,main]第10/33个文件获取连接正在入库
Thread[pool-1-thread-2,5,main]第10/33个文件获取连接正在入库
Thread[pool-1-thread-7,5,main]第10/33个文件获取连接正在入库
Thread[pool-1-thread-10,5,main]第10/33个文件获取连接正在入库
Thread[pool-1-thread-6,5,main]第10/33个文件获取连接正在入库
Thread[pool-1-thread-8,5,main]第10/33个文件获取连接正在入库
Thread[pool-1-thread-4,5,main]第10/33个文件获取连接正在入库
Thread[pool-1-thread-3,5,main]第10/33个文件获取连接正在入库
Thread[pool-1-thread-1,5,main]第10/33个文件完成入库归还连接
数据库驱动加载成功
Thread[pool-1-thread-1,5,main]第11/33个文件获取连接正在入库
Thread[pool-1-thread-4,5,main]第11/33个文件完成入库归还连接
数据库驱动加载成功
.
.
.
数据库驱动加载成功
Thread[pool-1-thread-3,5,main]第33/33个文件获取连接正在入库
Thread[pool-1-thread-9,5,main]第33/33个文件完成入库归还连接
Thread[pool-1-thread-8,5,main]第33/33个文件完成入库归还连接
Thread[pool-1-thread-6,5,main]第33/33个文件完成入库归还连接
Thread[pool-1-thread-7,5,main]第33/33个文件完成入库归还连接
Thread[pool-1-thread-10,5,main]第33/33个文件完成入库归还连接
Thread[pool-1-thread-5,5,main]第33/33个文件完成入库归还连接
Thread[pool-1-thread-4,5,main]第33/33个文件完成入库归还连接
Thread[pool-1-thread-3,5,main]第33/33个文件完成入库归还连接
Thread[pool-1-thread-2,5,main]第33/33个文件完成入库归还连接
Thread[pool-1-thread-1,5,main]第33/33个文件完成入库归还连接
这里的longAdder只是为了方便观看,并没有严格按线程递增。
我们模拟33个文件,线程池的核心大小为10,可以看到最大只有10个文件在同时执行,只有当其中文件入库完毕,新的文件才能执行。达到了我们想要的效果。
1.2 方式2 使用阻塞队列+CountDownLatch
CountDownLatch是什么?
它是一种同步辅助工具,允许一个或多个线程等待,直到在其他线程中执行的一组操作完成。
CountDownLatch使用给定的计数进行初始化。await()会阻塞,直到当前计数由于countDown()的调用而达到零,之后所有等待线程都会被释放,任何后续的await()调用都会立即返回。这是一种一次性现象——计数无法重置。
CountDownLatch是一种通用的同步工具,可用于多种目的。用计数1初始化的CountDownLatch用作简单的开/关锁存器或门:所有调用的线程都在门处等待,直到调用countDown的线程打开它。初始化为N的CountDownLatch可以用来让一个线程等待,直到N个线程完成了一些操作,或者一些操作已经完成了N次。
自定义一个阻塞队列,并将这个阻塞队列构建成数据库连接池,使用10个固定的大小,只有文件take到连接才会入库操作,拿不到的时候就阻塞直到其它文件入库完成归还数据库连接。
@Slf4j
public class ConnectionQueue

    LinkedBlockingQueue<Connection> connections = null;

    private int size = 10;

    public ConnectionQueue(int size) throws Exception
        new ConnectionQueue(null, size);


    public ConnectionQueue(LinkedBlockingQueue<Connection> connections, int size) throws IllegalArgumentException
        if (size <= 0 || size > 100)
            throw new IllegalArgumentException("size 长度必须适宜,在1-100之间");

        this.connections = connections;
        this.size = size;


    /**
     * 初始化数据库连接
     */
    public void init()
        if (connections == null)
            connections = new LinkedBlockingQueue<>(size);

        for (int i = 0; i < size; i++)
            connections.add(ConnectionUtils.getConnection());


    /**
     * 获取一个数据库连接,如果没有空闲连接将阻塞直到拿到连接
     * @return
     * @throws InterruptedException
     */
    public Connection get() throws InterruptedException
        return connections.take();


    public Connection poll() throws InterruptedException
        return connections.poll();


    /**
     * 归还空闲连接
     * @param connection
     */
    public void put(Connection connection)
        connections.add(connection);


    public int size()
        return connections.size();


    /**
     * 销毁
     */
    public void destroy()
        Iterator<Connection> it = connections.iterator();
        while (it.hasNext())
            Connection conn = it.next();
            if (conn != null)
                try
                    conn.close();
                    log.info("关闭连接 " + conn);
                 catch (SQLException e)
                    log.error("关闭连接失败", e);

             else
                log.info("conn = 为空", conn);


        if (connections != null)
            connections.clear();
同时使用CountDownLatch进行计数,await()直到所有线程都执行完毕,再进行资源销毁和其它业务操作。
public static void main(String[] args) throws Exception
        List<File> fileList = cn.hutool.core.io.FileUtil.loopFiles(new File("测试路径"));
        ConnectionQueue connectionQueue = new ConnectionQueue(10);
        connectionQueue.init();
        ExecutorService executorService = new ThreadPoolExecutor(10,
                10,
                1,
                TimeUnit.MINUTES,
                new LinkedBlockingQueue<>(10),
                 (r, executor) ->
                     if (r instanceof Test.TestRun)
                         ((TestRun) r).getCountDownLatch().countDown();

                     System.out.println(Thread.currentThread() +" reject countdown");

                );
        CountDownLatch countDownLatch = new CountDownLatch(fileList.size());
        for(File file : fileList)
            try
                Connection conn = connectionQueue.get();
                executorService.execute(new TestRun(countDownLatch, connectionQueue, fileList, conn));
             catch (Exception exception)
                exception.printStackTrace();


        countDownLatch.await();
        executorService.shutdown();
        connectionQueue.destroy();


    public static class TestRun implements Runnable
        private CountDownLatch countDownLatch;
        private ConnectionQueue connectionQueue;
        private Connection connection;
        private List<File> fileList;

        public TestRun(CountDownLatch countDownLatch, ConnectionQueue connectionQueue, List<File> fileList, Connection connection)
            this.countDownLatch = countDownLatch;
            this.connectionQueue = connectionQueue;
            this.fileList = fileList;
            this.connection = connection;


        public CountDownLatch getCountDownLatch()
            return countDownLatch;


        public void setCountDownLatch(CountDownLatch countDownLatch)
            this.countDownLatch = countDownLatch;


        @SneakyThrows
        @Override
        public void run()
            try
                System.out.println(Thread.currentThread() + "第"+ countDownLatch.getCount() + "/"+ fileList.size() +"个文件获取连接正在入库");
                Random random = new Random();
                Thread.sleep(random.nextInt(1000));
                System.out.println(Thread.currentThread() + "第"+ countDownLatch.getCount() + "/"+ fileList.size() +"个文件完成入库归还连接");
             finally
                connectionQueue.put(connection);
                countDownLatch.countDown();
执行结果:
数据库驱动加载成功
数据库驱动加载成功
数据库驱动加载成功
数据库驱动加载成功
数据库驱动加载成功
数据库驱动加载成功
数据库驱动加载成功
数据库驱动加载成功
数据库驱动加载成功
数据库驱动加载成功
Thread[pool-1-thread-1,5,main]第33/33个文件获取连接正在入库
Thread[pool-1-thread-4,5,main]第33/33个文件获取连接正在入库
Thread[pool-1-thread-3,5,main]第33/33个文件获取连接正在入库
Thread[pool-1-thread-2,5,main]第33/33个文件获取连接正在入库
Thread[pool-1-thread-10,5,main]第33/33个文件获取连接正在入库
Thread[pool-1-thread-6,5,main]第33/33个文件获取连接正在入库
Thread[pool-1-thread-7,5,main]第33/33个文件获取连接正在入库
Thread[pool-1-thread-8,5,main]第33/33个文件获取连接正在入库
Thread[pool-1-thread-9,5,main]第33/33个文件获取连接正在入库
Thread[pool-1-thread-5,5,main]第33/33个文件获取连接正在入库
Thread[pool-1-thread-4,5,main]第33/33个文件完成入库归还连接
Thread[pool-1-thread-4,5,main]第32/33个文件获取连接正在入库
Thread[pool-1-thread-8,5,main]第32/33个文件完成入库归还连接
Thread[pool-1-thread-8,5,main]第31/33个文件获取连接正在入库
Thread[pool-1-thread-8,5,main]第31/33个文件完成入库归还连接
Thread[pool-1-thread-8,5,main]第30/33个文件获取连接正在入库
Thread[pool-1-thread-4,5,main]第30/33个文件完成入库归还连接
...
Thread[pool-1-thread-2,5,main]第10/33个文件获取连接正在入库
Thread[pool-1-thread-5,5,main]第10/33个文件完成入库归还连接
Thread[pool-1-thread-4,5,main]第9/33个文件完成入库归还连接
Thread[pool-1-thread-9,5,main]第8/33个文件完成入库归还连接
Thread[pool-1-thread-2,5,main]第7/33个文件完成入库归还连接
Thread[pool-1-thread-6,5,main]第6/33个文件完成入库归还连接
Thread[pool-1-thread-7,5,main]第5/33个文件完成入库归还连接
Thread[pool-1-thread-10,5,main]第4/33个文件完成入库归还连接
Thread[pool-1-thread-3,5,main]第3/33个文件完成入库归还连接
Thread[pool-1-thread-1,5,main]第2/33个文件完成入库归还连接
Thread[pool-1-thread-8,5,main]第1/33个文件完成入库归还连接
1.2.1 如果线程池触发reject会发生什么?
需要注意的是,这里要考虑到线程池的拒绝策略。
我们知道JDK线程池拒绝策略实现了四种:
AbortPolicy 默认策略,抛出异常
CallerRunsPolicy  从名字上可以看出,调用者执行
DiscardOldestPolicy 丢弃最老的任务,再尝试执行
DiscardPolicy  直接丢弃不做任何操作
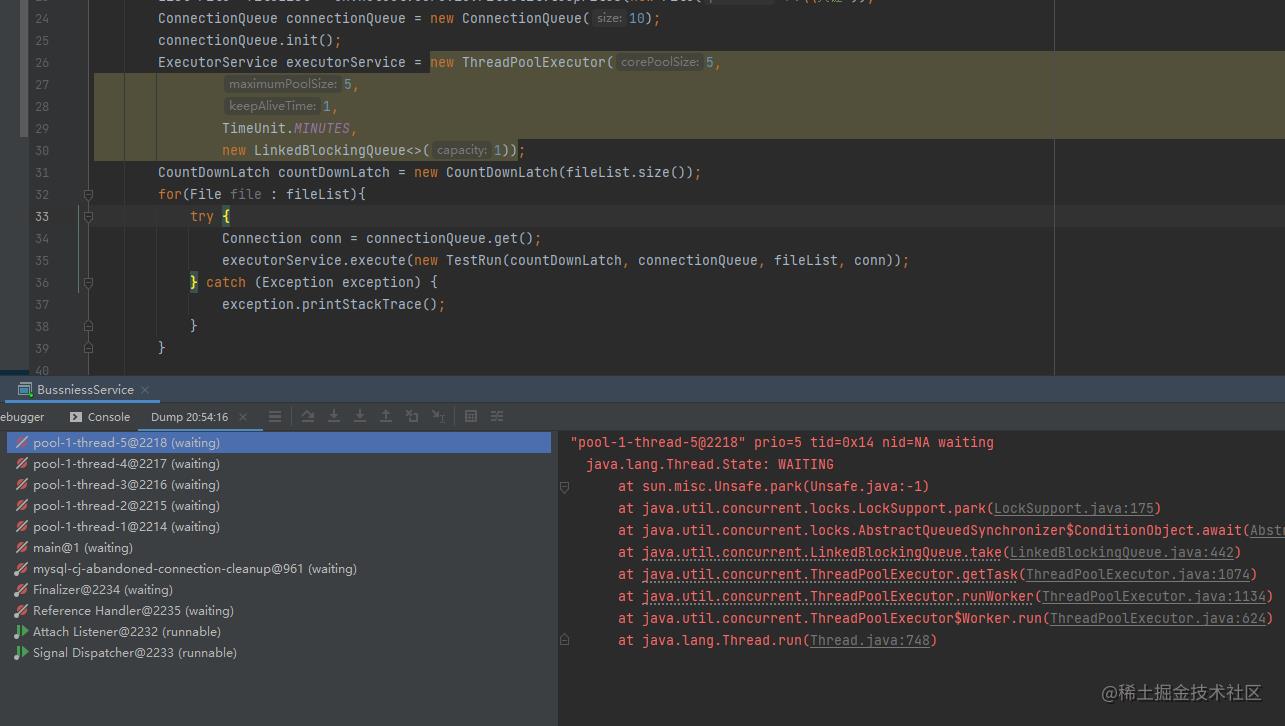
ThreadPoolExecutor默认拒绝策略为AbortPolicy,就是抛出一个异常,那么这时候就执行不到后面的countdown。
所以需要重写策略,在线程池队列已满拒绝新进任务的时候执行countdown,避免countDownLatch.await()永远等待。
如果使用默认的拒绝策略,执行如下:
1.3 方式3 使用Semaphore
在 java 中,使用了 synchronized 关键字和 Lock 锁实现了资源的并发访问控制,在同一时刻只允许一个线程进入临界区访问资源 (读锁除外)。但考虑到另外一种场景,共享资源在同一时刻可以提供给多个线程访问,如厕所有多个坑位,可以同时提供给多人使用。这种场景下,就可以使用Semaphore信号量来实现。
信号量通常用于限制可以访问某些(物理或逻辑)资源的线程数量。信号量维护一组许可(permit),在访问资源前,每个线程必须从信号量获得一个许可,以保证资源的有限访问。当线程处理完后,向信号量返回一个许可,允许另一个线程获取。
当信号量许可>1,意味可以访问资源,如果信号量许可<=0,线程进入休眠。
当信号量许可=1,约等于synchronized或lock的效果。
就好比一个厕所管理员,站在门口,只有厕所有空位,就开门允许与空侧数量等量的人进入厕所。多个人进入厕所后,相当于N个人来分配使用N个空位。为避免多个人来同时竞争同一个侧卫,在内部仍然使用锁来控制资源的同步访问。
在我们的场景下,共享资源就是数据库连接池N个,M个文件需要拿到连接池进行入库操作,但连接池数量N有限,远小于文件数M,所以需要对连接池的访问并发度进行控制。
信号量在这里起到了控流的作用。
Semaphore semaphore = new Semaphore(10);
允许线程池最多10个任务并行执行,只有当其它任务执行完毕归还permit,新的任务拿到permit才能开始执行。
public static void main(String[] args) throws Exception
        List<File> fileList = FileUtil.loopFiles(new File("测试路径"));
        Semaphore semaphore = new Semaphore(10);

        Random random = new Random();
        ExecutorService executorService = new ThreadPoolExecutor(10,
                10,
                1,
                TimeUnit.MINUTES,
                new LinkedBlockingQueue<>(10));
        AtomicInteger count = new AtomicInteger(1);
        for (File file : fileList)
            semaphore.acquire();
                executorService.execute(() ->
                try
                    int subCount = count.getAndIncrement();
                    System.out.println(Thread.currentThread() + "第" + subCount + "/" + fileList.size() + "个文件获取连接正在入库");
                    // 模拟入库操作
                    int time = random.nextInt(1000);
                    Thread.sleep(time);
                    System.out.println(Thread.currentThread() + "第" + subCount + "/" + fileList.size() + "个文件完成入库归还连接");
                 catch (Exception e)
                    e.printStackTrace();
                 finally
                    semaphore.release();

            );


        System.out.println("shutdown");
        executorService.shutdown();
因为我们的大数据框架本身有获取连接池的轮子,这里省略了从连接池获取连接的操作。
运行日志:
Thread[pool-1-thread-1,5,main]第1/33个文件获取连接正在入库
Thread[pool-1-thread-3,5,main]第3/33个文件获取连接正在入库
Thread[pool-1-thread-4,5,main]第2/33个文件获取连接正在入库
Thread[pool-1-thread-10,5,main]第5/33个文件获取连接正在入库
Thread[pool-1-thread-9,5,main]第4/33个文件获取连接正在入库
Thread[pool-1-thread-8,5,main]第8/33个文件获取连接正在入库
Thread[pool-1-thread-2,5,main]第9/33个文件获取连接正在入库
Thread[pool-1-thread-7,5,main]第7/33个文件获取连接正在入库
Thread[pool-1-thread-6,5,main]第6/33个文件获取连接正在入库
Thread[pool-1-thread-5,5,main]第10/33个文件获取连接正在入库
Thread[pool-1-thread-5,5,main]第10/33个文件完成入库归还连接
Thread[pool-1-thread-5,5,main]第11/33个文件获取连接正在入库
Thread[pool-1-thread-3,5,main]第3/33个文件完成入库归还连接
...
Thread[pool-1-thread-2,5,main]第23/33个文件完成入库归还连接
shutdown
Thread[pool-1-thread-2,5,main]第33/33个文件获取连接正在入库
Thread[pool-1-thread-4,5,main]第24/33个文件完成入库归还连接
Thread[pool-1-thread-5,5,main]第32/33个文件完成入库归还连接
Thread[pool-1-thread-1,5,main]第30/33个文件完成入库归还连接
Thread[pool-1-thread-9,5,main]第26/33个文件完成入库归还连接
Thread[pool-1-thread-3,5,main]第19/33个文件完成入库归还连接
Thread[pool-1-thread-2,5,main]第33/33个文件完成入库归还连接
Thread[pool-1-thread-8,5,main]第22/33个文件完成入库归还连接
Thread[pool-1-thread-6,5,main]第27/33个文件完成入库归还连接
Thread[pool-1-thread-10,5,main]第31/33个文件完成入库归还连接
Thread[pool-1-thread-7,5,main]第28/33个文件完成入库归还连接
1.3.1 如果引发了默认线程池拒绝策略,Semaphore会有问题吗?
我们知道CountDownLatch由于线程池拒绝策略,没有执行到countdown()会导致程序一直阻塞。那么Semaphore会有相应的问题吗?
如果线程池队列满了,触发了默认拒绝策略,这时候,Semaphore执行了acquire(),但没执行release()。
写一个测试例子:
public static void main(String[] args) throws InterruptedException
        CountDownLatch countDownLatch = new CountDownLatch(20);
        Semaphore semaphore = new Semaphore(10);
        ExecutorService executorService = new ThreadPoolExecutor(5,
                5,
                1,
                TimeUnit.MINUTES,
                new LinkedBlockingQueue<>(1), (r, executor) ->
                    Random random = new Random();
                    try
                        Thread.sleep(random.nextInt(1000));
                     catch (InterruptedException e)
                        e.printStackTrace();

                    if (r instanceof TestRun)
                        ((TestRun) r).getCountDownLatch().countDown();
//                                    ((TestRun) r).getSemaphore().release();

                    System.out.println(Thread.currentThread() + " reject countdown " + semaphore.availablePermits());
        );


        for (int i = 0; i < 30; i++)
            semaphore.acquire();
            Thread.sleep(100);
            executorService.execute(new TestRun(countDownLatch, semaphore));


//        countDownLatch.await();
        System.out.println("完成");
        executorService.shutdown();


    public static class TestRun implements Runnable
        private CountDownLatch countDownLatch;
        private Semaphore semaphore;

        public TestRun(CountDownLatch countDownLatch, Semaphore semaphore)
            this.countDownLatch = countDownLatch;
            this.semaphore = semaphore;


        public CountDownLatch getCountDownLatch()
            return countDownLatch;


        public void setCountDownLatch(CountDownLatch countDownLatch)
            this.countDownLatch = countDownLatch;


        public Semaphore getSemaphore()
            return semaphore;


        public void setSemaphore(Semaphore semaphore)
            this.semaphore = semaphore;


        @SneakyThrows
        @Override
        public void run()
//            semaphore.acquire();
            Random random = new Random();
            Thread.sleep(random.nextInt(1000));
            countDownLatch.countDown();
            semaphore.release();
            System.out.println(Thread.currentThread() + " start" + " semaphore = " + semaphore.availablePermits());
            System.out.println(Thread.currentThread() + " countdown");
执行日志:
Thread[pool-1-thread-1,5,main] start semaphore = 8
Thread[pool-1-thread-1,5,main] countdown
Thread[pool-1-thread-3,5,main] start semaphore = 5
Thread[pool-1-thread-3,5,main] countdown
Thread[pool-1-thread-2,5,main] start semaphore = 4
Thread[pool-1-thread-2,5,main] countdown
Thread[pool-1-thread-2,5,main] start semaphore = 5
Thread[pool-1-thread-2,5,main] countdown
Thread[pool-1-thread-5,5,main] start semaphore = 6
Thread[pool-1-thread-5,5,main] countdown
Thread[pool-1-thread-1,5,main] start semaphore = 7
Thread[pool-1-thread-1,5,main] countdown
Thread[main,5,main] reject countdown 7
Thread[pool-1-thread-4,5,main] start semaphore = 5
Thread[pool-1-thread-4,5,main] countdown
Thread[pool-1-thread-3,5,main] start semaphore = 5
Thread[pool-1-thread-3,5,main] countdown
Thread[pool-1-thread-4,5,main] start semaphore = 4
Thread[pool-1-thread-4,5,main] countdown
Thread[pool-1-thread-5,5,main] start semaphore = 3
Thread[pool-1-thread-5,5,main] countdown
Thread[pool-1-thread-2,5,main] start semaphore = 3
Thread[pool-1-thread-2,5,main] countdown
Thread[pool-1-thread-1,5,main] start semaphore = 4
Thread[pool-1-thread-1,5,main] countdown
Thread[main,5,main] reject countdown 4
Thread[pool-1-thread-4,5,main] start semaphore = 4
Thread[pool-1-thread-4,5,main] countdown
Thread[pool-1-thread-3,5,main] start semaphore = 4
Thread[pool-1-thread-3,5,main] countdown
Thread[pool-1-thread-5,5,main] start semaphore = 3
Thread[pool-1-thread-5,5,main] countdown
Thread[pool-1-thread-4,5,main] start semaphore = 3
Thread[pool-1-thread-4,5,main] countdown
Thread[pool-1-thread-2,5,main] start semaphore = 2
Thread[pool-1-thread-2,5,main] countdown
Thread[pool-1-thread-3,5,main] start semaphore = 2
Thread[pool-1-thread-3,5,main] countdown
Thread[pool-1-thread-3,5,main] start semaphore = 2
Thread[pool-1-thread-3,5,main] countdown
Thread[pool-1-thread-2,5,main] start semaphore = 3
Thread[pool-1-thread-2,5,main] countdown
Thread[pool-1-thread-4,5,main] start semaphore = 4
Thread[pool-1-thread-4,5,main] countdown
Thread[pool-1-thread-5,5,main] start semaphore = 5
Thread[pool-1-thread-5,5,main] countdown
Thread[pool-1-thread-1,5,main] start semaphore = 6
Thread[pool-1-thread-1,5,main] countdown
Thread[main,5,main] reject countdown 6
完成
Thread[pool-1-thread-5,5,main] start semaphore = 4
Thread[pool-1-thread-5,5,main] countdown
Thread[pool-1-thread-2,5,main] start semaphore = 5
Thread[pool-1-thread-2,5,main] countdown
Thread[pool-1-thread-4,5,main] start semaphore = 6
Thread[pool-1-thread-4,5,main] countdown
Thread[pool-1-thread-3,5,main] start semaphore = 7
Thread[pool-1-thread-3,5,main] countdown
可以看到执行了3次reject,最后semaphore值为7,正常应该为初始值10。
首先程序能够正常执行完毕,然后并发度下降了。
如果极端情况下,触发拒绝策略增多,semaphore的值降为1,这里semaphore就变成了lock或者synchronized,多线程就失去了效果变成了单线程串行执行。
通过JDK线程池拒绝策略之一的CallerRunsPolicy源码可知,这里的r即为调用者线程,在这里就是main线程。我们在main线程执行了acquire(),那么我们只需要重写拒绝策略,在这里执行release()就可保证并发度与初始值保持一致。

但是如果semaphore=0呢?会阻塞执行吗?
1.3.2 如果初始化的时候就为0
Semaphore semaphore = new Semaphore(0);
那么程序会永远阻塞不执行,因为没有可用的permit。

jdk源码这里没有对传入的参数做判断,甚至可以传入负数。

因为与countdownlatch不同,这里可以释放增加任意大于0的permit数量。

1.3.3 如果reject次数大于等于初始化长度
初化长度大于1,比如10,
Semaphore semaphore = new Semaphore(10);
同时,线程池拒绝次数>= 10,理论上,这个时候Semaphore就会出现0或负数。
线程就会阻塞。
但这种情况真的会发生吗?
我模拟了很多次都没出现阻塞的情况。
把线程池大小调整为1,将Semaphore大小设置为>1,这里为4。
public static void main(String[] args) throws InterruptedException
        CountDownLatch countDownLatch = new CountDownLatch(20);
        Semaphore semaphore = new Semaphore(4);
        ExecutorService executorService = new ThreadPoolExecutor(1,
                1,
                1,
                TimeUnit.MINUTES,
                new LinkedBlockingQueue<>(1), (r, executor) ->
                    Random random = new Random();
                    try
                        Thread.sleep(random.nextInt(1000));
                     catch (InterruptedException e)
                        e.printStackTrace();

                    if (r instanceof TestRun)
                        ((TestRun) r).getCountDownLatch().countDown();
        //                            ((TestRun) r).getSemaphore().acquire();
//                                    ((TestRun) r).getSemaphore().release();

                    System.out.println(Thread.currentThread() + " reject countdown " + semaphore.availablePermits());
        );


        for (int i = 0; i < 30; i++)
            semaphore.acquire();
//            Thread.sleep(100);
            executorService.execute(new TestRun(countDownLatch, semaphore));


//        countDownLatch.await();
        System.out.println("完成");
        executorService.shutdown();


    public static class TestRun implements Runnable
        private CountDownLatch countDownLatch;
        private Semaphore semaphore;

        public TestRun(CountDownLatch countDownLatch, Semaphore semaphore)
            this.countDownLatch = countDownLatch;
            this.semaphore = semaphore;


        public CountDownLatch getCountDownLatch()
            return countDownLatch;


        public void setCountDownLatch(CountDownLatch countDownLatch)
            this.countDownLatch = countDownLatch;


        public Semaphore getSemaphore()
            return semaphore;


        public void setSemaphore(Semaphore semaphore)
            this.semaphore = semaphore;


        @SneakyThrows
        @Override
        public void run()
//            semaphore.acquire();
            Random random = new Random();
            Thread.sleep(random.nextInt(1000));
            countDownLatch.countDown();
            semaphore.release();
            System.out.println(Thread.currentThread() + " start" + " semaphore = " + semaphore.availablePermits());
            System.out.println(Thread.currentThread() + " countdown");
执行结果:
Thread[pool-1-thread-1,5,main] start semaphore = 2
Thread[pool-1-thread-1,5,main] countdown
Thread[main,5,main] reject countdown 2
Thread[pool-1-thread-1,5,main] start semaphore = 1
Thread[pool-1-thread-1,5,main] countdown
Thread[main,5,main] reject countdown 1
Thread[pool-1-thread-1,5,main] start semaphore = 1
Thread[pool-1-thread-1,5,main] countdown
Thread[main,5,main] reject countdown 0
Thread[pool-1-thread-1,5,main] start semaphore = 1
Thread[pool-1-thread-1,5,main] countdown
Thread[pool-1-thread-1,5,main] start semaphore = 1
Thread[pool-1-thread-1,5,main] countdown
Thread[pool-1-thread-1,5,main] start semaphore = 1
Thread[pool-1-thread-1,5,main] countdown
Thread[pool-1-thread-1,5,main] start semaphore = 1
Thread[pool-1-thread-1,5,main] countdown
Thread[pool-1-thread-1,5,main] start semaphore = 1
Thread[pool-1-thread-1,5,main] countdown
Thread[pool-1-thread-1,5,main] start semaphore = 1
Thread[pool-1-thread-1,5,main] countdown
Thread[pool-1-thread-1,5,main] start semaphore = 1
Thread[pool-1-thread-1,5,main] countdown
Thread[pool-1-thread-1,5,main] start semaphore = 1
Thread[pool-1-thread-1,5,main] countdown
Thread[pool-1-thread-1,5,main] start semaphore = 1
Thread[pool-1-thread-1,5,main] countdown
Thread[pool-1-thread-1,5,main] start semaphore = 1
Thread[pool-1-thread-1,5,main] countdown
Thread[pool-1-thread-1,5,main] start semaphore = 1
Thread[pool-1-thread-1,5,main] countdown
Thread[pool-1-thread-1,5,main] start semaphore = 1
Thread[pool-1-thread-1,5,main] countdown
Thread[pool-1-thread-1,5,main] start semaphore = 1
Thread[pool-1-thread-1,5,main] countdown
Thread[pool-1-thread-1,5,main] start semaphore = 1
Thread[pool-1-thread-1,5,main] countdown
Thread[pool-1-thread-1,5,main] start semaphore = 1
Thread[pool-1-thread-1,5,main] countdown
Thread[pool-1-thread-1,5,main] start semaphore = 1
Thread[pool-1-thread-1,5,main] countdown
Thread[pool-1-thread-1,5,main] start semaphore = 1
Thread[pool-1-thread-1,5,main] countdown
Thread[pool-1-thread-1,5,main] start semaphore = 1
Thread[pool-1-thread-1,5,main] countdown
Thread[pool-1-thread-1,5,main] start semaphore = 0
Thread[pool-1-thread-1,5,main] countdown
Thread[pool-1-thread-1,5,main] start semaphore = 1
Thread[pool-1-thread-1,5,main] countdown
Thread[pool-1-thread-1,5,main] start semaphore = 1
Thread[pool-1-thread-1,5,main] countdown
Thread[pool-1-thread-1,5,main] start semaphore = 1
Thread[pool-1-thread-1,5,main] countdown
Thread[pool-1-thread-1,5,main] start semaphore = 1
Thread[pool-1-thread-1,5,main] countdown
完成
Thread[pool-1-thread-1,5,main] start semaphore = 1
Thread[pool-1-thread-1,5,main] countdown
最后semaphore = 1.
当我将semaphore初始化值调整为3,5,2,最后semaphore的值总是为1。
线程池触发拒绝次数总是为semaphore初始化值-1。
其实也很好理解,因为当permit>=1的时候,acquire()方法才会返回,不然就一直阻塞。所以初始permit>0的情况下,永远不会出现permit为0。
所以,结论是只要semaphore的初始值大于0,就不用担心程序会一直阻塞不执行。
同时,线程池触发拒绝策略,如果没有重写拒绝策略执行semaphore.release(),就会将并发度降低。
2. 总结
1.直接使用线程池队列要注意阻塞队列大小为Integer.MAX_VALUE可能导致内存消耗问题。
2.这里使用信号量最为简单便捷。
3.不管使用的是coundownlatch还是信号量,都要注意线程池拒绝的情况。
如果countdownlatch因为线程池拒绝策略没有执行countdown会导致await一直等待阻塞;
如果信号量因为线程池拒绝策略没有执行release,导致没有足够的permit,不会导致程序阻塞,但会降低并发 度。
分享一些 Kafka 消费数据的小经验

前言
之前写过一篇《从源码分析如何优雅的使用 Kafka 生产者》 ,有生产者自然也就有消费者。
建议对 Kakfa 还比较陌生的朋友可以先看看。
就我的使用经验来说,大部分情况都是处于数据下游的消费者角色。也用 Kafka 消费过日均过亿的消息(不得不佩服 Kakfa 的设计),本文将借助我使用 Kakfa 消费数据的经验来聊聊如何高效的消费数据。
单线程消费
以之前生产者中的代码为例,事先准备好了一个 Topic:data-push,3个分区。
先往里边发送 100 条消息,没有自定义路由策略,所以消息会均匀的发往三个分区。
先来谈谈最简单的单线程消费,如下图所示:
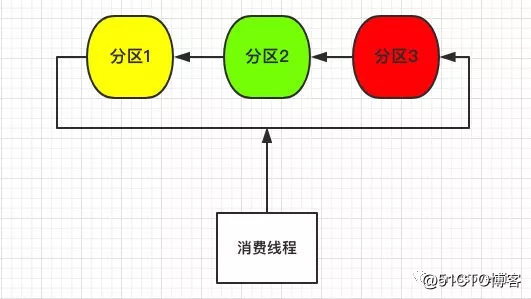
由于数据散列在三个不同分区,所以单个线程需要遍历三个分区将数据拉取下来。
单线程消费的示例代码:
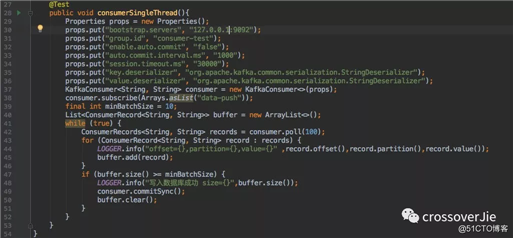
这段代码大家在官网也可以找到:将数据取出放到一个内存缓冲中最后写入数据库的过程。
先不讨论其中的 offset 的提交方式。
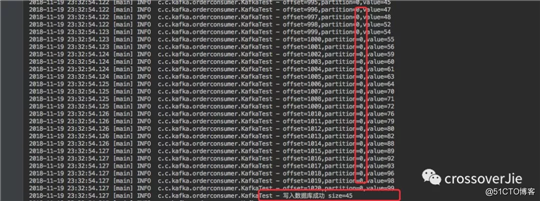
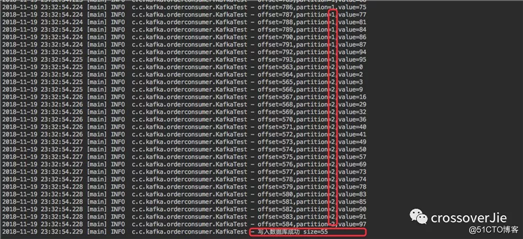
通过消费日志可以看出:
取出的 100 条数据确实是分别遍历了三个分区。
单线程消费虽然简单,但存在以下几个问题:
-
效率低下。如果分区数几十上百个,单线程无法高效的取出数据。
- 可用性很低。一旦消费线程阻塞,甚至是进程挂掉,那么整个消费程序都将出现问题。
多线程消费
既然单线程有诸多问题,那是否可以用多线程来提高效率呢?
在多线程之前不得不将消费模式分为两种进行探讨:消费组、独立消费者。
这两种消费模式对应的处理方式有着很大的不同,所以很有必要单独来讲。
独立消费者模式
先从 独立消费者模式谈起,这种模式相对于消费组来说用的相对小众一些。
看一个简单示例即可知道它的用法:
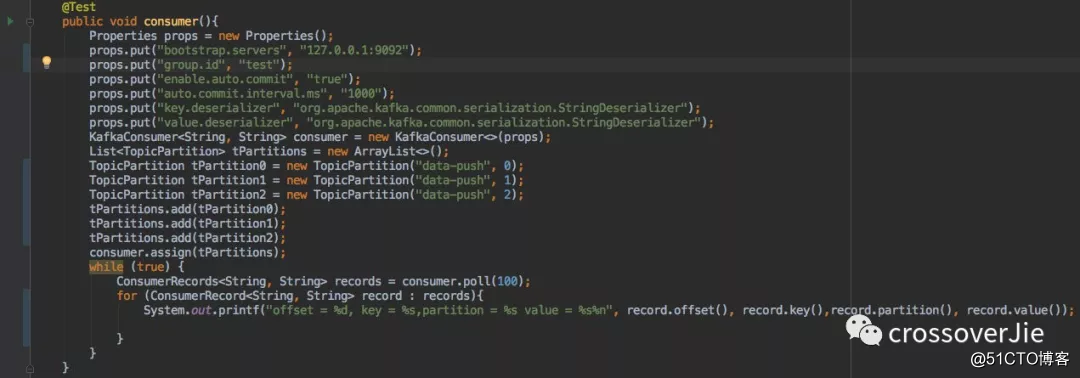
值得注意的是:独立消费者可以不设置 group.id 属性。
也是发送100条消息,消费结果如下:
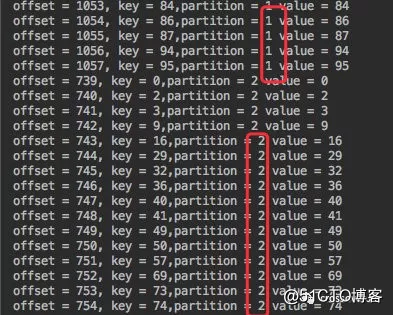
通过 API 可以看出:我们可以手动指定需要消费哪些分区。
比如 data-push Topic 有三个分区,我可以手动只消费其中的 1 2 分区,第三个可以视情况来消费。
同时它也支持多线程的方式,每个线程消费指定分区进行消费。
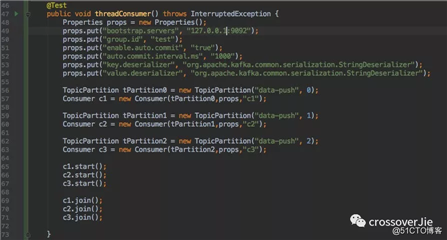

为了直观,只发送了 10 条数据。
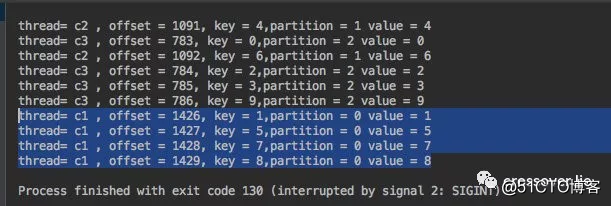
根据消费结果可以看出:
c1 线程只取 0 分区;c2 只取 1 分区;c3 只取 2 分区的数据。
甚至我们可以将消费者多进程部署,这样的消费方式如下:
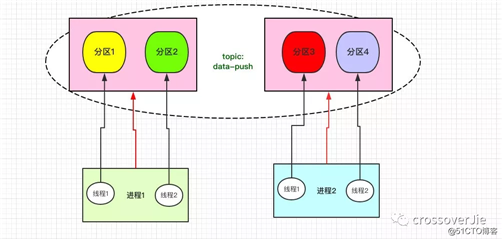
假设 Topic:data-push 的分区数为 4 个,那我们就可以按照图中的方式创建两个进程。
每个进程内有两个线程,每个线程再去消费对应的分区。
这样当我们性能不够新增 Topic 的分区数时,消费者这边只需要这样水平扩展即可,非常的灵活。
这种自定义分区消费的方式在某些场景下还是适用的,比如生产者每次都将某一类的数据只发往一个分区。这样我们就可以只针对这一个分区消费。
但这种方式有一个问题:可用性不高,当其中一个进程挂掉之后;该进程负责的分区数据没法转移给其他进程处理。
消费组模式
消费组模式应当是使用最多的一种消费方式。
我们可以创建 N 个消费者实例( newKafkaConsumer()),当这些实例都用同一个 group.id 来创建时,他们就属于同一个消费组。
在同一个消费组中的消费实例可以收到消息,但一个分区的消息只会发往一个消费实例。
还是借助官方的示例图来更好的理解它。
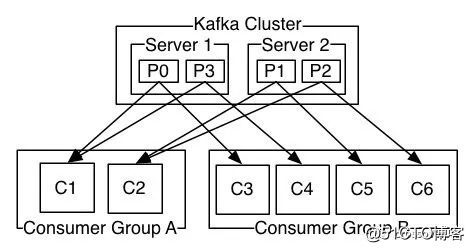
某个 Topic 有四个分区 p0 p1 p2 p3,同时创建了两个消费组 groupA,groupB。
-
A 消费组中有两个消费实例 C1、C2。
- B 消费组中有四个消费实例 C3、C4、C5、C6。
这样消息是如何划分到每个消费实例的呢?
通过图中可以得知:
-
A 组中的 C1 消费了 P0 和 P3 分区;C2 消费 P1、P2 分区。
- B 组有四个实例,所以每个实例消费一个分区;也就是消费实例和分区是一一对应的。
需要注意的是:
这里的消费实例简单的可以理解为 newKafkaConsumer,它和进程没有关系。
比如说某个 Topic 有三个分区,但是我启动了两个进程来消费它。
其中每个进程有两个消费实例,那其实就相当于有四个实例了。
这时可能就会问 4 个实例怎么消费 3 个分区呢?
消费组自平衡
这个 Kafka 已经帮我做好了,它会来做消费组里的 Rebalance。
比如上面的情况,3 个分区却有 4 个消费实例;最终肯定只有三个实例能取到消息。但至于是哪三个呢,这点 Kakfa 会自动帮我们分配好。
看个例子,还在之前的 data-push 这个 Topic,其中有三个分区。
当其中一个进程(其中有三个线程,每个线程对应一个消费实例)时,消费结果如下:

里边的 20 条数据都被这个进程的三个实例消费掉。
这时我新启动了一个进程,程序和上面那个一模一样;这样就相当于有两个进程,同时就是 6 个实例。
我再发送 10 条消息会发现:
进程1 只取到了分区 1 里的两条数据(之前是所有数据都是进程1里的线程获取的)。

同时进程2则消费了剩下的 8 条消息,分别是分区 0、2 的数据(总的还是只有三个实例取到了数据,只是分别在不同的进程里)。

当我关掉进程2,再发送10条数据时会发现所有数据又被进程1里的三个线程消费了。

通过这些测试相信大家已经可以看到消费组的优势了。
我们可以在一个消费组中创建多个消费实例来达到高可用、高容错的特性,不会出现单线程以及独立消费者挂掉之后数据不能消费的情况。同时基于多线程的方式也极大的提高了消费效率。
而当新增消费实例或者是消费实例挂掉时 Kakfa 会为我们重新分配消费实例与分区的关系就被称为消费组 Rebalance。
发生这个的前提条件一般有以下几个:
-
消费组中新增消费实例。
-
消费组中消费实例 down 掉。
-
订阅的 Topic 分区数发生变化。
- 如果是正则订阅 Topic 时,匹配的 Topic 数发生变化也会导致 Rebalance。
所以推荐使用这样的方式消费数据,同时扩展性也非常好。当性能不足新增分区时只需要启动新的消费实例加入到消费组中即可。
总结
本次只分享了几个不同消费数据的方式,并没有着重研究消费参数、源码;这些内容感兴趣的话可以在下次分享。
文中提到的部分源码可以在这里查阅:
https://github.com/crossoverJie/JCSprout
你的点赞与分享是对我最大的支持
以上是关于分享一个生产者-消费者的真实场景的主要内容,如果未能解决你的问题,请参考以下文章