Hive3安装
Posted 键盘侠JC
tags:
篇首语:本文由小常识网(cha138.com)小编为大家整理,主要介绍了Hive3安装相关的知识,希望对你有一定的参考价值。
1、下载安装包
地址:http://archive.apache.org/dist/hive/
2、安装mysql
参考:https://www.cnblogs.com/jpxjx/p/16817724.html
3、上传安装包并解压
tar zxvf apache-hive-3.1.2-bin.tar.gz

4、解决Hive与Hadoop之间guava版本差异
cd /root/export/server/apache-hive-3.1.2-bin/
rm -rf lib/guava-19.0.jar
cp /root/export/server/hadoop-3.3.5/share/hadoop/common/lib/guava-27.0-jre.jar ./lib/
5、修改配置文件
5.1、hive-env.sh
cd /root/export/server/apache-hive-3.1.2-bin/conf
mv hive-env.sh.template hive-env.sh

vi hive-env.sh
export HADOOP_HOME=/root/export/server/hadoop-3.3.5
export HIVE_CONF_DIR=/root/export/server/apache-hive-3.1.2-bin/conf
export HIVE_AUX_JARS_PATH=/root/export/server/apache-hive-3.1.2-bin/lib
5.2、hive-site.xml
touch hive-site.xml
vi hive-site.xml
<configuration> <! <property> <name>javax.jdo.option.ConnectionURL</name> <value>jdbc:mysql://hadoop:3306/hive3?createDatabaseIfNotExist=true&useSSL=false&useUnicode=true&characterEncoding=UTF-8</value> </property> <property> <name>javax.jdo.option.ConnectionDriverName</name> <value>com.mysql.jdbc.Driver</value> </property> <property> <name>javax.jdo.option.ConnectionUserName</name> <value>root</value> </property> <property> <name>javax.jdo.option.ConnectionPassword</name> <value>hadoop</value> </property> <! <property> <name>hive.server2.thrift.bind.host</name> <value>hadoop</value> </property> <! <property> <name>hive.metastore.uris</name> <value>thrift://hadoop:9083</value> </property> <! <property> <name>hive.metastore.event.db.notification.api.auth</name> <value>false</value> </property> </configuration>
5.3、上传mysql jdbc驱动到hive安装包lib下
mysql-connector-j-8.0.32.jar
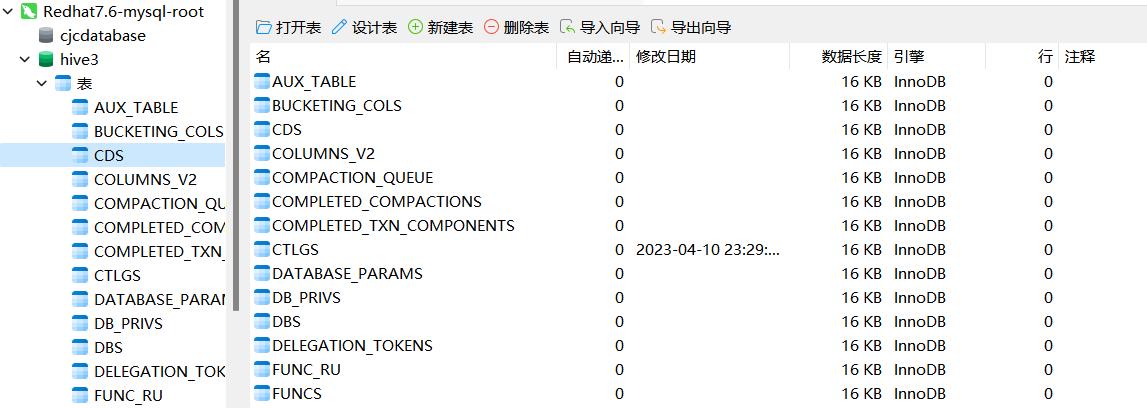
5.4、初始化元数据
cd /root/export/server/apache-hive-3.1.2-bin/

bin/schematool -initSchema -dbType mysql -verbos
#初始化成功会在mysql中创建74张表

6、在hdfs创建hive存储目录(如存在则不用操作)
hadoop fs -mkdir /tmp
hadoop fs -mkdir -p /user/hive/warehouse
hadoop fs -chmod g+w /tmp
hadoop fs -chmod g+w /user/hive/warehouse
7、启动hive
7.1、启动metastore服务
#前台启动  关闭ctrl+c
/root/export/server/apache-hive-3.1.2-bin/bin/hive

#前台启动开启debug日志
/root/export/server/apache-hive-3.1.2-bin/bin/hive

#后台启动 进程挂起  关闭使用jps+ kill -9
nohup /root/export/server/apache-hive-3.1.2-bin/bin/hive
7.2、启动hiveserver2服务
 nohup /root/export/server/apache-hive-3.1.2-bin/bin/hive

  #注意 启动hiveserver2需要一定的时间  不要启动之后立即beeline连接 可能连接不上
8、beeline客户端连接
8.1、拷贝hadoop安装包到beeline客户端机器上(hadoop02)
scp -r /root/export/server/apache-hive-3.1.2-bin/ hadoop02:/root/export/server/
8.2、连接访问
/root/export/server/apache-hive-3.1.2-bin/bin/beeline

beeline> ! connect jdbc:hive2://hadoop:10000
beeline> root
beeline> 直接回车
学习没有一蹴而就,放下急躁,一步一步扎实前进
Hive的安装和部署
Hive的安装和部署
一、下载、上传并解压Hive安装包
1.下载Hive和MySQl连接驱动
Hive下载地址
mysql连接驱动下载地址
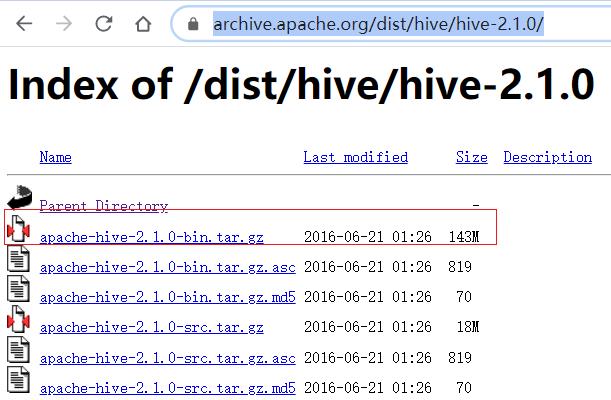
本次下载的Hive版本是:hive-2.1.0-bin-tar.gz
MySQ连接驱动版本是:mysql-connector-java-5.1.38.jar
2.将本地下载的Hive安装包和MySQL连接驱动包上传到linux上
#1.切换到上传的指定目录
cd /export/software/
#2.上传
rz
3.解压Hive安装包到指定位置
#1.解压到指定目录
tar -zxvf apache-hive-2.1.0-bin.tar.gz 5
-C /export/server/
#2.切换到指定目录
cd /export/server/
#3.重命名hive文件
mv apache-hive-2.1.0-bin hive-2.1.0-bin
二、修改配置文件
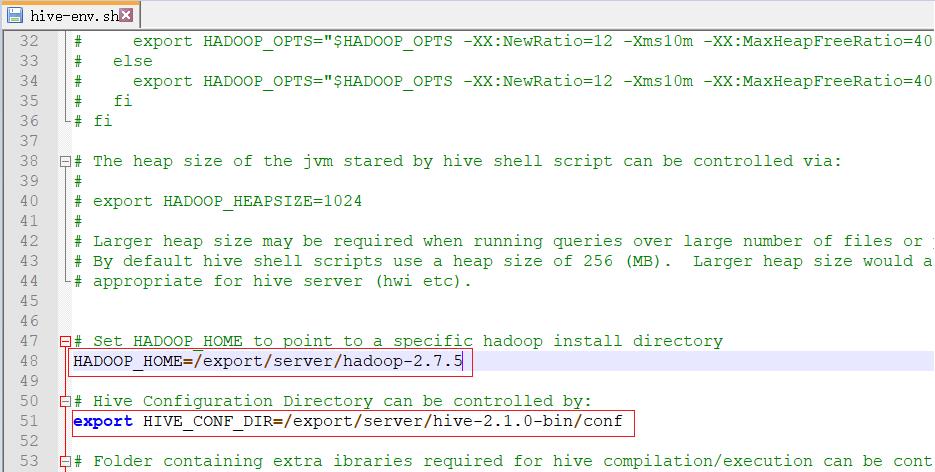
1.编辑hive-env.sh文件
#1.切换到指定目录
cd /export/server/hive-2.1.0-bin/conf/
#2.重命名hive文件
mv hive-env.sh.template hive-env.sh
#3.修改hive-evn.sh文件第48行
HADOOP_HOME=/export/server/hadoop-2.7.5
#4.修改hive-evn.sh文件51行
export HIVE_CONF_DIR=/export/server/hive-2.1.0-bin/conf
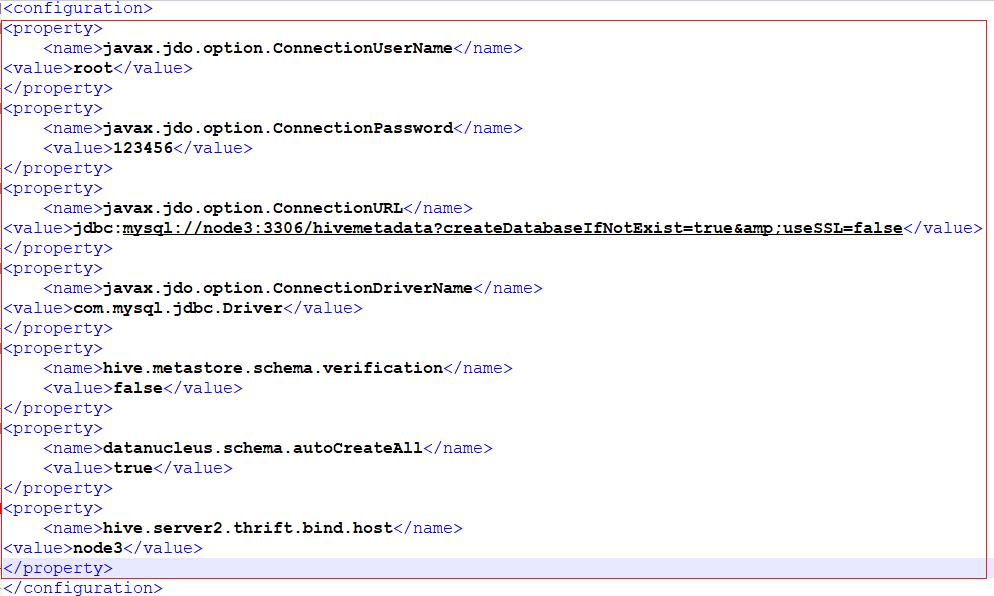
2.将提供的hive-site.xml放入conf目录中,并修改hive-site.xml
提供的hive-site.xml内容如下:
<?xml version="1.0" encoding="UTF-8" standalone="no"?>
<?xml-stylesheet type="text/xsl" href="configuration.xsl"?><!--
   Licensed to the Apache Software Foundation (ASF) under one or more
   contributor license agreements.  See the NOTICE file distributed with
   this work for additional information regarding copyright ownership.
   The ASF licenses this file to You under the Apache License, Version 2.0
   (the "License"); you may not use this file except in compliance with
   the License.  You may obtain a copy of the License at

       http://www.apache.org/licenses/LICENSE-2.0

   Unless required by applicable law or agreed to in writing, software
   distributed under the License is distributed on an "AS IS" BASIS,
   WITHOUT WARRANTIES OR CONDITIONS OF ANY KIND, either express or implied.
   See the License for the specific language governing permissions and
   limitations under the License.
-->
<configuration>
</configuration>
添加内容如下:
<property>
<name>javax.jdo.option.ConnectionUserName</name>
<value>root</value>
</property>
<property>
<name>javax.jdo.option.ConnectionPassword</name>
<value>123456</value>
</property>
<property>
<name>javax.jdo.option.ConnectionURL</name>
<value>jdbc:mysql://node3:3306/hivemetadata?createDatabaseIfNotExist=true&useSSL=false</value>
</property>
<property>
<name>javax.jdo.option.ConnectionDriverName</name>
<value>com.mysql.jdbc.Driver</value>
</property>
<property>
<name>hive.metastore.schema.verification</name>
<value>false</value>
</property>
<property>
<name>datanucleus.schema.autoCreateAll</name>
<value>true</value>
</property>
<property>
<name>hive.server2.thrift.bind.host</name>
<value>node3</value>
</property>
3.将MySQL连接驱动放入Hive的lib目录中
#1.复制mysql-connector-java-5.1.38.jar到指定目录
cp /export/software/mysql-connector-java-5.1.38.jar /export/server/hive-2.1.0-bin/lib/
#2.切换到指定目录下
cd /export/server/hive-2.1.0-bin/
#3.查看是否复制成功
ll lib/
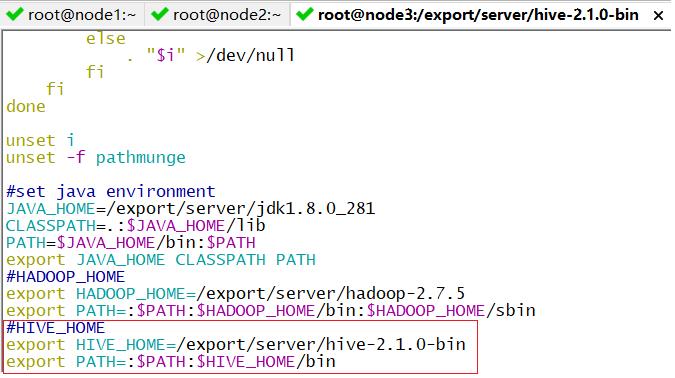
4.配置Hive的环境变量
#1.编辑profile文件
vim /etc/profile
#2.添加以下内容
#HIVE_HOME
export HIVE_HOME=/export/server/hive-2.1.0-bin
export PATH=:$PATH:$HIVE_HOME/bin
#3.刷新环境变量
source /etc/profile
5.启动HDFS和YARN
#1.启动hdfs
start-dfs.sh
#2.启动yarn
start-yarn.sh
三、启动Hive
1.创建HDFS相关目录
#1.创建Hive所有表的数据的存储目录
hdfs dfs -mkdir  -p   /user/hive/warehouse
#2.修改tmp目录的权限
hdfs dfs -chmod g+w   /tmp
#3.修改warehouse目录的权限
hdfs dfs -chmod g+w   /user/hive/warehouse
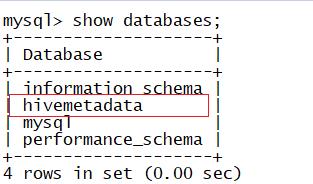
2.初始化Hive元数据
#1.切换到指定目录
cd /export/server/hive-2.1.0-bin/
#2.初始化元数据
bin/schematool -dbType mysql -initSchema

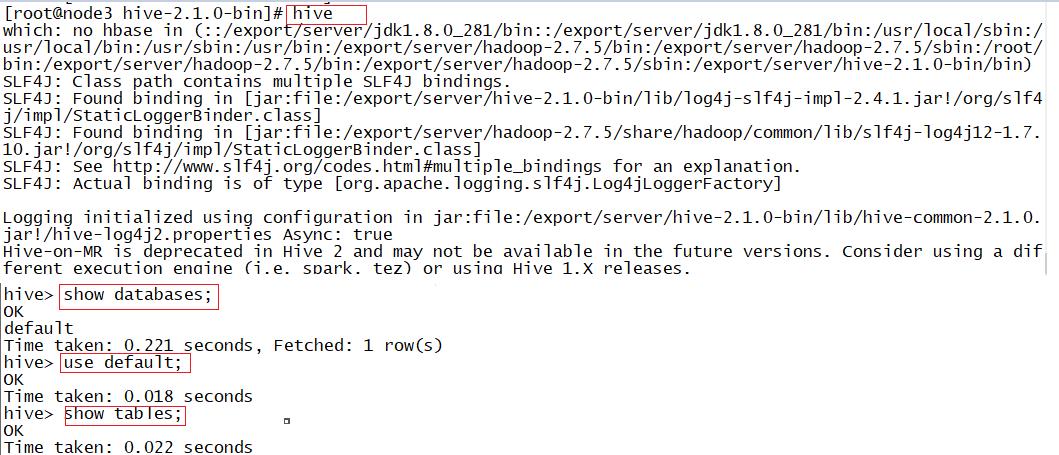
3.启动Hive
#1.启动Hive
hive
#2.查看所有数据库
show databases;
#3.使用当前数据库
use default;
#3.查看数据库下所有表
show tables;
四、案例:Hive实现WordCount
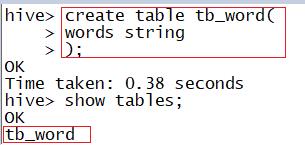
1.创建表:
create table tb_word(
words string
);
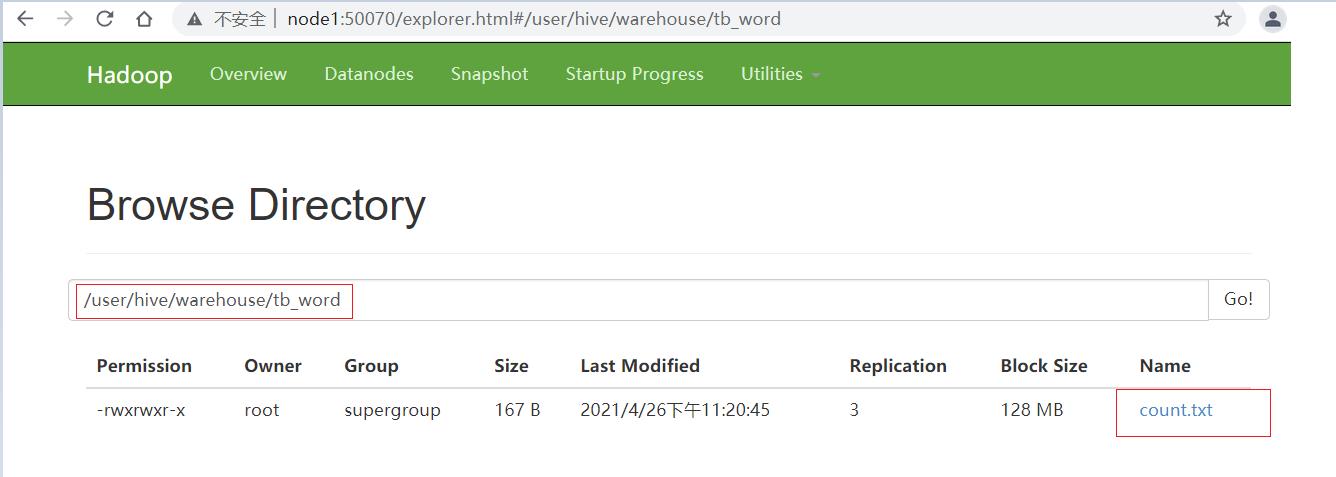
2.加载HDFS数据到tb_word表中
load data inpath '/wordcount/input/count.txt' into
table tb_word;

3.SQL分析处理:
create table tb_word2 as select explode(split(words," "))
as word from tb_word;
select word,count(*) as numb from tb_word2 group by word
order by numb desc;
运行结果:

五、案例:Hive实现二手房统计分析
1.创建表:
create table tb_house(
xiaoqu string,
huxing string,
area double,
region string,
floor string,
fangxiang string,
t_price int,
s_price int,
buildinfo string
) row format delimited fields terminated by ',';
2.加载本地文件数据到tb_house表中
load data local inpath '/export/data/secondhouse.csv' into
table tb_house;
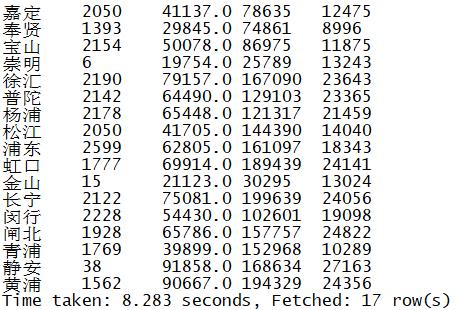
3.SQL分析处理
select
region,
count(*) as numb,
round(avg(s_price),0) as avgprice,
max(s_price) as maxprice,
min(s_price) as minprice
from tb_house
group by region;
运行结果:
以上是关于Hive3安装的主要内容,如果未能解决你的问题,请参考以下文章