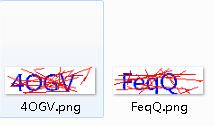
Python图片处理 生产4位验证码
Posted zhan
tags:
篇首语:本文由小常识网(cha138.com)小编为大家整理,主要介绍了Python图片处理 生产4位验证码相关的知识,希望对你有一定的参考价值。
图像处理是一门应用非常广的技术,而拥有非常丰富第三方扩展库的 Python 当然不会错过这一门盛宴。PIL (Python Imaging Library)是 Python 中最常用的图像处理库,如果你是python2.x,可以通过以下地址进行下载:http://www.pythonware.com/products/pil/index.htm,找到相对应的版本进行下载就可以了。
注意:PIL模块在python3.x中已经替换成pillow模块,文档地址:http://pillow.readthedocs.io/en/latest/,直接使用pip3 install pillow即可安装模块,导入时使用from PIL import Image.
1利用PIL模块生产4位验证码
代码:
#!/usr/bin/env python
#coding:utf8
import random
import string
import sys
import math
from PIL import Image, ImageDraw, ImageFont, ImageFilter

class VerificationCode():
    def __init__(self):
        # 字体的位置,不同版本的系统会有不同
        self.font_path = \'msyh.ttf\'
        # 生成几位数的验证码
        self.number = 4
        # 生成验证码图片的高度和宽度
        self.size = (100, 30)
        # 背景颜色,默认为白色
        self.bgcolor = (255, 255, 255)
        # 字体颜色,默认为蓝色
        self.fontcolor = (0, 0, 255)
        # 干扰线颜色。默认为红色
        self.linecolor = (255, 0, 0)
        # 是否要加入干扰线
        self.draw_line = True
        # 加入干扰线条数的上下限
        self.line_number = 20
        #验证码内容
        self.text = ""

    # 用来随机生成一个字符串
    def gene_text(self):
        source = list(string.ascii_letters)
        for index in range(0, 10):
            source.append(str(index))
        self.text = "".join(random.sample(source, self.number))  # number是生成验证码的位数

    # 用来绘制干扰线
    def gene_line(self,draw, width, height):
        begin = (random.randint(0, width), random.randint(0, height))
        end = (random.randint(0, width), random.randint(0, height))
        draw.line([begin, end], fill=self.linecolor)

    # 生成验证码
    def gene_code(self):
        width, height = self.size  # 宽和高
        image = Image.new(\'RGBA\', (width, height), self.bgcolor)  # 创建图片
        font = ImageFont.truetype(self.font_path, 25)  # 验证码的字体
        draw = ImageDraw.Draw(image)  # 创建画笔
        # text = self.gene_text()  # 生成字符串
        print(self.text)
        font_width, font_height = font.getsize(self.text)
        draw.text(((width - font_width) / self.number, (height - font_height) / self.number), self.text, font=font, fill=self.fontcolor)  # 填充字符串
        if self.draw_line:
            for i in range(self.line_number):
                self.gene_line(draw, width, height)

        # image = image.transform((width + 20, height + 10), Image.AFFINE, (1, -0.3, 0, -0.1, 1, 0), Image.BILINEAR)  # 创建扭曲
        image = image.filter(ImageFilter.EDGE_ENHANCE_MORE)  # 滤镜,边界加强
        image.save("{0}.png".format(self.text),"png")  # 保存验证码图片
        # image.show()

def main():
    vc = VerificationCode()
    vc.gene_text()
    vc.gene_code()

if __name__ == "__main__":
    main()
运行结果:

以上是关于Python图片处理 生产4位验证码的主要内容,如果未能解决你的问题,请参考以下文章