Python学习笔记五(模块与包)
Posted <<<<
tags:
篇首语:本文由小常识网(cha138.com)小编为大家整理,主要介绍了Python学习笔记五(模块与包)相关的知识,希望对你有一定的参考价值。
一、模块
1.模块介绍
一个模块就是包含了一组功能的python文件,可以通过import导入模块使用。
python中模块分为四个类别:
a) 使用python编写的.py文件
b) 已被编译为共享库或DLL的C或C++扩展
c) 把一系列模块组织到一起的文件夹,文件夹内有__init__.py文件,称该文件夹为包
d) 使用C编写并链接到python解释器的内置模块
定义my_module.py模块,模块名为my_module
print("from my_module.py")
num = 2222
def read1():
    print("my_module模块:",num)
def read2():
    print("my_module模块")
    read1()
def change():
    global num
    num = 0
2.模块导入
模块可以包含可执行的语句和函数定义,这些语句目的是初始化模块,在模块名第一次遇到import语句时才执行。模块第一次导入后就将模块名加载到内存了,后续import次模块是对已加载到内存的模块对象增加了一次引用,不会重新执行模块内语句。
第一次模块导入时会做的三件事:
a) 为模块源文件创建新的名词空间,在模块中定义的函数和方法若是使用global时访问的就是这个名词空间。
b) 在新创建的命名空间中执行模块中包含的代码。
c) 使用模块名创建名字来引用命名空间
每个模块都是一个独立的名称空间,定义在模块中的函数,把这个模块名称空间当做全局名称空间。不用担心自定义模块中全局变量被导入时与使用者全局变量冲突。
import  my_module
num = 111
print(my_module.num)  #输出的是模块全局名称空间中num的值
import  my_module
def read1():
    print("from test...")
my_module.read1()  #执行的是模块全局名称空间中的read1
import  my_module
num = 111
my_module.change()  #实际修改的模块自身全局名称空间中的num
print(num)          #输出的是调用函数全局名称空间中的num
可以使用import my_module as mm 为模块起别名,对编写可扩展代码有用。比如两个模块xmlreader.py和csvreader.py,都定义了函数read_data(filename)用来从文件中读取一些数据,但采用不同的输入格式。可以编写代码来选择性地挑选读取模块。
if file_format == "xml":
    import xmlreader as reader
elif file_format == "csv":
    import csvreader as reader
data = reader.read_date(filename)
from...import和import的区别:使用from...import...是将模块中的名字直接导入到当前的名称空间中,在当前名称空间中,直接使用相关名字即可,无需使用模块前缀。缺点是容易和当前执行文件中的名字冲突。
函数中调用的变量或其他函数,仍然在函数定义文件中的全局名称空间中找。
from my_module import read1
num = 1111
read1()  #调用read1时,仍然从my_module全局名称空间中找num
from my_module import read2
def read1():
    print("aaaa")
read2()   #仍然从my_module全局名称空间中找read1
from my_module import read1
def read1():
    print("aaaa")
read1()   #重名会覆盖,以本文件中定义为准,覆盖掉导入的
from...import *会吧模块中所有的不是以下划线开头的名字都导入到当前位置,一般不建议使用该方式。可以使用__all__控制*,比如在模块中新增一行__all__=[\'read1\',\'read2\'] 使用from...import *就只能导入这两个名字。
3.py文件区分两种用途:模块和脚本
一个python文件的两种用途:
a) 当做脚本执行:__name__=="__main__"
b) 当做模块被导入使用:__name__=="模块名"
可以控制.py文件在不同应用场景下执行不同的逻辑
4.模块搜索路径
模块查找顺序为:内存中已加载的模块-》内置模块-》sys.path路径中包含的模块
a) 第一次导入模块时,会检查该模块是否已经被加载到内存(当前执行文件名称空间对应内存)中,有则直接引用。
python解释器启动时会自动加载一些模块到内存,使用sys.module可以查看
b) 如果内存没有,解释器会查找同名的内建模块
c) 如果内建模块也没有,则从sys.path给出的目录列表中依次查找模块文件。
初始化后,python程序可以修改sys.path,路径在前面的优先于标准库被加载。通过列表添加的方式添加新路径。
import sys
sys.path.append("D:\\\\")
sys.path.insert(0,"E:\\\\")   #最前面优先被搜索到
print(sys.path)
二、包
1.包的介绍
包是一个包含有__init__.py的文件夹,用于组织python模块名称空间的方式。主要目的为提高程序的结构性和可维护性。
包的导入语句也分为import和from...import...两种,但是无论哪种,在导入时都必须遵循一个原则:凡是导入时带点的,点的左边必须是一个包,否则非法。导入成功后,无此限制。
import包,产生的名称空间的名字来源于原文件,即包下的__init__.py文件,导入包本质就是导入改文件。
2.包的使用
单独导入包名时不会导入包中所有子模块,需要在包下的__init__.py中添加from . import 模块,并且from后import导入的模块,不能带点,否则会有语法错误。f
from aa.bb import * 导入的是bb包中__init__.py文件中的名字,并非bb文件夹下的模块名字。
绝对导入是以包的根路径作为起始位置,相对导入是使用.或者..的方式作为起始。
包以及包中包含的模块都是用于被导入的,不是被直接执行的。环境变量以执行文件为准。比如两个模块均在同一目录下,被其他路径的文件导入,那么这两个模块之间若要导入时,不可直接import,需要添加操作执行文件的路径来导入。
三、日志模块
1.日志级别
日志分为五个级别:CRITICAL、ERROR、WARNING、INFO、DEBUG,依次可以使用数字50、40、30、20、10代替,NOSET表示不设置级别,用0代替。当日志设置为某一级别后,只会记录比该级别更高级别的日志。
#默认界别为warning,输出就只输出warning、error、critical级别日志
import logging
logging.debug("debug_test")
logging.info("info_test")
logging.warning("warning_test")
logging.error("error_test")
logging.critical("critical_test")
2.logging模块的Formatter,Handler,Logger,Filter对象
产生日志对象logger,过滤日志对象Filter,接收日志并控制输出位置的对象Handler,日志格式对象Formatter。

 1 import logging
 2 #1.Logger,产生日志
 3 logger = logging.getLogger("访问日志")
 4 #2.Filter,几乎用不上
 5 #3.Handler,接收logger传来的日志,格式化,并打印到终端或文件
 6 sh = logging.StreamHandler()
 7 fh1 = logging.FileHandler("f1.log",encoding="utf-8")
 8 fh2 = logging.FileHandler("f2.log",encoding="utf-8")
 9 #4.Formatter,日志格式化
10 formatter1 = logging.Formatter(
11     fmt = \'%(asctime)s - %(name)s - %(levelname)s - %(module)s: %(message)s\',
12     datefmt=\'%Y-%m-%d %H-%M-%S %p\',
13 )
14 formatter2 = logging.Formatter(
15     fmt = \'%(asctime)s : %(message)s\',
16     datefmt=\'%Y-%m-%d %H-%M-%S %p\',
17 )
18 formatter3 = logging.Formatter(
19     fmt=\'%(asctime)s : %(module)s : %(message)s\',
20     datefmt=\'%Y-%m-%d %H-%M-%S %p\',
21 )
22 #5.为handler绑定日志格式
23 sh.setFormatter(formatter1)
24 fh1.setFormatter(formatter2)
25 fh2.setFormatter(formatter3)
26 #6.为logger绑定handler
27 logger.addHandler(sh)
28 logger.addHandler(fh1)
29 logger.addHandler(fh2)
30 #7.设置日志级别:logger对象的日志级别应该小于或等于handler的日志级别,否则低级别日志无法到到handler
31 logger.setLevel(10)
32 sh.setLevel(10)
33 fh1.setLevel(10)
34 fh2.setLevel(10)
35 #8.测试
36 logger.debug("debug test")
37 logger.info(\'info test\')
38 logger.warning(\'warning test\')
39 logger.error(\'error test\')
40 logger.critical(\'critical test\')
在实际编程中使用以上方法较麻烦,可以将日志相关对象创建写在一个py文件中作为模块来调用。

 1 import os
 2 import logging.config
 3 BASE_DIR=os.path.dirname(os.path.dirname(os.path.abspath(__file__))) #获取上一级目录绝对路径
 4 LOG_PATH=os.path.join(BASE_DIR,\'log\',\'access.log\')
 5 COLLECT_PATH=os.path.join(BASE_DIR,\'log\',\'collect.log\')
 6 DB_PATH=os.path.join(BASE_DIR,\'db\',\'user\')
 7
 8 # 定义三种日志输出格式 开始
 9 standard_format = \'[%(asctime)s][%(threadName)s:%(thread)d][task_id:%(name)s][%(filename)s:%(lineno)d]\' \\
10                   \'[%(levelname)s][%(message)s]\'
11
12 simple_format = \'[%(levelname)s][%(asctime)s][%(filename)s:%(lineno)d]%(message)s\'
13
14 id_simple_format = \'[%(levelname)s][%(asctime)s] %(message)s\'
15
16 # log配置字典
17 LOGGING_DIC = {
18     \'version\': 1,
19     \'disable_existing_loggers\': False,
20     \'formatters\': {
21         \'standard\': {
22             \'format\': standard_format
23         },
24         \'simple\': {
25             \'format\': simple_format
26         },
27         \'id_simple\' : {
28             \'format\' : id_simple_format
29         },
30     },
31     \'filters\': {},
32     \'handlers\': {
33         #打印到终端的日志
34         \'console\': {
35             \'level\': \'DEBUG\',
36             \'class\': \'logging.StreamHandler\',  # 打印到屏幕
37             \'formatter\': \'simple\'
38         },
39         #打印到文件的日志,收集info及以上的日志
40         \'default\': {
41             \'level\': \'DEBUG\',
42             \'class\': \'logging.handlers.RotatingFileHandler\',  # 保存到文件
43             \'formatter\': \'standard\',
44             \'filename\': LOG_PATH,  # 日志文件
45             \'maxBytes\': 1024*1024*5,  # 日志大小 5M
46             \'backupCount\': 5,
47             \'encoding\': \'utf-8\',  # 日志文件的编码,再也不用担心中文log乱码了
48         },
49         \'collect\': {
50             \'level\': \'DEBUG\',
51             \'class\': \'logging.handlers.RotatingFileHandler\',  # 保存到文件
52             \'formatter\': \'simple\',
53             \'filename\': COLLECT_PATH,  # 日志文件
54             \'maxBytes\': 1024*1024*5,  # 日志大小 5M
55             \'backupCount\': 5,
56             \'encoding\': \'utf-8\',  # 日志文件的编码,再也不用担心中文log乱码了
57         },
58     },
59     \'loggers\': {
60         \'\': {
61             \'handlers\': [\'default\', \'console\',\'collect\'],  # 这里把上面定义的两个handler都加上,即log数据既写入文件又打印到屏幕
62             \'level\': \'DEBUG\',
63             \'propagate\': False,  # 向上(更高level的logger)传递
64         },
65     },
66 }
loggers的子字典中key表示logger名,若将key设置为空key,这样在生成logger对象时,使用logging.getLogger(__name__),不同文件会产生相应的logger名,可以使得日志输出时标识不同。
\'loggers\': {
        \'\': {
            \'handlers\': [\'default\', \'console\'],
            \'level\': \'DEBUG\',
            \'propagate\': True,
        },
}
导入logging的配置文件后,定义log对象生成的函数。
from conf import settings
import logging.config

def logger_handle(log_name):
    logging.config.dictConfig(settings.LOGGING_DIC)
    logger = logging.getLogger(log_name)
    return logger
在需要记录log的文件中导入上述文件。
from lib import common
def test():
    print("支付成功")
    log_msg = "xxx在商城消费8元"
    logger = common.logger_handle("支付日志")
    logger.info(log_msg)
四、re模块
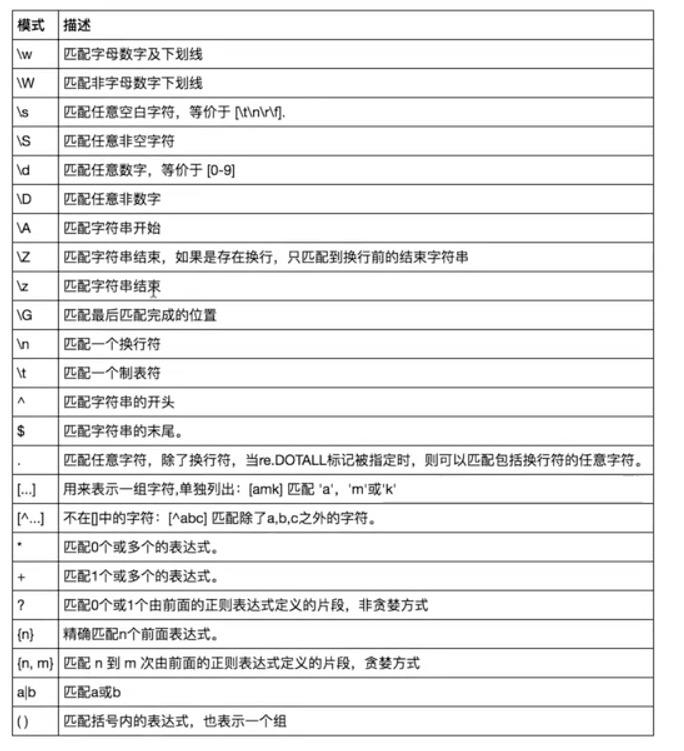
正则是用来描述一类实物的规则,主要用于匹配字符串。

import re
#\\w和\\W
print(re.findall(\'\\w\',"asdf 1234 %@^#"))
print(re.findall(\'\\W\',"asdf 1234 %@^#"))
#\\s和\\S,\\n和\\t都可被\\s匹配
print(re.findall(\'\\s\',"asdf 1234 %@^#"))
print(re.findall(\'\\S\',"asdf 1234 %@^#"))
print(re.findall(\'\\s\',"asdf 1234\\n\\t %@^#"))
#\\d和\\D
print(re.findall(\'\\d\',"asdf 1234 %@^#"))
print(re.findall(\'\\D\',"asdf 1234 %@^#"))
#^和$
print(re.findall(\'^a\',"asdf 1234 %@^#"))
print(re.findall(\'#$\',"asdf 1234 %@^#"))
#匹配重复
print(re.findall(\'a.d\',"asdf 1234 %@^#"))
print(re.findall(\'as*\',"asdf ass 1234 %@^#"))
print(re.findall(\'as?\',"asdf ass 1234 %@^#"))
print(re.findall(\'a.*\',"asdf ass 1234 %@^#"))
print(re.findall(\'a.*?\',"asdf ass 1234 %@^#")) #.*默认贪婪匹配,.*?为非贪婪匹配
print(re.findall(\'as+\',"asdf ass 1234 %@^#"))
print(re.findall(\'as{0,2}\',"asdf ass 1234 %@^#"))
print(re.findall(\'a[cs%]d\',"asdf acd 1234  a%d@^#")) #[]内都为普通字符,如果-没有转义,需要放到[]的首尾处
#分组
print(re.findall(\'a(\\w+)\',"asdf ass 1234 %@^#")) #只输出括号中的
print(re.findall(\'a(?:\\w+)\',"asdf ass 1234 %@^#")) #输出匹配到的全部内容
re模块相关的方法
findall返回所有满足条件的结果,放在列表中
import re
print(re.findall(\'\\d\\s\',"asdf a2 1234 %@^#"))
search只找到第一个匹配然后返回包含匹配结果的对象,通过group()来获取匹配的字符串,如果没有匹配到内容,返回None
import re
print(re.search(\'\\d\\s\',"asdf a2 1234 %@^#").group())
match同search,只不过是从字符串开始匹配
import re
print(re.search(\'^a\',"asdf a2 1234 %@^#").group())
split按照匹配到的字符进行字符串分割。
import re
print(re.split(\'[ab]\',\'abcd\'))#从开头按照a分割为\'\'和\'bcd\',在按照b分割为\'\'和\'cd\'
sub,将字符串中匹配的到子串替换为新的字符串
import re
print(re.sub(\'a\',\'A\',\'aabbccad\')) #不指定n,默认替换所有
print(re.sub(\'a\',\'A\',\'aabbccad\',1)) #只替换第一个
print(re.sub(\'^(\\w)(.*?)(\\w)$\',r\'\\3\\2\\1\',\'aabbccad\',1)) #加括号后自动编序号,按照序号交换收尾字符
compile,用正则表达式生成一个对象,每次使用时通过对象调用相关方法
import re
obj=re.compile("(?:\\d{0,3}\\.){3}\\d{0,3}")
print(obj.findall("ipaddr:10.1.1.1\\n"))
print(obj.findall("src_ip:192.168.1.1"))
五、time和datetime模块
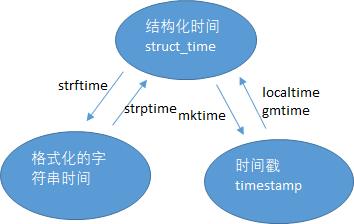
python中的几个时间:
a) 时间戳,表示从1970年1月1日00:00:00开始按照秒计算的偏移量。可使用time.time查看当前时间戳。
b)格式化的时间字符串
c)结构化的时间:struct_time元组工9个元素,分别是年、月、日
import time
print(time.time())  #时间戳
print(time.strftime("%Y-%m-%d %X")) #格式化时间
print(time.localtime()) #本地时区结构化时间
print(time.gmtime())   #UTC时区结构化时间

%a    Locale’s abbreviated weekday name.
%A    Locale’s full weekday name.
%b    Locale’s abbreviated month name.
%B    Locale’s full month name.
%c    Locale’s appropriate date and time representation.
%d    Day of the month as a decimal number [01,31].
%H    Hour (24-hour clock) as a decimal number [00,23].
%I    Hour (12-hour clock) as a decimal number [01,12].
%j    Day of the year as a decimal number [001,366].
%m    Month as a decimal number [01,12].
%M    Minute as a decimal number [00,59].
%p    Locale’s equivalent of either AM or PM.    (1)
%S    Second as a decimal number [00,61].    (2)
%U    Week number of the year (Sunday as the first day of the week) as a decimal number [00,53]. All days in a new year preceding the first Sunday are considered to be in week 0.    (3)
%w    Weekday as a decimal number [0(Sunday),6].
%W    Week number of the year (Monday as the first day of the week) as a decimal number [00,53]. All days in a new year preceding the first Monday are considered to be in week 0.    (3)
%x    Locale’s appropriate date representation.
%X    Locale’s appropriate time representation.
%y    Year without century as a decimal number [00,99].
%Y    Year with century as a decimal number.
%z    Time zone offset indicating a positive or negative time difference from UTC/GMT of the form +HHMM or -HHMM, where H represents decimal hour digits and M represents decimal minute digits [-23:59, +23:59].
%Z    Time zone name (no characters if no time zone exists).
%%    A literal \'%\' character.

格式化字符串的时间格式
三种时间直接转换关关系

import time
print(time.localtime())  #获取本地时间
print(time.localtime(13333333))  #时间戳转换为机构化时间
print(time.mktime(time.localtime()))  #结构化时间转换为时间戳
print(time.strftime("%Y-%m-%d %X",time.localtime())) #结构化时间转换为格式化时间
print(time.strptime("以上是关于Python学习笔记五(模块与包)的主要内容,如果未能解决你的问题,请参考以下文章
