python之路_day78_django中ajax应用
Posted 骑猪走秀
tags:
篇首语:本文由小常识网(cha138.com)小编为大家整理,主要介绍了python之路_day78_django中ajax应用相关的知识,希望对你有一定的参考价值。
一、Ajax介绍
Ajax(Asynchronous Javascript And XML)翻译成中文就是“异步Javascript和XML”。即使用Javascript语言与服务器进行异步交互,传输的数据为XML(当然,传输的数据不只是XML)。
- 同步交互:客户端发出一个请求后,需要等待服务器响应结束后,才能发出第二个请求;
- 异步交互:客户端发出一个请求后,无需等待服务器响应结束,就可以发出第二个请求。
Ajax除了异步的特点外,还有一个就是:浏览器页面局部刷新;(这一特点给用户的感受是在不知不觉中完成请求和响应过程)。因此使用ajax的主要特点有如下几点:(1)Ajax使用Javascript技术向服务器发送异步请求;(2)Ajax无须刷新整个页面;(3)因为服务器响应内容不再是整个页面,而是页面中的局部,所以Ajax性能高。在django入门项目中我们已经简单的介绍了一下ajax应用。下面我们将做详细介绍。
二、ajax实现方式
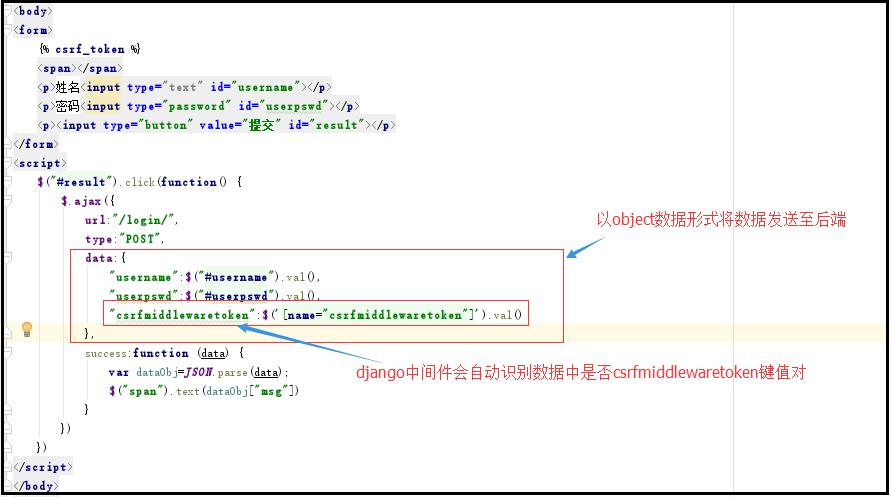
具体实现方式实例如下:
html文件部分:

后端函数部分:

三、$.Ajax的参数
1、contentType类型一
上述实例中是我们对ajax的基本使用,也是ajax中参数contentType的默认使用方式,他决定了发送信息至服务器时内容编码的类型。现将此参数的默认使用方式总结如下:
data:        当前ajax请求要携带的数据,是一个object对象,ajax方法就会默认地把它编码成某种格式(urlencoded:?a=1&b=2)发送给服务端;此外,ajax默认以get方式发送请求。

contentType:"application/x-www-form-urlencoded"。发送信息至服务器时内容编码类型。用来指明当前请求的数据编码格式;urlencoded:?a=1&b=2;
2、contentType类型二
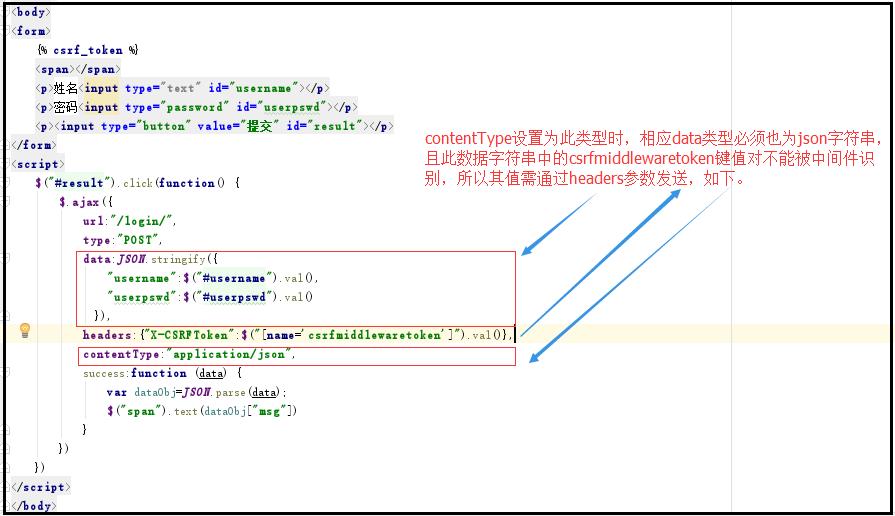
上述这种默认参数形式,data中的csrf跨站请求伪造键值对会被中间件自动识别,contentType参数还有如下一种形式,介绍如下:
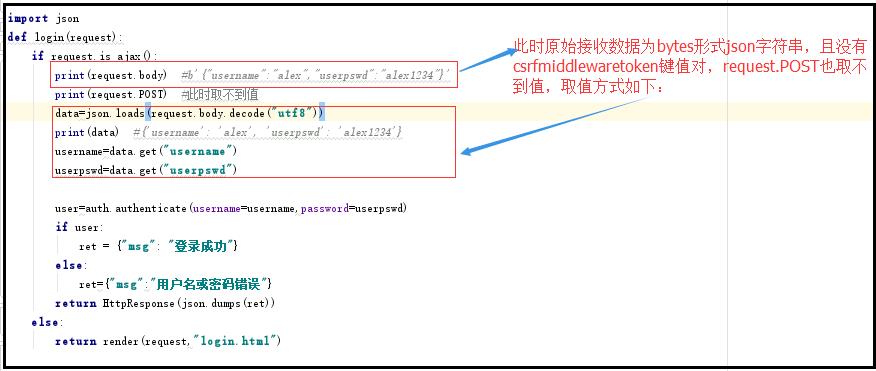
contentType:"application/json",即向服务器发送一个json字符串。注意:contentType:"application/json"一旦设定,data必须是json字符串,不能是json对象
html文件部分:

后端函数部分:

上述通过headers参数发送csrf跨站请求伪造其实共有两种方式获取那个值,分别总结如下:
方式一:
  headers:{"X-CSRFToken":$("[name=\'csrfmiddlewaretoken\']").val()}

方式二:
  headers:{"X-CSRFToken":$.cookie("csrftoken")},
#其中方式二需引用jquery.cookie.js文件,如:<script src="https://cdn.bootcss.com/jquery-cookie/1.4.1/jquery.cookie.js"></script>
四、上传文件
1、form表单上传
如下实例以注册页面为例,form表单提交的时候需要在form中设置enctype="multipart/form-data"属性,使得form中数据和file文件以不同的方式发送值后端,后端通过不同的方法取出相应的数据进行处理。
html文件:
 <form class="form-horizontal" style="margin-top: 20px" action="{{ request.get_full_path }}" method="post" enctype="multipart/form-data">
            {% csrf_token %}
            <div class="col-sm-offset-4 col-sm-8">
                <h2>注册页面</h2>
                <span style="color: red"> {{ error_msg }}</span>
            </div>
            <div class="form-group">
                <label for="username" class="col-sm-2 control-label col-sm-offset-2">姓名</label>
                <div class="col-sm-4">
                    <input type="text" class="form-control" id="username" placeholder="数字或字母组成,不能包含特殊字符" name="username">
                </div>
            </div>
            <div class="form-group">
                <label for="userpswd1" class="col-sm-2 control-label col-sm-offset-2">密码</label>
                <div class="col-sm-4">
                    <input type="password" class="form-control" id="userpswd1" placeholder="密码长度至少为8位字符组成" name="userpswd1">
                </div>
            </div>
            <div class="form-group">
                <label for="userpswd2" class="col-sm-2 control-label col-sm-offset-2">确认密码</label>
                <div class="col-sm-4">
                    <input type="password" class="form-control" id="userpswd1" placeholder="密码长度至少为8位字符组成" name="userpswd2">
                </div>
            </div>
             <div class="form-group">
                <label for="img_file" class="col-sm-2 control-label col-sm-offset-2">上传头像</label>
                <div class="col-sm-4">
                    <input type="file" id="img_file" name="img_file">
                </div>
            </div>
            <div class="form-group">
                <div class="col-sm-offset-4 col-sm-4">
                    <input type="submit" class="btn btn-success btn-lg btn-block" value="确定">
                </div>
            </div>
    </form>
后端处理函数:
import os
from day78.settings import BASE_DIR
def formreg(request):
    if request.method=="POST":
        print(request.POST)
        user=request.POST.get("username")
        userpswd1=request.POST.get("userpswd1")
        userpswd2=request.POST.get("userpswd2")
        print(user,userpswd1,userpswd2)
        if userpswd1==userpswd2:
            User.objects.create_user(username=user,password=userpswd1)
            print(request.FILES)
            file_obj=request.FILES.get("img_file")    #获取文件对象
            file_name=file_obj.name                   #获取文件名字
            path = os.path.join(BASE_DIR, "app01", "static", file_name)
            with open(path,"wb") as f:
                for line in file_obj:
                    f.write(line)
            return HttpResponse("注册成功")
    return render(request,"formreg.html")
2、ajax上传文件
html文件部分:
    <form class="form-horizontal" style="margin-top: 20px">
            {% csrf_token %}
            <div class="col-sm-offset-4 col-sm-8">
                <h2>注册页面</h2>
                <span style="color: red" class="error_msg"></span>
            </div>
            <div class="form-group">
                <label for="username" class="col-sm-2 control-label col-sm-offset-2">姓名</label>
                <div class="col-sm-4">
                    <input type="text" class="form-control" id="username" placeholder="数字或字母组成,不能包含特殊字符" name="username">
                </div>
            </div>
            <div class="form-group">
                <label for="userpswd1" class="col-sm-2 control-label col-sm-offset-2">密码</label>
                <div class="col-sm-4">
                    <input type="password" class="form-control" id="userpswd1" placeholder="密码长度至少为8位字符组成" name="userpswd1">
                </div>
            </div>
            <div class="form-group">
                <label for="userpswd2" class="col-sm-2 control-label col-sm-offset-2">确认密码</label>
                <div class="col-sm-4">
                    <input type="password" class="form-control" id="userpswd2" placeholder="密码长度至少为8位字符组成" name="userpswd2">
                </div>
            </div>
             <div class="form-group">
                <label for="img_file" class="col-sm-2 control-label col-sm-offset-2">上传头像</label>
                <div class="col-sm-4">
                    <input type="file" id="img_file" name="img_file">
                </div>
            </div>
            <div class="form-group">
                <div class="col-sm-offset-4 col-sm-4">
                    <input type="button" class="btn btn-success btn-lg btn-block" value="确定" id="ensure">
                </div>
            </div>
    </form>
    <div style="margin-left: 220px">
        <img src="/static/3.jpg" alt="" class="img-rounded">
        <img src="/static/3.jpg" alt="" class="img-circle">
        <img src="/static/3.jpg" alt="" class="img-thumbnail">
    </div>

</div>
<script src="/static/jquery-3.2.1.min.js"></script>
<script src="/static/bootstrap/js/bootstrap.min.js"></script>
<script>
    $("#ensure").click(function () {
        var $formData=new FormData();
        $formData.append("username",$("#username").val());
        $formData.append("userpswd1",$("#userpswd1").val());
        $formData.append("userpswd2",$("#userpswd2").val());
        $formData.append("img_file",$("#img_file")[0].files[0]);
        $.ajax({
            url:"/ajaxreg/",
            type:"POST",
            data:$formData,
            contentType:false,
            processData:false,
            headers:{"X-CSRFToken":$(\'[name="csrfmiddlewaretoken"]\').val()},
            success:function (data) {
                    $(".error_msg").text(data)
            }
        })
    })
</script>
后端处理函数:
与form提交处理的方式一样,如下:
import os
from day78.settings import BASE_DIR
def ajaxreg(request):
    if request.is_ajax():
        username = request.POST.get("username")
        userpswd1 = request.POST.get("userpswd1")
        userpswd2 = request.POST.get("userpswd2")
        print(username, userpswd1, userpswd2)
        if userpswd1 == userpswd2:
            User.objects.create_user(username=username, password=userpswd1)
            print(request.FILES)
            file_obj = request.FILES.get("img_file")  # 获取文件对象
            file_name = file_obj.name                 # 获取文件名字
            path = os.path.join(BASE_DIR, "app01", "static", file_name)
            with open(path, "wb") as f:
                for line in file_obj:
                    f.write(line)
            return HttpResponse("注册成功")
        else:
            return HttpResponse("注册失败")
    return render(request,"ajaxreg.html")
以上是关于python之路_day78_django中ajax应用的主要内容,如果未能解决你的问题,请参考以下文章