从零构建可视化jar包部署平台JarManage
Posted code2roc
tags:
篇首语:本文由小常识网(cha138.com)小编为大家整理,主要介绍了从零构建可视化jar包部署平台JarManage相关的知识,希望对你有一定的参考价值。
项目背景
在java项目部署过程中,由于内外部各种因素,可能会遇到一些感觉操作不便捷的场景,例如
- jar包未随系统自动启动需要每次手动重启
- 系统vpn堡垒机多重防御更新繁琐
- 系统无图形化界面命令行操作复杂
- 等等......
在工作中之前也总结了windows的Jar包部署工具与linux下的jar包自动化部署脚本,这次就想着否能将二者统一结合,本着简单/高效/功能专一的原则,做出一
个可视化jar包部署平台,JarManage应运而生
功能介绍
项目地址:https://gitee.com/code2roc/jar-manage
支持在线创建项目,上传Jar包,自动备份,配置启动参数,注册系统服务,查看启动日志等功能,具有以下优点
- 基于servlet开发,依赖简洁,部署包10MB左右
- 结合嵌入式tomcat一键部署,无外部容器依赖
- 使用h2db存储数据,无外部数据库依赖
- 适配windows/linux平台,满足多种环境
- 具体项目经平台部署后自动注册系统服务,无需担心服务器重启
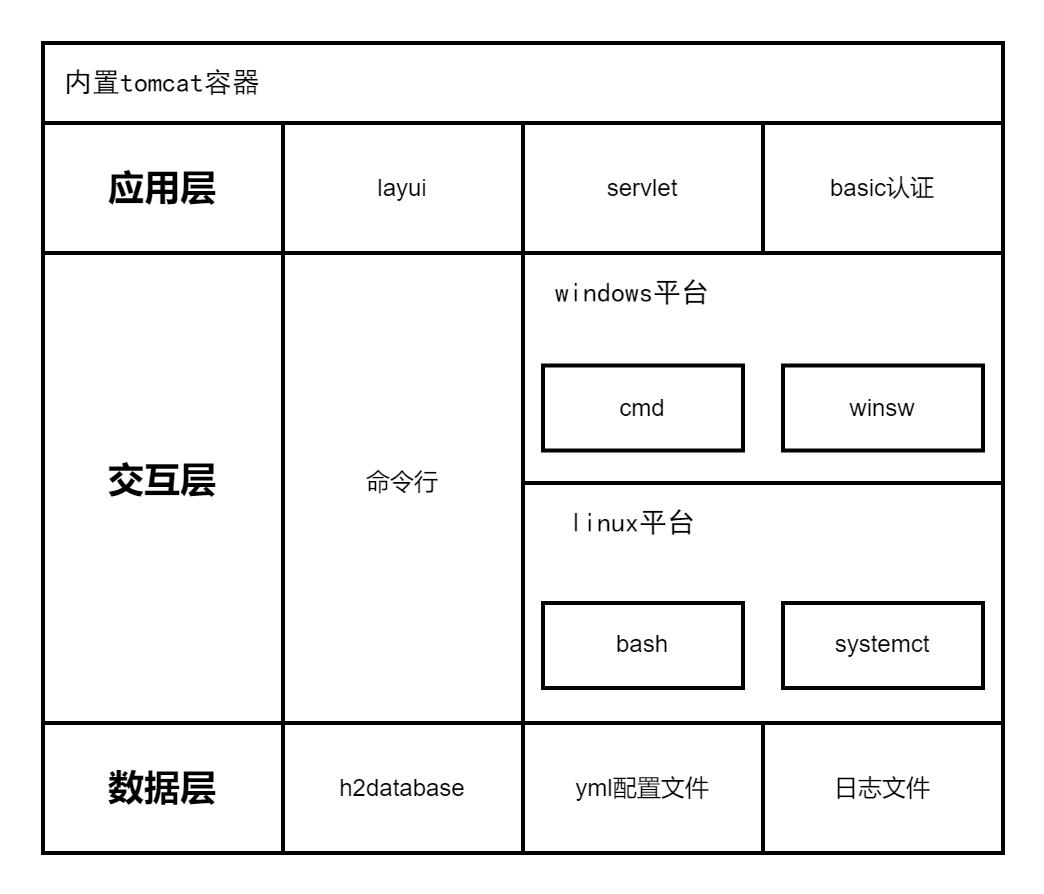
系统架构图如下

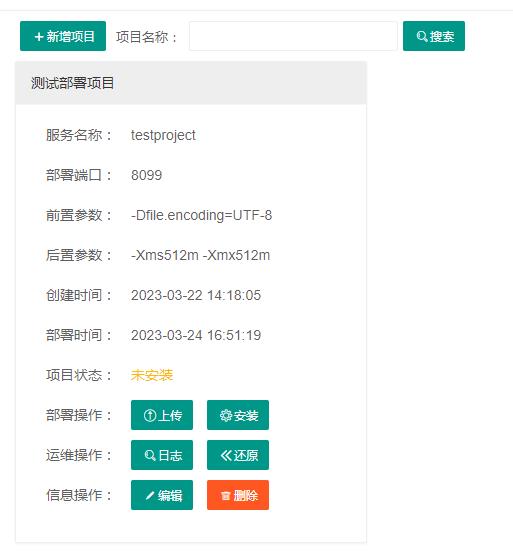
系统截图展示


技术分析
平台识别
首先通过系统os识别是windows平台还是linux平台
String os = System.getProperty("os.name").toLowerCase();
if (os.startsWith("win"))
   platform = DepolyPlatform.Windows;
通过system-release文件识别部分基于CentOS开发的Linux系统
String command = "cat /etc/system-release";
String result = CMDUtil.executeLinuxCommand(command);
if (result.startsWith("Red Hat"))
   platform = DepolyPlatform.LinuxRedHat;
 else if (result.startsWith("CentOS"))
   platform = DepolyPlatform.LinuxCentOS;
 else if (result.startsWith("openEuler"))
   platform = DepolyPlatform.LinuxOpenEuler;
通过issue文件识别部分基于Ubuntu/Debian开发的Linux系统
command = "cat /etc/issue";
result = CMDUtil.executeLinuxCommand(command);
if (!StringUtil.isEmpty(result))
  if (result.startsWith("Ubuntu"))
     platform = DepolyPlatform.LinuxUbuntu;
 else if (result.startsWith("Debian"))
      platform = DepolyPlatform.LinuxDebian;
windows注册服务
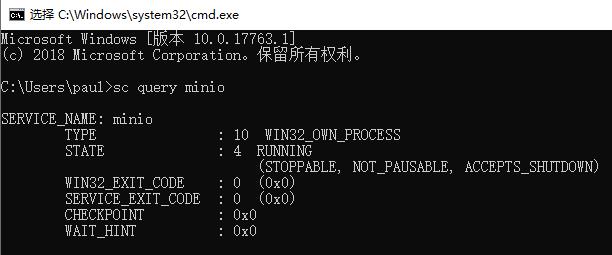
通过sc query命令判断服务状态

    public String getStatus(String serviceName)
        String status = DepolyStatus.UnInstall;
        try
            String command = "sc query " + serviceName;
            String commandResultFilePath = CMDUtil.executeWindowCommandStoreFile(command);
            BufferedReader reader = new BufferedReader(new InputStreamReader(new FileInputStream(commandResultFilePath)));
            String line = reader.readLine();
            while (line != null)
                if (line.trim().startsWith("STATE"))
                    if (line.trim().substring(line.trim().indexOf(":") + 1, line.trim().indexOf(":") + 4).trim().equals("1"))
                        status = DepolyStatus.Stopped;
                    else if (line.trim().substring(line.trim().indexOf(":") + 1, line.trim().indexOf(":") + 4).trim().equals("2"))
                        status = DepolyStatus.Startting;
                    else if (line.trim().substring(line.trim().indexOf(":") + 1, line.trim().indexOf(":") + 4).trim().equals("3"))
                        status = DepolyStatus.Stopping;
                    else if (line.trim().substring(line.trim().indexOf(":") + 1, line.trim().indexOf(":") + 4).trim().equals("4"))
                        status = DepolyStatus.Running;

                line = reader.readLine();

         catch (IOException e)
            LogUtil.error(e);

        return status;
通过winsw这个开源项目配置exe和xml文件将jar包注册为windows服务,项目地址:https://github.com/winsw/winsw/
linux注册服务
通过systemctl status命令判断服务状态

    public String getStatus(String serviceName)
        String status = DepolyStatus.UnInstall;
        try
            String command = "systemctl status " + serviceName;
            String commandResultFilePath = CMDUtil.executeLinuxCommandWithStore(command);
            BufferedReader reader = new BufferedReader(new InputStreamReader(new FileInputStream(commandResultFilePath)));
            String line = reader.readLine();
            while (line != null)
                if (line.trim().startsWith("Active"))
                    if (line.trim().indexOf("inactive (dead)") > 0)
                        status = DepolyStatus.Stopped;
                    else if (line.trim().indexOf("active (running)") > 0)
                        status = DepolyStatus.Running;
                    else if (line.trim().indexOf("failed") > 0)
                        status = DepolyStatus.Stopped;

                line = reader.readLine();

         catch (IOException e)
            LogUtil.error(e);

        return status;
通过拷贝service文件到systemd/system目录下注册linux服务
yml配置文件识别
- maven配置
        <dependency>
            <groupId>org.yaml</groupId>
            <artifactId>snakeyaml</artifactId>
            <version>1.26</version>
        </dependency>
- 配置文件
jarmanage:
  port: 8555
  username: admin
  password: abcd@1234
  backupcount: 5
- 工具类
    public static String getConfigValue(String configName)
        String configValue = "";
        try
            Yaml yaml = new Yaml();
            InputStream resourceAsStream = new FileInputStream(new File("resources"+File.separator+"application.yml"));
            Map obj = yaml.load(resourceAsStream);
            Map<String,Object> param = (Map) obj.get("jarmanage");
            configValue = ConvertUtil.convert2String(param.get(configName));
        catch (Exception e)
            LogUtil.error(e);

        return configValue;
h2database使用
- maven引用
        <dependency>
            <groupId>com.h2database</groupId>
            <artifactId>h2</artifactId>
            <version>2.1.214</version>
        </dependency>
- 工具类
    public static Connection getConnection() throws Exception
        File file = new File("database");
        Connection conn = DriverManager.getConnection("jdbc:h2:file:" + file.getAbsolutePath() + File.separator + "manage", "root", "abcd@1234");
        return conn;


    public static void executeSQL(String sql)
        try
            Connection conn = getConnection();
            Statement stmt = conn.createStatement();
            stmt.execute(sql);
            stmt.close();
            conn.close();
         catch (Exception e)
            LogUtil.error(e);
servelt内置tomcat打包
- maven引用
        <dependency>
            <groupId>org.apache.tomcat.embed</groupId>
            <artifactId>tomcat-embed-core</artifactId>
            <version>9.0.35</version>
        </dependency>
        <dependency>
            <groupId>org.apache.tomcat.embed</groupId>
            <artifactId>tomcat-embed-el</artifactId>
            <version>9.0.35</version>
        </dependency>
        <dependency>
            <groupId>org.apache.tomcat.embed</groupId>
            <artifactId>tomcat-embed-jasper</artifactId>
            <version>9.0.35</version>
        </dependency>
- 手动启动
            //启动tomcat服务
            // 1.创建一个内嵌的Tomcat
            Tomcat tomcat = new Tomcat();
            // 2.设置Tomcat端口
            tomcat.setPort(8555);
            // 3.设置工作目录,tomcat需要使用这个目录进行写一些东西
            final String baseDir = "workspace" + File.separator;
            tomcat.setBaseDir(baseDir);
            tomcat.getHost().setAutoDeploy(false);
            // 4. 设置webapp资源路径
            String webappDirLocation = "webapp" + File.separator;
            StandardContext ctx = (StandardContext) tomcat.addWebapp("/", new File(webappDirLocation).getAbsolutePath());
            // 5. 设置上下文路每径
            String contextPath = "";
            ctx.setPath(contextPath);
            ctx.addLifecycleListener(new Tomcat.FixContextListener());
            ctx.setName("jar-manage");
            tomcat.getHost().addChild(ctx);
            //6.启动
            tomcat.getConnector();
            tomcat.start();
            tomcat.getServer().await();
- 打包包含引用类库,自定义配置xml,指定运行class
        <plugins>
            <plugin>
                <!-- 打包包含引用 -->
                <artifactId>maven-assembly-plugin</artifactId>
                <configuration>
                    <descriptors>
                        <!-- 自定义配置 -->
                        <descriptor>package.xml</descriptor>
                    </descriptors>
                    <archive>
                        <manifest>
                            <!-- 运行类 -->
                            <mainClass>com.code2roc.jarmanage.Application</mainClass>
                        </manifest>
                    </archive>
                </configuration>
                <executions>
                    <execution>
                        <id>make-assembly</id>
                        <phase>package</phase>
                        <goals>
                            <goal>single</goal>
                        </goals>
                    </execution>
                </executions>
            </plugin>
            <plugin>
                <groupId>org.apache.maven.plugins</groupId>
                <artifactId>maven-compiler-plugin</artifactId>
                <configuration>
                    <source>8</source>
                    <target>8</target>
                </configuration>
            </plugin>
        </plugins>
<assembly xmlns="http://maven.apache.org/ASSEMBLY/2.1.1"
          xmlns:xsi="http://www.w3.org/2001/XMLSchema-instance"
          xsi:schemaLocation="http://maven.apache.org/ASSEMBLY/2.1.1 https://maven.apache.org/xsd/assembly-2.1.1.xsd">
    <!-- TODO: a jarjar format would be better -->
    <id>depoly</id>
    <formats>
        <format>jar</format>
    </formats>
    <includeBaseDirectory>false</includeBaseDirectory>
    <dependencySets>
        <dependencySet>
            <outputDirectory>/</outputDirectory>
            <useProjectArtifact>true</useProjectArtifact>
            <unpack>true</unpack>
            <scope>runtime</scope>
        </dependencySet>
    </dependencySets>
    <fileSets>
        <fileSet>
            <directory>src/main/webapp/</directory>
            <outputDirectory>/webapp</outputDirectory>
            <includes>
                <include>**/**</include>
            </includes>
        </fileSet>
        <fileSet>
            <directory>src/main/resources/</directory>
            <outputDirectory>/resources</outputDirectory>
            <includes>
                <include>**/**</include>
            </includes>
        </fileSet>
    </fileSets>
</assembly>
Pulsar学习笔记之 编译Jar包构建镜像部署集群
编译 Pulsar Jar包
拉取开源代码
mkdir ~/dev/apache
cd ~/dev/apache
git clone https://github.com/apache/pulsar.git
cd pulsar

#从TAG v2.6.1 创建本地分支
git checkout -b v2.6.1_build v2.6.1
编译Jar包,并打包成发布包
mvn install -DskipTests

# 查看编译后的结果
cd distribution/
tree ./

cd server/target
tree ./
部署本地单机模式 Pulsar
解压上面编译打包好的发布包,并启动单机模式,可用于本地开发测试
cd ~/dev/apache/pulsar/distribution/server/target

# 解压编译好的Jar包
tar -zxvf apache-pulsar-2.6.1-bin.tar.gz
cd apache-pulsar-2.6.1

# 修改单机模式的配置文件
vim conf/standalone.conf

# 启动单机模式Pulsar
bin/pulsar standalone

# 关闭单机模式Pulsar
Ctrl + c
单机模式开启 JWT认证 配置示例
# 生成secret和tokens
mkdir -p /tmp/test-jwt
bin/pulsar tokens create-secret-key --output /tmp/test-jwt/my-base64-secret.key --base64
bin/pulsar tokens create --secret-key file:///tmp/test-jwt/my-base64-secret.key --subject my-jwt-user > /tmp/test-jwt/my-jwt-user.tokens

# 修改认证相关的配置项
vim conf/standalone.conf
    authenticationEnabled=true
    authenticationProviders=org.apache.pulsar.broker.authentication.AuthenticationProviderToken
    tokenSecretKey=file:///tmp/test-jwt/my-base64-secret.key
    brokerClientAuthenticationPlugin=org.apache.pulsar.client.impl.auth.AuthenticationToken
    brokerClientAuthenticationParameters=file:///tmp/test-jwt/my-jwt-user.tokens

# 启动单机模式Pulsar
bin/pulsar standalone
构建Docker镜像
将上述编译打包好的发布包构建成Docker镜像
# 构建镜像
cd ~/dev/apache/pulsar/docker
./build.sh

# 查看构建的镜像
docker images | grep pulsar
推送镜像到镜像仓库
docker tag apachepulsar/pulsar-all:2.6.1 registry.example.tabalt.net/pulsar-test/pulsar-all:2.6.1
docker login --username=xxx --password=yyy registry.example.tabalt.net
docker push registry.example.tabalt.net/pulsar-test/pulsar-all:2.6.0
部署Pulsar到K8s集群
# 登陆K8s master机器
ssh k8s-master.example.tabalt.net

# 安装本地存储卷
kubectl create namespace local-storage
helm repo add streamnative https://charts.streamnative.io
helm repo update
helm install local-storage-provisioner streamnative/local-storage-provisioner \\
    --set namespace=local-storage -n local-storage
kubectl get pods -n local-storage -o wide

# 拉取pulsar helm chart
mkdir pulsar
cd pulsar/
git clone https://github.com/apache/pulsar-helm-chart.git
cd pulsar-helm-chart
git checkout -b v2.6.1_deploy pulsar-2.6.1

# 部署Pular
./scripts/pulsar/prepare_helm_release.sh -c -n pulsar -k pulsar
helm upgrade --install pulsar charts/pulsar \\
    --set images.zookeeper.repository=registry.example.tabalt.net/pulsar-test/pulsar-all \\
    --set images.bookie.repository=registry.example.tabalt.net/pulsar-test/pulsar-all \\
    --set images.autorecovery.repository=registry.example.tabalt.net/pulsar-test/pulsar-all \\
    --set images.broker.repository=registry.example.tabalt.net/pulsar-test/pulsar-all \\
    --set images.proxy.repository=registry.example.tabalt.net/pulsar-test/pulsar-all \\
    --set images.functions.repository=registry.example.tabalt.net/pulsar-test/pulsar-all \\
    --set bookkeeper.metadata.image.repository=registry.example.tabalt.net/pulsar-test/pulsar-all \\
    --set pulsar_metadata.image.repository=registry.example.tabalt.net/pulsar-test/pulsar-all \\
    --set namespace=pulsar --set volumes.local_storage=true \\
    -n pulsar

kubectl get pods -n pulsar -o wide

# 查看是pod镜像版本是否匹配
kubectl describe pod pulsar-bookie-0 -n pulsar | grep image

# 删除原来的Pulsar(如有),请注意不要误删线上集群并确保他人未在使用
helm uninstall pulsar -n pulsar
kubectl delete namespace pulsar
以上是关于从零构建可视化jar包部署平台JarManage的主要内容,如果未能解决你的问题,请参考以下文章