Vue 核心
Posted A-L-Kun
tags:
篇首语:本文由小常识网(cha138.com)小编为大家整理,主要介绍了Vue 核心相关的知识,希望对你有一定的参考价值。
Vue 核心(二)

八、 绑定样式
1、 class
<!DOCTYPE html>
<html lang="en">
<head>
  <meta charset="UTF-8">
  <title>样式绑定</title>
  <script type="text/javascript" src="../js/vue.js"></script>
  <style>
    .basic
      width: 400px;
      height: 400px;
      border: 1px solid indigo;

    .custom_1
      background-color: cyan;

    .custom_2
      background-color: green;

    .custom_3
      background-color: red;


  </style>
</head>
<body>
<div id="root">
  <!--绑定class样式--字符串写法,适用于:样式的类名不确定,需要动态指定-->
  <div class="basic" :class="custom" @click="changeStyle">
    你好
  </div>
  <!--绑定class样式--数组写法,适用于:要绑定的样式个数不确定、名字也不确定-->
  <div class="basic" :class="custom_arr" @click="changeStyle">
    样式数组
  </div>
  <!--绑定class样式--对象写法,适用于:要绑定的样式个数确定、名字也确定,但是需要动态决定是否使用-->
  <div class="basic" :class="custom_obj" @click="changeStyle">
    绑定对象
  </div>
</div>
<script type="text/javascript">
  Vue.config.productionTip = false;
  new Vue(
    el: "#root",
    data()
      return
        custom: "custom_1",
        custom_arr: [],  // 样式数组,可以动态的删除和添加样式,增加动态性
        custom_obj:
          custom_3: false,
          custom_2: true,
        ,

    ,
    methods:
      changeStyle()
        // 需求,点击事件设置随机样式
        const style = (() =>
          return  ["custom_1", "custom_2", "custom_3"]
        )()  // 将所有的样式存放在一个数组中
        let num = Math.floor(Math.random() * 3)
        this.custom = style[num]


  )
</script>
</body>
</html>
2、 style
<!DOCTYPE html>
<html lang="en">
<head>
  <meta charset="UTF-8">
  <title>样式绑定</title>
  <script type="text/javascript" src="../js/vue.js"></script>
</head>
<body>
<div id="root">
  <div :>
    style内部样式
  </div>
</div>
<script type="text/javascript">
  Vue.config.productionTip = false;
  new Vue(
    el: "#root",
    data()
      return
        styleObj:
          fontSize: \'40px\',
          color: "red",
          backgroundColor: "blue",
        ,

    ,
  )
</script>
</body>
</html>
绑定样式:
class 样式:
写法:
:class="xxx"xxx 可以是字符串、对象、数组
- 字符串适用于:类名不确定,需要动态获取
- 对象写法适用于:要绑定多个样式,个数不确定,名字也不确定
- 数组写法适用于:要绑定多个样式,个数确定,名字也确定,但不确定是否需要使用
style 样式:
:style=对象绑定方法:style=[]数组绑定方法,数组里面必须是存放样式的对象
九、 条件渲染
1、 渲染指令
v-if & v-else
v-show
比较 if 与 show;
- 如果需要频繁切换
v-show较好- 当条件不成立时,
v-if的所有节点不会解析(项目中使用)
2、 使用示例
<!DOCTYPE html>
<html lang="en">
<head>
  <meta charset="UTF-8">
  <title>样式绑定</title>
  <script type="text/javascript" src="../js/vue.js"></script>
</head>
<body>
<div id="root">
<!--使用 v-show 做条件渲染-->
  <div v-show="isShow" @click="toHid">click me to hid,注意,只是进行隐藏,并没有完全删除</div>
  <div v-if="false">你好,这个内容是被彻底删除的</div>
  <div >
    <h2>当前值是:num</h2>
    <butto @click="num++">点我</butto>
    <div v-show="num % 3 === 0">Angular</div>
    <div v-show="num % 3 === 1">React</div>
    <div v-show="num % 3 === 2">Vue</div>
    <!--使用 v-if 做条件渲染-->
    <div v-if="num % 3 === 0">Angular</div>
    <div v-else-if="num % 3 === 1">React</div>
    <div v-else>Vue</div>

    <!--条件模板的使用:其不会影响HTML的结构,同时,其只可以同 v-if 使用-->
    <template v-if="num === 1">
      <h3>1</h3>
      <h3>1</h3>
      <h3>1</h3>
    </template>
  </div>
</div>
<script type="text/javascript">
  Vue.config.productionTip = false;
  new Vue(
    el: "#root",
    data()
      return
        isShow: true,
        num: 0,

    ,
    methods:
      toHid()
        this.isShow = false
      ,
    ,
  )
</script>
</body>
</html>
十、 列表渲染
1、 基本语法
<!DOCTYPE html>
<html lang="en">
<head>
  <meta charset="UTF-8">
  <title>基本列表</title>
  <script type="text/javascript" src="../js/vue.js"></script>
</head>
<body>
<div id="root">
  <!--遍历列表-->
  <h1>人员列表</h1>
  <ul>
    <li v-for="person in persons" :key="person.id">
      <!--<li v-for="(person, index) in persons" :key="person.id">-->
      <!--遍历对象-->
      <ul>
        <li v-for="(value, key) in person" :key="key">
          <p>遍历对象:value -- key</p>
        </li>
      </ul>
    </li>
  </ul>
  <!--遍历字符串-->
  <h1>字符串遍历</h1>
  <ul>
    <li v-for="(char, index) of \'Hello World\'" :key="index">
      <!--注意,of 和 in 是等价的-->
      char -- index
    </li>
  </ul>
  <!--遍历指定次数-->
  <h1>数字迭代</h1>
  <ul>
    <li v-for="(value, index) of 5" :key="index">
      value -- index
    </li>
  </ul>
</div>
<script type="text/javascript">
  Vue.config.productionTip = false;
  new Vue(
    el: "#root",
    data()
      return
        persons: [
          id: "001", name: "Make", age: 17,
          id: "002", name: "Jack", age: 16,
          id: "003", name: "Neck", age: 19,
        ]

    ,
  )
</script>
</body>
</html>
v-for可以遍历数组、对象、字符串以及指定次数
2、 key原理
使用 index 作为key时:
<!DOCTYPE html>
<html lang="en">
<head>
  <meta charset="UTF-8">
  <title>遍历列表中key的作用</title>
  <script type="text/javascript" src="../js/vue.js"></script>
</head>
<body>
<div id="root">
  <h1>人员列表</h1>
  <button @click.once="addPerson">添加一个数据</button>
  <ul>
    <li v-for="(person, index) in persons" :key="index">
    <!-- <li v-for="(person, index) in persons" :key="person.id"> 使用 id 作为 key-->
      <!--key的作用-->
      <p>
        person.name + person.age <br>
        <input type="text" placeholder="输入数据">
      </p>

    </li>
  </ul>

</div>
<script type="text/javascript">
  Vue.config.productionTip = false;
  new Vue(
    el: "#root",
    data()
      return
        persons: [
          id: "001", name: "Make", age: 17,
          id: "002", name: "Jack", age: 16,
          id: "003", name: "Neck", age: 19,
        ]

    ,
    methods:
      addPerson()
        const p = id: "004", name: "Lisa", age: 17
        this.persons.unshift(p)

    ,
  )
</script>
</body>
</html>
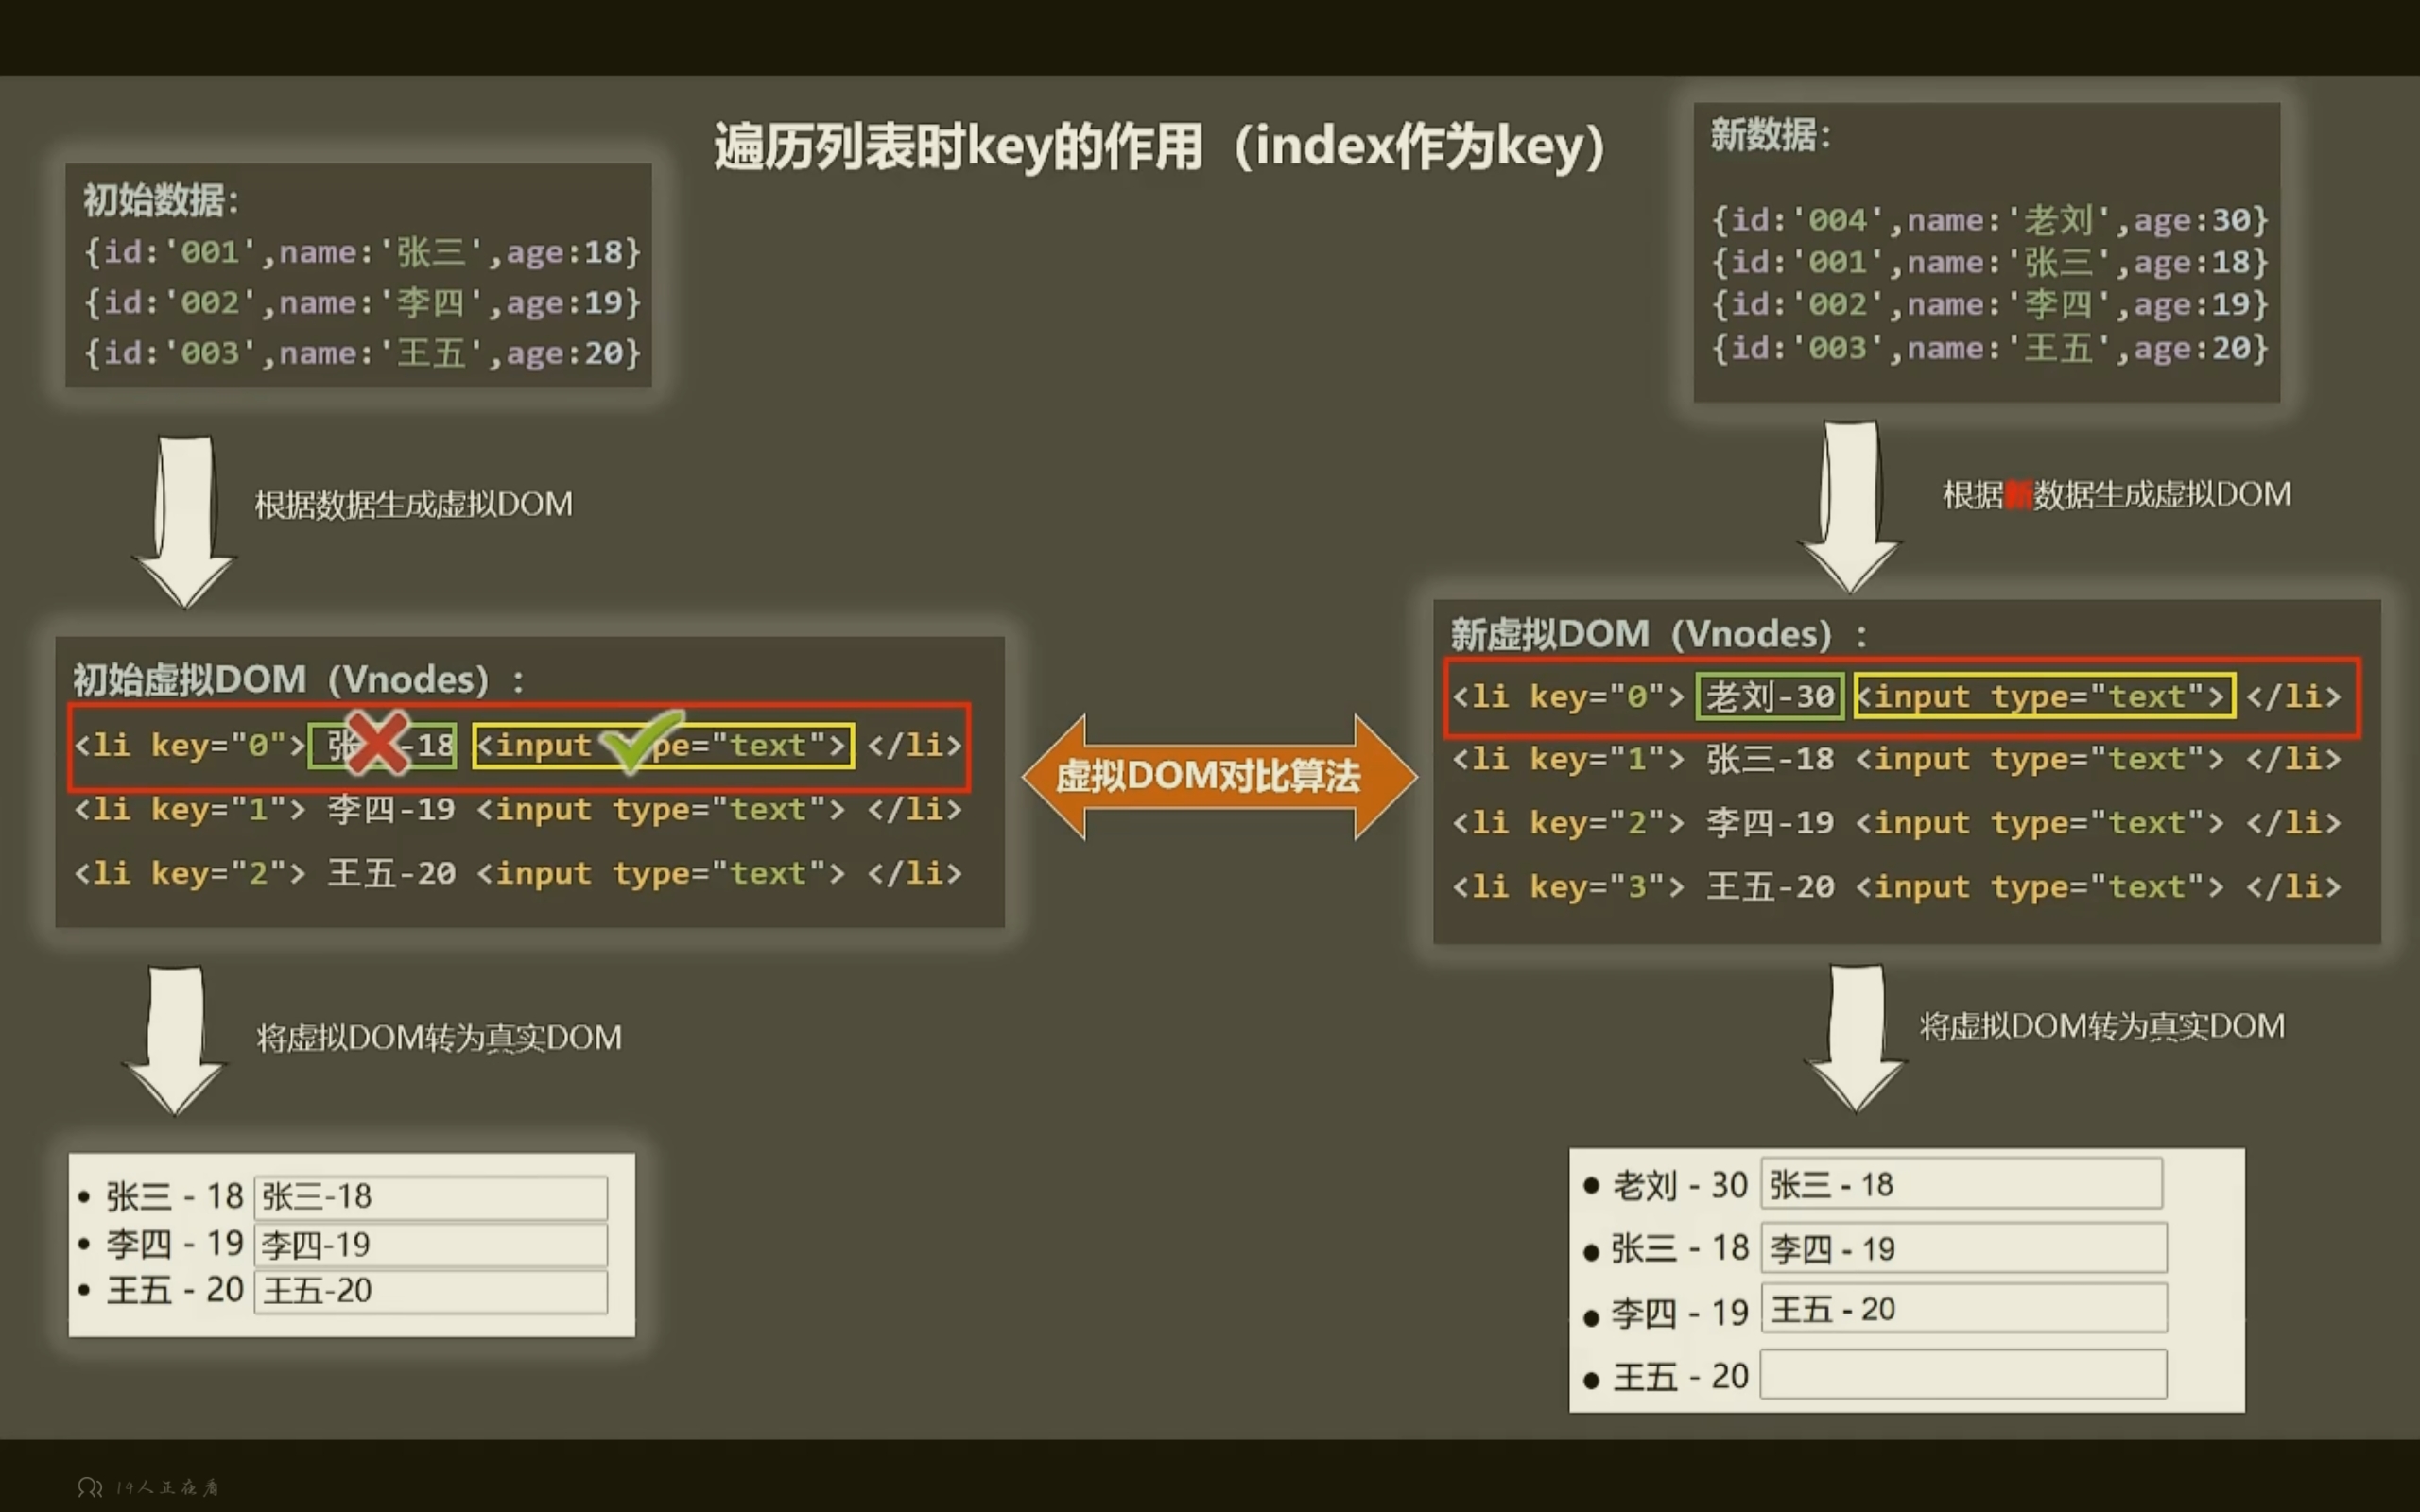
使用 id 这个唯一标识时:
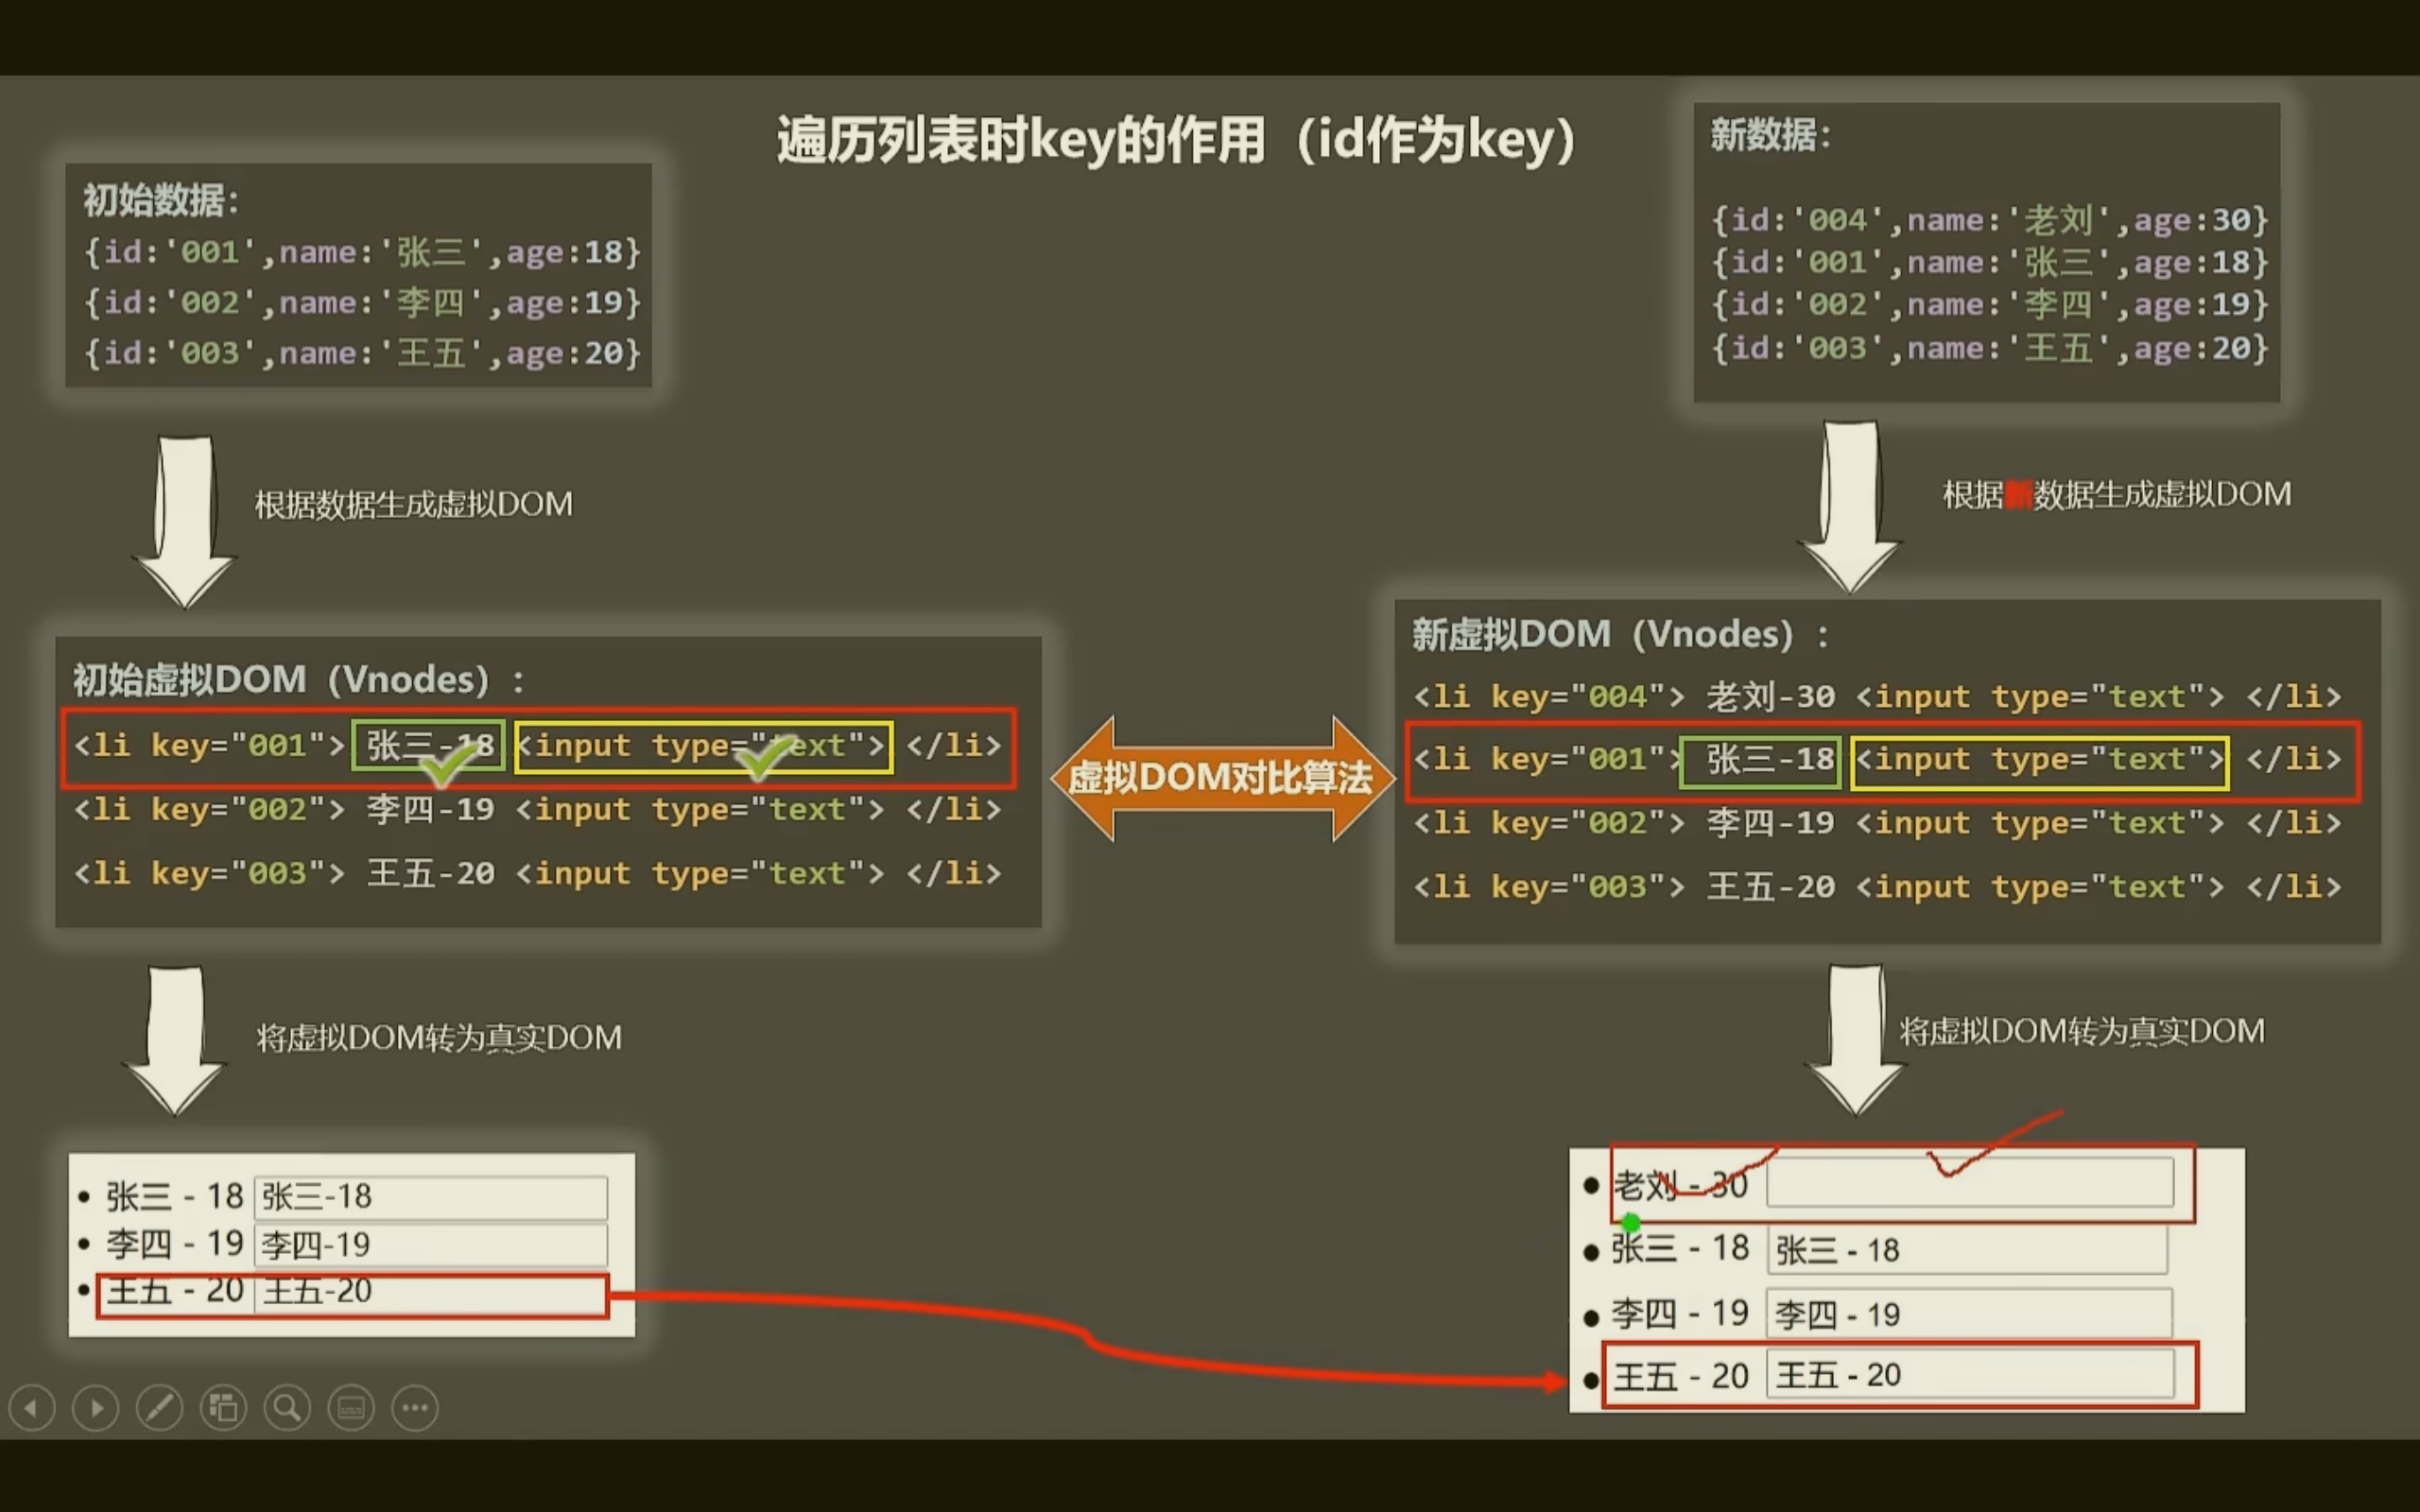
key 的内部原理:
- 虚拟 DOM 中 key 的作用:
- key 是虚拟 DOM 对象的标识,当数据发生改变时,Vue 会根据新数据生成新的虚拟 DOM!
- 随后 Vue 进行 新虚拟 DOM 与旧虚拟 DOM 的差异比较
比较规则:
- 虚拟 DOM 找到了与新虚拟 DOM 相同的 key
- 若虚拟 DOM 中内容没变,直接使用之前的真实 DOM
- 若虚拟 DOM 中内容变了,则生成新的真实 DOM,随后替换掉页面中之前的真实 DOM
- 就虚拟 DOM 中未找到与新虚拟 DOM 相同的 key:创建新的真实 DOM,随后渲染到页面中
如果使用 index 作为 key 可能会引发的问题:
- 若对数据进行:逆序添加,逆序删除等破坏顺序操作:会产生没有必要的真实 DOM 更新 ==》界面效果没有问题,但效率低
- 如果结构中还包含输入类的 DOM:会产生错误的 DOM 更新 ==》 界面有问题
开发中如何选择 key?
- 最好使用每条数据唯一标识作为 key,比如 id、手机号、身份证号、学号等唯一标识;
- 如果不存在对数据的逆序添加、逆序删除等破坏顺序的操作,仅用于渲染列表用于展示,使用 index 作为 key 是没有问题的,但是不推荐。
3、 列表过滤
<!DOCTYPE html>
<html lang="en">
<head>
  <meta charset="UTF-8">
  <title>列表过滤</title>
  <script type="text/javascript" src="../js/vue.js"></script>
</head>
<body>
<div id="root">
  <h1>人员列表</h1>
  <input type="text" placeholder="请输入需要搜索的名字" v-model="keyword">
  <ul>
    <li v-for="person in filterPerson" :key="person.id">
      <!--key的作用-->
      <p>
        person.name + person.age <br>
      </p>

    </li>
  </ul>

</div>
<script type="text/javascript">
  Vue.config.productionTip = false;
  new Vue(
    el: "#root",
    data()
      return
        persons: [
          id: "001", name: "Make", age: 17,
          id: "002", name: "Jack", age: 16,
          id: "003", name: "Neck", age: 19,
        ],
        keyword: "",

    ,
    computed:
      filterPerson()
        return this.persons.filter((person) =>
          return (person.name.indexOf(this.keyword) !== -1)
        )


  )
</script>
</body>
</html>
这里使用的是 computed 来实现这个功能,当然,也可以使用 wacth 监视器来实现这个功能。
4、 列表排序
<!DOCTYPE html>
<html lang="en">
<head>
  <meta charset="UTF-8">
  <title>列表过滤</title>
  <script type="text/javascript" src="../js/vue.js"></script>
</head>
<body>
<div id="root">
  <h1>人员列表</h1>
  <input type="text" placeholder="请输入需要搜索的名字" v-model="keyword">
  <button @click="sortType=1">升序</button>
  <button @click="sortType=-1">降序</button>
  <button @click="sortType=0">原顺序</button>
  <ul>
    <li v-for="person in filterPerson" :key="person.id">
      <!--key的作用-->
      <p>
        person.name + person.age <br>
      </p>
    </li>
  </ul>

</div>
<script type="text/javascript">
  Vue.config.productionTip = false;
  new Vue(
    el: "#root",
    data()
      return
        persons: [
          id: "001", name: "Make", age: 17,
          id: "002", name: "Jack", age: 16,
          id: "003", name: "Neck", age: 19,
        ],
        keyword: "",
        sortType: 0, // 1 升序, -1 降序

    ,
    computed:
      filterPerson()
        const arr =  this.persons.filter((person) =>
          return (person.name.indexOf(this.keyword) !== -1)
        )
        // 判断这些数据是否需要排序
        if (this.sortType)
          arr.sort((a, b) =>
            return this.sortType === 1 ? a.age - b.age : b.age - a.age
          )

        return arr


  )
</script>
</body>
</html>
5、 数组更新检测
Vue 将被侦听的数组的变更方法进行了包裹,所以它们也将会触发视图更新。这些被包裹过的方法包括:
push()pop()shift()unshift()splice()sort()reverse()
替换数组:
变更方法,顾名思义,会变更调用了这些方法的原始数组。相比之下,也有非变更方法,例如 filter()、concat() 和 slice()。它们不会变更原始数组,而总是返回一个新数组。当使用非变更方法时,可以用新数组替换旧数组:
example1.items = example1.items.filter(function (item)
  return item.message.match(/Foo/)
)
注意,由于 JavaScript 的限制,Vue 不能检测数组和对象的变化。深入响应式原理中有相关的讨论。
同时,也可以使用 Vue.set(target, key, value)来替换数组里面的值:
const vm = new Vue(
	data()
    	return
    		arr: ["a", "b", "c"],

	,
)
// 使用包裹方法修改数组的第一个元素:

vm.arr.splice(0, 1, "d")

// 使用 Vue.set 来修改数组的第一个元素
Vue.set(vm.arr, 0, "d")
vm.$set(vm.arr, 0, "d")
6、 大总结
<!DOCTYPE html>
<html lang="en">
<head>
  <meta charset="UTF-8">
  <title>大总结</title>
  <script type="text/javascript" src="../js/vue.js"></script>
</head>
<body>
<div id="root">
  <h1>学生信息</h1>
  <button @click="student.age++">年龄+1岁</button>
  <button @click="addSex">添加性别属性,默认值:男</button>
  <button @click="student.sex = \'未知\'">修改性别</button>
  <button @click="addFriend">在列表首位添加一个朋友</button>
  <button @click="changeFriend">修改第一个朋友的名字为张三</button>
  <button @click="addHobby">添加一个爱好</button>
  <button @click="changeHobby">修改第二个爱好为:C++</button>

  <h3>姓名:student.name</h3>
  <h3>年龄:student.age</h3>
  <h3 v-if="student.sex">student.sex</h3>
  <h3>爱好:</h3>
  <ul>
    <li v-for="(hobby, index) in student.hobbies" :key="index">
      hobby
    </li>
  </ul>
  <h3>朋友们</h3>
  <ul>
    <li v-for="(friend, index) of student.friends" :key="index">
      friend.name -- friend.age
    </li>
  </ul>
</div>
<script type="text/javascript">
  Vue.config.productionTip = false;
  new Vue(
    el: "#root",
    data()
      return
        student:
          name: "Lisa",
          age: 17,
          friends: [
            name: "Jerry", age: 37,
            name: "Tony", age: 38
          ],
          hobbies: ["C", "Python", "C#"]


    ,
    methods:
      addSex()
        Vue.set(this.student, "sex", "男")
        // this.$set(this.student, "sex", "男")
      ,
      addFriend()
        this.student.friends.unshift(
          name: "Make",
          age: 19,
        )
      ,
      changeFriend()
        this.student.friends[0].name = "张三"  // 修改数组里面的对象可以被 Vue 监视到
      ,
      addHobby()
        this.student.hobbies.push("Java")
      ,
      changeHobby()
        this.student.hobbies.splice(1, 1, "C++")  // 使用重写后的方法,修改数组后可以被检测到
      ,

  )
</script>
</body>
</html>
Vue 监视数据的原理:
-
Vue 会监视 data 中所有层次的数据
-
如何监测对象中的数据?
通过 setter 来实现,且要在
new Vue时,就传入要监测的数据- 对象中后追加的属性,Vue 默认不做响应式处理
- 如需给后添加的属性做响应式,请使用 Vue 提供的
set(target, key, value)方法
-
如何监视数组中的数据?
通过包裹数组更新元素的方法实现,本质就是做了两件事:
- 调用原生对应的方法对数组进行更新
- 重新解析模板,进而更新页面
-
在 Vue 修改数组中的某个元素一定要使用如下方法:
- 使用被包裹的 API
- 使用
set()方法
注意:
Vue.set()和vm.$set()不能给 vm 或 vm 的根数据对象添加属性!!!
十一、 收集表单数据
<!DOCTYPE html>
<html lang="en">
<head>
  <meta charset="UTF-8">
  <title>收集表单</title>
  <script type="text/javascript" src="../js/vue.js"></script>
</head>
<body>
<div id="root">
  <form @submit.prevent="submitData">
    <label for="account">账号:</label>
    <input type="text" id="account" v-model.trim="uerInfo.account" placeholder="请输入您的账号"> <br>
    <!--.trim 去除输入框里面的空格-->

    <label for="password">密码:</label>
    <input type="password" id="password" v-model="uerInfo.password" placeholder="请输入您的密码"> <br>

    <label for="age">年龄:</label>
    <input type="number" id="age" v-model.number="uerInfo.age" placeholder="请输入您的年龄"> <br>
    <!--使用指令修饰符来指定输入的内容为数字类型-->


    性别:
    男<input type="radio" name="sex" value="male" v-model="uerInfo.sex"> 女 <input type="radio" name="sex" value="female" v-model="uerInfo.sex"> <br>

    爱好:
    Java <input type="checkbox" v-model="uerInfo.hobbies" value="Java">
    Python <input type="checkbox" v-model="uerInfo.hobbies" value="Python">
    C <input type="checkbox" v-model="uerInfo.hobbies" value="C"> <br>

    所属校区:
    <select v-model="uerInfo.city">
      <option value="">请选择校区</option>
      <option value="nc">南昌</option>
      <option value="gz">赣州</option>
    </select> <br>

    其他信息:
    <textarea cols="30" rows="10" v-model.lazy="uerInfo.others"></textarea> <br>
    <!--.lazy 缓慢收集,失去焦点的一瞬间进行数据的收集-->

    <input type="checkbox" v-model="uerInfo.agree"> 阅读并接受 <a href="javascript:;">《用户使用协议》</a> <br>

    <button>提交</button>
  </form>
</div>
<script type="text/javascript">
  Vue.config.productionTip = false;
  new Vue(
    el: "#root",
    data()
      return
        uerInfo:
          account: "",
          password: "",
          age: "",
          sex: "male", // 默认为男
          hobbies: ["Java"],  // 默认勾选 Java
          city: "",
          others: "",
          agree: false,


    ,
    methods:
      submitData()
        console.log(JSON.stringify(this.uerInfo))  // 将对象装换为 JSON 格式
      ,
    ,
  )
</script>
</body>
</html>
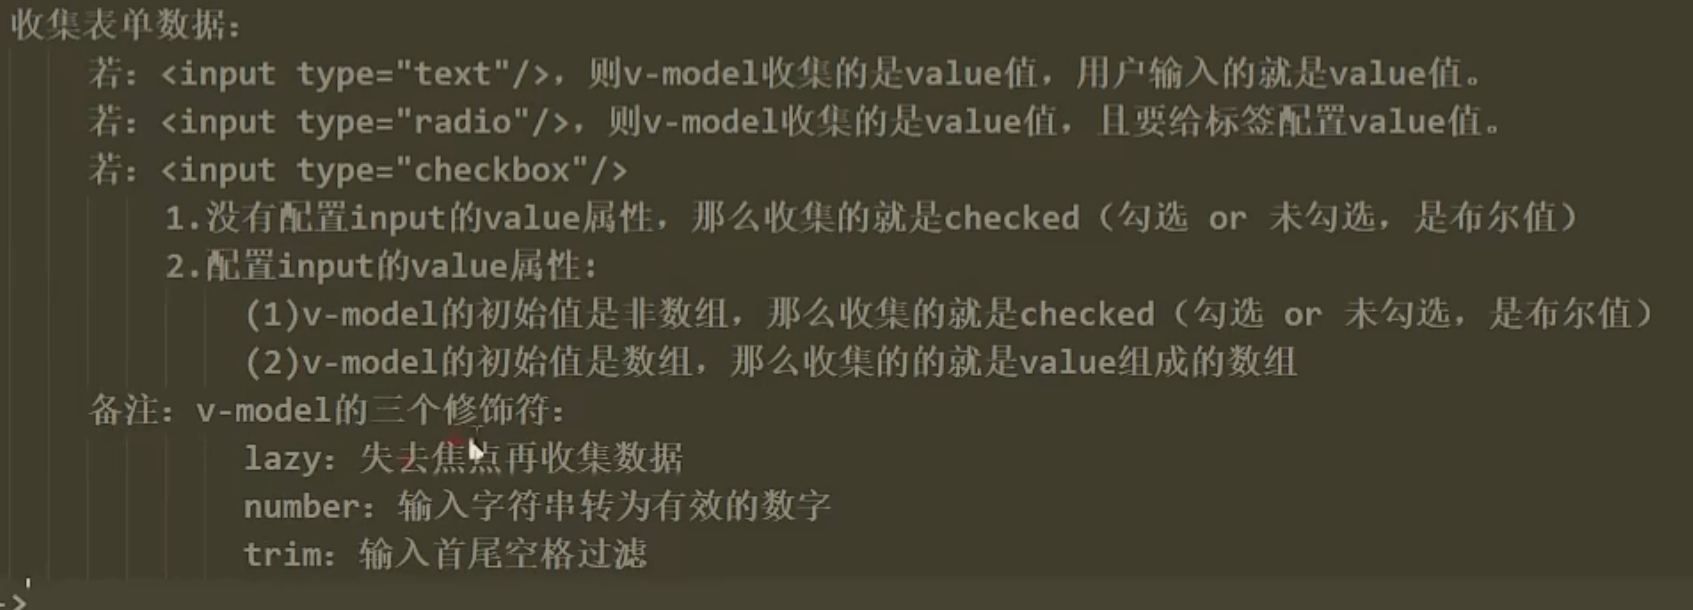
收集表单数据总结:
十二、 内置指令
我们学过的指令:
| 指令 | 描述 |
|---|---|
v-bind |
单向绑定解析表达式,可简写为 :xxx |
v-model |
双向数据绑定 |
v-for |
遍历数组 / 对象 / 字符串 |
v-on |
绑定事件监听,可简写为 @ |
v-if / v-else-if / v-else |
条件渲染(动态控制节点是否存在) |
v-show |
条件渲染(动态控制节点是否展示) |
1、 v-text
功能:向其所在的节点渲染文本内容
<!DOCTYPE html>
<html lang="en">
<head>
    <meta charset="UTF-8">
    <title>v-text</title>
    <script type="text/javascript" src="../js/vue.js"></script>
</head>
<body>
<div id="root">
  <div v-text="name"></div>  <!--更多的时候使用插值语法-->
</div>
<script type="text/javascript">
  Vue.config.productionTip = false;
  new Vue(
    el: "#root",
    data()
      return
        name: "Lisa"

    ,
  )
</script>

</body>
</html>
v-text其会替换掉标签里面的所有内容,同时其不会解析标签
2、 v-html
<!DOCTYPE html>
<html lang="en">
<head>
    <meta charset="UTF-8">
    <title>v-html</title>
    <script type="text/javascript" src="../js/vue.js"></script>
</head>
<body>
<div id="root">
  <div v-html="name"></div>  <!--支持结构的解析-->
  <div v-text="name"></div>
</div>
<script type="text/javascript">
  Vue.config.productionTip = false;
  new Vue(
    el: "#root",
    data()
      return
        name: "<h3>你好</h3>"

    ,
  )
</script>

</body>
</html>
但是这个使用会比较危险,可能会受到 xss 攻击,一定要在可信的内容上使用 v-html,永远不要用在用户提交的内容上!
3、 v-cloak
<!DOCTYPE html>
<html lang="en">
<head>
    <meta charset="UTF-8">
    <title>v-cloak</title>
    <script type="text/javascript" src="../js/vue.js"></script>
  <style>
    [v-cloak]   /*选择所有含有v-cloak的标签*/
      display: none;

  </style>
</head>
<body>
<div id="root">
<h2 v-cloak>name</h2>  <!--当 Vue 被加载出来时,v-cloak 会被删除-->

</div>
<script type="text/javascript">
  Vue.config.productionTip = false;
  new Vue(
    el: "#root",
    data()
      return
        name: "Lisa"

    ,
  )
</script>

</body>
</html>
v-cloak 指令(没有值):
- 本质是一个特殊属性,Vue 实例创建完毕并接管容器后,会删掉 v-cloak 属性
- 使用 css 配合 v-cloak 可以解决网速慢时,页面展示出 xx 的问题
4、 v-once
<!DOCTYPE html>
<html lang="en">
<head>
    <meta charset="UTF-8">
    <title>v-once</title>
    <script type="text/javascript" src="../js/vue.js"></script>
</head>
<body>
<div id="root">
  <h2 v-once>初始化的n值是:n</h2>
  <!--v-once 指令的作用是插值语法只能执行一次,不会执行第二次-->
  <h2>当前的 n 值是:</h2>
  <p>n = n</p>
  <button @click="n++"> n+1</button>
</div>
<script type="text/javascript">
  Vue.config.productionTip = false;
  new Vue(
    el: "#root",
    data()
      return
        n: 1

    ,
  )
</script>

</body>
</html>
v-once 指令:
- v-once 所在节点在初次动态渲染后,就视为静态内容了
- 以后数据的改变不会引起 v-once 所在结构的更新,可以用于优化性能
5、 v-pre
<!DOCTYPE html>
<html lang="en">
<head>
    <meta charset="UTF-8">
    <title>v-pre</title>
    <script type="text/javascript" src="../js/vue.js"></script>
</head>
<body>
<div id="root">
  <h2 v-pre>Vue 很简单</h2>
  <!--使得其所在节点跳过编译过程-->
  <h2>当前的 n 值是:</h2>
  <p>n = n</p>
  <button @click="n++"> n+1</button>
</div>
<script type="text/javascript">
  Vue.config.productionTip = false;
  new Vue(
    el: "#root",
    data()
      return
        n: 1

    ,
  )
</script>

</body>
</html>
v-pre 指令:
- 跳过其所在节点的编译过程
- 可利用它跳过没有使用指令语法、没有使用插值语法,会加快编译速度
6、 自定义指令
6.1 示例
实例1:定义一个 v-big 指令,和 v-text 类似,但会把绑定的数值放大 10 倍
<!DOCTYPE html>
<html lang="en">
<head>
  <meta charset="UTF-8">
  <title>v-big</title>
  <script type="text/javascript" src="../js/vue.js"></script>
</head>

<body>
<div id="root">
  <h3>当前的n值是:<span v-text="n"></span></h3>
  <h3>放大十倍的n值是:<span v-big="n"></span></h3>
  <button @click="n++">N+1</button>
</div>

</body>
<script type="text/javascript">
  Vue.config.productionTip = false;
  // 全局指令
  // Vue.directive("big", (element, binding) =>
  //   // big 函数何时调用?
  //   // 1. 指令与元素成功绑定时会调用(初始化)
  //   // 2. 指令所在的模板被重新解析时调用
  //   console.log("big", this)  // 注意,此处的 this 是 Window
  //   console.log(element, binding.value)
  //   element.innerText = binding.value * 10
  // )

  new Vue(
    el: "#root",
    data()
      return
        n: 0,

    ,
    directives:
      "big-number"() ,  // 当指令为 v-big-number 时的写法
      big(element, binding)
        // big 函数何时调用?
        // 1. 指令与元素成功绑定时会调用(初始化)
        // 2. 指令所在的模板被重新解析时调用
        console.log("big", this)  // 注意,此处的 this 是 Window
        console.log(element, binding.value)
        element.innerText = binding.value * 10
      ,

  )
</script>

</html>
实例2:定义一个 v-fbind 指令,和 v-bind 功能类似,但可以让其所绑定的 input 元素默认获取焦点
<!DOCTYPE html>
<html lang="en">
<head>
  <meta charset="UTF-8">
  <title>v-fbind</title>
  <script type="text/javascript" src="../js/vue.js"></script>
</head>

<body>
<div id="root">
  <input type="text" v-fbind:value="n">
  <hr>
  <button @click="n++">N+1</button>
</div>
<script type="text/javascript">
  Vue.config.productionTip = false;
  new Vue(
    el: "#root",
    data()
      return
        n: 0,

    ,
    directives:
      fbind:
        // 如果只写成函数形式的话,其只有 bind 和 update 功能
        bind(element, binding)
          console.log("指令与元素成功绑定时调用")
          element.value = binding.value  // 把数据插入文本框内
        ,
        inserted(element, binding)
          console.log("指令所在元素被插入页面时调用")
          element.focus() // 获取焦点
        ,
        update(element, binding)
          console.log("指令所在的模板被重新解析时调用")
          element.value = binding.value
        ,

    ,
  )
</script>

</body>

</html>
全局指令:Vue.directive()
6.2 总结
一、 定义语法:
-
局部指令:
new Vue( directives: 指令名: 配置对象 / 回调函数, ) -
全局指令:
Vue.drective("指令名", 配置对象 / 回调函数)
二、 配置对象中常用的三个回调:
- bind:指令与元素成功绑定时调用
- inserted:指令所在元素被插入页面时使用
- update:指令所在模板结构被重新解析时调用
三、 备注:
- 指令定义时不需要加
v-,但是使用时需要加v- - 指令名如果是多个单词,需要使用
kabab-case命名方式,不要用cameCase命名
十三、 生命周期
1、 引出生命周期
生命周期:
- 又名:生命周期函数、生命周期函数、生命周期钩子
- 是什么:Vue 在关键时刻帮助我们调用的一些特殊名称的函数
- 生命周期函数的名字不可更改,但函数的具体内容是程序员根据需求编写的
- 生命周期函数中的 this 指向是 vm 或 组件实例对象
<!DOCTYPE html>
<html lang="en">
<head>
    <meta charset="UTF-8">
    <title>生命周期</title>
    <script type="text/javascript" src="../js/vue.js"></script>
</head>
<body>
<div id="root">
  <h2 :>SteveAnthony</h2>
</div>
<script type="text/javascript">
  Vue.config.productionTip = false
  new Vue(
    el: "#root",
    data()
      return
        opacity: 1,

    ,
    mounted()
        console.log("Vue 将生成的 HTML 挂载到页面中")
        setInterval(() =>
            this.opacity -= 0.01
            if (this.opacity <= 0)
                this.opacity = 1

        , 16)
    ,

  )
</script>

</body>
</html>
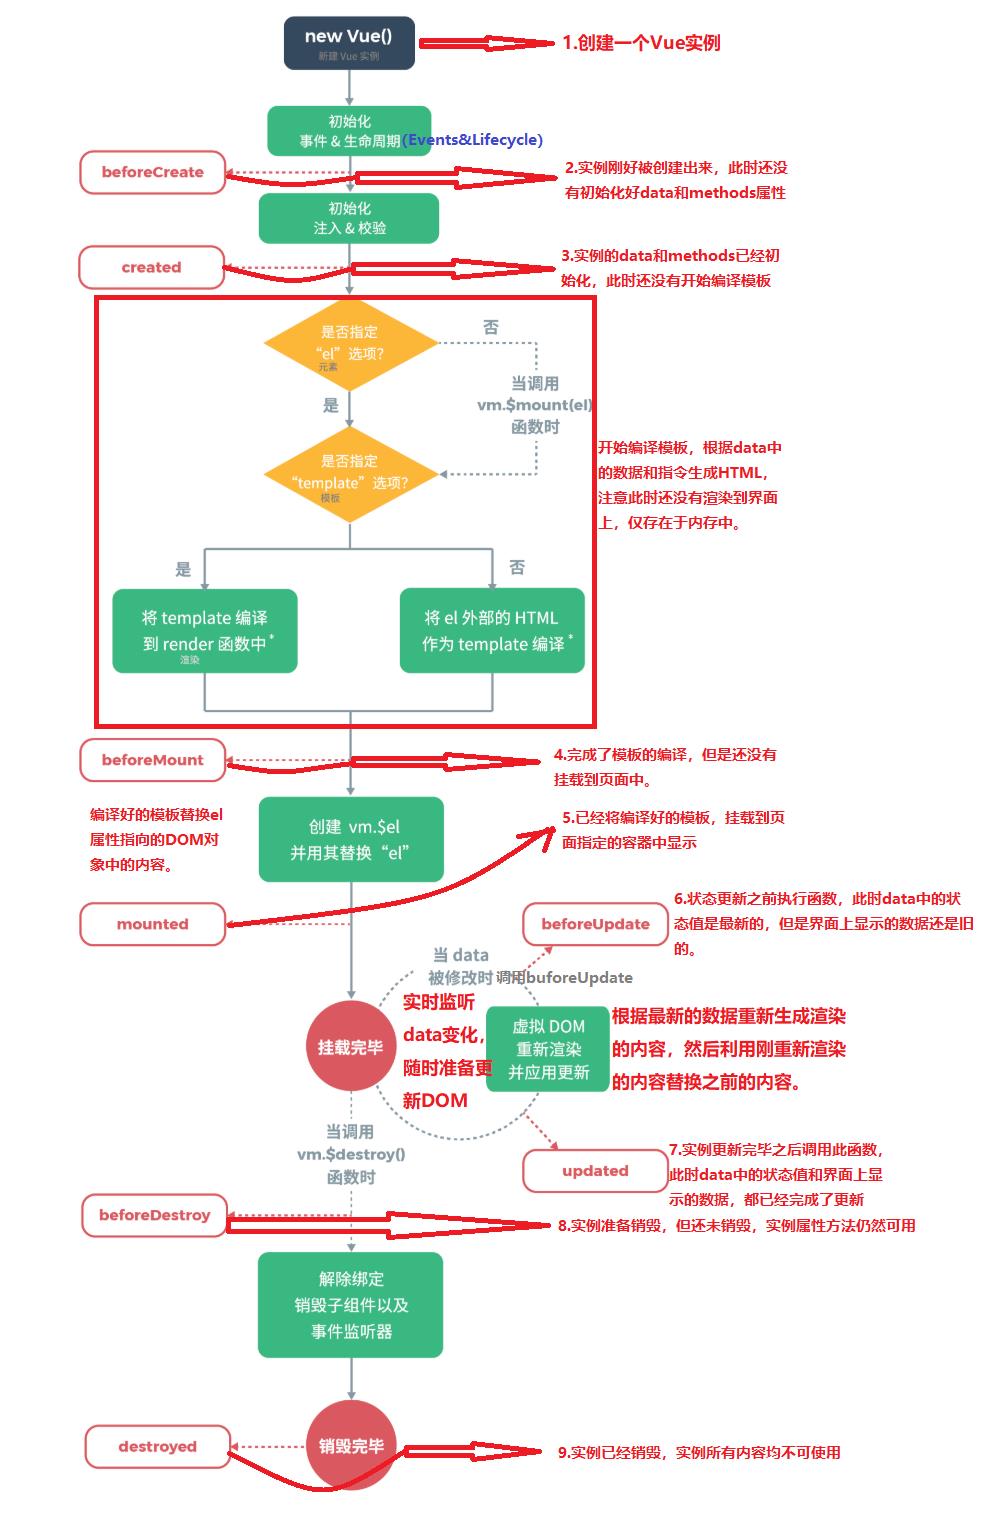
2、 分析生命周期
这是实例的生命周期。
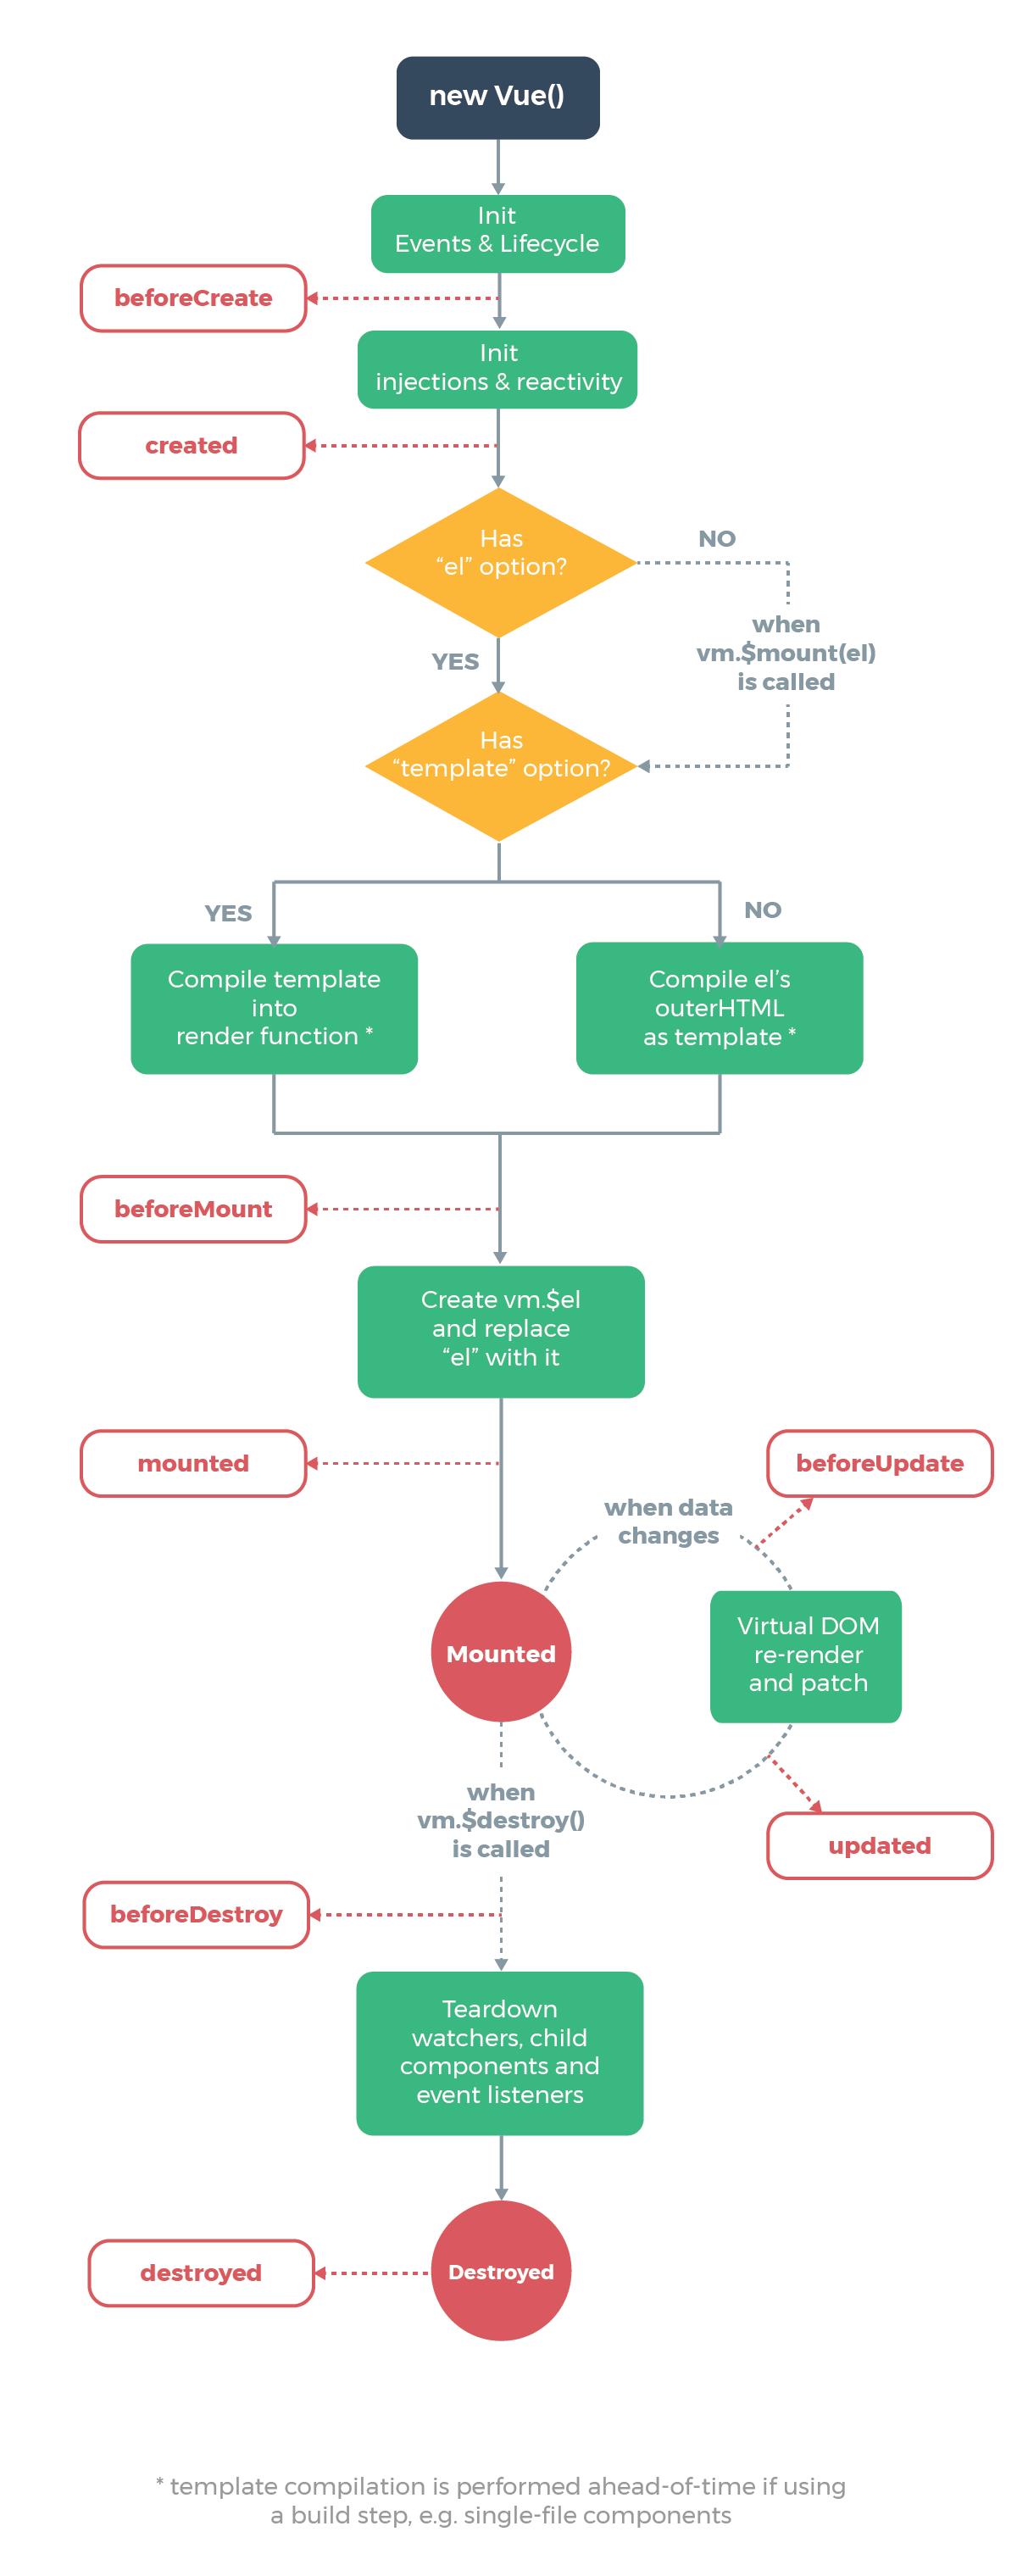
解释图:
<!DOCTYPE html>
<html lang="en">
<head>
    <meta charset="UTF-8">
    <title>生命周期</title>
    <script type="text/javascript" src="../js/vue.js"></script>
</head>
<body>
<div id="root">
  <h2>当前的 n 值是:num</h2>
    <button @click="add">N+1</button>
</div>
<script type="text/javascript">
  Vue.config.productionTip = false
  new Vue(
    el: "#root",
    data()
      return
        num: 1,

    ,
      methods:
        add()
            this.num += 1
        ,
      ,
      beforeCreate()
          console.log("Vue 实例创建,但没有初始化数据监测和数据代理")
          debugger;
      ,
      created()
          console.log("Vue 初始化,数据监测、数据代理")
          debugger;
      ,
      beforeMount()
          console.log("完成模板编译,但是还没有进行页面的挂载")
          debugger;
      ,
      mounted()
          console.log("Vue 将生成的 HTML 挂载到页面中")
          debugger;
      ,
      beforeUpdate()
          console.log("状态更新之前执行函数,此时 data 中的状态值是最新的,但是页面上显示的数据还是旧的")
          debugger;
      ,
      updated()
          console.log("利用刚重新渲染的内容替换之前的内容")
          debugger;
      ,
      beforeDestroy()
          console.log("实例准备销毁,但是还没有销毁")
          debugger;
      ,
      destroy()
          console.log("实例已经销毁,实例所有内容均不可使用")
          debugger;


  )
</script>

</body>
</html>
使用
vm.$destory()完全想销毁一个实例,清理它与其他实例的连接,解绑它的全部指令以及事件监听器
3、 总结
常用的生命周期钩子:
- mounted:发送 Ajax 请求、启动定时器、绑定自定义事件、订阅消息等【初始化操作】
- beforeDestroy:清除定时器、解绑自定义事件、取消订阅消息等
关于销毁 Vue 实例:
- 销毁后借助 Vue 开发者工具看不到任何信息
- 销毁后自定义事件会失效,当原生 DOM 事件依然有效
- 一般不会在 beforeDestroy 操作数据,因为即便操作数据,也不会再触发更新流程了
本文来自博客园,作者:Steve_Anthony,转载请注明原文链接:https://www.cnblogs.com/liuzhongkun/p/17262619.html
以上是关于Vue 核心的主要内容,如果未能解决你的问题,请参考以下文章