第五篇:python基础_5
Posted
tags:
篇首语:本文由小常识网(cha138.com)小编为大家整理,主要介绍了第五篇:python基础_5相关的知识,希望对你有一定的参考价值。
本篇内容
- 协程函数
- 递归
- 二分法
- import语句
- from...import语句
- 模块搜索路径
- 包的导入
- 软件开发规范
- logging模块的使用
一、 协程函数
1.定义
协程函数就是使用了yield表达式形式的生成器。
#!/usr/binl/env python
#encoding: utf-8
#author: YangLei

def eater(name):
    print("%s eat food" %name)
    while True:
        food = yield

g = eater("yanglei")
print(g)
2.执行过程
运行协程函数,要先next(),对协程函数进行初始化函数,然后再send() ,send会给yield传一个值。
next()与send()的区别:
next():让函数初始化。
send():触发下一次代码的执行时,会给yield赋值。
#!/usr/binl/env python
#encoding: utf-8
#author: YangLei

def eater(name):
    print(‘%s 说:我开动啦‘ %name)
    food_list=[]
    while True:
        food=yield food_list
        food_list.append(food)
        print(‘%s eat %s‘ %(name,food))

def producer():
    alex_g=eater(‘xiaolan‘)
    next(alex_g)
    while True:
        food=input(‘>>: ‘).strip()
        if not food:continue
        print(alex_g.send(food))

producer()
3.装饰器扩展
协程函数与装饰器的结合,可以避免忘记初始化函数
#!/usr/binl/env python
#encoding: utf-8
#author: YangLei

def init(func):
    def wrapper(*args,**kwargs):
        res = func(*args,**kwargs)
        next(res)
        return res
    return wrapper

@init
def eater(name):
    print("%s eat food" %name)
    food_list=[]
    while True:
        food = yield food_list
        print("%s star to eat %s" %(name,food))
        food_list.append(food)

g = eater("xiaolan")

print(g.send("火锅"))
print(g.send("烤肉"))
print(g.send("烤鱼"))
4.面向过程应用
面向过程:核心是过程二字,过程即解决问题的步骤,基于面向过程去设计程序就像是在设计一条工业流水线,是一种机械式的思维方式。
优点:程序结构清晰,可以把复杂的问题简单化,流程化。
缺点:可扩展性差,一条流线只是用来解决一个问题。
#!/usr/binl/env python
#encoding: utf-8
#author: YangLei

#grep -rl ‘error‘ /dir/
import os
def init(func):
    def wrapper(*args,**kwargs):
        g=func(*args,**kwargs)
        next(g)
        return g
    return wrapper

#第一阶段:找到所有文件的绝对路径
@init
def search(target):
    while True:
        filepath=yield
        g=os.walk(filepath)
        for pardir,_,files in g:
            for file in files:
                abspath=r‘%s\\%s‘ %(pardir,file)
                target.send(abspath)

#第二阶段:打开文件
@init
def opener(target):
    while True:
        abspath=yield
        with open(abspath,‘rb‘) as f:
            target.send((abspath,f))

#第三阶段:循环读出每一行内容
@init
def cat(target):
    while True:
        abspath,f=yield #(abspath,f)
        for line in f:
            res=target.send((abspath,line))
            if res:break

#第四阶段:过滤
@init
def grep(pattern,target):
    tag=False
    while True:
        abspath,line=yield tag
        tag=False
        if pattern in line:
            target.send(abspath)
            tag=True

#第五阶段:打印该行属于的文件名
@init
def printer():
    while True:
        abspath=yield
        print(abspath)

g = search(opener(cat(grep(‘error‘.encode(‘utf-8‘), printer()))))
g.send(r‘F:\\python\\s18‘)
二、 递归
1.递归调用
在调用一个函数的过程中,直接或间接地调用了函数本身,我们称为递归的调用。
(1)直接调用
#!/usr/binl/env python
#encoding: utf-8
#author: YangLei

def func():
    print(‘the is func‘)
    func()

func()
(2)间接调用
#!/usr/binl/env python
#encoding: utf-8
#author: YangLei

def foo():
    print(‘the is foo‘)
    bar()

def bar():
    print(‘the is bar‘)
    foo()

foo()
2.递归的执行
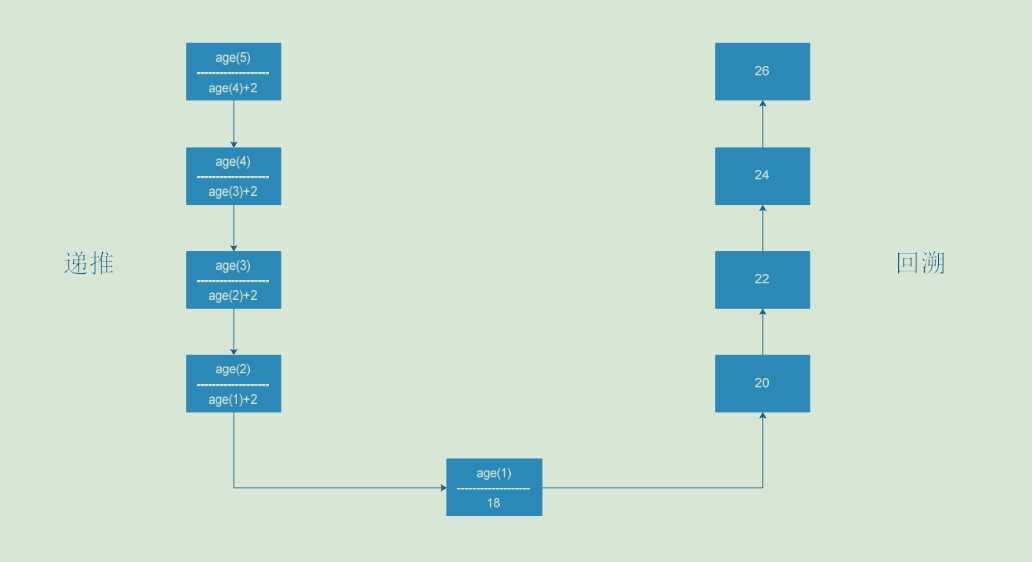
递归的执行分为两个阶段递推和回溯。
#!/usr/binl/env python
#encoding: utf-8
#author: YangLei

def age(n):
    if n == 1:
        return 18
    return age(n-1)+2

print(age(5))

三、 二分法
算法:当数据量很大适宜采用该方法。采用二分法查找时,数据需是排好序的。主要思想是:(设查找的数组区间为array[low, high])。
#!/usr/binl/env python
#encoding: utf-8
#author: YangLei

l = [1,2,5,7,10,31,44,47,56,99,102,130,240]
def binary_search(l,num):
    print(l)
    if len(l) > 1:
        mid_index=len(l)//2
        if num > l[mid_index]:
            #in the right
            l=l[mid_index:]
            binary_search(l,num)
        elif num < l[mid_index]:
            #in the left
            l=l[:mid_index]
            binary_search(l,num)
        else:
            print(‘find it‘)
    else:
        if l[0] == num:
            print(‘find it‘)
        else:
            print(‘not exist‘)
        return

binary_search(l,31)
四、import语句
1.执行源文件。
2.以一个源文件的全局名称空间。
3.在当前位置拿到一个模块名,指向2创建的名称空间。
#!/usr/binl/env python
#encoding: utf-8
#author: YangLei

print(‘from the spam.py‘)
money=0
x=1
def read1():
    print(‘spam->read1->money‘,money)

def read2():
    print(‘spam->read2 calling read‘)
    read1()

def change():
    global money
    money=0
#!/usr/binl/env python
#encoding: utf-8
#author: YangLei

import spam

money=100000000000
def read1():
    print(‘from test‘)

print(spam.money)
print(spam.read1)
spam.read1()

spam.read2()
spam.change()
print(money)
spam.read1()

import spam as s1
print(s1.money)
五、from...import语句
优点:使用源文件内的名字时无需加前缀,使用方便。
缺点:容易与当前文件的名称空间内的名字混淆。
#!/usr/binl/env python
#encoding: utf-8
#author: YangLei

print(‘from the spam.py‘)
money=0
x=1
def read1():
    print(‘spam->read1->money‘,money)

def read2():
    print(‘spam->read2 calling read‘)
    read1()

def change():
    global money
    money=0
#!/usr/binl/env python
#encoding: utf-8
#author: YangLei

from spam import money,read1,read2,change

money=0
print(money)
print(read1)

read1()

def read1():print(‘ok‘)
read2()

money=10
change()
print(money)

from spam import money as m

print(m)
六、模块搜索路径
注意:自定义的模块名一定不要与python自带的模块名重名
内存中---> 内置模块---> sys.path
#!/usr/binl/env python
#encoding: utf-8
#author: YangLei

print(‘from the spam.py‘)
money=0
x=1
def read1():
    print(‘spam->read1->money‘,money)

def read2():
    print(‘spam->read2 calling read‘)
    read1()

def change():
    global money
    money=0
#!/usr/binl/env python
#encoding: utf-8
#author: YangLei

import time
import importlib

import spam
time.sleep(20)
import spam
print(spam.money)

importlib.reload(spam)
print(spam.money)


import sys
print(‘time‘ in sys.modules)
import time
print(‘time‘ in sys.modules)
当spam在别的路径时
#!/usr/binl/env python
#encoding: utf-8
#author: YangLei

import sys
# print(sys.path)
sys.path.insert(0,r‘F:\\python\\s18\\day5\\test‘)


import spam
七、包的导入
(1)无论是import形式还是from...import形式,凡是在导入语句中(而不是在使用时)遇到带点的,都要第一时间提高警觉:这是关于包才有的导入语法
(2)包是目录级的(文件夹级),文件夹是用来组成py文件(包的本质就是一个包含__init__.py文件的目录)
(3)import导入文件时,产生名称空间中的名字来源于文件,import 包,产生的名称空间的名字同样来源于文件,即包下的__init__.py,导入包本质就是在导入该文件
1.绝对导入
#!/usr/binl/env python
#encoding: utf-8
#author: YangLei

import sys
print(sys.path)
sys.path.append(r‘F:\\python\\s18\\day5‘)
import aaa

print(aaa)
print(aaa.x)
print(aaa.y)

aaa.m1.func1()

aaa.bbb.m3.func3()


aaa.func1()
aaa.func2()
aaa.func3()

import aaa.bbb.m3 as abm
abm.func3()
2.相对导入
#!/usr/binl/env python
#encoding: utf-8
#author: YangLei

import sys
sys.path.append(r‘C:\\Users\\Administrator\\PycharmProjects\\python18期周末班\\day5\\a‘)

import glance_v1

glance_v1.get()
glance_v1.create_resource(‘test.conf‘)
glance_v1.main()
glance_v1.register_models(‘mysql‘)
八、软件开发规范

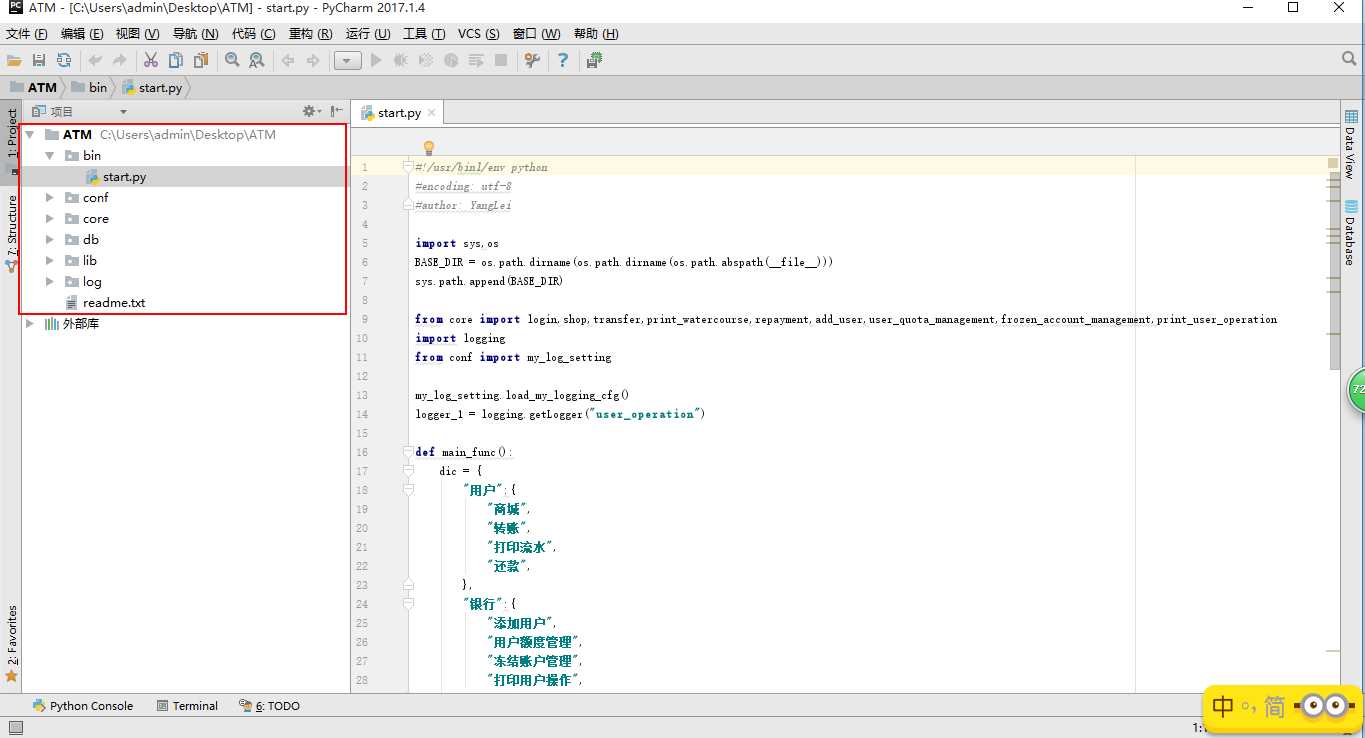
以项目来命名,项目文件夹中要包含bin文件夹、conf文件夹、core文件夹、db文件夹、lib文件夹、log文件夹和readme。
九、logging模块的使用
1.使用方法
(1)如果不指定filename,则默认打印到终端
(2)指定日志级别:
指定方式:
1:level=10
2:level=logging.ERROR
日志级别种类:
CRITICAL = 50
FATAL = CRITICAL
ERROR = 40
WARNING = 30
WARN = WARNING
INFO = 20
DEBUG = 10
NOTSET = 0
(3)指定日志级别为ERROR,则只有ERROR及其以上级别的日志会被打印
logging.basicConfig(filename=‘access.log‘,
                    format=‘%(asctime)s - %(name)s - %(levelname)s -%(module)s:  %(message)s‘,
                    datefmt=‘%Y-%m-%d %H:%M:%S %p‘,
                    level=10)

logging.debug(‘debug‘)
logging.info(‘info‘)
logging.warning(‘warning‘)
logging.error(‘error‘)
logging.critical(‘critical‘)
logging.log(10,‘log‘)
2.自定义logging
"""
logging配置
"""

import os
import logging.config

# 定义三种日志输出格式 开始

standard_format = ‘[%(asctime)s][%(threadName)s:%(thread)d][task_id:%(name)s][%(filename)s:%(lineno)d]‘                   ‘[%(levelname)s][%(message)s]‘ #其中name为getlogger指定的名字

simple_format = ‘[%(levelname)s][%(asctime)s][%(filename)s:%(lineno)d]%(message)s‘

id_simple_format = ‘[%(levelname)s][%(asctime)s] %(message)s‘

# 定义日志输出格式 结束

logfile_dir = os.path.dirname(os.path.abspath(__file__))  # log文件的目录

logfile_name = ‘all2.log‘  # log文件名

# 如果不存在定义的日志目录就创建一个
if not os.path.isdir(logfile_dir):
    os.mkdir(logfile_dir)

# log文件的全路径
logfile_path = os.path.join(logfile_dir, logfile_name)

# log配置字典
LOGGING_DIC = {
    ‘version‘: 1,
    ‘disable_existing_loggers‘: False,
    ‘formatters‘: {
        ‘standard‘: {
            ‘format‘: standard_format
        },
        ‘simple‘: {
            ‘format‘: simple_format
        },
    },
    ‘filters‘: {},
    ‘handlers‘: {
        #打印到终端的日志
        ‘console‘: {
            ‘level‘: ‘DEBUG‘,
            ‘class‘: ‘logging.StreamHandler‘,  # 打印到屏幕
            ‘formatter‘: ‘simple‘
        },
        #打印到文件的日志,收集info及以上的日志
        ‘default‘: {
            ‘level‘: ‘DEBUG‘,
            ‘class‘: ‘logging.handlers.RotatingFileHandler‘,  # 保存到文件
            ‘formatter‘: ‘standard‘,
            ‘filename‘: logfile_path,  # 日志文件
            ‘maxBytes‘: 1024*1024*5,  # 日志大小 5M
            ‘backupCount‘: 5,
            ‘encoding‘: ‘utf-8‘,  # 日志文件的编码,再也不用担心中文log乱码了
        },
    },
    ‘loggers‘: {
        #logging.getLogger(__name__)拿到的logger配置
        ‘‘: {
            ‘handlers‘: [‘default‘, ‘console‘],  # 这里把上面定义的两个handler都加上,即log数据既写入文件又打印到屏幕
            ‘level‘: ‘DEBUG‘,
            ‘propagate‘: True,  # 向上(更高level的logger)传递
        },
    },
}


def load_my_logging_cfg():
    logging.config.dictConfig(LOGGING_DIC)  # 导入上面定义的logging配置
    logger = logging.getLogger(__name__)  # 生成一个log实例
    logger.info(‘It works!‘)  # 记录该文件的运行状态

if __name__ == ‘__main__‘:
    load_my_logging_cfg()

logging配置文件
以上是关于第五篇:python基础_5的主要内容,如果未能解决你的问题,请参考以下文章