python笔记- 发送邮件
Posted
tags:
篇首语:本文由小常识网(cha138.com)小编为大家整理,主要介绍了python笔记- 发送邮件相关的知识,希望对你有一定的参考价值。
依赖:
Python代码实现发送邮件,使用的模块是smtplib、MIMEText,实现代码之前需要导入包:
import smtplib
from email.mime.text import MIMEText
使用163邮件发送邮件,具体代码实现如下:
import smtplib
from email.mime.text import MIMEText
‘‘‘
发送邮件函数,默认使用163smtp
:param mail_host: 邮箱服务器,16邮箱host: smtp.163.com
:param port: 端口号,163邮箱的默认端口是 25
:param username: 邮箱账号 [email protected]
:param passwd: 邮箱密码(不是邮箱的登录密码,是邮箱的授权码)
:param recv: 邮箱接收人地址,多个账号以逗号隔开
:param title: 邮件标题
:param content: 邮件内容
:return:
‘‘‘

def send_mail(username, passwd, recv, title, content, mail_host=‘smtp.163.com‘, port=25):
    msg = MIMEText(content)    # 邮件内容
    msg[‘Subject‘] = title     # 邮件主题
    msg[‘From‘] = username     # 发送者账号
    msg[‘To‘] = recv           # 接收者账号列表
    smtp = smtplib.SMTP(mail_host, port=port)      # 连接邮箱,传入邮箱地址,和端口号,smtp的端口号是25
    smtp.login(username, passwd)                   # 登录发送者的邮箱账号,密码
    # 参数分别是 发送者,接收者,第三个是把上面的发送邮件的 内容变成字符串
    smtp.sendmail(username, recv, msg.as_string())
    smtp.quit()  # 发送完毕后退出smtp
    print(‘email send success.‘)

if __name__ == ‘__main__‘:
    email_user = ‘[email protected]‘  # 发送者账号
    email_pwd = ‘xxxxx‘  # 发送者密码,授权码
    maillist = ‘[email protected]‘
    title = ‘测试邮件标题‘
    content = ‘这里是邮件内容‘
    send_mail(email_user, email_pwd, maillist, title, content)
163邮箱的授权码获取方法如下:
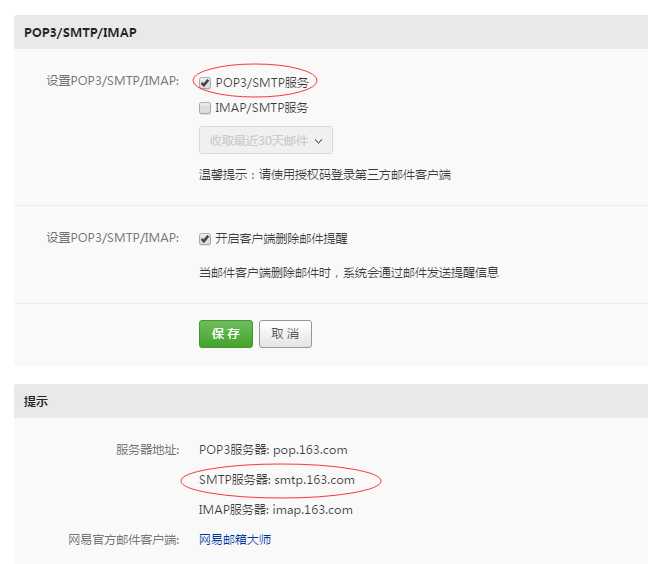
1. 登录163邮箱,点击设置-POP3/SMTP/IMAP,如下:

2. 开启SMTP服务且可以查询SMTP的host地址:

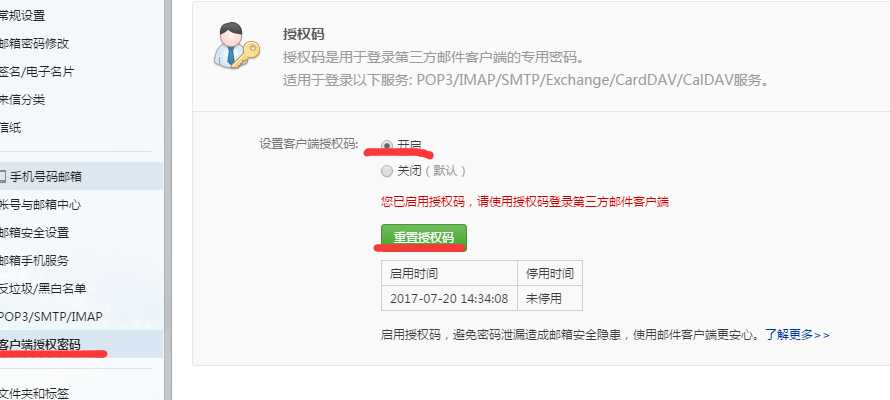
3. 点击客户端授权密码,可以重置授权码:

使用QQ邮件发送邮件,具体代码实现如下:
import smtplib
from email.mime.text import MIMEText
‘‘‘
发送邮件函数,默认使用163smtp
:param mail_host: 邮箱服务器,qq邮箱host:  smtp.qq.com
:param port: 端口号,qq邮箱的默认端口是: 456
:param username: 邮箱账号 [email protected]
:param passwd: 邮箱密码(不是邮箱的登录密码,是邮箱的授权码)
:param recv: 邮箱接收人地址,多个账号以逗号隔开
:param title: 邮件标题
:param content: 邮件内容
:return:
‘‘‘
#qq邮箱发送邮件
def send_mail(username, passwd, recv, title, content, mail_host=‘smtp.qq.com‘, port=456):
    msg = MIMEText(content)    # 邮件内容
    msg[‘Subject‘] = title     # 邮件主题
    msg[‘From‘] = username     # 发送者账号
    msg[‘To‘] = recv           # 接收者账号列表
    smtp = smtplib.SMTP_SSL(mail_host, port=port)      # 连接邮箱,传入邮箱地址,和端口号,smtp的端口号是25
    smtp.login(username, passwd)                   # 登录发送者的邮箱账号,密码
    # 参数分别是 发送者,接收者,第三个是把上面的发送邮件的 内容变成字符串
    smtp.sendmail(username, recv, msg.as_string())
    smtp.quit()  # 发送完毕后退出smtp
    print(‘email send success.‘)

if __name__ == ‘__main__‘:
    email_user = ‘[email protected]‘  # 发送者账号
    email_pwd = ‘WOSHINIGE123‘  # 发送者密码,授权码
    maillist = ‘[email protected]‘
    title = ‘测试邮件标题‘
    content = ‘这里是邮件内容‘
    send_mail(email_user, email_pwd, maillist, title, content)
多个 收件人且带附件:
# import smtplib
# from email.mime.text import MIMEText
# ‘‘‘
# 发送邮件函数,默认使用163smtp
# :param mail_host: 邮箱服务器,qq邮箱host:  smtp.163.com
# :param port: 端口号,qq邮箱的默认端口是: 25
# :param username: 邮箱账号 [email protected]
# :param passwd: 邮箱密码(不是邮箱的登录密码,是邮箱的授权码)
# :param recv: 邮箱接收人地址,多个账号以逗号隔开
# :param title: 邮件标题
# :param content: 邮件内容
# :return:
# ‘‘‘
import smtplib
from email.mime.text import MIMEText
from email.mime.multipart import MIMEMultipart

#邮箱服务器地址
email_host = ‘smtp.163.com‘
#发送者
email_user = ‘[email protected]‘
#授权码
email_pwd = ‘WOSHINIGE123‘
#多个收件人,使用分号分隔
maillist =‘[email protected];[email protected]‘
#对多个收件人进行分割,以;为标准,返回结果是list[‘[email protected]‘,‘[email protected]‘]
email_info = maillist.split(‘;‘)
#构造一个发附件的邮件内容对象
new_msg = MIMEMultipart()
#邮件正文内容
new_msg.attach(MIMEText(‘test email.....‘))
#邮件主题
new_msg[‘Subject‘] = ‘test email‘
#邮件发送者
new_msg[‘From‘] = email_user
#邮件接收者,多个收件人的账号使用,连接,传入类型是str
new_msg[‘To‘] = ‘,‘.join(email_info)
#打开a.txt读取文本内容
att = MIMEText(open(‘a.txt‘).read())
att["Content-Type"] = ‘application/octet-stream‘
# 发送附件就得这么写,固定格式,filename指定附件的名字
att["Content-Disposition"] = ‘attachment; filename="haha.txt"‘
new_msg.attach(att)
# 连接邮箱,传入邮箱地址,和端口号,smtp的端口号是25
smtp = smtplib.SMTP(email_host, port=25)
# 发送者的邮箱账号,密码,先登录
smtp.login(email_user, email_pwd)
smtp.sendmail(email_user, email_info, new_msg.as_string())
smtp.quit()
print(‘email send success.‘)
多个收件人时账号之间使用分号;分割,进行smtp.sendmail(传入的多个收件人类型是list);new_msg[‘TO‘] = recv,接收的类型是str
使用类实现邮件的发送,即可发送多人也可发送附件:
import smtplib
from email.mime.text import MIMEText
from email.mime.multipart import MIMEMultipart

class SendMail(object):
    def __init__(self, username, passwd, recv, title, content, file=None, email_host=‘smtp.163.com‘, port=25):
        self.username = username
        self.passwd = passwd
        self.recv = recv
        self.title = title
        self.content = content
        self.file = file
        self.email_host = email_host
        self.port = port

    def send_mail(self):
        msg = MIMEMultipart()
        #发送内容的对象
        if self.file:#处理附件的
            att = MIMEText(open(self.file, encoding=‘utf-8‘).read())
            att["Content-Type"] = ‘application/octet-stream‘
            att["Content-Disposition"] = ‘attachment; filename="%s"‘%self.file
            msg.attach(att)
        msg.attach(MIMEText(self.content))#邮件正文的内容
        msg[‘Subject‘] = self.title  # 邮件主题
        msg[‘From‘] = self.username  # 发送者账号
        #将多个账号‘[email protected];[email protected]‘ 以分号分割,分割为list
        self.recv = self.recv.split(‘;‘)
        if isinstance(self.recv, list):
            msg[‘To‘] = ‘,‘.join(self.recv)
        else:
            msg[‘To‘] = self.recv  # 接收者账号列表
        if self.username.endswith(‘qq.com‘):  #如果发送者是qq邮箱
            self.smtp = smtplib.SMTP_SSL(self.email_host, port=self.port)
        else:
            self.smtp = smtplib.SMTP(self.email_host, port=self.port)
        #发送邮件服务器的对象
        self.smtp.login(self.username, self.passwd)
        try:
            self.smtp.sendmail(self.username, self.recv, msg.as_string())
        except Exception as e:
            print(‘出错了。。‘, e)
        else:
            print(‘发送成功!‘)
        self.smtp.quit()

if __name__ == ‘__main__‘:
    m = SendMail(
        username=‘[email protected]‘, passwd=‘xxxxxxx‘,file=‘a.txt‘, recv=‘[email protected];[email protected]‘,
        title=‘多个收件人‘, content=‘哈哈哈啊哈哈哈哈‘, email_host=‘smtp.163.com‘, port=25
    )
    m.send_ma
欢迎多多评论~~~~
以上是关于python笔记- 发送邮件的主要内容,如果未能解决你的问题,请参考以下文章