卡片式UI的总结 android
Posted DreamerQL
tags:
篇首语:本文由小常识网(cha138.com)小编为大家整理,主要介绍了卡片式UI的总结 android相关的知识,希望对你有一定的参考价值。
在使用android卡片是ui之前,先可以去看看github上的一个效果
https://github.com/AWCNTT/ArticleTranslateProject/blob/master/translated/Issue%23105/2014-11-06-Creating-a-Cards-UI-on-Android.md
自从卡片式UI第一次在Google+ app上亮相,这种设计模式在Android社区上开始变得越来越火。很多人都热衷于这种设计模式并在他们的开发中使用。这不只归功于其时尚的外观,还有它实用之处。每张卡片拥有其相关的内容及其内容所触发的动作。换句话来说,每张卡片有它唯一的内容管理机制。
当我们着手思考在eBay Kleinanzeigen Android app (解说:ebay 的移动客户端) 开发商品订购功能时,遇到最大的问题是如何设置入口功能。最终的结果,最好的解决办法是在用户的广告列表中使用卡片式UI。使每个广告可以通过“Promote”动作按钮彰显其特色。
在这片文章中我将会通过一个简单的ListView和适配器逻辑来讲解怎样创建一个卡片式UI。
1:我们先从layout开始
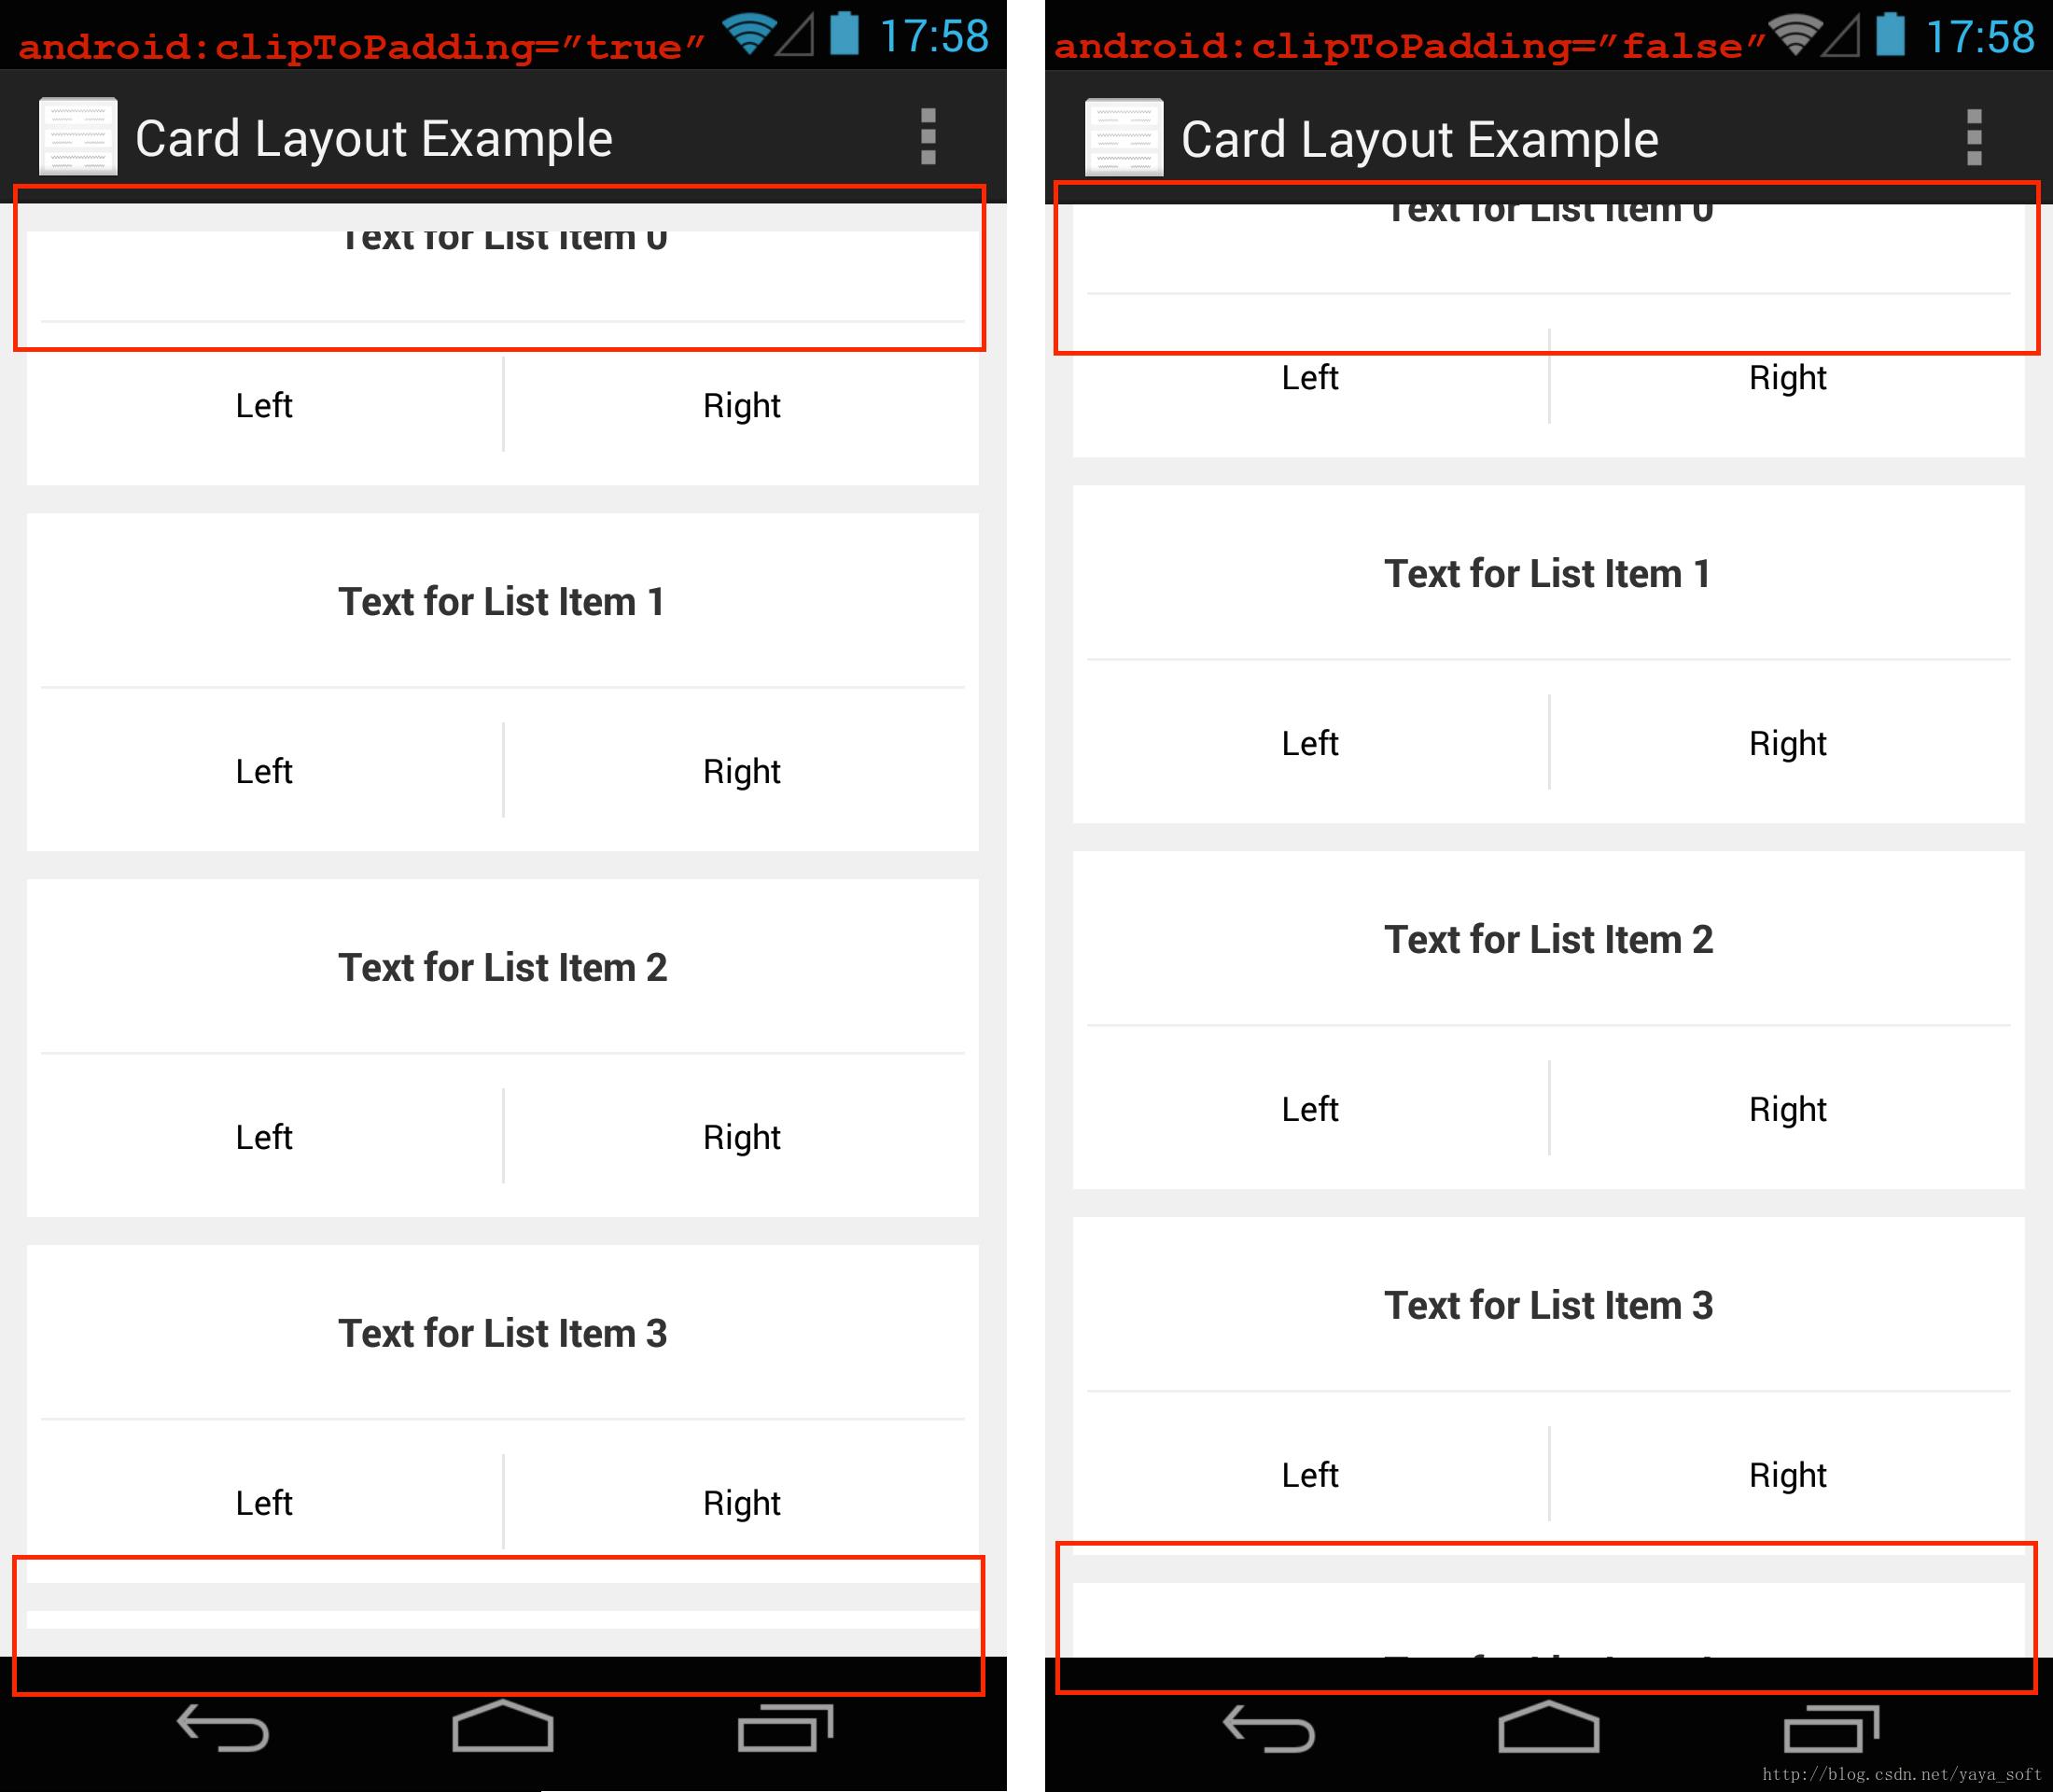
layout包含一个内嵌在背景为灰色的LinearLayout的ListView。ListView有10 dip的填充以及项目之间用10 dip进行分割。此外列表中的物体设置为白色背景,为了更好地区分和看起来像卡片。以下是含有ListView的Fragment或Activity的layout:[html] view plain copy print ?


- <LinearLayout xmlns:android="http://schemas.android.com/apk/res/android"
- xmlns:tools="http://schemas.android.com/tools"
- android:layout_width="match_parent"
- android:layout_height="match_parent"
- android:background="@color/light_grey" >
- <ListView
- android:id="@+id/cards_list"
- android:layout_width="match_parent"
- android:layout_height="wrap_content"
- android:clipToPadding="false"
- android:divider="@android:color/transparent"
- android:dividerHeight="10dp"
- android:padding="10dp"
- android:scrollbarStyle="outsideOverlay"
- tools:listitem="@layout/list_item_card" />
- </LinearLayout>
<LinearLayout xmlns:android="http://schemas.android.com/apk/res/android"
    xmlns:tools="http://schemas.android.com/tools"
    android:layout_width="match_parent"
    android:layout_height="match_parent"
    android:background="@color/light_grey" >

    <ListView
        android:id="@+id/cards_list"
        android:layout_width="match_parent"
        android:layout_height="wrap_content"
        android:clipToPadding="false"
        android:divider="@android:color/transparent"
        android:dividerHeight="10dp"
        android:padding="10dp"
        android:scrollbarStyle="outsideOverlay"
        tools:listitem="@layout/list_item_card" />

</LinearLayout> 另一个重要的细节为scrollbarStyle属性, 我们设置为"outsideOverlay" 使其不会覆盖卡片,它会显示在ListView的边缘,无视填充。
列表的项目设计由你的内容决定。在例子里面,我添加一个TextView和两个动作按钮在白色背景LinearLayout中。
[html] view plain copy print ?


- <LinearLayout xmlns:android="http://schemas.android.com/apk/res/android"
- android:layout_width="match_parent"
- android:layout_height="match_parent"
- android:background="@drawable/selectable_background"
- android:orientation="vertical" >
- <TextView
- android:id="@+id/list_item_card_text"
- style="@style/ListItemText"
- android:layout_width="match_parent"
- android:layout_height="wrap_content" />
- <View
- android:id="@+id/list_item_seperator"
- android:layout_width="match_parent"
- android:layout_height="1dip"
- android:layout_marginLeft="5dip"
- android:layout_marginRight="5dip"
- android:background="@color/light_grey" />
- <LinearLayout
- style="?android:attr/buttonBarStyle"
- android:layout_width="match_parent"
- android:layout_height="wrap_content" >
- <Button
- android:id="@+id/list_item_card_button_1"
- style="?android:attr/buttonBarButtonStyle"
- android:layout_width="match_parent"
- android:layout_height="wrap_content"
- android:layout_margin="5dip"
- android:layout_weight="1"
- android:focusable="false"
- android:focusableInTouchMode="false"
- android:text="@string/list_item_left_button"
- android:textSize="12sp"
- android:textStyle="normal" />
- <Button
- android:id="@+id/list_item_card_button_2"
- style="?android:attr/buttonBarButtonStyle"
- android:layout_width="match_parent"
- android:layout_height="wrap_content"
- android:layout_margin="5dip"
- android:layout_weight="1"
- android:focusable="false"
- android:focusableInTouchMode="false"
- android:text="@string/list_item_right_button"
- android:textSize="12sp"
- android:textStyle="normal" />
- </LinearLayout>
- </LinearLayout>
<LinearLayout xmlns:android="http://schemas.android.com/apk/res/android"
    android:layout_width="match_parent"
    android:layout_height="match_parent"
    android:background="@drawable/selectable_background"
    android:orientation="vertical" >

    <TextView
        android:id="@+id/list_item_card_text"
        style="@style/ListItemText"
        android:layout_width="match_parent"
        android:layout_height="wrap_content" />

    <View
        android:id="@+id/list_item_seperator"
        android:layout_width="match_parent"
        android:layout_height="1dip"
        android:layout_marginLeft="5dip"
        android:layout_marginRight="5dip"
        android:background="@color/light_grey" />

    <LinearLayout
        style="?android:attr/buttonBarStyle"
        android:layout_width="match_parent"
        android:layout_height="wrap_content" >

        <Button
            android:id="@+id/list_item_card_button_1"
            style="?android:attr/buttonBarButtonStyle"
            android:layout_width="match_parent"
            android:layout_height="wrap_content"
            android:layout_margin="5dip"
            android:layout_weight="1"
            android:focusable="false"
            android:focusableInTouchMode="false"
            android:text="@string/list_item_left_button"
            android:textSize="12sp"
            android:textStyle="normal" />

        <Button
            android:id="@+id/list_item_card_button_2"
            style="?android:attr/buttonBarButtonStyle"
            android:layout_width="match_parent"
            android:layout_height="wrap_content"
            android:layout_margin="5dip"
            android:layout_weight="1"
            android:focusable="false"
            android:focusableInTouchMode="false"
            android:text="@string/list_item_right_button"
            android:textSize="12sp"
            android:textStyle="normal" />
    </LinearLayout>

</LinearLayout>
2: 代码编写
代码设计模块也是很简单,通过一系列重要部件组成。我更加倾向于第一步先去创建适配器,为ListView的初始化做好准备。我继承了BaseAdapter,在getView方法里填充列表项目的图层, 初始化TextView的动作按钮。 最核心部分是如何设置的各个按钮的触发器。因为适配器是重复使用的,这很有可能使触发器内嵌在适配器里,紧接着的项目肯定会使用相同的触发器但使用不同的参数。在适配器的逻辑里,每个列表项目是由同一个视图id构成,因此不可能知道当前id的视图按钮是对应哪个列表项目。
在这一点上,更为合适的方法是将实现移交给相关ListView的适配器。为了这样实现,我把View.OnClickListener放在我的适配器的构造器中,在适配器类中作为变量存储,把按钮触发器作为一个实例。
下面是适配器构造器和getView的实现:
[java] view plain copy print ?

- public CardsAdapter(Context context, List<String> items, OnClickListener itemButtonClickListener)
- this.context = context;
- this.items = items;
- this.itemButtonClickListener = itemButtonClickListener;
- @Override
- public View getView(int position, View convertView, ViewGroup parent)
- ViewHolder holder;
- if (convertView == null)
- convertView = LayoutInflater.from(context).inflate(R.layout.list_item_card, null);
- holder = new ViewHolder();
- holder.itemText = (TextView) convertView.findViewById(R.id.list_item_card_text);
- holder.itemButton1 = (Button) convertView.findViewById(R.id.list_item_card_button_1);
- holder.itemButton2 = (Button) convertView.findViewById(R.id.list_item_card_button_2);
- convertView.setTag(holder);
- else
- holder = (ViewHolder) convertView.getTag();
- holder.itemText.setText(items.get(position));
- if (itemButtonClickListener != null)
- holder.itemButton1.setOnClickListener(itemButtonClickListener);
- holder.itemButton2.setOnClickListener(itemButtonClickListener);
- return convertView;
public CardsAdapter(Context context, List<String> items, OnClickListener itemButtonClickListener)
    this.context = context;
    this.items = items;
    this.itemButtonClickListener = itemButtonClickListener;


@Override
public View getView(int position, View convertView, ViewGroup parent)

    ViewHolder holder;

    if (convertView == null)
        convertView = LayoutInflater.from(context).inflate(R.layout.list_item_card, null);

        holder = new ViewHolder();
        holder.itemText = (TextView) convertView.findViewById(R.id.list_item_card_text);
        holder.itemButton1 = (Button) convertView.findViewById(R.id.list_item_card_button_1);
        holder.itemButton2 = (Button) convertView.findViewById(R.id.list_item_card_button_2);
        convertView.setTag(holder);

     else
        holder = (ViewHolder) convertView.getTag();


    holder.itemText.setText(items.get(position));

    if (itemButtonClickListener != null)
        holder.itemButton1.setOnClickListener(itemButtonClickListener);
        holder.itemButton2.setOnClickListener(itemButtonClickListener);


    return convertView;
3: 核心部分
在你选择的Fragment或Activity中,我们在图层里填充ListView,以及初始化ListView实例并绑定适配器。最后我们最关键的的地方是需要在适配器添加触发器,将会区分好所看到的项目按钮。我们不需要关心不可见的列表项目因为它们在可见视图窗口以外,我们不可能的点击的地方。
覆盖View.OnClickListener的onClick方法时,我简单地通过ListView中的getFirstVisiblePosition()和getLastVisiblePosition()遍历所看到的项目,并检查所点击的按钮是否属于现在所遍历的项目。
private final class ListItemButtonClickListener implements OnClickListener
@Override
public void onClick(View v)
for (int i = cardsList.getFirstVisiblePosition(); i <= cardsList.getLastVisiblePosition(); i++)
if (v == cardsList.getChildAt(i - cardsList.getFirstVisiblePosition()).findViewById(R.id.list_item_card_button_1))
// PERFORM AN ACTION WITH THE ITEM AT POSITION i
Toast.makeText(getActivity(), "Clicked on Left Button of List Item " + i, Toast.LENGTH_SHORT).show();
else if (v == cardsList.getChildAt(i - cardsList.getFirstVisiblePosition()).findViewById(R.id.list_item_card_button_2))
// PERFORM ANOTHER ACTION WITH THE ITEM AT POSITION i
Toast.makeText(getActivity(), "Clicked on Right Button of List Item " + i, Toast.LENGTH_SHORT).show();
关键地方在于当ListView.getFirstVisiblePosition() 或 ListView.getLastVisiblePosition() 方法返回列表中索引, ListView.getChildAt 方法提供给我们的索引是可见里的索引顺序。例如如果FirstVisiblePosition为3,getChildAt(3)将会返回列表中第6个元素给我们。
总的来说,当我们需要在点击列表项目的具体内容时,可在ListView里添加相关触发器。(例如,跳转到项目相关详细的页面)。
Demohttp://download.csdn.net/detail/yaya_soft/8142799
以上是关于卡片式UI的总结 android的主要内容,如果未能解决你的问题,请参考以下文章