184Win10下Java8调用Python的face_recognition库来实现人脸识别
Posted zhangchao19890805
tags:
篇首语:本文由小常识网(cha138.com)小编为大家整理,主要介绍了184Win10下Java8调用Python的face_recognition库来实现人脸识别相关的知识,希望对你有一定的参考价值。
前言
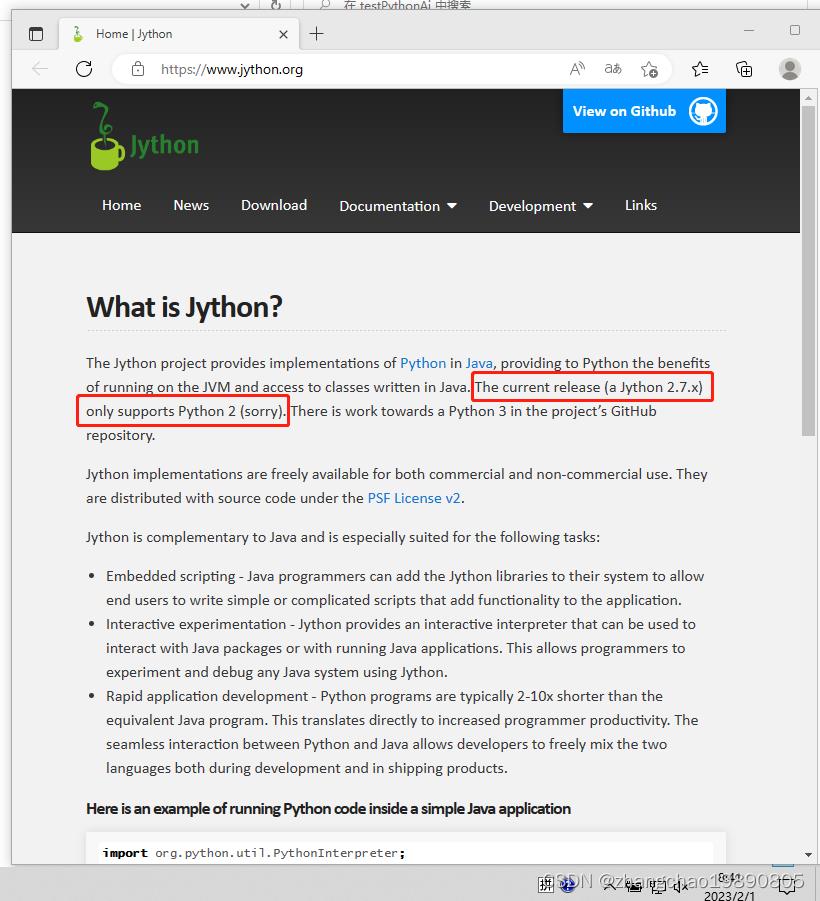
face_recognition 是一个开源的、人脸识别的Python库。本文讲解了在 Windows 10操作系统上,使用 Java8 来调用 Python 的 face_recognition 库来实现人脸识别。虽然 Java8 有 Jython,但是由于截至发文时 Jython 支持的版本太老(只有Python 2),所以此处不适合用 Jython。
Jython 官网对支持版本的介绍:

配置Python环境
去 Anaconda 官网:https://www.anaconda.com/ 下载 Anaconda 安装包并且安装。
安装Python 3.6 的环境,打开命令行程序,执行下面命令:
conda create --name py36 python=3.6
激活 python 3.6 环境,用来安装必要的库:
activate py36
安装 face_recognition :
pip3 install face_recognition
安装 pandas :
pip3 install pandas
去C盘,找到 C:\\Users\\用户名 文件夹,找到 C:\\Users\\用户名\\.conda\\envs\\py36\\python 文件。这个就是 Python 的程序,当在命令行里激活 python36 环境的时候,就是在运行此文件。记录下这个具体的文件路径,后面Java 调用 Python 的时候会用到。我的电脑是 C:\\Users\\51489\\.conda\\envs\\py36\\python ,我以这个文件路径做例子讲解。
代码实现
Python代码:
# author: zhangchao
import os,sys
import face_recognition
import json
import numpy as np
from PIL import Image


imagePath_1 = sys.argv[1]

image1 = Image.open(imagePath_1)
image1 = np.array(image1)
locs = face_recognition.face_locations(image1, number_of_times_to_upsample=1, model="cnn")

locsJsonStr = json.dumps(locs)
print(locsJsonStr)
print("---")

locsLen = len(locs)
if locsLen <= 0:
    exit()

encodingResult = face_recognition.face_encodings(image1, locs)
print(encodingResult)
本例子 Java 代码使用 Maven 管理, pom.xml
<?xml version="1.0" encoding="UTF-8"?>
<project xmlns="http://maven.apache.org/POM/4.0.0"
         xmlns:xsi="http://www.w3.org/2001/XMLSchema-instance"
         xsi:schemaLocation="http://maven.apache.org/POM/4.0.0 http://maven.apache.org/xsd/maven-4.0.0.xsd">
    <modelVersion>4.0.0</modelVersion>

    <groupId>zhangchao</groupId>
    <artifactId>javaShortBlog</artifactId>
    <version>1.0-SNAPSHOT</version>

    <properties>
        <maven.compiler.source>8</maven.compiler.source>
        <maven.compiler.target>8</maven.compiler.target>
        <project.build.sourceEncoding>UTF-8</project.build.sourceEncoding>
        <project.reporting.outputEncoding>UTF-8</project.reporting.outputEncoding>
    </properties>

    <dependencies>
        <!-- https://mvnrepository.com/artifact/com.google.code.gson/gson -->
        <dependency>
            <groupId>com.google.code.gson</groupId>
            <artifactId>gson</artifactId>
            <version>2.10.1</version>
        </dependency>
    </dependencies>
</project>
处理命令行流的 CmdInputStreamRunnable 类:
package zhangchao.pyfacerecognition;


import java.io.*;

/**
 * @author 张超
 * 操作系统执行命令时会有输出,这些输出会被Java当作输入进行读取。
 * 本类启动线程来读取操作系统执行命令时的输出,避免出现JVM线程卡死,但命令本身正常的情况。
 */
public class CmdInputStreamRunnable implements Runnable
    private StringBuffer stringBuffer;
    private InputStream inputStream;

    public CmdInputStreamRunnable(StringBuffer stringBuffer, InputStream inputStream)
        this.stringBuffer = stringBuffer;
        this.inputStream = inputStream;


    @Override
    public void run()
        BufferedReader bufrIn = null;
        try
            bufrIn = new BufferedReader(new InputStreamReader(inputStream, "UTF-8"));
            // 读取输出
            String line = null;
            while ((line = bufrIn.readLine()) != null)
                stringBuffer.append(line).append('\\n');

         catch (UnsupportedEncodingException e)
            e.printStackTrace();
         catch (IOException e)
            e.printStackTrace();
         finally
            try
                if (null != bufrIn)
                    bufrIn.close();

             catch (IOException e)
                e.printStackTrace();
调用命令行的 CmdUtils 类:
package zhangchao.pyfacerecognition;

import java.io.IOException;
import java.io.UnsupportedEncodingException;
import java.util.concurrent.TimeUnit;

/**
 * @author 张超
 */
public class CmdUtils

    /**
     * 执行命令,返回系统输出的字符串
     *
     * @param cmd 要执行的执行命令。对于exe等可执行程序,建议在命令中写好绝对路径,或者在操作系统中设置好环境变量。
     * @return 系统执行命令后输出的字符串
     */
    public static String exec(String cmd)
        // 存放OS执行命令时的输出(对Java来说是输入)
        StringBuffer result = new StringBuffer();

        Process process = null;

        try
            // 执行命令, 返回一个子进程对象(命令在子进程中执行)
            process = Runtime.getRuntime().exec(cmd, null, null);

            CmdInputStreamRunnable processInput = new CmdInputStreamRunnable(result, process.getInputStream());
            CmdInputStreamRunnable processError = new CmdInputStreamRunnable(result, process.getErrorStream());

            new Thread(processInput).start();
            new Thread(processError).start();


            // 方法阻塞, 等待命令执行完成(成功会返回0)
            process.waitFor();

         catch (UnsupportedEncodingException e)
            e.printStackTrace();
         catch (IOException e)
            e.printStackTrace();
         catch (InterruptedException e)
            e.printStackTrace();
         finally
            // 销毁子进程
            if (process != null)
                process.destroy();


        // 返回执行结果
        return result.toString();


    /**
     * 执行命令,返回系统输出的字符串
     *
     * @param cmd 要执行的执行命令。对于exe等可执行程序,建议在命令中写好绝对路径,或者在操作系统中设置好环境变量。
     * @param timeout 子进程的存活时间,子进程超时后
     * @param unit 过期时间的时间单位
     * @return 系统执行命令后输出的字符串
     */
    public static String exec(String cmd, long timeout, TimeUnit unit)
        // 存放OS执行命令时的输出(对Java来说是输入)
        StringBuffer result = new StringBuffer();

        Process process = null;

        try
            // 执行命令, 返回一个子进程对象(命令在子进程中执行)
            process = Runtime.getRuntime().exec(cmd, null, null);

            CmdInputStreamRunnable processInput = new CmdInputStreamRunnable(result, process.getInputStream());
            CmdInputStreamRunnable processError = new CmdInputStreamRunnable(result, process.getErrorStream());

            new Thread(processInput).start();
            new Thread(processError).start();


            // 方法阻塞, 等待命令执行完成(成功会返回0)
            process.waitFor(timeout, unit);

         catch (UnsupportedEncodingException e)
            e.printStackTrace();
         catch (IOException e)
            e.printStackTrace();
         catch (InterruptedException e)
            e.printStackTrace();
         finally
            // 销毁子进程
            if (process != null)
                process.destroy();


        // 返回执行结果
        return result.toString();
辅助解析JSON的ZcFaceVectorDto类
package zhangchao.pyfacerecognition;

import java.math.BigDecimal;
import java.util.List;

/**
 * 辅助解析JSON的DTO
 * @author zhangchao
 */
public class ZcFaceVectorDto
    private List<List<Integer>> locs;

    private List<List<BigDecimal>> encodings;


    //   setters/getters


    public List<List<Integer>> getLocs()
        return locs;


    public void setLocs(List<List<Integer>> locs)
        this.locs = locs;


    public List<List<BigDecimal>> getEncodings()
        return encodings;


    public void setEncodings(List<List<BigDecimal>> encodings)
        this.encodings = encodings;
调用 Python 计算人脸向量的 FaceVectorUtils 类:
package zhangchao.pyfacerecognition;

import com.google.gson.Gson;

import java.io.*;
import java.math.BigDecimal;
import java.util.ArrayList;
import java.util.List;

/**
 * 调用python计算人脸向量
 * @author zhangchao
 */
public class FaceVectorUtils

    private static final String PYTHON_EXE_PATH = "C:\\\\Users\\\\51489\\\\.conda\\\\envs\\\\py36\\\\python";

    /**
     * 从图片中计算人脸向量
     * @param originFilePath 原图片的硬盘路径位置。
     * @return 人脸向量列表。可能会返回多个人脸的向量。
     */
    public static List<List<BigDecimal>> calFaceVector(String originFilePath)
        if (null == originFilePath)
            return null;

        File originFile = new File(originFilePath);
        if (!originFile.exists())
            return null;

        String tmpCompressPath = null;
        // 如果文件太大,就压缩文件
        if (originFile.length() > 380 * 1024)
            tmpCompressPath = "D:\\\\ws\\\\zctest\\\\ShortBlog\\\\pyFaceRecognition\\\\tmpCompressFile.jpg";
         else
            tmpCompressPath = originFilePath;

        // 调用python3.6 计算人脸特征向量
        String result = CmdUtils.exec(PYTHON_EXE_PATH +
                " D:\\\\ws\\\\zctest\\\\ShortBlog\\\\pyFaceRecognition\\\\calVector.py " +
                tmpCompressPath);

        String[] arr = result.split("---");
        // 判断图片中有没有适合对比的人脸。如果没有就不存入 ep_face_vector
        Gson gson = new Gson();
        String locsStr = "locs: " + arr[0] + "";
        ZcFaceVectorDto faceVectorDto = gson.fromJson(locsStr, ZcFaceVectorDto.class);
        if (null == faceVectorDto || null == faceVectorDto.getLocs() ||
                faceVectorDto.getLocs().isEmpty())
            return null;


        // 从字符串中解析出人脸特征向量。
        String encodingStr = arr[1];
        encodingStr = encodingStr.replaceAll("array", "");
        encodingStr = encodingStr.replaceAll("[(]", "");
        encodingStr = encodingStr.replaceAll("[)]", "");
        encodingStr = "encodings:" + encodingStr + "";

        ZcFaceVectorDto encodingFaceVectorDto = gson.fromJson(encodingStr, ZcFaceVectorDto.class);
        if (null == encodingFaceVectorDto || encodingFaceVectorDto.getEncodings() == null ||
                encodingFaceVectorDto.getEncodings().isEmpty())
            return null;

        return encodingFaceVectorDto.getEncodings();


    /**
     * 计算两个向量之间的距离。
     *
     * @param vector1 第一个向量
     * @param vector2 第二个向量
     * @return 两个向量之间的距离。
     */
    public static double calVectorDistance(List<BigDecimal> vector1, List<BigDecimal> vector2)
        List<BigDecimal> minus = new ArrayList<>();
        int size = vector1.size();
        for (int i = 0; i < size; i++)
            minus.add(vector1.get(i).subtract(vector2.get(i)));

        BigDecimal total = new BigDecimal("0");
        for (BigDecimal item : minus)
            BigDecimal tmp = item.multiply(item);
            total = total.add(tmp);

        double dbTotal = total.doubleValue();
        double distance = Math.sqrt(dbTotal);
        return distance;
测试类 TestFace:
package zhangchao.pyfacerecognition;

import java.util.List;
import java.math.BigDecimal;

public class TestFace
    public static void main(String args[])
        System.out.println("begin");
        List<List<BigDecimal>> vectorList_1 = FaceVectorUtils.calFaceVector(
                "D:\\\\ws\\\\zctest\\\\ShortBlog\\\\pyFaceRecognition\\\\origin01.jpg"
        );

        List<List<BigDecimal>> vectorList_2 = FaceVectorUtils.calFaceVector(
                "D:\\\\ws\\\\zctest\\\\ShortBlog\\\\pyFaceRecognition\\\\origin02.jpg"
        );

        for (List<BigDecimal> item01 : vectorList_1)
            for (List<BigDecimal> item02 : vectorList_2)
                double distance = FaceVectorUtils.calVectorDistance(item01, item02);
                // 这里用户可以根据需要设置边界值,不一定必须时 0.49。
                // distance 数值越小说明两张脸越像。
                if (distance < 0.49)
                    System.out.println(true);
                 else
                    System.out.println(false);


        System.out.println(以上是关于184Win10下Java8调用Python的face_recognition库来实现人脸识别的主要内容,如果未能解决你的问题,请参考以下文章