利用github pages+GitHub Actions+Hugo搭建个人博客
Posted 劳埃德·福杰
tags:
篇首语:本文由小常识网(cha138.com)小编为大家整理,主要介绍了利用github pages+GitHub Actions+Hugo搭建个人博客相关的知识,希望对你有一定的参考价值。
github pages是Github提供的一个网页寄存服务,可存放静态网页,包括博客、项目文档等。
参考Hugo官方文档
1.创建github仓库
仓库名的格式:<github用户名>.github.io
2.本地安装Hugo
Hugo是一个开源的静态站点生成器(open-source static site generators)。类似的框架还有jekyll、Hexo等,只不过Hugo由GO语言编写,执行速度会更快一点。
前提条件:安装Git和Go(版本至少为1.18,且要配置环境变量GOBIN,Hugo就会安装到GOBIN目录下)
go install -tags extended github.com/gohugoio/hugo@latest
hugo version
3.本地新建一个 Hugo网站
// 本地获取远程仓库内容(github需事先配置ssh公钥)
git clone git@github.com:yx-Feng/yx-Feng.github.io.git
// 在现有仓库目录中新建一个站点
hugo new site ./yx-Feng.github.io --force
网站目录介绍
- content: 文章存放目录
- static: 静态资源存放目录, 如:图片、样式文件、脚本文件等
- data: 数据模板目录,Hugo静态网站不会连接像mysql这样的数据库,而此目录保存的数据相当于Hugo使用的数据库,生成过程用到的配置数据,可以用YAML, JSON, TOML等格式文件存储
- themes: 网站主题存放目录
- config.toml : 网站的配置文件,可配置网站名称、关键字、插件等
// 进入yx-Feng.github.io目录
cd yx-Feng.github.io/
// 自己选择一个主题,主题网址:https://themes.gohugo.io/themes/hugo-theme-puppet/
git clone https://github.com/roninro/hugo-theme-puppet.git themes/puppet
直接把/themes/puppet/exampleSite这个目录下的内容复制到根目录就行,按照自己的需求,自行配置config.toml文件,content目录,themes/puppet/static/img目录等。
config.toml
baseURL = "http://localhost:1313"
title = "yxFeng"               # 对应主页正中间的标题
theme = "puppet"

copyright = ""
paginate = 3
languageCode = "en"
defaultContentLanguage = "en"
hasCJKLanguage = true
enableInlineShortcodes = true
enableEmoji = true
# prevent build failures when using Hugo's Instagram shortcode due to deprecated Instagram API.
# See https://github.com/gohugoio/hugo/issues/7228#issuecomment-714490456
ignoreErrors = ["error-remote-getjson"]

disqusShortname = ""
googleAnalytics = ""

[outputs]
home = ["html", "JSON", "RSS"]

# prevent build failures when using Hugo's template _internal/opengraph.html
[taxonomies]
category = "categories"
tag = "tags"
series = "series"

[markup]
[markup.highlight]
noClasses = true
codeFences = true
guessSyntax = true
lineNos = true
lineNumbersInTable = false
style = "dracula"

[markup.goldmark.renderer]
unsafe = true

# 配置菜单
[menu]
[[menu.main]]
identifier = "home"
name = "Home"
url = "/"
weight = -100
[[menu.main]]
identifier = "archive"
name = "Archive"
url = "/archive/"
weight = 10
[[menu.main]]
identifier = "guide"
name = "Guide"
url = "/series/themes-guide/"
weight = 20
[[menu.main]]
identifier = "about"
name = "About"
url = "/about/"
weight = 50
[[menu.main]]
identifier = "github"
name = "Github"
url = "https://github.com/yx-Feng"
weight = 100

[params]
author = "yxFeng"                              # 作者
description = "不过是些许风霜罢了。" # 自我介绍
keywords = "blog,developer,personal"
img_home = "img/home-bg.jpg"     # 主页图片,在themes\\puppet\\static\\img目录下面
img_404 = "img/404-bg.jpg"            # 404图片

useFaviconGenerator = true

custom_js = []
custom_css = [] # ["css/custom.css"]  Add your file to assets folder  [assets/css/custom.css]

# 配置侧边栏
[params.sidebar]
enable = true
gravatarEmail = ""
# 可设置头像图片
avatar = "img/avatar.jpg"
bio = "a personal website"
# 社交链接
[params.social]
twitter = "yx-Feng"
facebook = "yx-Feng"
zhihu = "yx-Feng"
weibo = "yx-Feng"
github = "yx-Feng"
gitlab = "yx-Feng"
linkedin = "yx-Feng"
rss = true
[params.social.mastodon]
weight = 56
icon = "fab fa-mastodon"
format = "https://mastodon.social/%v"
id = "yx-Feng"
url = ""
# 朋友
[[params.friends]]
name = "甲"
url = "https://github.com/yx-Feng"
[[params.friends]]
name = "乙"
url = "https://github.com/yx-Feng"

# giscus是由GitHub Discussions驱动的评论系统,访客借助 GitHub 在你的网站上留下评论,无需数据库,数据均储存在GitHub Discussions中
# See https://giscus.app/
[params.giscus]
enable = true
repo = "roninro/hugo-theme-puppet"
repo_id = "R_kgDOHuvyhw"
category = "General"
category_id = "DIC_kwDOHuvyh84CQjDo"
input_position = "top"
theme = "light_tritanopia"
lang = "en"
删掉 themes/puppet/目录下的.git目录和.gitignore文件。
hugo server // 启动Hugo的开发服务器,本地测试一波4.利用GitHub Actions部署网站
GitHub Actions是github官方提供的一个市场,里面有很多现成的action。action其实就是别人写的脚本,不同action提供不同的操作,如运行测试、登录远程服务器,发布到第三方服务等。
我们这里用到的actoin有:
- Hugo setup:能将Hugo安装到GitHub Actions的一台虚拟机上
- Build:Hugo构建静态站点
- Deploy:将./public中的内容推送到gh-pages分支上
①首先,在本地项目根目录中创建.github/workflows/gh-pages.yml文件
name: github pages

on:
  push:
    branches:
      - main  # Set a branch that will trigger a deployment
  pull_request:

jobs:
  deploy:
    runs-on: ubuntu-22.04
    steps:
      - uses: actions/checkout@v3
        with:
          submodules: true  # Fetch Hugo themes (true OR recursive)
          fetch-depth: 0    # Fetch all history for .GitInfo and .Lastmod

      - name: Setup Hugo
        uses: peaceiris/actions-hugo@v2
        with:
          hugo-version: 'latest'
          # extended: true

      - name: Build
        run: hugo --minify

      - name: Deploy
        uses: peaceiris/actions-gh-pages@v3
        if: github.ref == 'refs/heads/main'
        with:
          github_token: $ secrets.GITHUB_TOKEN
          publish_dir: ./public
②修改 config.toml 中的baseURL为上面拿到的https://<github用户名>.github.io
③本地执行下面指令
hugo                      // 发布网站到public目录中,Hugo建站的时候会读取public目录中的内容
git add .                 // 将所有内容添加到本地git仓库中
git commit -m "site init" // 提交信息
// 创建gh-pages分支
// GitHub Actions会从main分支获取内容执行一些操作,生成的内容会推送到gh-pages分支
git checkout --orphan gh-pages
git push -u origin main // 将本地网站推送至远程库④配置GitHub Pages
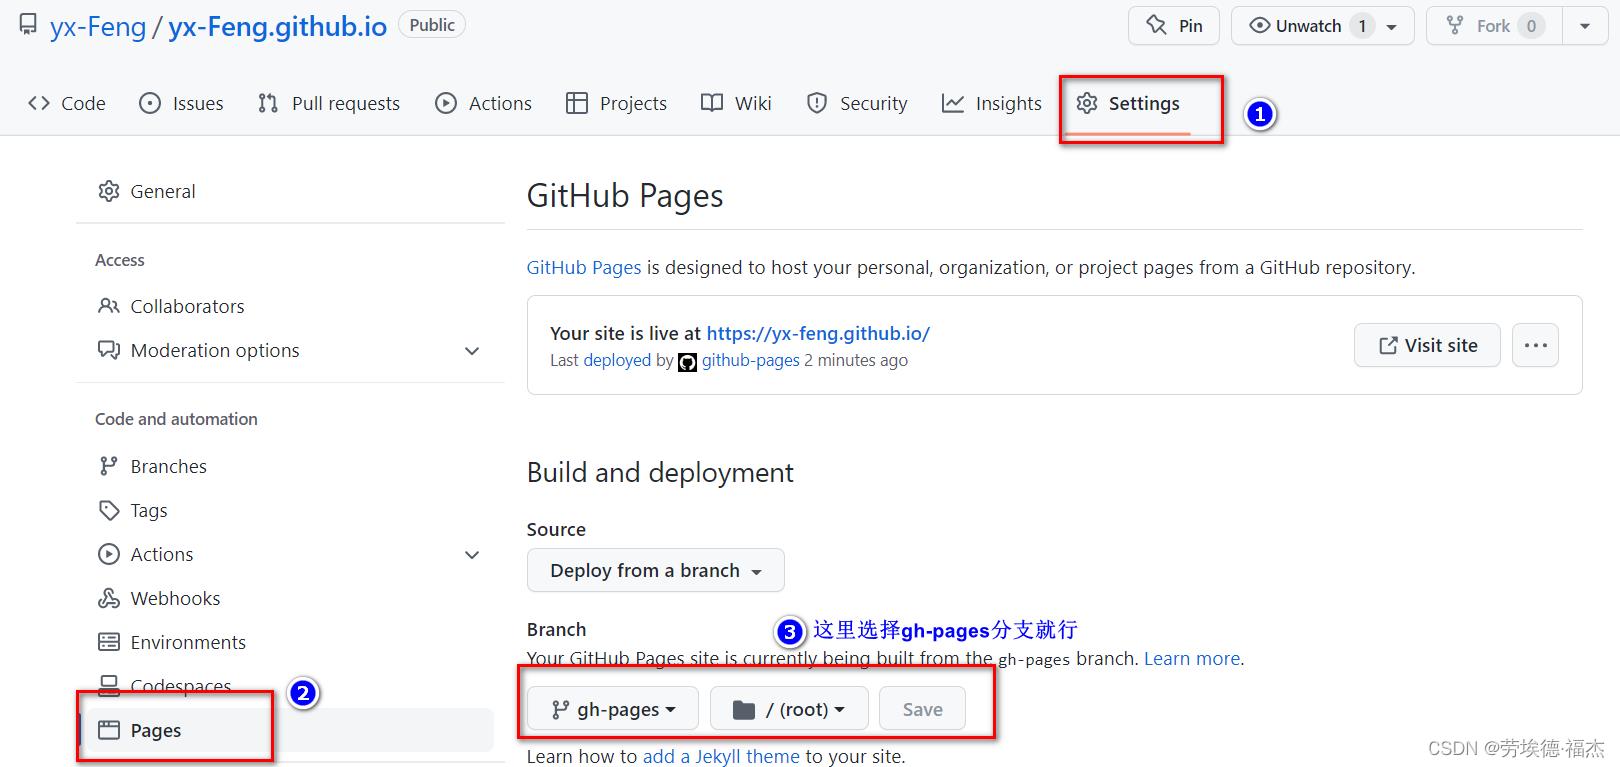
5.初步效果

6.如何新增博客,更新网站
git clone git@github.com:yx-Feng/yx-Feng.github.io.git // 克隆一份远程仓库
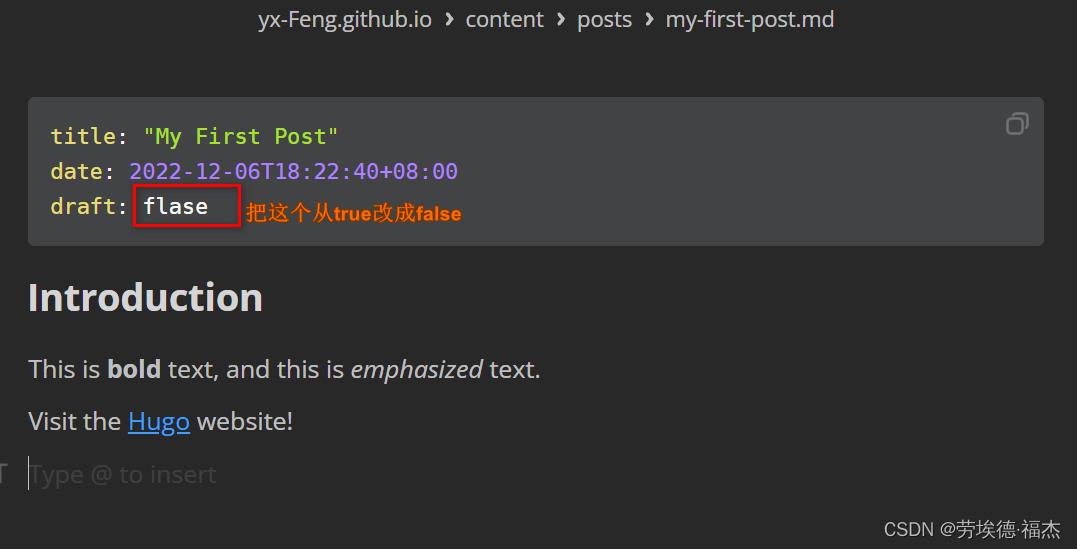
hugo new posts/my-first-post.md // 新增一篇文章,存储在content/posts目录中可以打开该md文件,自行添加内容
改完需要将下图的draft:true改成draft:false,后面hugo server的时候,文章才会发布到网站上,否则不会发布(hugo server -D可以在draft:true的时候查看网站的更新,不过推送到远程仓库仍然不会更新)
hugo server              // 本地检查网站有没有新增博客
// 推送至远程仓库
hugo
git add .
git commit -m "新增博客my-first-post.md"
git push -u origin main
以上是关于利用github pages+GitHub Actions+Hugo搭建个人博客的主要内容,如果未能解决你的问题,请参考以下文章