React和Antd项目开发
Posted
tags:
篇首语:本文由小常识网(cha138.com)小编为大家整理,主要介绍了React和Antd项目开发相关的知识,希望对你有一定的参考价值。
参考技术A项目要求用less 和 antd 按需加载:
安装node 、 git(登录注册码云先) 、 yarn
9.配置package.json 的less 和 按需加载 :
(1)在index.js 中 import \'antd/dist/antd.less\',admin.js 中 import Row,Col,Button from \'antd\';
(2)对less-loader 进行降级 yarn remove less-loader --》 yarn add less-loader@5.0.0
(3)配置package.json的babel增加 :
"babel":
"presets": [
"react-app"
],
"plugins": [
[
"import",
"libraryName": "antd",
"libraryDirectory": "es",
"style": "css"
]
]
,
然后重新yarn start
---------------------以下作为后台管理开发------------------------
共享单车—— React后台管理系统开发手记:AntD Table基础表格
前言:以下内容基于React全家桶+AntD实战课程的学习实践过程记录。最终成果github地址:https://github.com/66Web/react-antd-manager,欢迎star。
一、基础表格

- Table组件基础Api
- bordered属性:是否展示外边框和列边框
- columns属性:表格列的配置描述(即表头)
- dataSource属性:数据数组
- pagination属性:分页器,设为 false 时不展示和进行分页
 <Card title="基础表格">
          <Table
                   bordered
                   columns={columns}
                   dataSource={this.state.dataSource}
                   pagination={false}
            />
</Card>
-
Table基本用法
-
render()中:定义columns表头配置信息数组
const columns = [ { title: ‘id‘, //表头标题 dataIndex: ‘id‘ //数据源 }, { title: ‘用户名‘, dataIndex: ‘userName‘ }, { title: ‘性别‘, dataIndex: ‘sex‘, render(sex){ return sex === 1 ? ‘男‘ : ‘女‘ } }, { title: ‘状态‘, dataIndex: ‘state‘, render(state){ let config = { ‘1‘: ‘咸鱼一条‘, ‘2‘: ‘人民公仆‘, ‘3‘: ‘医院护士‘, ‘4‘: ‘科技公司FE‘, ‘5‘: ‘创业者‘ } return config[state] } }, { title: ‘爱好‘, dataIndex: ‘interest‘, render(abc){ let config = { ‘1‘: ‘游泳‘, ‘2‘: ‘打篮球‘, ‘3‘: ‘踢足球‘, ‘4‘: ‘跑步‘, ‘5‘: ‘爬山‘, ‘6‘: ‘骑行‘, ‘7‘: ‘桌球‘, ‘8‘: ‘麦霸‘ } return config[abc] } }, { title: ‘生日‘, dataIndex: ‘birthday‘ }, { title: ‘地址‘, dataIndex: ‘address‘ }, { title: ‘早起时间‘, dataIndex: ‘time‘ } ] - componentDidMount()中:指定表格的数据源
dataSource为一个数组const dataSource = [ //数据源 { id: ‘0‘, userName: ‘Elena‘, sex: ‘1‘, state: ‘1‘, interest: ‘1‘, birthday: ‘2019-01-01‘, address: ‘西虹市海淀区桃花公园‘, time: ‘07:00‘ }, { id: ‘1‘, userName: ‘Mary‘, sex: ‘1‘, state: ‘2‘, interest: ‘3‘, birthday: ‘2019-01-01‘, address: ‘西虹市海淀区桃花公园‘, time: ‘07:00‘ }, { id: ‘2‘, userName: ‘Tom‘, sex: ‘2‘, state: ‘3‘, interest: ‘4‘, birthday: ‘2019-01-01‘, address: ‘西虹市海淀区桃花公园‘, time: ‘07:00‘ } ] -
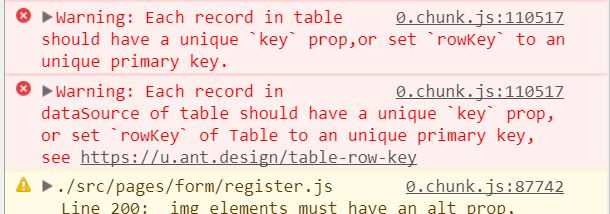
报错:原因是数据需要指定唯一key值;使用 map 循环遍历可以快速添加key值
-
注意:定义好数据源后,必须通过this.setState将dataSource添加到state中
state={} componentDidMount(){ const dataSource= [……], dataSource.map((item, index) => { item.key = index; }) this.setState({ dataSource }) }
二、动态数据渲染表格
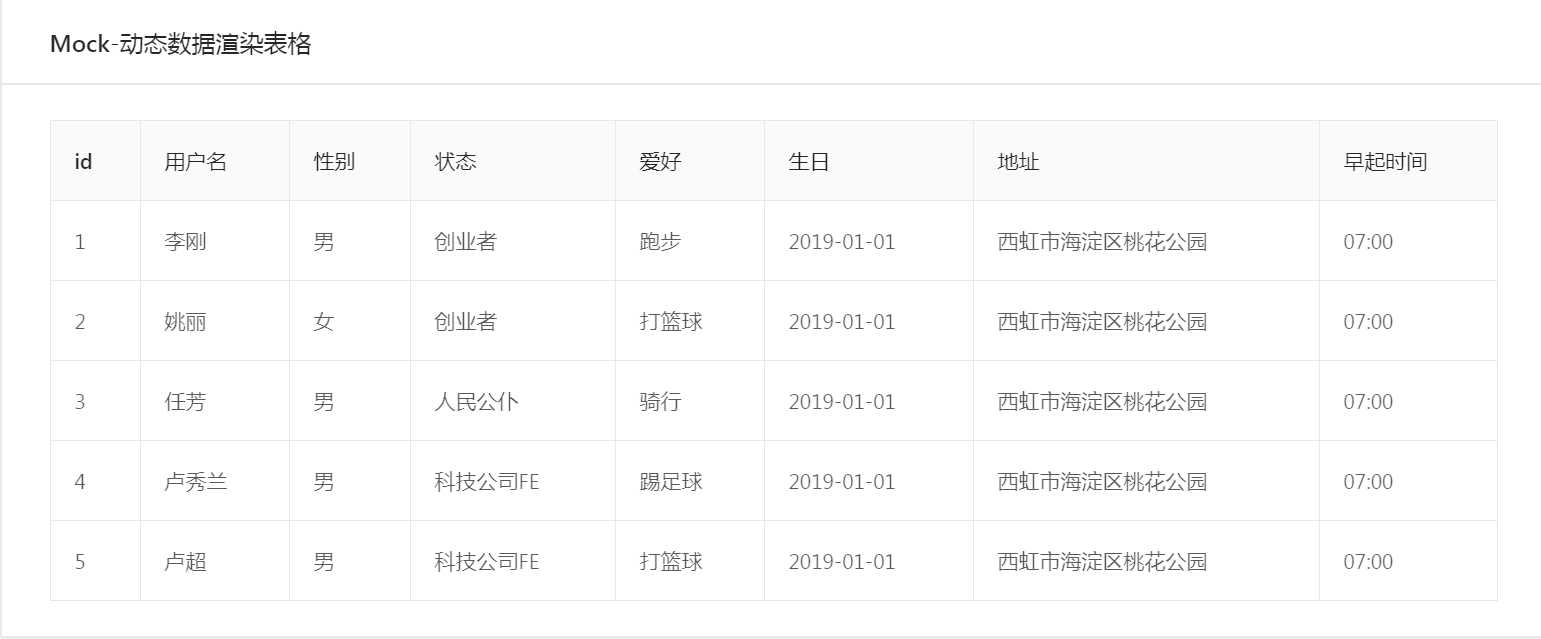
- 动态渲染数据
- 在线工具模拟数据:Easy Mock用法及Mock.js规范
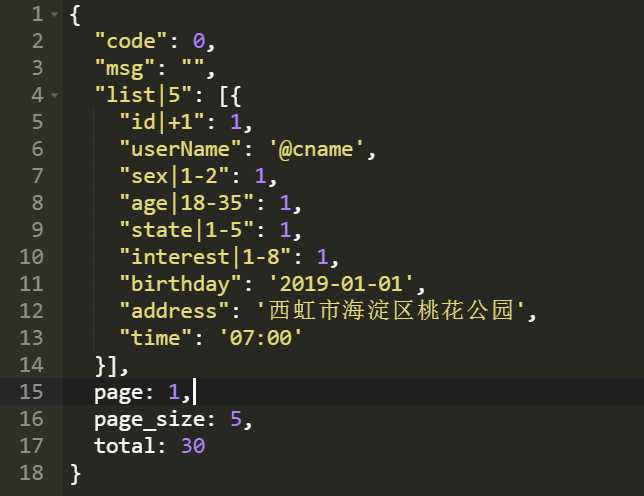
-
生成数据
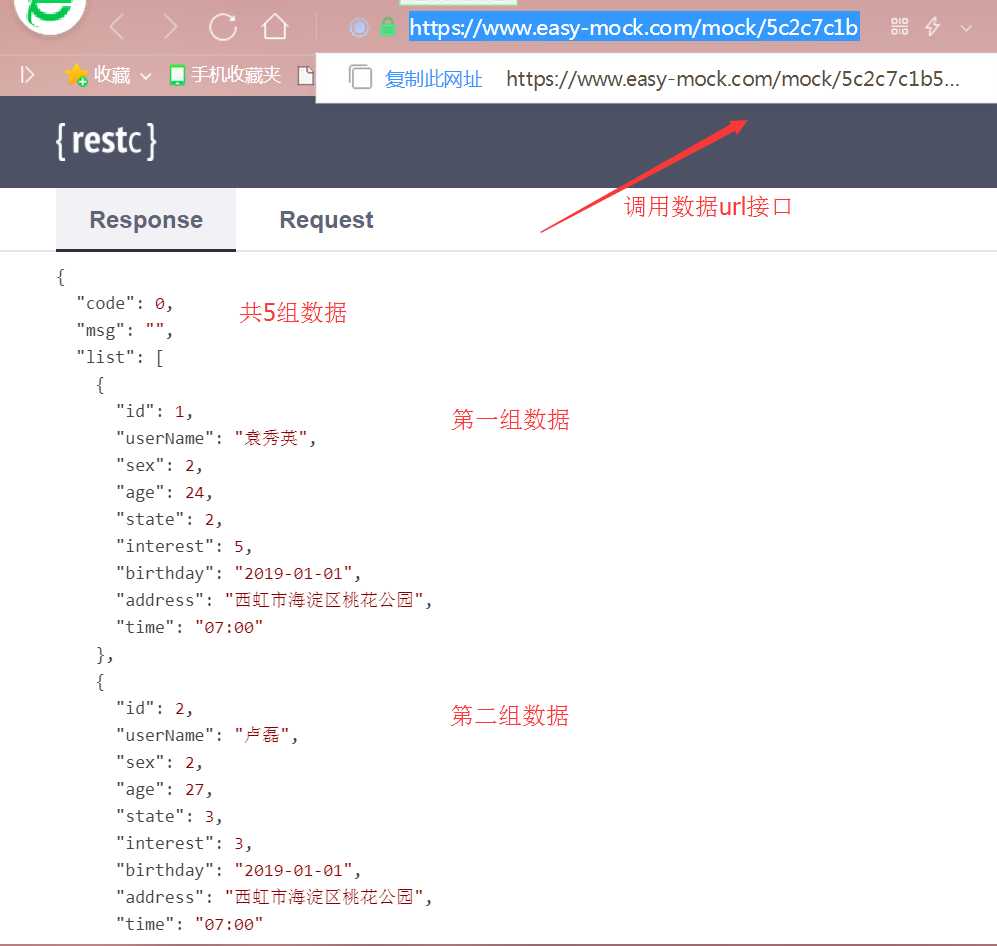
-
src->axios->index.js:定义ajax方法,封装axios异步获取Easy Mock项目虚拟数据的过程【项目工程化】
import axios from ‘axios‘ import { Modal } from ‘antd‘; export default class Axios{ …… static ajax(options){ let baseApi = ‘https://www.easy-mock.com/mock/5c2c7c1b580d6209d1e2aa88/mockapi‘ return new Promise((resolve,reject) => { axios({ url: options.url, method:‘get‘, baseURL: baseApi, timeout: 5000, params: (options.data && options.data.params) || ‘‘ }).then((response)=>{ if(response.status === 200){ let res = response.data; if(res.code === 0){ resolve(res); }else{ Modal.info({ title: ‘提示‘, content: res.msg }) } }else{ reject(response.data) } }) }); } }注意:根据返回的response获取数据信息时,要按照Easy Mock中定义的数据结构而定!!!
-
baseTable.js中:定义request方法,调用axios动态获取Mock数据
import axios from ‘./../../axios/index‘ state = { dataSource2: [] } params = { page: 1 } //动态获取mock数据 request = () => { let _this = this; axios.ajax({ url: ‘/table/list‘, data:{ params:{ page: this.params.page } } }).then((res) => { if(res.code === 0){ res.list.map((item, index) => { item.key = index }) this.setState({ dataSource2: res.list }) } }) } -
Table组件中:指定数据源为动态获取到的dataSource2
<Card title="Mock-动态数据渲染表格" style={{margin: ‘10px 0‘}}> <Table bordered columns={columns} dataSource={this.state.dataSource2} pagination={false} /> </Card>
三、表格单选
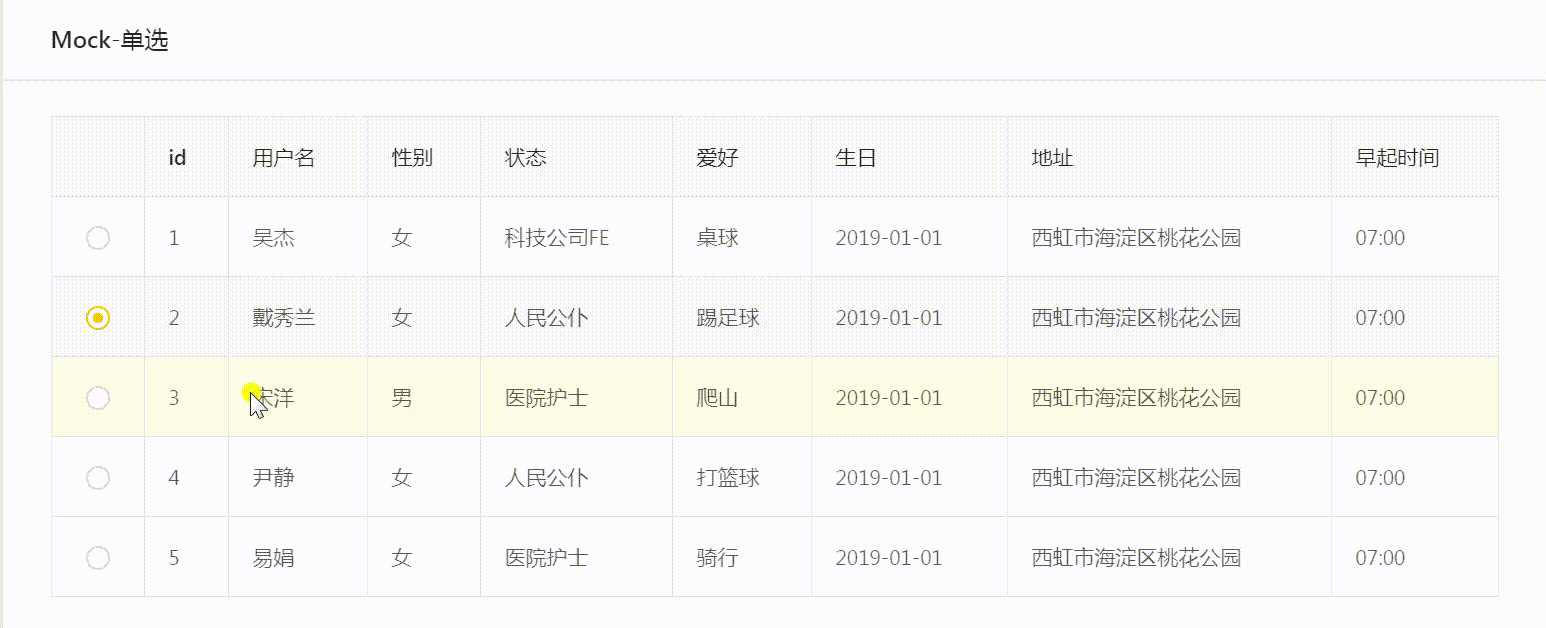
- rowSelection属性:列表项是否可选择,对象
- 配置项:
- type:单选/多选
- selectedRowKeys:指定选中项的key数组,需要和onChange进行配合(单选,仅onRow事件即可)
const selectedRowKeys = this.state.selectedRowKeys; const rowSelection = { type: ‘radio‘, selectedRowKeys }
-
onRow事件:控制点击某一行,设置行属性
<Card title="Mock-单选" style={{margin: ‘10px 0‘}}> <Table bordered rowSelection={rowSelection} onRow={(record, index) => { return { onClick: () => { this.onRowClick(record, index) } //点击行 } }} columns={columns} dataSource={this.state.dataSource2} pagination={false} /> </Card>提取出onRowClick方法:获取当前点击行的数据项record和索引index
//点击某一行 record:当前点击行的数据项 index:当前点击行的索引 onRowClick = (record, index) => { let selectKey = [index]; Modal.info({ title: ‘信息‘, content: `用户名:${record.userName},用户爱好:${record.interest}` }); this.setState({ selectedRowKeys: selectKey, selectedItem: record }) }
四、表格复选
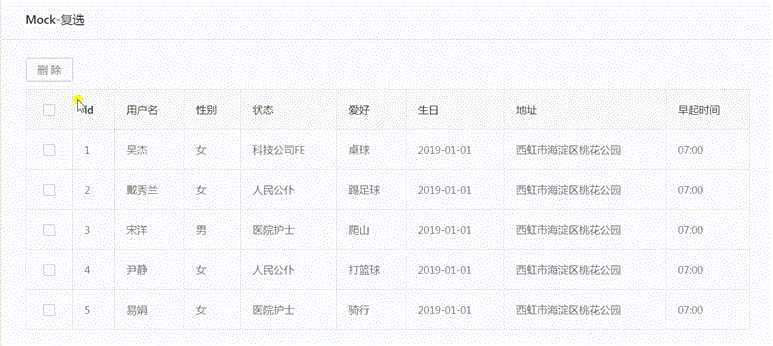
- 配置rowSelection属性对象
- 添加onChange事件
- selectedRowKeys:当前选中的行索引
- selectedRows:当前选中的行对象
const rowCheckSelection = { type: ‘checkbox‘, selectedRowKeys, onChange: (selectedRowKeys, selectedRows) => { // let ids = [] // selectedRows.map((item) => { // ids.push(item.id) // }) this.setState({ selectedRowKeys, //必需 // selectedIds: ids, selectedRows }) } }
-
选中多行执行操作
-
获取state中的seletedRows对象,遍历得到item对象
- 利用item.id执行操作
-
执行完操作,需要重新刷新页面:调用this.request()
//多选执行删除动作 handleDelete = () => { let rows = this.state.selectedRows; let ids = []; rows.map((item) => { ids.push(item.id) }) Modal.confirm({ title: ‘删除提示‘, content: `您确定要删除这些数据吗?${ids.join(‘,‘)}`, onOk: () => { message.success(‘删除成功‘) this.request(); //重新刷新页面 } }) } -
request方法中:当获取数据成功后,重置state中当前选中项参数均为空
selectedRowKeys: [], //重置 selectedRows: null,
-
其它,同单选
<Card title="Mock-复选" style={{margin: ‘10px 0‘}}> <div style={{marginBottom: 10}}> <Button onClick={this.handleDelete}>删除</Button> </div> <Table bordered rowSelection={rowCheckSelection} onRow={(record, index) => { return { onClick: () => { this.onRowClick(record, index) } //点击行 } }} columns={columns} dataSource={this.state.dataSource2} pagination={false} /> </Card>
五、表格分页
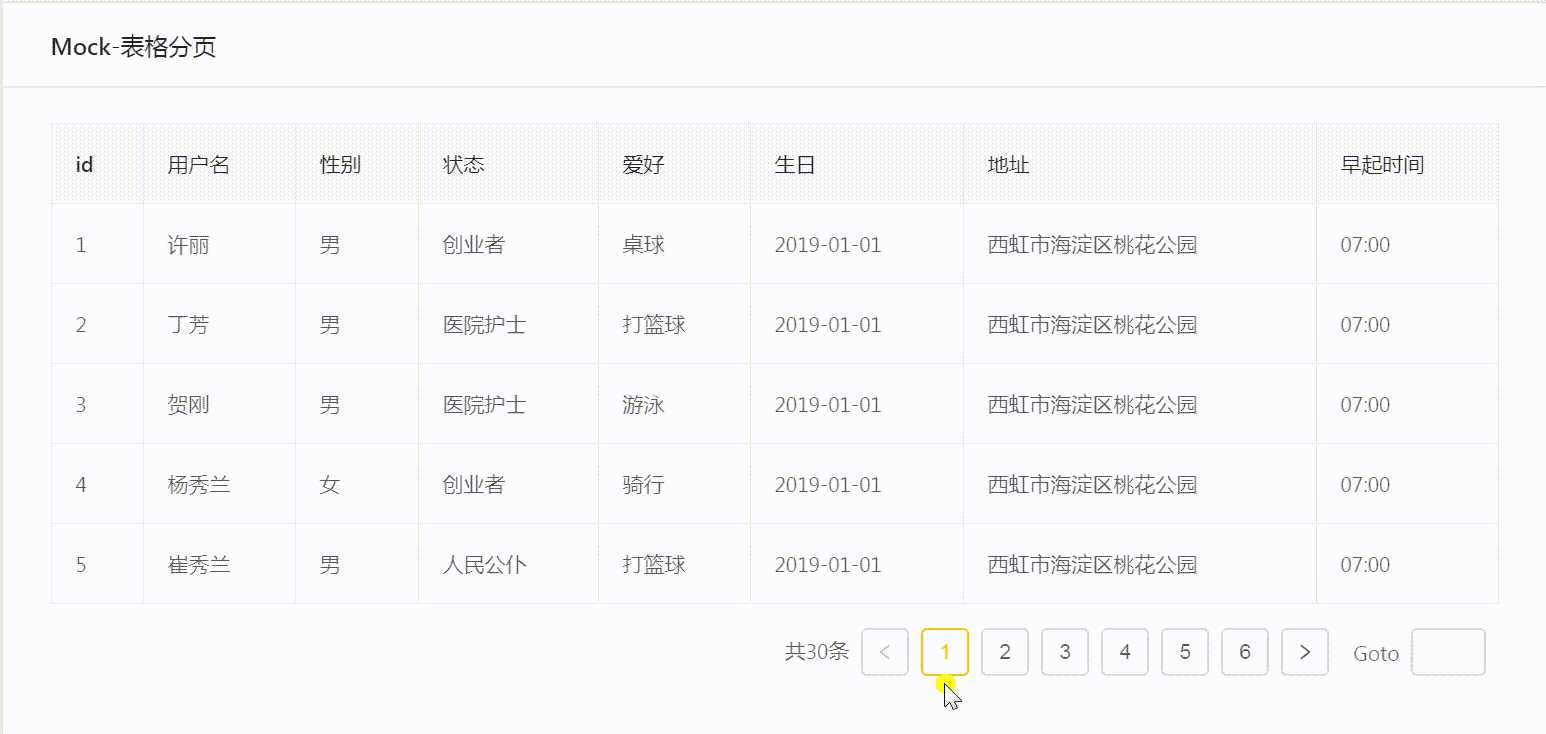
- src->utils->utils.js:封装pagination分页工具函数 【项目工程化】
pagination(data,callback){ return { onChange: (current) => { callback(current) //回调函数返回当前页 }, current: data.page, pageSize: data.page_size, total: data.total, showTotal: () => { return `共${data.total}条` }, showQuickJumper: true //是否快速跳转至某一页 } }注意:获取data对象的数据,需要符合Easy Mock中模拟数据的数据结构!!!
-
request方法中:当获取数据成功后,调用Utils.pagination()给state添加并配置pagination
import Utils from ‘./../../utils/utils‘ let _this = this; //保留外层this,否则this指向会有问题 pagination: Utils.pagination(res,(current) => { _this.params.page = current; this.request(); }) -
Table组件中使用pagination属性
<Card title="Mock-表格分页" style={{margin: ‘10px 0‘}}> <Table bordered columns={columns} dataSource={this.state.dataSource2} pagination={this.state.pagination} /> </Card>
六、Loading拦截加载项
- index.html中:在<div id="root"></div>下配置全局html文件 【项目工程化】
<div class="ajax-loading" id="ajaxLoading" style="display: none;"> <div class="overlay"></div> <div class="loading"> <img src="https://media.number-7.cn/ebike-h5/static/images/common/loading.gif" > <span>加载中,请稍后...</span> </div> </div> -
src->style->loading.less:同时 common.less中引入
/** load **/ .ajax-loading{ display: none; .loading{ position: fixed; top: 50%; left: 50%; transform: translate(-50%,-50%); padding:0 40px; height: 80px; line-height: 80px; background: rgba(0, 0, 0, 0.75); border-radius: 6px; text-align: center; z-index: 9999; font-size:@fontD; color:#fff; img{ width: 32px; vertical-align: middle; } span{ margin-left:12px; } } .overlay{ position: fixed; left: 0; right: 0; top: 0; bottom: 0; z-index: 9998; background: rgb(255, 255, 255); opacity: 0.1; } }@import ‘./../style/loading.less‘;
-
src->axios->index.js:ajax方法中设置loading默认display block,当获取数据成功后,改为display none
let loading; if(options.data && options.data.isShowLoading !== false){ loading = document.getElementById(‘ajaxLoading‘); loading.style.display = ‘block‘; } //其它代码 .then((response)=>{ if(options.data && options.data.isShowLoading !== false){ loading = document.getElementById(‘ajaxLoading‘); loading.style.display = ‘none‘; }
七、实例代码
- pages->table->basicTable.js:对应路由/admin/table/basic
import React from ‘react‘;
import {Card, Table, Modal, Button, message} from ‘antd‘;
import axios from ‘./../../axios/index‘
import Utils from ‘./../../utils/utils‘
export default class BasicTables extends React.Component{
state = {
dataSource2: []
}
params = {
page: 1
}
componentDidMount(){
const dataSource = [   //数据源
            {
                id: ‘0‘,
                userName: ‘Elena‘,
                sex: ‘1‘,
                state: ‘1‘,
                interest: ‘1‘,
                birthday: ‘2019-01-01‘,
                address: ‘西虹市海淀区桃花公园‘,
                time: ‘07:00‘
            },
            {
                id: ‘1‘,
                userName: ‘Mary‘,
                sex: ‘1‘,
                state: ‘2‘,
                interest: ‘3‘,
                birthday: ‘2019-01-01‘,
                address: ‘西虹市海淀区桃花公园‘,
                time: ‘07:00‘
            },
            {
                id: ‘2‘,
                userName: ‘Tom‘,
                sex: ‘2‘,
                state: ‘3‘,
                interest: ‘4‘,
                birthday: ‘2019-01-01‘,
                address: ‘西虹市海淀区桃花公园‘,
                time: ‘07:00‘
            }
        ]
dataSource.map((item, index) => {
item.key = index;
})
this.setState({
dataSource
})
this.request();
}
//动态获取mock数据
request = () => {
let _this = this;
axios.ajax({
url: ‘/table/list‘,
data:{
params:{
page: this.params.page
},
// isShowLoading: false
}
}).then((res) => {
if(res.code === 0){
res.list.map((item, index) => {
item.key = index
})
this.setState({
dataSource2: res.list,
selectedRowKeys: [], //重置
selectedRows: null,
pagination: Utils.pagination(res,(current) => {
_this.params.page = current;
this.request();
})
})
}
})
}
onRowClick = (record, index) => {
let selectKey = [index];
Modal.info({
title: ‘信息‘,
content: `用户名:${record.userName},用户爱好:${record.interest}`
});
this.setState({
selectedRowKeys: selectKey,
selectedItem: record
})
}
// add = () => {
// let item = this.state.selectedItem;
// if(item.id){
// }
// }
//多选执行删除动作
handleDelete = () => {
let rows = this.state.selectedRows;
let ids = [];
rows.map((item) => {
ids.push(item.id)
})
Modal.confirm({
title: ‘删除提示‘,
content: `您确定要删除这些数据吗?${ids.join(‘,‘)}`,
onOk: () => {
message.success(‘删除成功‘)
this.request(); //重新刷新页面
}
})
}
render(){
const columns = [
{
title: ‘id‘, //表头标题
dataIndex: ‘id‘ //数据源
},
{
title: ‘用户名‘,
dataIndex: ‘userName‘
},
{
title: ‘性别‘,
dataIndex: ‘sex‘,
render(sex){
return sex === 1 ? ‘男‘ : ‘女‘
}
},
{
title: ‘状态‘,
dataIndex: ‘state‘,
render(state){
let config = {
‘1‘: ‘咸鱼一条‘,
‘2‘: ‘人民公仆‘,
‘3‘: ‘医院护士‘,
‘4‘: ‘科技公司FE‘,
‘5‘: ‘创业者‘
}
return config[state]
}
},
{
title: ‘爱好‘,
dataIndex: ‘interest‘,
render(abc){
let config = {
‘1‘: ‘游泳‘,
‘2‘: ‘打篮球‘,
‘3‘: ‘踢足球‘,
‘4‘: ‘跑步‘,
‘5‘: ‘爬山‘,
‘6‘: ‘骑行‘,
‘7‘: ‘桌球‘,
‘8‘: ‘麦霸‘
}
return config[abc]
}
},
{
title: ‘生日‘,
dataIndex: ‘birthday‘
},
{
title: ‘地址‘,
dataIndex: ‘address‘
},
{
title: ‘早起时间‘,
dataIndex: ‘time‘
}
]
const selectedRowKeys = this.state.selectedRowKeys;
const rowSelection = {
type: ‘radio‘,
selectedRowKeys
}
const rowCheckSelection = {
type: ‘checkbox‘,
selectedRowKeys,
onChange: (selectedRowKeys, selectedRows) => {
// let ids = []
// selectedRows.map((item) => {
// ids.push(item.id)
// })
this.setState({
selectedRowKeys, //必需
// selectedIds: ids,
selectedRows
})
}
}
return (
<div>
<Card title="基础表格">
<Table
bordered
columns={columns}
dataSource={this.state.dataSource}
pagination={false}
/>
</Card>
<Card title="Mock-动态数据渲染表格" style={{margin: ‘10px 0‘}}>
      <Table
           bordered
           columns={columns}
           dataSource={this.state.dataSource2}
           pagination={false}
      />
</Card>
 <Card title="Mock-单选" style={{margin: ‘10px 0‘}}>
      <Table
            bordered
            rowSelection={rowSelection}
            onRow={(record, index) => {
                  return {
                       onClick: () => {
                            this.onRowClick(record, index)
                       }  //点击行
                  }
            }}
            columns={columns}
            dataSource={this.state.dataSource2}
            pagination={false}
      />
</Card>
<Card title="Mock-复选" style={{margin: ‘10px 0‘}}>
        <div style={{marginBottom: 10}}>
               <Button onClick={this.handleDelete}>删除</Button>
        </div>
        <Table
                bordered
                rowSelection={rowCheckSelection}
                onRow={(record, index) => {
                        return {
                            onClick: () => {
                                this.onRowClick(record, index)
                            }  //点击行
                        }
                }}
                columns={columns}
                dataSource={this.state.dataSource2}
                pagination={false}
        />
</Card>
<Card title="Mock-表格分页" style={{margin: ‘10px 0‘}}>
      <Table
                bordered
                columns={columns}
                dataSource={this.state.dataSource2}
                pagination={this.state.pagination}
       />
</Card>
</div>
)
}
}
注:项目来自慕课网
以上是关于React和Antd项目开发的主要内容,如果未能解决你的问题,请参考以下文章