轻松入门微信小程序云开发(详细)
Posted 互联网小队
tags:
篇首语:本文由小常识网(cha138.com)小编为大家整理,主要介绍了轻松入门微信小程序云开发(详细)相关的知识,希望对你有一定的参考价值。
文章目录
1、课程介绍
0基础入门微信小程序开发、理解微信小程序的开发流程、理解小程序云开发的使用、独立完成小程序全栈项目
html、css、javascript
多敲代码、多看官方文档
基础内容 > 注册申请 > 开发工具
代码构成 > JSON > WXML > WXSS > JS
云开发 > 云数据库 > 云函数 > 云存储
电影案例 > 上线审核
| 电影小程序 | |
|---|---|
| 用户登录 | 如何通过云函数获取openid |
| 传统微信登录 VS 云开发微信登录 | |
| 如何获取用户信息 | |
| 电影列表 | 如何云函数调用第三方API |
| 云函数调用API VS 小程序调用API | |
| 渲染列表 | |
| 电影评价 | 云数据库插入数据 |
| 选择相册图片或拍照 | |
| 云存储的图片上传 |
2、小程序基础
2-1、小程序注册
2-2、小程序开发工具介绍
2-3、创建小程序及代码结构介绍
.json:配置文件,以json格式存储一些配置
.wxml:模板文件,描述页面结构,相当于HTML
.wxss:样式文件,调整页面样式,相当于css
.js:脚本逻辑文件,页面和用户的交互逻辑
2-4、配置文件JSON
project.config.json:项目配置
app.json:全局配置
page.json:页面配置
2-5、页面结构WXML
WXML 全程是WeiXin MarkUp Language,是小程序框架设计的一套标签语言,结合小程序的基础组件、事件系统,可以构建出页面的结构,充当的就是类似HTML的角色。
数据从动态的服务端获取,渲染到页面
数据绑定使用 Mustache 语法(双大括号)将变量包起来
wx:for="list"
wx:if="isLogin"、很长时间不改变的场景
hidden="!isLogin"、频繁切换场景
base.wxml
<view>Hi msg</view>
<view wx:for="arr" wx:key="*this">index item</view>
<view wx:for="list" wx:key="*this">item.name item.age</view>
<view>
    <view wx:if="isLogin">Bob已登录</view>
    <view wx:else>请登录</view>
    <view hidden="!isLogin">hidden</view>
</view>
base.js
Page(
    data:
        msg: 'Vue',
        arr:['a','b'],
        list:[

                name:'bob1',
                age:19
            ,
                name:'bob2',
                age:29

        ],
        isLogin:true

)
2-6、页面样式WXSS
WXSS (WeiXin Style Sheets)是一套用于小程序的样式语言,用于描述WXML的组件样式,也就是视觉上的效果。
尺寸单位:rpx(responsive pixel):可以根据屏幕宽度进行自适应,适配不同宽度的屏幕。
引入外部wxss:@import './test.wxss'
第三方样式库:WeUI、iView Weapp、Vant Weapp
2-7、页面交互JS
JS负责逻辑交互
计数器demo
this.setData(
  count:this.data.count+1
)
事件是对用户的交互操作行为的相应
bind VS catch
事件对象
base.wxml
<view class="box" catchtap="onbox" data-id='onbox父'>
    <view class="child" catchtap="onchild"></view>
</view>
<view>
    <button bindtap="handle">点我+1</button>
    <view>count</view>
</view>
base.js
Page(
    data:
        count:0
    ,
    handle:function()
        this.setData(
            count:this.data.count+1
        )
    ,
    onbox:function(e)
        console.log('onbox 父');
        console.log(e);
        console.log(e.currentTarget.dataset.id);

    ,
    onchild:function(e)
        console.log('onchild 儿');
        console.log(e);
    ,
)
3、小程序云开发
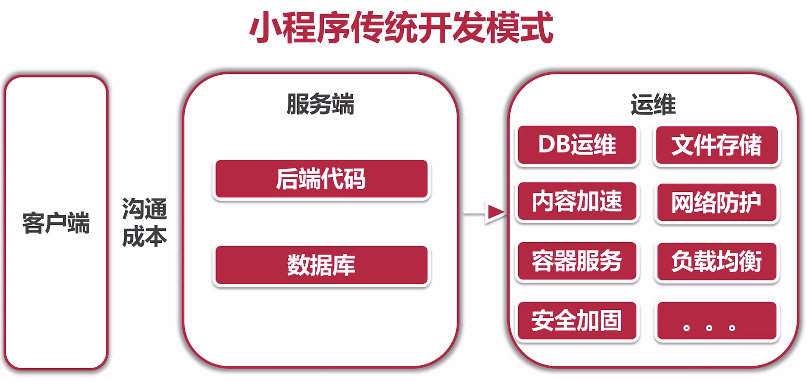
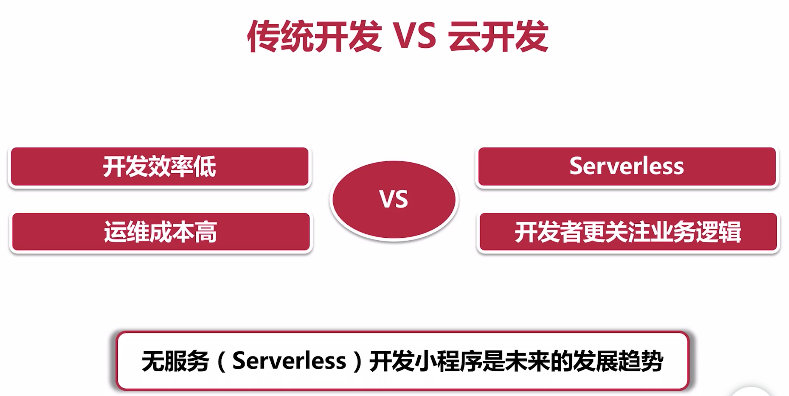
3-1、小程序云开发介绍
云函数 云数据库 云存储

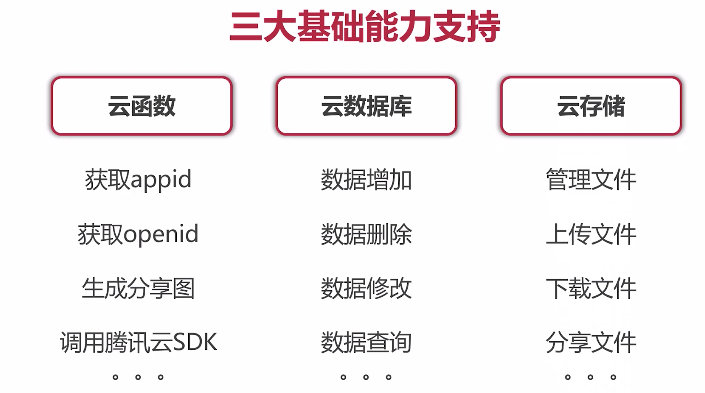
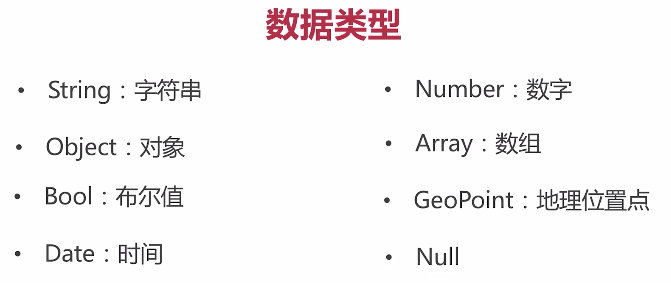
3-2、云数据库
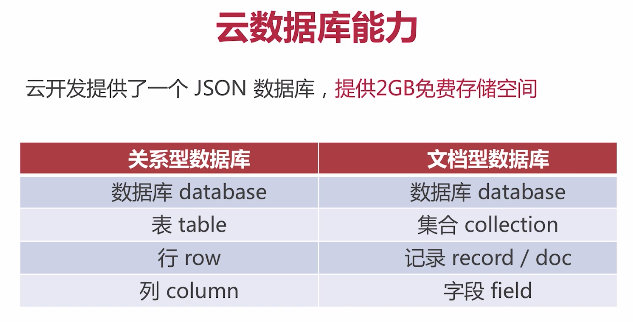
数据库初始化
初始化 const db = wx.cloud.database()
切换环境 const testDB = wx.cloud.database( env:'test' )
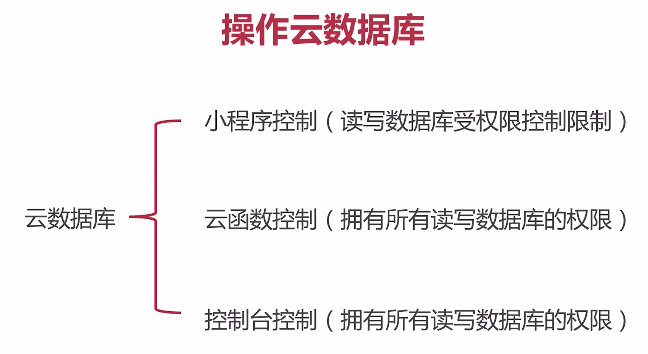
通过小程序控制,插入数据会默认插入openid、通过控制台插入不会默认插入openid
cloud.wxml
<button type="warn">小程序控制</button>
<button type="primary" bindtap="insert">增加数据</button>
<button type="primary" bindtap="update">更新数据</button>
<button type="primary" bindtap="search">查找数据</button>
<button type="primary" bindtap="delete">删除数据</button>
cloud.js
// 初始化数据库
const db = wx.cloud.database();

Page(
    data:

    ,
    insert: function ()

        // 普通写法
        /*
        db.collection('userss').add(
            data:
                name: 'bob',
                age: 20
            ,
            success: res =>
                console.log(res);
            ,
            fail: err =>
                console.log(err);

        )
        */

        // Promise写法
        db.collection('userss').add(
            data:
                name: 'bob',
                age: 20

        ).then(res=>
            console.log(res);
        ).catch(err=>
            console.log(err);
        )

    ,
    update:function()
        db.collection('userss').doc('8937eaa96117afc104b0a4b6145d825c')
        .update(
            data:
                age:210

        ).then(res=>
            console.log(res);
        ).catch(err=>
            console.log(err);
        )
    ,
    search:function()
        db.collection('userss').where(
            name:'bob'
        ).get().then(res=>
            console.log(res);
        ).catch(err=>
            console.log(err);
        )
    ,
    delete:function()
        db.collection('userss').doc('8937eaa96117b09304b0d7d23131e328')
        .remove().then(res=>
            console.log(res);
        ).catch(err=>
            console.log(err);
        )
    ,
)
3-3、云函数
求和函数 sum()
获取当前用户的openid
批量删除云数据库的数据
上传并部署:云端安装依赖(不上传node_modules)
云函数更新一次,就要右键上传并部署一次
cloud.wxml
<button type="warn">云函数控制</button>
<button type="primary" bindtap="sum">调用云函数sum</button>
<button type="primary" bindtap="getOpenId">获取当前用户openid</button>
<button type="primary" bindtap="batchDelete">批量删除</button>
cloud.js
// 初始化数据库
const db = wx.cloud.database();

Page(
    data:

    ,
    sum: function ()
        wx.cloud.callFunction(
            name: 'quickstartFunctions',
            config:
                env: this.data.envId
            ,
            data:
                type: 'sum',
                a:2,
                b:3

        ).then(res=>
            console.log(res);
        ).catch(err=>
            console.log(err);
        )
    ,
    getOpenId:function()
        wx.cloud.callFunction(
            name: 'quickstartFunctions',
            config:
                env: this.data.envId
            ,
            data:
                type: 'getOpenId'

        ).then(res=>
            console.log(res);
        ).catch(err=>
            console.log(err);
        )
    ,
    batchDelete:function()
        wx.cloud.callFunction(
            name: 'quickstartFunctions',
            config:
                env: this.data.envId
            ,
            data:
                type: 'batchDelete'

        ).then(res=>
            console.log(res);
        ).catch(err=>
            console.log(err);
        )
    ,

)
sum index.js
const cloud = require('wx-server-sdk')

cloud.init(
    env: cloud.DYNAMIC_CURRENT_ENV
)

// 获取openId云函数入口函数
exports.main = async (event, context) =>
    return
        sum: event.a + event.b
getOpenid index.js
const cloud = require('wx-server-sdk')

cloud.init(
  env: cloud.DYNAMIC_CURRENT_ENV
)

// 获取openId云函数入口函数
exports.main = async (event, context) =>
  // 获取基础信息
  const wxContext = cloud.getWXContext()

  return
    openid: wxContext.OPENID,
    appid: wxContext.APPID,
    unionid: wxContext.UNIONID,
batchDelete index.js
const cloud = require('wx-server-sdk')

cloud.init(
    env: cloud.DYNAMIC_CURRENT_ENV
)

const db = cloud.database();


// 获取openId云函数入口函数
exports.main = async (event, context) =>
    try
        return await db.collection('userss').where(
            name: 'bob'
        ).remove();
     catch (e)
        console.error(e);
3-4、云存储(1)
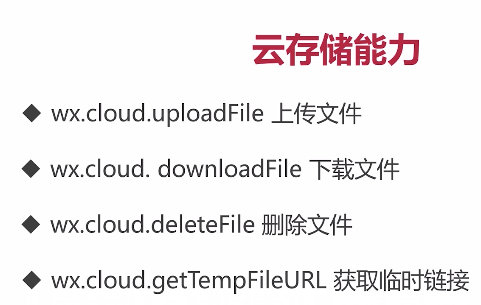
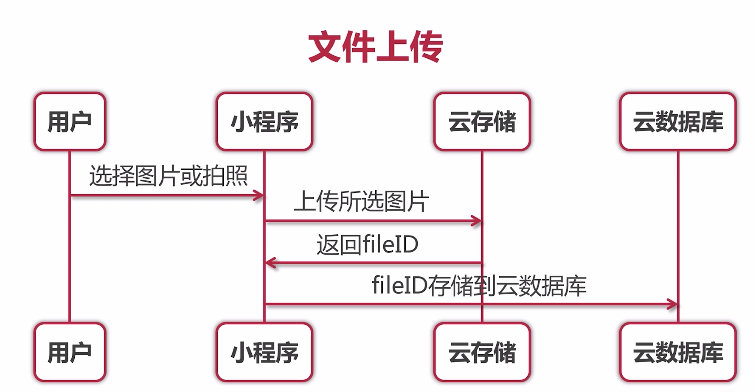
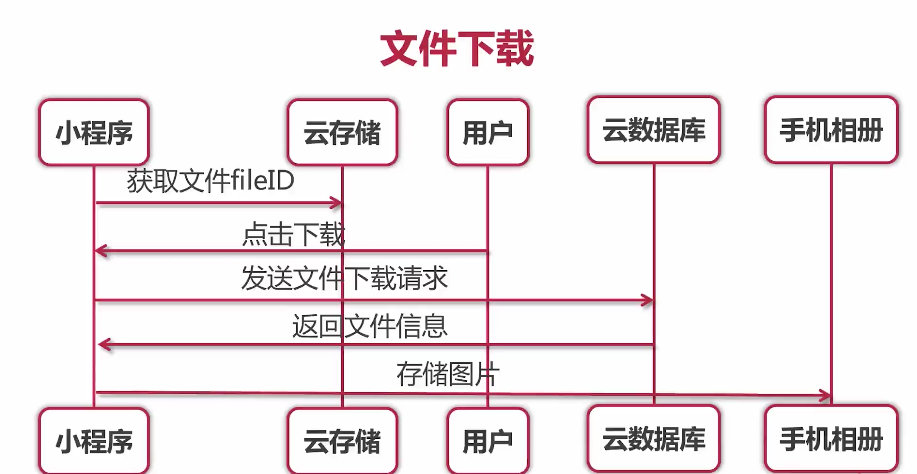
3-5、云存储(2)
cloud.wxml
<button type="warn">云存储</button>
<button type="primary" bindtap="upload">上传图片</button>
<button type="primary" bindtap="getFile">文件展示</button>
<block wx:for="imgs" wx:key="*this">
    <image src="item.fileID"></image>
    <button type="primary"
    data-fileID="item.fileID"
    bindtap="downloadFile">文件下载</button>
</block>
cloud.js
// 初始化数据库
const db = wx.cloud.database();
Page(
data:
imgs:[]
,
upload: function ()
// 选择图片
wx.chooseImage(
count: 1,
sizeType: ['original', 'compressed'],
sourceType: ['album', 'camera'],
success(res)
// tempFilePath可以作为img标签的src属性显示图片
const tempFilePaths = res.tempFilePaths;
console.log(tempFilePaths);
//
wx.cloud.uploadFile(
// 指定上传到的云路径
cloudPath: new Date().getTime()+'.png'