如何制作RPM包
Posted Carlton Xu
tags:
篇首语:本文由小常识网(cha138.com)小编为大家整理,主要介绍了如何制作RPM包相关的知识,希望对你有一定的参考价值。
#安装制作rpm工具rpmbuild
yum install -y rpm-build
创建用户
注意: 创建rpm包一定不要使用root用户,因为root用户权限比较大,如果脚本编写错误的话,可能会导致破坏系统文件
useradd sysadmin   # 创建普通用户sysadmin,用户可随意
passwd sysadmin  # 给普通用户设置密码
创建制作PRM所需的工作目录
##手动建立工作目录
mkdir -p ~/rpmbuildBUILD,RPMS,SOURCE,PEC,RPMS
安装rpmdevtools辅助工具包来自动生成rpmbuild目录
yum install -y rpmdevtools
rpmdev-setuptree  # 执行此命令来自动生成
目录详解
| 目录 | 说明 | macros宏名 |
|---|---|---|
| BUILD | 编译rpm包的临时目录 | %_builddir |
| RPMS | 存放由rpmbuild最终制作好的二进制包 | %_rpmdir |
| SOURCES | 所有源代码和补丁文件的存放目录 | %_sourcedir |
| SPECS | 存放SPEC文件的目录(重要) | %_specdir |
| SPRMS | 最终生成的二进制源码包所在目录 | %_srcrpmdir |
注意: 关于rpmbuild默认工作路径的确定,通常由在/usr/lib/rpm/macros这个文件里的一个叫做%_topdir的宏变量来定义,你也可以使用rpmbuild --showrc | grep _topdir 来进行查看。如果想更改这个目录名,rpm官方并不推荐直接更改这个目录,而是在用户家目录下建立一个名为.rpmmacros的隐藏文件(注意前面的点不能少,这是Linux下隐藏文件的常识),然后在里面重新定义%_topdir,指向一个新的目录名。这样就可以满足某些“高级”用户的差异化需求了。通常情况下.rpmmacros文件里一般只有一行内容 %_topdir $HOME/newfile
准备要制作的源码包和所需的一些额外文件
**例如:**补丁包,服务所需的配置文件以及service管理启动脚本等,都放置SOURCES目录下(获取nginx源码包)
cd ~/rpmbuild/SOURCES
wget http://nginx.org/download/nginx-1.7.7.tar.gz  # 获取nginx源码包
ls  # 查看当前目录下的文件
init.nginx  nginx-1.7.7.tar.gz  nginx.conf
nginx脚本文件如下
vim init.nginx # 编写启动服务脚本,让其可以使用service和chkconfig来管理
#!/bin/sh
#
# nginx - this script starts and stops the nginx daemon
#
# chkconfig:   - 85 15
# description:  Nginx is an HTTP(S) server, HTTP(S) reverse \\
#               proxy and IMAP/POP3 proxy server
# processname: nginx
## config:      /etc/nginx/nginx.conf
# config:      /usr/local/nginx/conf/nginx.conf
# config:      /etc/sysconfig/nginx
## pidfile:     /var/run/nginx/nginx.pid
# pidfile:     /usr/local/nginx/logs/nginx.pid
# Source function library.
. /etc/rc.d/init.d/functions
# Source networking configuration.
. /etc/sysconfig/network
# Check that networking is up.
[ "$NETWORKING" = "no" ] && exit 0
nginx="/usr/local/nginx/sbin/nginx"
prog=$(basename $nginx)
#NGINX_CONF_FILE="/etc/nginx/nginx.conf"
NGINX_CONF_FILE="/usr/local/nginx/conf/nginx.conf"
[ -f /etc/sysconfig/nginx ] && . /etc/sysconfig/nginx
lockfile=/var/lock/subsys/nginx
make_dirs()
   # make required directories
   user=`nginx -V 2>&1 | grep "configure arguments:" | sed 's/[^*]*--user=\\([^ ]*\\).*/\\1/g' -`
   options=`$nginx -V 2>&1 | grep 'configure arguments:'`
   for opt in $options; do
       if [ `echo $opt | grep '.*-temp-path'` ]; then
           value=`echo $opt | cut -d "=" -f 2`
           if [ ! -d "$value" ]; then
               # echo "creating" $value
               mkdir -p $value && chown -R $user $value
           fi
       fi
   done

start()
    [ -x $nginx ] || exit 5
    [ -f $NGINX_CONF_FILE ] || exit 6
    make_dirs
    echo -n $"Starting $prog: "
    daemon $nginx -c $NGINX_CONF_FILE
    retval=$?
    echo
    [ $retval -eq 0 ] && touch $lockfile
    return $retval

stop()
    echo -n $"Stopping $prog: "
    killproc $prog -QUIT
    retval=$?
    echo
    [ $retval -eq 0 ] && rm -f $lockfile
    return $retval

restart()
    configtest || return $?
    stop
    sleep 1
    start

reload()
    configtest || return $?
    echo -n $"Reloading $prog: "
    killproc $nginx -HUP
    RETVAL=$?
    echo

force_reload()
    restart

configtest()
  $nginx -t -c $NGINX_CONF_FILE

rh_status()
    status $prog

rh_status_q()
    rh_status >/dev/null 2>&1

case "$1" in
    start)
        rh_status_q && exit 0
        $1
        ;;
    stop)
        rh_status_q || exit 0
        $1
        ;;
    restart|configtest)
        $1
        ;;
    reload)
        rh_status_q || exit 7
        $1
        ;;
    force-reload)
        force_reload
        ;;
    status)
        rh_status
        ;;
    condrestart|try-restart)
        rh_status_q || exit 0
            ;;
    *)
        echo $"Usage: $0 start|stop|status|restart|condrestart|try-restart|reload|force-reload|configtest"
        exit 2
esac
#进入SPECS目录
创建nginx.spec文件
cd ~/rpmbuild/SPECS
rpmdev-newspec nginx.spec  # 可以使用rpmdev-newspec工具来生成,也可以手动vim编写.
nginx.spec文件内容如下:
Name: nginx          # 软件包名称
Version: 1.7.7        # 版本号,(不能使用-)
Release: 1%?dist    # release号,对应下面的changelog,如 nginx-1.7.7-3.el6.x86_64.rpm
Summary: nginx-1.7.7.tar.gz to nginx-1.7.7.rpm   # 简要描述信息,最好不要超过50个字符,如要详述,使用下面的%description
Group: Applications/Archiving      # 要全用这里面的一个组:less /usr/share/doc/rpm-version/GROUPS
License: GPLv2                     # 一定带上(最好是对方源码包的License)BSD,GPL,GPLv2
URL: http://nginx.org/
Packager:  centos   # 包提供者
Vendor: centos
Source0: %name-%version.tar.gz   # source主要是引用一下自己定义好的脚本,配置文件之类的内容。
Source1: init.nginx    # nginx在主配置文件里面做了很多优化,包括cpu抢占,各种缓存策略,tcp,进程数等。
Source2: nginx.conf    # 每增加一个Source ,都需要在 %install 段和 %files 段做相应配置,如果是启动脚本的话,最好在脚本段配置一下
BuildRoot: %_topdir/BUILDROOT

BuildRequires: gcc  # 编译代码需要的软件。这个只影响编译命令,不影响打包后的rpm包的依赖关系。
Requires: openssl,openssl-devel,pcre-devel,pcre  # 定义nginxrpm安装时依赖的包,需要提前进行yum手动安装

%description   # 软件包的描述,可多行编写,段中间空行隔开
Custom a rpm by yourself!Build nginx-1.7.7.tar.gz to nginx-1.7.7.rpm

%prep    # 准备阶段,主要就是把源码包解压到build目录下,设置一下环境变量,并cd进去
%setup -q    # 这个宏的作用静默模式解压并cd,并不需要我们手动cd,setup会自动完成初始的工作


%build  # 编译制作阶段,主要用于编译源码
%configure   #在 RMP 创建时候, 由于 nginx 不按照常规定义, 不可以定义 %_prefix 之类参数, 也不可以使用 %configure 这个参数进行 rpm 编译
             #一旦定义该参数, 会导致编译自动增加下面参数, 导致报错
             # + ./configure --build=x86_64-redhat-linux-gnu --host=x86_64-redhat-linux-gnu --target=x86_64-redhat-linux-gnu --program-prefix=
             #因此,这里需要 ./configure,且需把%configure删掉
             #而且这里需要安装 pcre-devel包,如果没有的话,会提示关于pcre的错误,直接安装此包就可以了
./configure \\
--prefix=/usr/local/nginx \\
--user=nginx \\
--group=nginx \\
--with-http_ssl_module \\
--with-http_flv_module \\
--with-http_stub_status_module \\
--with-http_gzip_static_module \\
--http-client-body-temp-path=/var/tmp/nginx/client/ \\
--http-proxy-temp-path=/var/tmp/nginx/proxy/ \\
--http-fastcgi-temp-path=/var/tmp/nginx/fcgi/ \\
--http-uwsgi-temp-path=/var/tmp/nginx/uwsgi \\
--http-scgi-temp-path=/var/tmp/nginx/scgi \\
--with-pcre
make %?_smp_mflags            # make后面的意思是:如果就多处理器的话make时并行编译


%install # 此区域主要用来完成实际软件安装必须执行的命令,其中可包含4种类型的脚本
rm -rf %buildroot
make install DESTDIR=%buildroot
%__install -p -D -m 0755 %SOURCE1 %buildroot/etc/rc.d/init.d/nginx
%__install -p -D %SOURCE2 %buildroot/usr/local/nginx/conf/nginx.conf

%pre  # 安装前执行的脚本动作
if [ $1 == 1 ];then                            # $1有3个值,代表动作,安装类型,处理类型
     /usr/sbin/useradd -r nginx -s /sbin/nologin 2> /dev/null # 1:表示安装
fi                                                            # 2:表示升级
                                                              # 0:表示卸载
%post # rpm安装后要执行的脚本动作
if [ $1 == 1 ];then
        /sbin/chkconfig --add %name
        /sbin/chkconfig %name on
        echo '
net.ipv4.tcp_max_syn_backlog = 65536
net.core.netdev_max_backlog =  32768
net.core.somaxconn = 32768

net.core.wmem_default = 8388608
net.core.rmem_default = 8388608
net.core.rmem_max = 16777216
net.core.wmem_max = 16777216

net.ipv4.tcp_timestamps = 0
net.ipv4.tcp_synack_retries = 2
net.ipv4.tcp_syn_retries = 2

net.ipv4.tcp_tw_recycle = 1
net.ipv4.tcp_tw_reuse = 1

net.ipv4.tcp_mem = 94500000 915000000927000000
net.ipv4.tcp_max_orphans = 3276800

#net.ipv4.tcp_fin_timeout = 30
#net.ipv4.tcp_keepalive_time = 120
net.ipv4.ip_local_port_range = 1024  65535' >> /etc/sysctl.conf
sysctl -p 2>&1 /dev/null   #此文件中主要是在安装后做内核参数的优化,包括tcp的快速释放和重利用等。
fi

%preun  # rpm卸载前执行的脚本动作,可以在下面编写
if [ $1 == 0 ];then
        /usr/sbin/userdel -r nginx 2> /dev/null
        /etc/init.d/nginx stop > /dev/null 2>&1
fi

%postun # rpm卸载后执行的脚本


%clean  # 清理段,主要用于完成编译安装后的清理BUILDROOT和BUILD动作
rm -rf %buildroot

%files  # 文件列表段,这个阶段主要是把前面已经编译好的内容打包,启动包括打包那些文件,其中exlude是指要排除那些包不打包进来.
%defattr(-,root,root,0755)  # defattr全局宏,指定下面打包所有文件的属主,属组,权限
/usr/local/nginx/  # 表示包含此目录下的所有文件
%attr(0755,root,root) /etc/rc.d/init.d/nginx  # 此宏是定义单个文件的权限
%config(noreplace) /usr/local/nginx/conf/nginx.conf  # 指定为配置文件,noreplace表示是否替换如果之前有的此文件的话


%changelog   # 日志改变段,主要用来描述每一次修改做个那写动作
 *  Thu Sep 2 2016 centos <admin@centos.com> - 1.7.7-1
 * Initial version
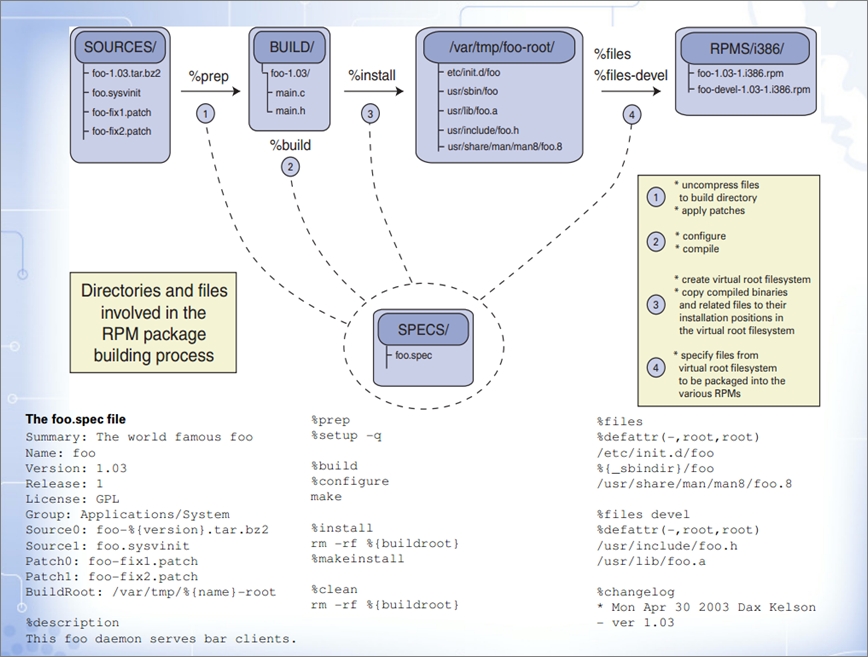
**总结:**总的概括一下,rpmbuild做的事情是以临时目录作为虚拟的系统根目录,然后build,install(需要制定参数,安装到临时虚拟根目录下),然后打包 file块中制定的目录结构。注意: %install部分使用的是绝对路径,而%file部分使用则是相对路径,虽然其描述的是同一个地方.
下面总结了在您运行 rpmbuid -ba nginx.spec 时,RPMBUILD 都做些什么:
- 读取并解析 nginx.spec 文件
- 运行 %prep 部分来将源代码解包到一个临时目录,并应用所有的补丁程序。
- 运行%build 部分来编译代码。
- 运行 %install 部分将代码安装到构建机器的目录中。
- 读取 %files部分的文件列表,收集文件并创建二进制和源 RPM 文件。
- 运行 %clean 部分来除去临时构建目录。
执行流程图:

#执行打包
**注意:**在制作RPM包之前你还需要安装必要的build时所需要工具以及编译是所依赖的包),此步骤完成后会在RPMS下存在刚才所制作好的RPM包
rpmbuild -bb nginx.spec
| rpmbuild 命令选项 | 执行的动作 |
|---|---|
| -bp nginx.spec | 制作到%prep段 |
| -bc nginx.spec | 制作到%build段 |
| -bi nginx.spec | 执行 spec 文件的 "%install" 阶段 (在执行了 %prep 和 %build 阶段之后)。这通常等价于执行了一次 "make install" |
| -bb nginx.spec | 制作二进制包(在执行了 %prep 和 %build 阶段之后) |
| -bs nginx.spec | 仅制作源码包 |
| -bl nginx.spec | 从spec文件宏扩展%files段,检查并且验证每个文件是否存在 |
| -ba nginx.spec | 表示既制作二进制包又制作src格式包(在执行了 %prep 和 %build 阶段之后) |
#END
到此一个ngnix的RPM包就制作好了,这里面最主要的还是编写spec文件,所以我们要想有更多的思路取编写spec文件,建议大家取网上搜一些src.rpm包来看看别人的spec文件是如何进行编写的,那么时间长了,我们基本就有一些思路取写spec文件了。
以上是关于如何制作RPM包的主要内容,如果未能解决你的问题,请参考以下文章