Linux磁盘管理
Posted 工程师WWW
tags:
篇首语:本文由小常识网(cha138.com)小编为大家整理,主要介绍了Linux磁盘管理相关的知识,希望对你有一定的参考价值。
要进行磁盘管理,首先我们需要知道磁盘的基本使用状况,使用了多少,还剩多少等等。df命令可以帮助我们看到它。
查看磁盘分区使用状况
df [选项] [文件]显示指定磁盘文件的可用空间。如果没有文件名被指定,则所有当前被挂载的文件系统的可用空间将被显示。默认情况下,磁盘空间将以 1KB 为单位进行显示。
选项:
-
-a 全部文件系统列表 -
-h 方便阅读方式显示 -
-H 等于“-h”,但是计算式,1K=1000,而不是1K=1024 -
-l 只显示本地文件系统 -
-T 文件系统类型 -
-t <文件系统类型> 只显示选定文件系统的磁盘信息 -
-x <文件系统类型> 不显示选定文件系统的磁盘信息
例如:
-
[root@localhost ~]# df -hTl -
Filesystem Type Size Used Avail Use% Mounted on -
/dev/mapper/centos-root xfs 18G 1.1G 17G 6% / -
devtmpfs devtmpfs 479M 0 479M 0% /dev -
tmpfs tmpfs 489M 0 489M 0% /dev/shm -
tmpfs tmpfs 489M 6.7M 483M 2% /run -
tmpfs tmpfs 489M 0 489M 0% /sys/fs/cgroup -
/dev/sda1 xfs 497M 126M 371M 26% /boot -
tmpfs tmpfs 98M 0 98M 0% /run/user/0
可以看到,根分区还有/boot分区的使用状况,等等。
如果我们想要看到某个目录下文件的大小,可以使用du命令:
-
[root@localhost /]# du -sh /etc/ -
23M /etc/
查看我们已经做到了。那么如何进行磁盘的分区和格式化呢?
分区
在使用新的硬盘之前,我们必须对其进行分区。也就是在磁盘中存储分区信息,告诉操作系统哪个扇区是哪个分区的,哪个分区用来启动的等等。
分区信息的储存方式有两个标准,MBR和GPT,分区之前,我们必须在两个之中选择一种标准。
GPT是一种新的标准,随着硬盘的不断增大,正在逐渐地取代MBR,但是现在MBR的也是不少的。
你那么MBR和GPT有什么区别呢?
MBR
MBR的意思是“主引导记录”。之所以叫“主引导记录”,是因为它是存在于驱动器开始部分的一个特殊的启动扇区。这个扇区包含了已安装的操作系统的启动加载器和驱动器的逻辑分区信息。所谓启动加载器,是一小段代码,用于加载驱动器上其他分区上更大的加载器。如何MBR被覆盖,操作系统就无法启动了。
MBR支持最大2TB磁盘,它无法处理大于2TB容量的磁盘。MBR还只支持最多4个主分区——如果你想要更多分区,你需要创建所谓“扩展分区”,并在其中创建逻辑分区。
GPT
GPT意为GUID分区表。(GUID意为全局唯一标识符)。这是
一个正逐渐取代MBR的新标准。它和UEFI相辅相成——UEFI用于取代老旧的Bios,而GPT则取代老旧的MBR。之所以叫作“GUID分区表”,是因为你的驱动器上的每个分区都有一个全局唯一的标识符(globally unique identifier,GUID)——这是一个随机生成的字符串,可以保证为地球上的每一个GPT分区都分配完全唯一的标识符。
在MBR磁盘上,分区和启动信息是保存在一起的。如果这部分数据被覆盖或破坏,事情就麻烦了。相对的,GPT在整个磁盘上保存多个这部分信息的副本,因此它更为健壮,并可以恢复被破坏的这部分信息。
GPT的硬盘大小大得多,几乎没有限制,最大可支持18EB。而主分区的数量也非常多,可以支持多达128个主分区,所以在GPT中没有扩展分区和逻辑分区的概念,都是主分区,当然也是可以创建的,但是没有必要。
但GPT也有缺点,就是不太适合x86,也就是32位的系统。
了解了分区标准之后,我们来进行磁盘的分区。
首先使用MBR进行分区。
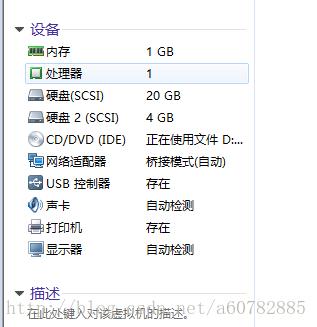
博主使用虚拟机,所以可以很方便的进行硬盘的添加。

添加了一块4GB的硬盘。
打开虚拟机,使用fdisk命令进行分区。
-
[root@localhost ~]# fdisk -
Usage: -
fdisk [options] <disk> change partition table -
fdisk [options] -l <disk> list partition table(s) -
fdisk -s <partition> give partition size(s) in blocks -
Options: -
-b <size> sector size (512, 1024, 2048 or 4096) -
-c[=<mode>] compatible mode: 'dos' or 'nondos' (default) -
-h print this help text -
-u[=<unit>] display units: 'cylinders' or 'sectors' (default) -
-v print program version -
-C <number> specify the number of cylinders -
-H <number> specify the number of heads -
-S <number> specify the number of sectors per track
首先查看fdisk -l查看
-
[root@localhost ~]# fdisk -l -
Disk /dev/sda: 21.5 GB, 21474836480 bytes, 41943040 sectors -
Units = sectors of 1 * 512 = 512 bytes -
Sector size (logical/physical): 512 bytes / 512 bytes -
I/O size (minimum/optimal): 512 bytes / 512 bytes -
Disk label type: dos -
Disk identifier: 0x0002b2d2 -
Device Boot Start End Blocks Id System -
/dev/sda1 * 2048 1026047 512000 83 Linux -
/dev/sda2 1026048 41943039 20458496 8e Linux LVM -
Disk /dev/sdb: 4294 MB, 4294967296 bytes, 8388608 sectors -
Units = sectors of 1 * 512 = 512 bytes -
Sector size (logical/physical): 512 bytes / 512 bytes -
I/O size (minimum/optimal): 512 bytes / 512 bytes
可以看到,这里多了一个/dev/sdb的硬盘。
然后使用fdisk /dev/sdb就可以进行分区了。
-
[root@localhost ~]# fdisk /dev/sdb -
Welcome to fdisk (util-linux 2.23.2). -
Changes will remain in memory only, until you decide to write them. -
Be careful before using the write command. -
Device does not contain a recognized partition table -
Building a new DOS disklabel with disk identifier 0xf286ed4d. -
Command (m for help):
使用fdisk命令进行分区使用交互模式,也就是会提示我们信息,让我们选择即可。使我们非常简单的对硬盘进行分区。
-
Command (m for help): n -
Partition type: -
p primary (0 primary, 0 extended, 4 free) -
e extended -
Select (default p): p -
Partition number (1-4, default 1): -
First sector (2048-8388607, default 2048): -
Using default value 2048 -
Last sector, +sectors or +sizeK,M,G (2048-8388607, default 8388607): +1G -
Partition 1 of type Linux and of size 1 GiB is set
一个一个选项的输入即可。这里我们创建了一个主分区,为他分配了1G的空间。
再添加一个扩展分区,剩下的空间都给它。
-
Command (m for help): n -
Partition type: -
p primary (1 primary, 0 extended, 3 free) -
e extended -
Select (default p): e -
Partition number (2-4, default 2): -
First sector (2099200-8388607, default 2099200): -
Using default value 2099200 -
Last sector, +sectors or +sizeK,M,G (2099200-8388607, default 8388607): -
Using default value 8388607 -
Partition 2 of type Extended and of size 3 GiB is set -
Command (m for help):
在扩展分区中添加两个逻辑分区,分别是2g和1g。最后结果如下:
-
Command (m for help): p -
Disk /dev/sdb: 4294 MB, 4294967296 bytes, 8388608 sectors -
Units = sectors of 1 * 512 = 512 bytes -
Sector size (logical/physical): 512 bytes / 512 bytes -
I/O size (minimum/optimal): 512 bytes / 512 bytes -
Disk label type: dos -
Disk identifier: 0xf286ed4d -
Device Boot Start End Blocks Id System -
/dev/sdb1 2048 2099199 1048576 83 Linux -
/dev/sdb2 2099200 8388607 3144704 5 Extended -
/dev/sdb5 2101248 6295551 2097152 83 Linux -
/dev/sdb6 6297600 8388607 1045504 83 Linux
如果满意了就直接w就可以退出保存了。如果不满意可以使用d删除某个分区,在重新增加。
这里就直接退出保存了。
使用fdisk查看。确实已经分区好了。
-
[root@localhost ~]# fdisk -l -
Disk /dev/sda: 21.5 GB, 21474836480 bytes, 41943040 sectors -
Units = sectors of 1 * 512 = 512 bytes -
Sector size (logical/physical): 512 bytes / 512 bytes -
I/O size (minimum/optimal): 512 bytes / 512 bytes -
Disk label type: dos -
Disk identifier: 0x0002b2d2 -
Device Boot Start End Blocks Id System -
/dev/sda1 * 2048 1026047 512000 83 Linux -
/dev/sda2 1026048 41943039 20458496 8e Linux LVM -
Disk /dev/sdb: 4294 MB, 4294967296 bytes, 8388608 sectors -
Units = sectors of 1 * 512 = 512 bytes -
Sector size (logical/physical): 512 bytes / 512 bytes -
I/O size (minimum/optimal): 512 bytes / 512 bytes -
Disk label type: dos -
Disk identifier: 0xf286ed4d -
Device Boot Start End Blocks Id System -
/dev/sdb1 2048 2099199 1048576 83 Linux -
/dev/sdb2 2099200 8388607 3144704 5 Extended -
/dev/sdb5 2101248 6295551 2097152 83 Linux -
/dev/sdb6 6297600 8388607 1045504 83 Linux
当然我们也可以使用GPT进行分区。
使用GPT进行分区不能使用fdisk命令,这个命令只能用来进行MBR分区,要进行GPT分区需要使用parted命令。
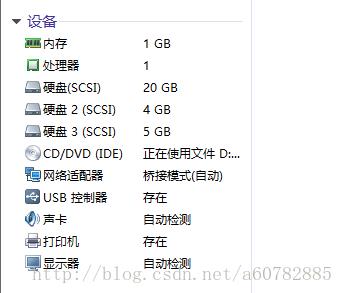
首先也是增加一个新的硬盘:增加了一个5G的硬盘。

使用parted命令:
-
[root@localhost ~]# parted -
GNU Parted 3.1 -
Using /dev/sda -
Welcome to GNU Parted! Type 'help' to view a list of commands. -
(parted)
默认使用第一块硬盘,看到上面有Using /dev/sda。
所以我们需要切换成第三块硬盘。
-
(parted) select /dev/sdc -
Using /dev/sdc
并且parted默认使用MBR进行分区,所以我们需要修改模式。也就是说,parted也可以进行MBR分区。
(parted) mklabel gpt选择了模式之后就可以进行分区了。这里会遇到4K对齐的问题,所以我们就简单的从1M开始。4K对齐计算
-
(parted) mkpart -
Partition name? []? -
File system type? [ext2]? -
Start? 1M -
End? 2000M
用这种方式分配所有的分区即可。
-
(parted) print -
Model: VMware, VMware Virtual S (scsi) -
Disk /dev/sdc: 5369MB -
Sector size (logical/physical): 512B/512B -
Partition Table: gpt -
Disk Flags: -
Number Start End Size File system Name Flags -
1 1049kB 2000MB 1999MB -
2 2000MB 2500MB 500MB -
3 2500MB 3000MB 500MB -
4 3000MB 4000MB 1000MB -
5 4000MB 5000MB 999MB
最后结果。可以看到。我们可以轻松的分配4个以上的分区。而不需要分配扩展分区。
最后直接quit就可以退出并保存了。
-
Disk /dev/sdc: 5368 MB, 5368709120 bytes, 10485760 sectors -
Units = sectors of 1 * 512 = 512 bytes -
Sector size (logical/physical): 512 bytes / 512 bytes -
I/O size (minimum/optimal): 512 bytes / 512 bytes -
Disk label type: gpt -
# Start End Size Type Name -
1 2048 3905535 1.9G Microsoft basic -
2 3905536 4882431 477M Microsoft basic -
3 4882432 5859327 477M Microsoft basic -
4 5859328 7813119 954M Microsoft basic -
5 7813120 9764863 953M Microsoft basic
分区我们做完了。那么如何进行格式化呢?使用mkfs
-
[root@localhost ~]# mkfs -t ext4 /dev/sdc1 -
mke2fs 1.42.9 (28-Dec-2013) -
Filesystem label= -
OS type: Linux -
Block size=4096 (log=2) -
Fragment size=4096 (log=2) -
Stride=0 blocks, Stripe width=0 blocks -
122160 inodes, 487936 blocks -
24396 blocks (5.00%) reserved for the super user -
First data block=0 -
Maximum filesystem blocks=501219328 -
15 block groups -
32768 blocks per group, 32768 fragments per group -
8144 inodes per group -
Superblock backups stored on blocks: -
32768, 98304, 163840, 229376, 294912 -
Allocating group tables: done -
Writing inode tables: done -
Creating journal (8192 blocks): done -
Writing superblocks and filesystem accounting information: done
然后进入parted查看:
-
Using /dev/sdc -
(parted) p -
Model: VMware, VMware Virtual S (scsi) -
Disk /dev/sdc: 5369MB -
Sector size (logical/physical): 512B/512B -
Partition Table: gpt -
Disk Flags: -
Number Start End Size File system Name Flags -
1 1049kB 2000MB 1999MB ext4 -
2 2000MB 2500MB 500MB -
3 2500MB 3000MB 500MB -
4 3000MB 4000MB 1000MB -
5 4000MB 5000MB 999MB
分区好了之后,并进行格式化了之后,就需要挂载分区。
挂载分区使用mount命令即可:
-
[root@localhost ~]# mkdir /mnt/testDisk -
[root@localhost ~]# mount /dev/sdc1/ /mnt/testDisk/
挂载好了之后,使用df命令查看:
-
[root@localhost testDisk]# df -lh -
Filesystem Size Used Avail Use% Mounted on -
/dev/mapper/centos-root 18G 1.1G 17G 6% / -
devtmpfs 479M 0 479M 0% /dev -
tmpfs 489M 0 489M 0% /dev/shm -
tmpfs 489M 6.8M 483M 2% /run -
tmpfs 489M 0 489M 0% /sys/fs/cgroup -
/dev/sda1 497M 126M 371M 26% /boot -
tmpfs 98M 0 98M 0% /run/user/0 -
/dev/sdc1 1.9G 5.7M 1.7G 1% /mnt/testDisk
确实挂载好了。
但是使用mount只是临时挂载,如果需要永久挂载,需要对/etc/fstab进行配置。
以上是普通分区,如果需要添加swap分区,在parted地方,需要修改某个分区的16进制编码。
使用mkswap即可修改。
mkswap /dev/sdc2最后使用swapon打开即可。
也可以使用swapoff关闭。
以上是关于Linux磁盘管理的主要内容,如果未能解决你的问题,请参考以下文章