React Native 之 TabBarIOS
Posted 黑森林工作室
tags:
篇首语:本文由小常识网(cha138.com)小编为大家整理,主要介绍了React Native 之 TabBarIOS相关的知识,希望对你有一定的参考价值。
前言
学习本系列内容需要具备一定 html 开发基础,没有基础的朋友可以先转至 HTML快速入门(一) 学习
本人接触 React Native 时间并不是特别长,所以对其中的内容和性质了解可能会有所偏差,在学习中如果有错会及时修改内容,也欢迎万能的朋友们批评指出,谢谢
文章第一版出自简书,如果出现图片或页面显示问题,烦请转至 简书 查看 也希望喜欢的朋友可以点赞,谢谢
TabBarios 组件简介
- 目前的APP内,大部分都是选项与选项之间切换,比如:微信、微博、QQ空间…,在iOS中,我们可以通过TabItem类进行实现,那么,在React Native中,我们可以通过TabBarIOS和TabBarIOS.Item组件来实现选项卡切换效果,大家可以看到后面带有IOS,所以这个组件不支持android,当然后面我们会通过自定义该组件来满足实际开发需求
- 当然,本章涉及到了
TabBarIOS组件,那么必不可少的,肯定需要与TabBarIOS.Item来搭配使用,废话不多说,先来看它们各自都拥有哪些属性
TabBarIOS 常见属性
继承了View的所有属性
barTintColor:标签栏的背景颜色
tintColor:当前被选中的标签图标颜色
translucent:bool值,决定标签栏是否需要半透明化
TabBarIOS.Item 常见属性
继承了View的所有属性
badge:图标右上角显示的红色角标
icon:给当前标签指定一个自定义图标(如果定义了
systemIcon属性这个属性会被忽略)onPress:点此标签被选中时调用,你应该修改过组件的状态使 selected=true
selected:这个属性决定了子视图是否可见,如果你看到一个空白的页面,很可能是没有选中任何一个标签
selectedIcon:当标签被选中的时候显示的自定义图标(如果定义了systemIcon属性,这个属性会被忽略,如果定义了icon而没定义这个属性,在选中的时候图标会被染上蓝色)
systemIcom:一些预定义的系统图标(如果使用了此属性,标题和自定义图标都会被覆盖为系统定义的值)
- 默认值:’bookmarks’, ‘contacts’, ‘downloads’, ‘favorites’, ‘featured’, ‘history’, ‘more’, ‘most-recent’, ‘most-viewed’, ‘recents’, ‘search’, ‘top-rated’
title:在图标下面显示的标题文字(如果定义了
systemIcon属性,这个属性会被忽略)
TabBarIOS 初体验
先简单来看下怎么使用TabBarIOS
- 首先我们需要引入TabBarIOS
import TabBarIOS from 'react-native';- 使用
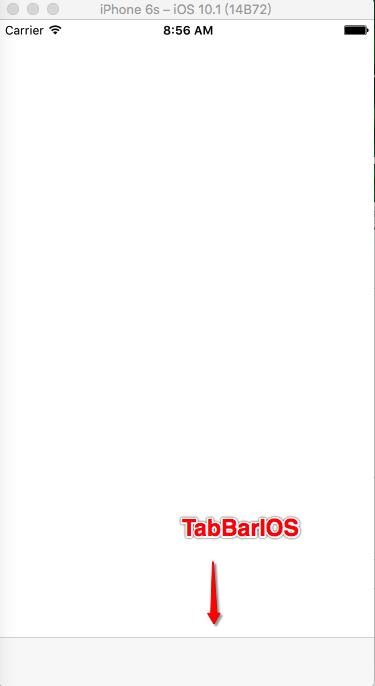
TabBarIOS很简单,但是需要配合TabBarIOS.Item使用,(需要注意的是我们必须给TabBarIOS设置尺寸,不然可能会造成实例化却无法看到的问题)
    render()
        return (
            <View style=styles.container>
                <TabBarIOS
                    style=height:49, width: width
                >
                </TabBarIOS>
            </View>
        );
效果:
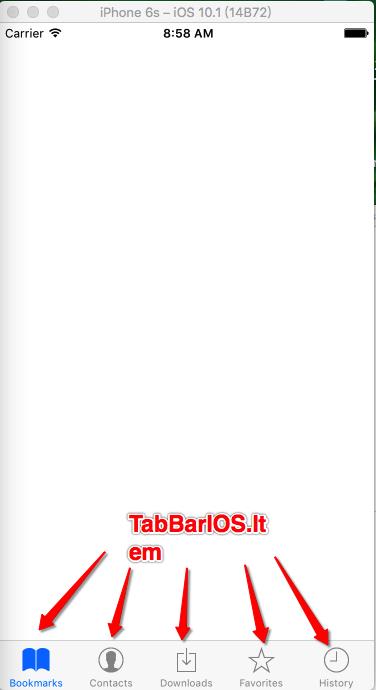
- 接着我们来给它添加
Item(TabBarIOS最多只能包含5个Item,超出的部分会用more图标代替)
    render()
        return (
            <View style=styles.container>
                <TabBarIOS
                    style=height:49, width: width
                >
                    <TabBarIOS.Item
                        systemIcon="bookmarks"  // 系统图标(bookmarks)
                    >
                    </TabBarIOS.Item>
                    <TabBarIOS.Item
                        systemIcon="contacts"  // 系统图标(contacts)
                    >
                    </TabBarIOS.Item>
                    <TabBarIOS.Item
                        systemIcon="downloads"  // 系统图标(downloads)
                    >
                    </TabBarIOS.Item>
                    <TabBarIOS.Item
                        systemIcon="favorites"  // 系统图标(favorites)
                    >
                    </TabBarIOS.Item>
                    <TabBarIOS.Item
                        systemIcon="history"  // 系统图标(history)
                    >
                    </TabBarIOS.Item>
                </TabBarIOS>
            </View>
        );
效果:
- 首先我们需要引入TabBarIOS
是不是很简单,接下来我们试着修改一下 TabBarIOS 的属性,看看效果怎样样
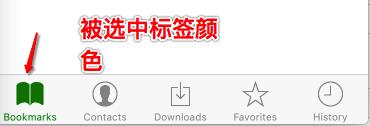
- 当前被选中标签颜色
    <TabBarIOS
        style=height:49, width: width
        tintColor="green"   // 被选中标签颜色
    >
    </TabBarIOS>
效果:
- 背景色
    <TabBarIOS
        style=height:49, width: width
        tintColor="green"
        barTintColor="black"    // TabBarIOS背景色
    >
    </TabBarIOS>
效果:
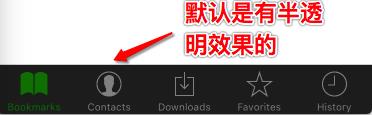
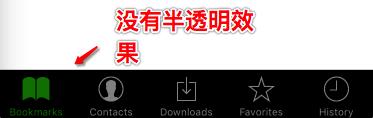
- 是否有半透明效果
    <TabBarIOS
        style=height:49, width: width
        tintColor="green"
        barTintColor="black"
        translucent=false     // TabBarIOS不需要半透明效果
    >
    </TabBarIOS>
效果:
- 当前被选中标签颜色
这边再来试试 TabBarIOS.Item 的属性
系统自带图标
- bookmarks
    <TabBarIOS.Item
        systemIcon="bookmarks"  // 系统图标(bookmarks)
    >
    </TabBarIOS.Item>
效果:

- contacts
    <TabBarIOS.Item
        systemIcon="contacts"  // 系统图标(contacts)
    >
    </TabBarIOS.Item>
效果:

- downloads
    <TabBarIOS.Item
        systemIcon="downloads"  // 系统图标(downloads)
    >
    </TabBarIOS.Item>
效果:

- favorites
    <TabBarIOS.Item
        systemIcon="favorites"  // 系统图标(favorites)
    >
    </TabBarIOS.Item>
效果:

- featured
    <TabBarIOS.Item
        systemIcon="featured"  // 系统图标(featured)
    >
    </TabBarIOS.Item>
效果:

- history
    <TabBarIOS.Item
        systemIcon="history"  // 系统图标(history)
    >
    </TabBarIOS.Item>
效果:

- more
    <TabBarIOS.Item
        systemIcon="more"  // 系统图标(more)
    >
    </TabBarIOS.Item>
效果:

- most-recent
    <TabBarIOS.Item
        systemIcon="most-recent"  // 系统图标(most-recent)
    >
    </TabBarIOS.Item>
效果:

- most-viewed
    <TabBarIOS.Item
        systemIcon="most-viewed"  // 系统图标(most-viewed)
    >
    </TabBarIOS.Item>
效果:

- recents
    <TabBarIOS.Item
        systemIcon="recents"  // 系统图标(recents)
    >
    </TabBarIOS.Item>
效果:

- search
    <TabBarIOS.Item
        systemIcon="search"  // 系统图标(search)
    >
    </TabBarIOS.Item>
效果:

- top-rated
    <TabBarIOS.Item
        systemIcon="top-rated"  // 系统图标(top-rated)
    >
    </TabBarIOS.Item>
效果:

- bookmarks
角标(角标的位置会受到TabBarIOS右边空间音效,当位置不够时,会自动往左移动,以保证显示完整性)
    <TabBarIOS
        style=height:49, width: width
        tintColor="green"
        barTintColor="black"
        translucent=false
    >
        <TabBarIOS.Item
            systemIcon="bookmarks"  // 系统图标(bookmarks)
            badge="99999999"
        >
        </TabBarIOS.Item>
        <TabBarIOS.Item
            systemIcon="contacts"  // 系统图标(contacts)
            badge="15"
        >
        </TabBarIOS.Item>
        <TabBarIOS.Item
            systemIcon="downloads"  // 系统图标(downloads)
            badge="@$!@"
        >
        </TabBarIOS.Item>
        <TabBarIOS.Item
            systemIcon="favorites"  // 系统图标(favorites)
            badge="aBBc"
        >
        </TabBarIOS.Item>
        <TabBarIOS.Item
            systemIcon="history"  // 系统图标(history)
            badge="99+"
        >
        </TabBarIOS.Item>
    </TabBarIOS>
效果:

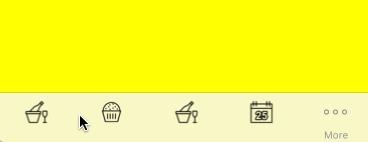
- 自定义图标(目前只支持本地图片)
    <TabBarIOS.Item
        renderAsOriginal=true // 如果为false,只会显示纯色图片
        icon=require('image!home')
    >
    </TabBarIOS.Item>
效果:

- 自定义高亮图标(目前只支持本地图片,如果没有设置,则会显示选中颜色图标)
selectedIcon=require('image!baker')效果:
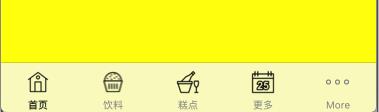
- 文字(如果设置了系统图标,那么这个属性会被忽略)
title="首页"效果:
TabBarIOS.Item点击
到这里肯定有人会说,为什么我的
TabBarIOS.Item不能接收点击事件,无法切换界面,这边就来讲解怎么去实现页面的切换,它涉及到 TabBarIOS.Item 的两个属性 ——selected和onPress- 首先,要实现页面之间的切换,那么首先它们自己要有对应的页面,这边先来给各个 Item 设置属于自己的页面
    render()
      return (
        <View style=styles.container>
            <TabBarIOS
                style=height:49, width: width
                tintColor="green"
                barTintColor="black"
                translucent=false
            >
                <TabBarIOS.Item
                    systemIcon="bookmarks"  // 系统图标(bookmarks)
                >
                    <View style=[styles.childViewStyle, backgroundColor:'yellow']>

                    </View>
                </TabBarIOS.Item>
                <TabBarIOS.Item
                    systemIcon="contacts"  // 系统图标(contacts)
                >
                    <View style=[styles.childViewStyle, backgroundColor:'blue']>

                    </View>
                </TabBarIOS.Item>
                <TabBarIOS.Item
                    systemIcon="downloads"  // 系统图标(downloads)
                >
                    <View style=[styles.childViewStyle, backgroundColor:'red']>

                    </View>
                </TabBarIOS.Item>
                <TabBarIOS.Item
                    systemIcon="favorites"  // 系统图标(favorites)
                >
                    <View style=[styles.childViewStyle, backgroundColor:'green']>

                    </View>
                </TabBarIOS.Item>
                <TabBarIOS.Item
                    systemIcon="history"  // 系统图标(history)
                >
                    <View style=[styles.childViewStyle, backgroundColor:'gray']>

                    </View>
                </TabBarIOS.Item>
            </TabBarIOS>
        </View>
    );
页面之间的切换其实就是根据
selected是否为 ture,以此决定是否重新渲染界面,涉及到重新渲染,所以肯定需要使用到getInitialState(状态机),具体操作如下- 首先我们定义一个初始化变量来确定要显示的页面
    getInitialState()
        return
            selectedTabItem:0   // 预设变量,记录当前点击的item

    ,
当我们点击相应标签的时候,系统就会调用
onPress属性来进行反馈- 首先点击onPress的时候我们需要更新 状态机 中预设变量的值
onPress=() => this.setState(selectedTabItem:0)- 接着我们要根据
预设变量来判断跳转到哪个页面(当预设变量的值改变后,状态机会再次调用render函数进行渲染,也就会调用 TabBarIOS.Item 内的 selected 属性)
selected=this.state.selectedTabItem == 0- 视图部分完整代码
    var TabBarIOSDemo = React.createClass(

        getInitialState()
            return
                selectedTabItem:0

        ,

        render()
            return (
                <View style=styles.container>
                    <TabBarIOS
                        style=height:49, width: width
                        tintColor="green"
                        barTintColor="black"
                        translucent=false
                    >
                        <TabBarIOS.Item
                            systemIcon="bookmarks"  // 系统图标(bookmarks)
                            onPress=() => this.setState(selectedTabItem:0)
                            selected=this.state.selectedTabItem == 0
                        >
                            <View style=[styles.childViewStyle, backgroundColor:'yellow']>

                            </View>
                        </TabBarIOS.Item>
                        <TabBarIOS.Item
                            systemIcon="contacts"  // 系统图标(contacts)
                            onPress=() => this.setState(selectedTabItem:1)
                            selected=this.state.selectedTabItem == 1
                        >
                            <View style=[styles.childViewStyle, backgroundColor:'blue']>

                            </View>
                        </TabBarIOS.Item>
                        <TabBarIOS.Item
                            systemIcon="downloads"  // 系统图标(downloads)
                            onPress=() => this.setState(selectedTabItem:2)
                            selected=this.state.selectedTabItem == 2
                        >
                            <View style=[styles.childViewStyle, backgroundColor:'red']>

                            </View>
                        </TabBarIOS.Item>
                        <TabBarIOS.Item
                            systemIcon="favorites"  // 系统图标(favorites)
                            onPress=() => this.setState(selectedTabItem:3)
                            selected=this.state.selectedTabItem == 3
                        >
                            <View style=[styles.childViewStyle, backgroundColor:'green']>

                            </View>
                        </TabBarIOS.Item>
                        <TabBarIOS.Item
                            systemIcon="history"  // 系统图标(history)
                            onPress=() => this.setState(selectedTabItem:4)
                            selected=this.state.selectedTabItem == 4
                        >
                            <View style=[styles.childViewStyle, backgroundColor:'gray']>

                            </View>
                        </TabBarIOS.Item>
                    </TabBarIOS>
                </View>
            );

    );
效果:

- 首先点击onPress的时候我们需要更新 状态机 中预设变量的值
- 首先我们定义一个初始化变量来确定要显示的页面
- 首先,要实现页面之间的切换,那么首先它们自己要有对应的页面,这边先来给各个 Item 设置属于自己的页面
到这里,TabBarIOS页面切换就完成了,当然实际开发中我们会抽取代码,使代码看起来不会这么杂乱,这在后面会通过综合项目进行讲解
补充
上面出现这样的代码,可能很多初学者不知道什么意思,这边就补充说明一下,在JS中是允许多个样式通过数组的形式传递的,它会根据数组内容自动去解析需要的值,并根据优先级去选择优先选择使用哪个属性

以上是关于React Native 之 TabBarIOS的主要内容,如果未能解决你的问题,请参考以下文章