Spring注解之组件注册
Posted GaoYang-笔迹
tags:
篇首语:本文由小常识网(cha138.com)小编为大家整理,主要介绍了Spring注解之组件注册相关的知识,希望对你有一定的参考价值。
Spring注解之组件注册
一、环境搭建
注解的方式是通过配置类的方式来注入组件,注解注入要比XML注入的方式简单,注解注入也需要在前者的基础上,添加一个spring-context的包,也是实际开发中常用的方式。
准备所需Jar包

二、Spring注解之组件注册
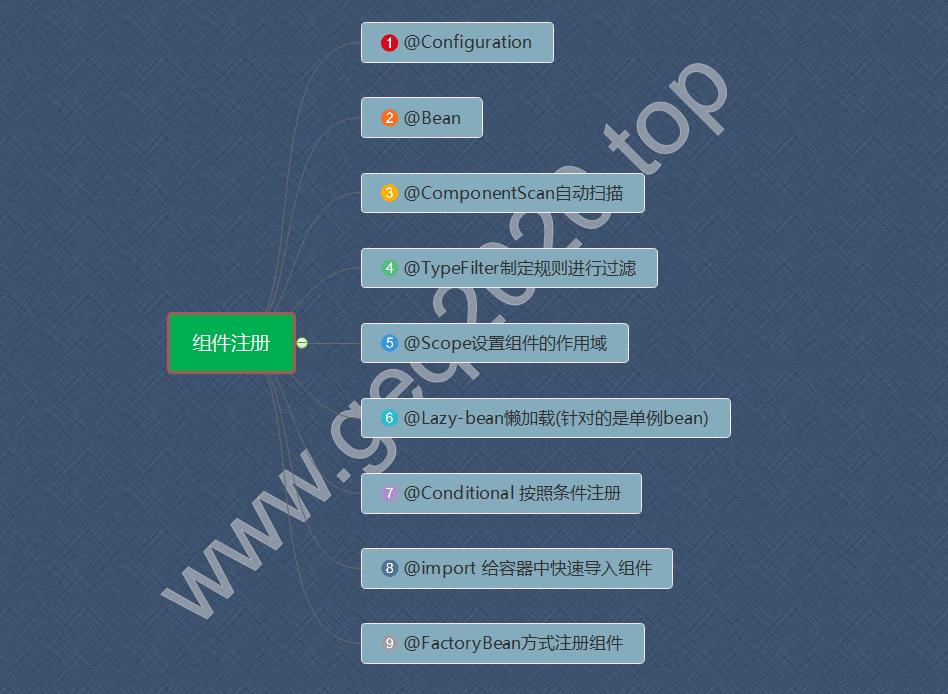
Spring提供了许多的注解配置,这样我们就可以通过注解的方式实现组件的注册,下图就是Spring中经常使用到的注解。
1、@ComponentScan和@Configurable
原先xml的方式
<?xml version="1.0" encoding="UTF-8"?>
<beans xmlns="http://www.springframework.org/schema/beans"
	xmlns:context="http://www.springframework.org/schema/context"
	xmlns:xsi="http://www.w3.org/2001/XMLSchema-instance"
	xsi:schemaLocation="http://www.springframework.org/schema/beans
        http://www.springframework.org/schema/beans/spring-beans.xsd
		http://www.springframework.org/schema/context
        http://www.springframework.org/schema/context/spring-context.xsd">
	<!-- 要扫描的包 -->
	<context:component-scan base-package="model"></context:component-scan>
</beans>
使用配置类
@Configurable来标注该类为Spring中的配置类,@ComponentScan(“model”)是为该配置类指定要去扫描的参数。
package config;
import org.springframework.beans.factory.annotation.Configurable;
import org.springframework.context.annotation.ComponentScan;
import model.Product;

/**
 * @Configurable: 该注解是标注该类是配置类
 * @ComponentScan:配置要扫描的包
 * @author GaoYang
 */
@Configurable
@ComponentScan("model")
public class MainConfig
2、@Component
使用该注解就可以将Java对象@Component注册到Ioc容器中,@Component注解要是给属性赋值要配合@Value注解为属性赋值。
/**
	@Componnt可以指定该对象的id,也可以不用指定
	默认id为该类的类名首字母小写
 */
@Component("students")
public class Student
	@Value("01")
	private int sid;
	@Value("侯宁宁")
	private String name;
	@Value("男")
	private String sex;
配置类
/**
 * @Configurable: 该注解是标注该类是配置类
 * @ComponentScan:配置要扫描的包
 * @author GaoYang
 */
@Configurable
@ComponentScan("model")
public class MainConfig
使用@Configuration注入
@Component("students")
public class Student
	@Value("01")
	private int sid;
	@Value("侯宁宁")
	private String name;
	@Value("男")
	private String sex;

	public Student()
		super();

	public Student(int sid, String name, String sex)
		super();
		this.sid = sid;
		this.name = name;
		this.sex = sex;

	public int getSid()
		return sid;

	public void setSid(int sid)
		this.sid = sid;

	public String getName()
		return name;

	public void setName(String name)
		this.name = name;

	public String getSex()
		return sex;

	public void setSex(String sex)
		this.sex = sex;

	@Override
	public String toString()
		return "Student [sid=" + sid + ", name=" + name + ", sex=" + sex + "]";
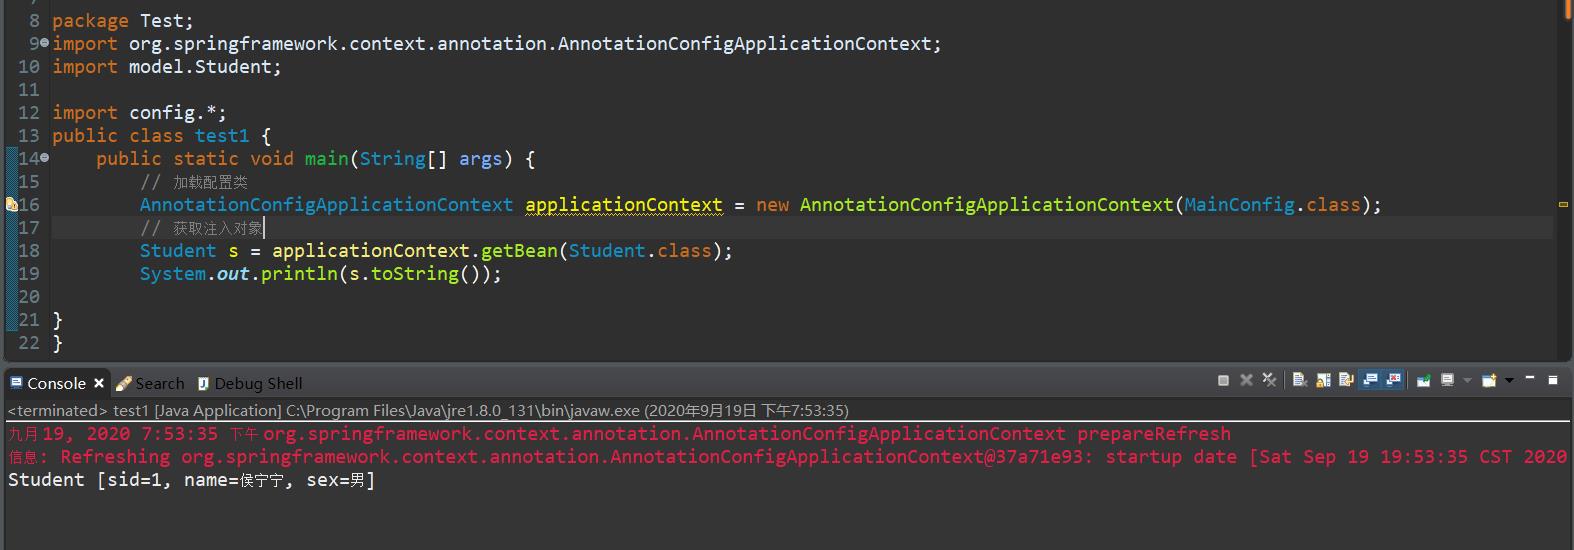
测试
3、@Bean
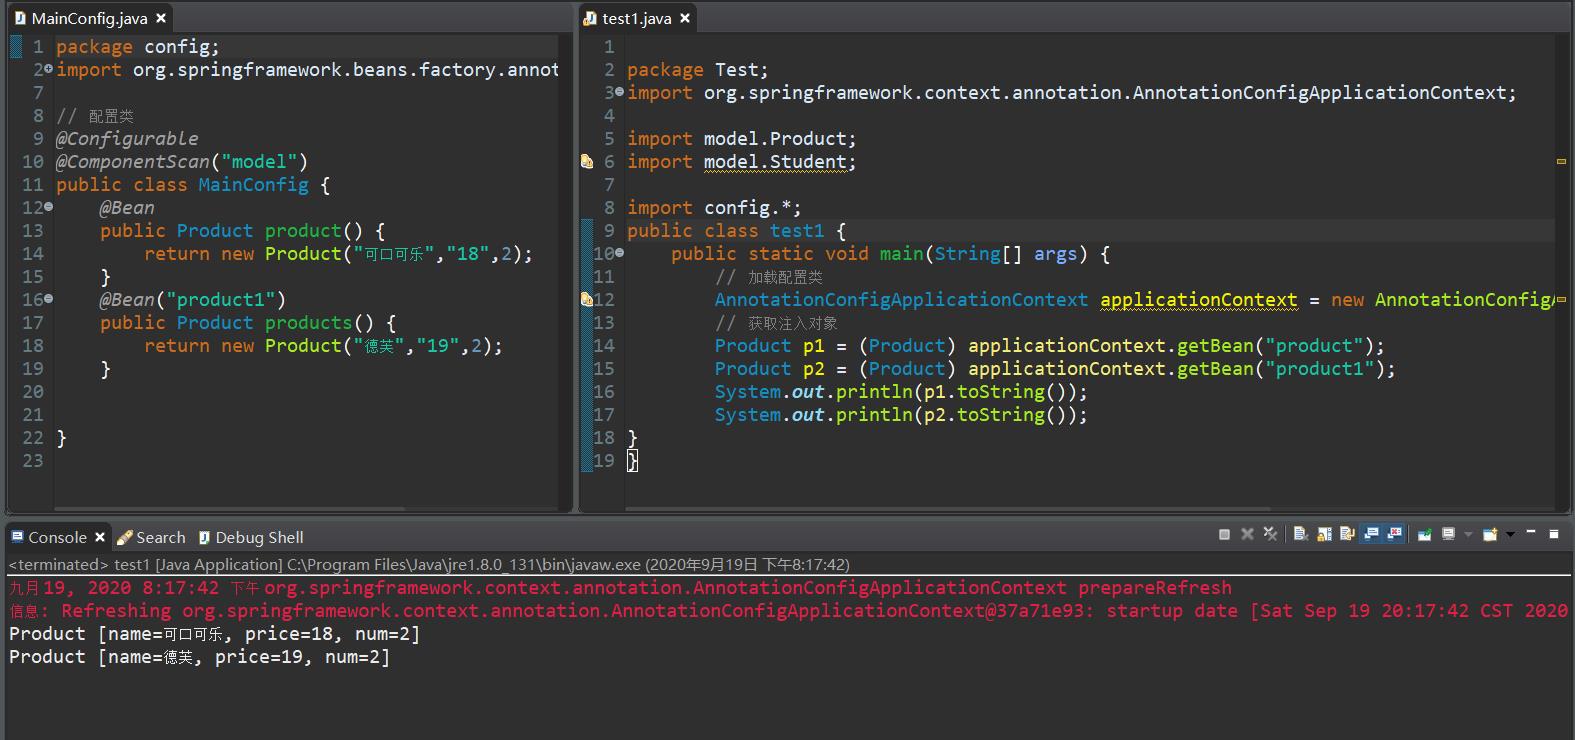
使用@Bean注解该可以在我们的spring注册类里标注,创建对象的方法,可以通过一个返回值为该对象的方法去创建该对象,并通过构造器为该对象的属性进行赋值。
// 配置类
@Configurable
@ComponentScan("model")
public class MainConfig
	// 默认id为方法名
	@Bean
	public Product product1()
		return new Product("张三","hashd",1);

	// 可以指定id
	@Bean("product2")
	public Product product2()
		return new Product("张三","hashd",1);
Java-Bean对象
public class Product
	private String name;
	private String price;
	private int num;
	public Product()
		super();

	public Product(String name, String price, int num)
		super();
		this.name = name;
		this.price = price;
		this.num = num;

	public String getName()
		return name;

	public void setName(String name)
		this.name = name;

	public String getPrice()
		return price;

	public void setPrice(String price)
		this.price = price;

	public int getNum()
		return num;

	public void setNum(int num)
		this.num = num;

	@Override
	public String toString()
		return "Product [name=" + name + ", price=" + price + ", num=" + num + "]";
测试
4、@TypeFilter
@TypeFilter注解
是通过设置条件来过滤一些资源,我们可以过滤一些资源不让它加载到ioc容器中。它的使用要在@ComponentScan这个注解中国去使用,通过excludeFilters参数传值,excludeFilters是一个数组,可以设定多个@TypeFilter。
@TypeFilter语法
@Configurable
@ComponentScan(value = "model",excludeFilters =
		// FilterType.ANNOTATION是通过注解的形式进行过滤
		@Filter(type = FilterType.ANNOTATION,classes = Controller.class),

		// FilterType.ASSIGNABLE_TYPE 是通过给定的类型
		@Filter(type = FilterType.ASSIGNABLE_TYPE,classes = Product.class),

		// FilterType.ASPECTJ 根据正则表达式
		@Filter(type = FilterType.ASPECTJ,classes = ""),

		// FilterType.CUSTOM 使用自定义规则
		@Filter(type = FilterType.CUSTOM,classes = TypeFilterImp.class)

)
public class MainConfig
	// @Bean == <bean></bean>
@FilterType.CUSTOM自定义规则
使用自定义规则,我们必须给它创建一个制定规则的类,这个类要去实现TypeFilter这个接口,并实现match这个方法,过滤器就会根据match方法的返回值加载,如果去ture就去过滤不满足条件的,如果为false则不会去加载!
/**
	 * MetadataReader: 读取到的当前正在扫描的信息
	 * MetadataReaderFactory:可以获取到其他任何类的信息
	 */
	@Override
	public boolean match(MetadataReader metadataReader, MetadataReaderFactory metadataReaderFactory) throws IOException
		// 获取当前类注解的信息
		AnnotationMetadata mr = metadataReader.getAnnotationMetadata();
		// 获取当前正在扫描的类的信息
		ClassMetadata classMetadata = metadataReader.getClassMetadata();
		// 获取当前类的资源信息
		Resource resource =  metadataReader.getResource();
		// 获取当前类的名字
		String className = classMetadata.getClassName();
		System.out.println("----"+className);
		// contains包含“er”
		if(className.contains("er"))
			return true;

		return false;
5、@Scope
Spring创建对象默认是单例的,使用@Scope来描述也就是scope=“singleton”,另外scope还有prototype、request、session、global session作用域。
各作用域的的作用
- singleton单例模式,全局有且仅有一个实例。(默认值)
- prototype原型模式,每次获取Bean的时候会有一个新的实例。
- request表示该针对每一次HTTP请求都会产生一个新的bean,同时该bean仅在当前HTTP request内有效,配置实例:
request、session、global session使用的时候首先要在初始化web的web.xml中做如下配置:
如果你使用的是Servlet 2.4及以上的web容器,那么你仅需要在web应用的XML声明文件web.xml中增加下述ContextListener即可:<web-app> ... <listener> <listener-class>org.springframework.web.context.request.RequestContextListener</listener-class> </listener> ... </web-app>
- session作用域表示该针对每一次HTTP请求都会产生一个新的bean,同时该bean仅在当前HTTP session内有效
- global session作用域类似于标准的HTTP Session作用域,不过它仅仅在基于portlet的web应用中才有意义。Portlet规范定义了全局Session的概念,它被所有构成某个 portlet web应用的各种不同的portlet所共享。在global session作用域中定义的bean被限定于全局portlet Session的生命周期范围内。如果你在web中使用global session作用域来标识bean,那么web会自动当成session类型来使用。
案例演示
singleton
@Configurable
@ComponentScan("model")
public class MainConfig
   /**
    * @Scope
    * prototype: 多实例的  @Scope("prototype")
    * singleton: 单实例的  @Scope("person")
    * request: 一次请求创建一个实例
    * session: 同一个session创建一个实例
    * @return
    */
   @Scope("singleton")
   @Bean
   public Product product()
   	System.out.println("该实例已被创建");
   	return new Product("张三","hashd",1);
测试代码
public class text
	public static void main(String[] args)
		AnnotationConfigApplicationContext applicationContext = new AnnotationConfigApplicationContext(MainConfig.class);
		System.out.println("Ioc容器已创建完成!");
		Product bean1 = applicationContext.getBean(Product.class);
		Product bean2 = applicationContext.getBean(Product.class);
		System.out.println(bean1== bean2);
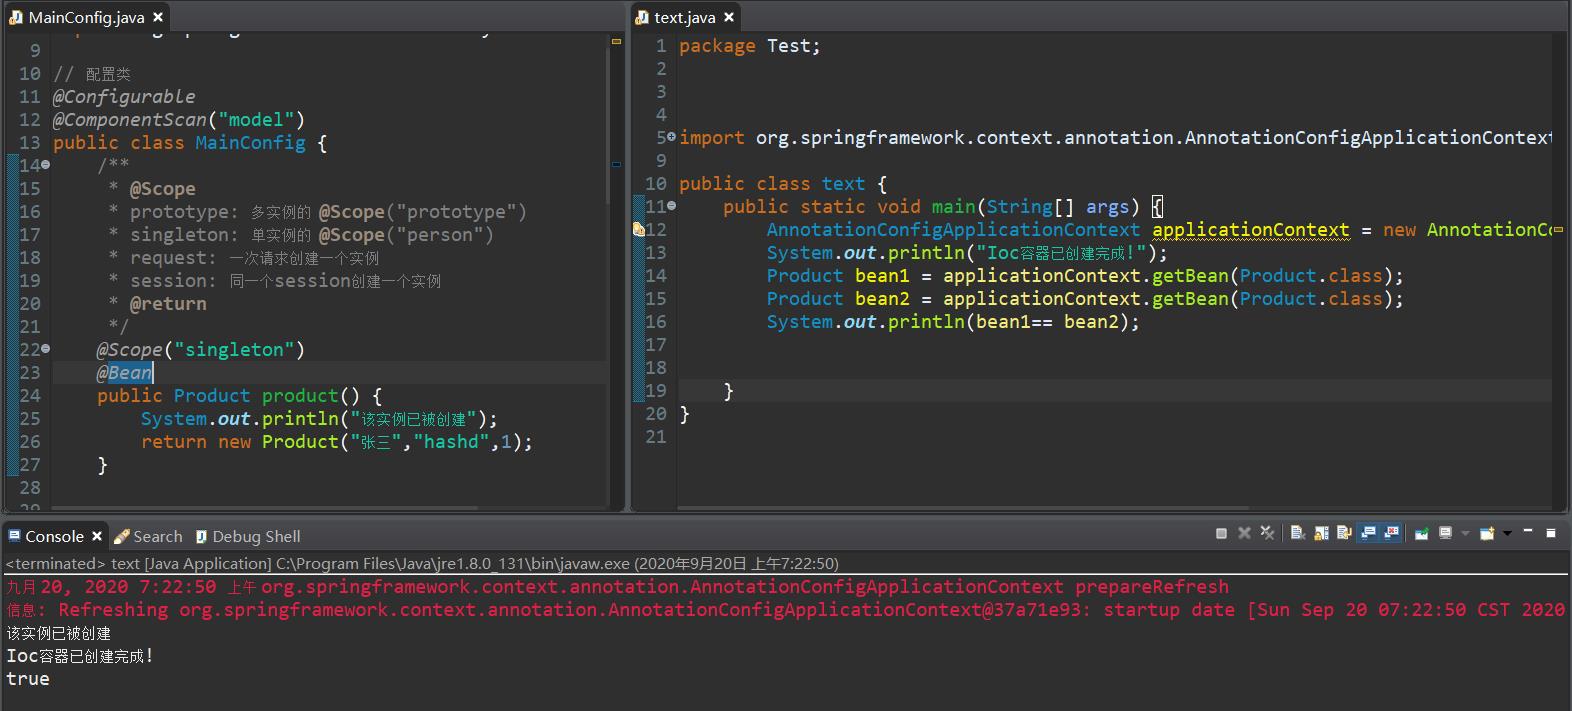
从下图可以看到,bean1 == bean2
6、Layz-bean
@Layz赖加载主要是针对的是单例模式下,单例模式下ioc容器初始化时,就将bean对象注入到了容器中,@Layz注解可以让容器创建时不去注册容器,而是等到第一次调用时才去注册bean对象。此时,创建的对象依然是单例模式!
使用语法
// 配置类
@Configurable
@ComponentScan("model")
public class MainConfig
	/**
	 * 懒加载:
	 * 		针对的是单实例的bean,默认在容器启动的时候创建对象
	 * 		赖加载:容器启动时不创建对象,当第一次被调用时被创建
	 *
	 */
	@Lazy
	@Bean
	public Product product()
		System.out.println("该实例已被创建");
		return new Product("张三","hashd",1);
测试
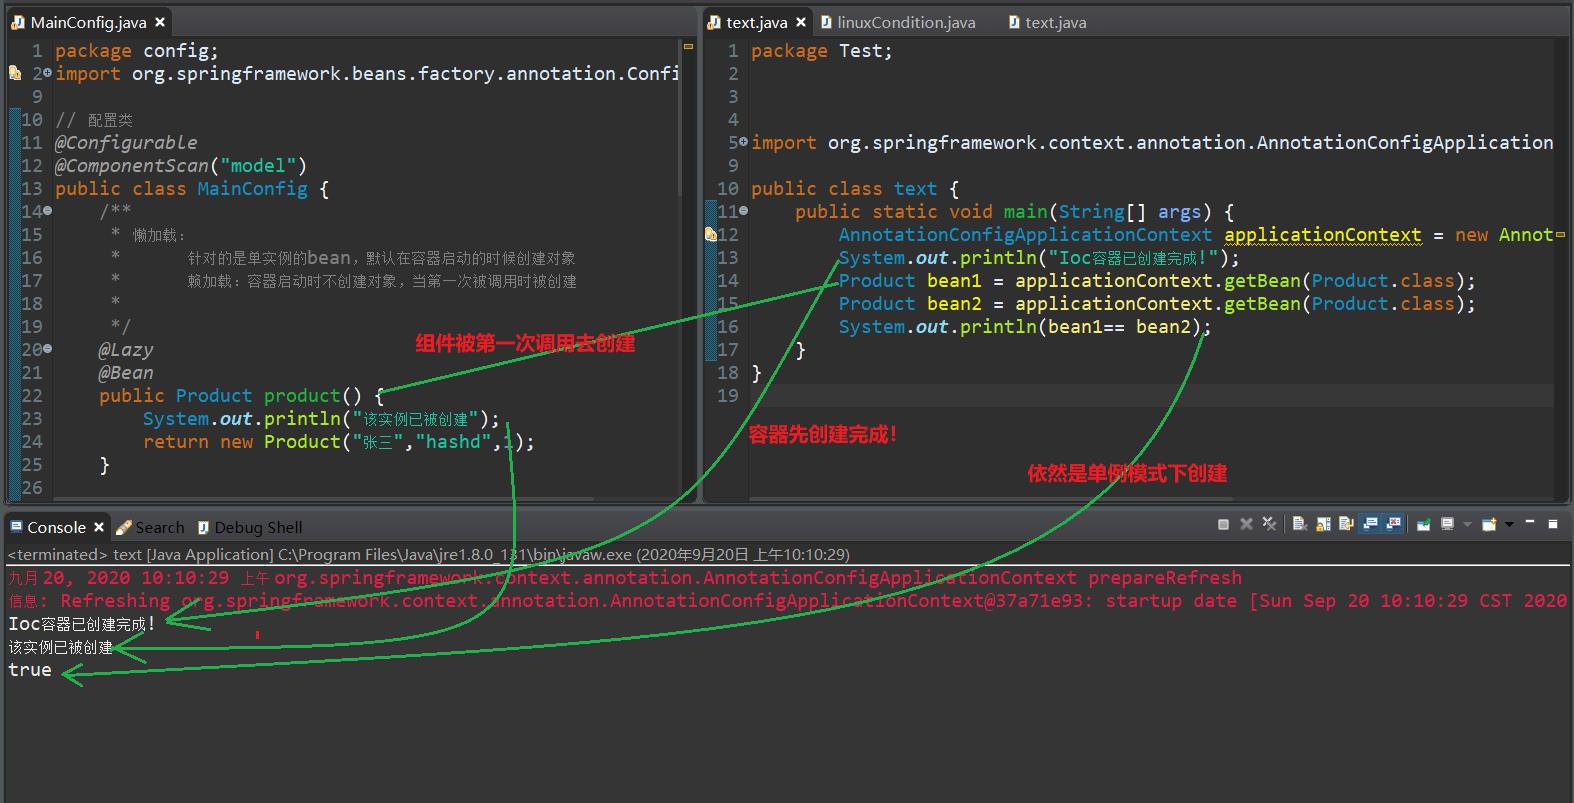
7、@Conditional
@Conditional注解是根据制定条件来进行注册,需要我创建配置条件的配置类,如果条件满足就进行注册,不满足就不去注册。
语法
配置类
@Configurable
public class MainConfig

	@Conditional(winCondition.class)
	@Bean("wind")
	public Product wind()
		System.out.println("该实例已被创建");
		return new Product("张三","wind",1);
条件类必须去实现Condition接口,并添加为实现的方法!
public class winCondition implements Condition

	@Override
	public boolean matches(ConditionContext context, AnnotatedTypeMetadata arg1)
		Environment environment = context.getEnvironment();
		// 获取当前操作系统的名字
		String property = environment.getProperty("os.name");
		if(property.contains("Windows"))
			return true;

		return false;
案例
需求根据当前操作系统去注册组件。
// 配置类
@Configurable
@Import(Hero.class)
public class MainConfig
	// Windows系统
	@Conditional(winCondition.class)
	@Bean("wind")
	public Product wind()
		System.out.println("该实例已被创建");
		return new Product("张三","wind",1);

	// Linux系统
	@Conditional(linuxCondition.class)
	@Bean("linux")
	public Product linux()
		return new Product("李四","linux",2);
条件配置类
public class winCondition implements Condition
	// Windows系统,返回true
	@Override
	public boolean matches(ConditionContext context, AnnotatedTypeMetadata arg1)
		Environment environment = context.getEnvironment();
		String property = environment.getProperty("os.name");
		if(property.contains("Windows"))
			return true;

		return false;
public class linuxCondition implements Condition
	/**
	 * ConditionContext: 判断条件能使用上下文环境
	 * AnnotatedTypeMetadata: 注释信息
	 */

	@Override
	public boolean matches(ConditionContext context, AnnotatedTypeMetadata metadata)
		// 是否Linux系统
		// 1、能获取到ioc使用的bean工厂
		ConfigurableListableBeanFactory beanFactory = context.getBeanFactory();
		// 2、获取类加载器
		ClassLoader clLoader = context.getClassLoader();
		// 3、获取当前环境信息
		  Environment environment = context.getEnvironment();
		  String property = environment.getProperty("os.name");

		// 5、bean注册类
		  BeanDefinitionRegistry registry = context.getRegistry();
		  if(property.contains("Linux"))
			  return true;


		return false;
测试…
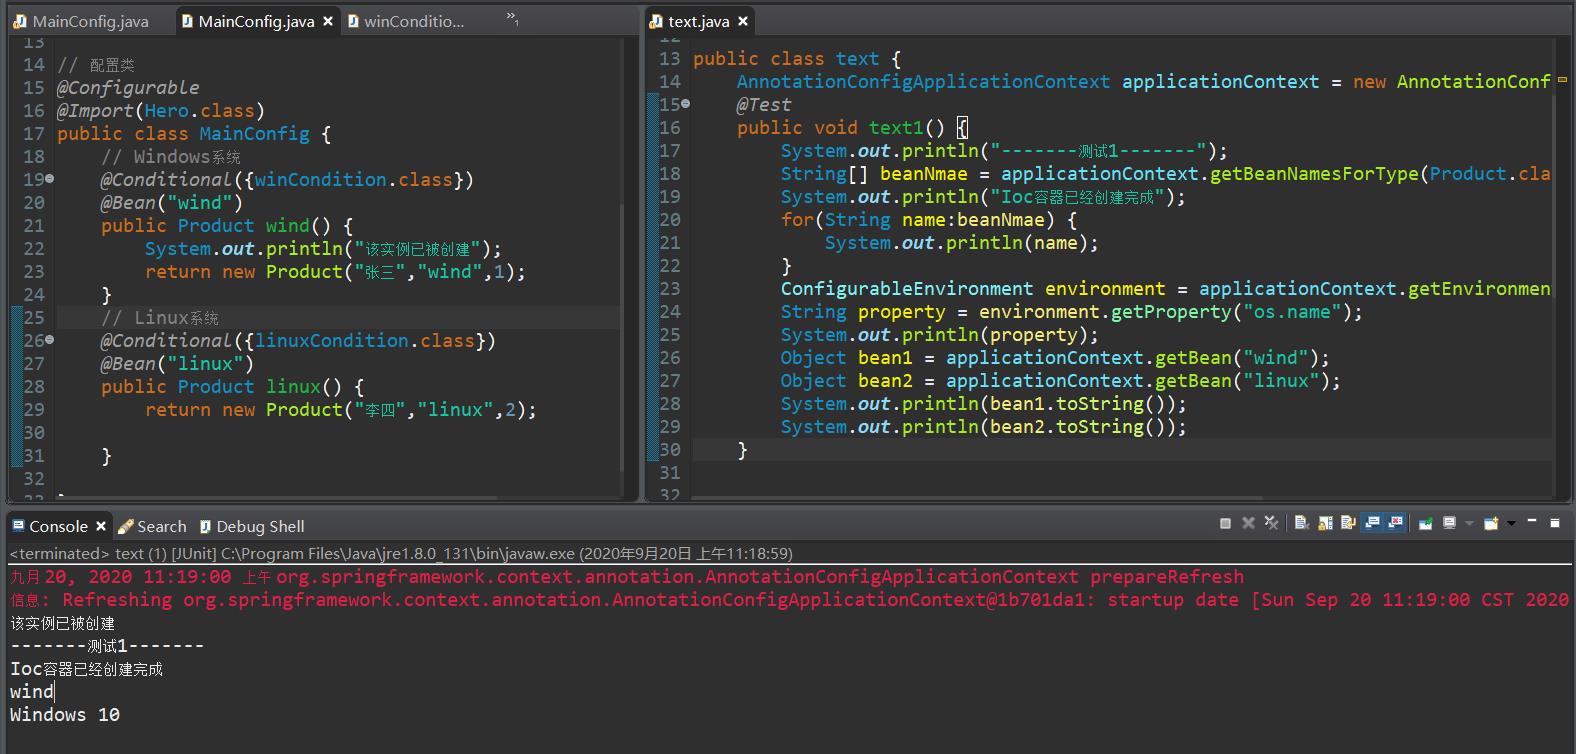
8、@import
- @Import只能用在类上 ,@Import通过快速导入的方式实现把实例加入spring的IOC容器中
- 加入IOC容器的方式有很多种,@Import注解就相对很牛皮了,@Import注解可以用于导入第三方包 ,当然@Bean注解也可以,但是@Import注解快速导入的方式更加便捷
- @Import注解有三种用法
8.1 第一种用法:直接填class数组
直接填对应的class数组,class数组可以有0到多个。对应的import的bean都将加入到spring容器中,这些在容器中bean名称是该类的全类名 ,比如com.yc.类名
@Import( 类名.class , 类名.class... )
public class TestDemo
8.2 第二种用法:ImportSelector方式【重点】
这种方式的前提就是一个类要实现ImportSelector接口,假如我要用这种方法,目标对象是Myclass这个类,分析具体如下:
创建Myclass类并实现ImportSelector接口
public class Myclass implements ImportSelector
//既然是接口肯定要实现这个接口的方法
    @Override
    public String[] selectImports(AnnotationMetadata annotationMetadata)
        return new String[0];


// 分析实现接口的selectImports方法中的:

// 1、返回值: 就是我们实际上要导入到容器中的组件全类名【重点 】
// 2、参数: AnnotationMetadata表示当前被@Import注解给标注的所有注解信息【不是重点】
// 需要注意的是selectImports方法可以返回空数组但是不能返回null,否则会报空指针异常!
以上分析完毕之后,具体用法步骤如下:
第一步:创建Myclass类并实现ImportSelector接口,这里用于演示就添加一个全类名给其返回值
public class Myclass implements ImportSelector
    @Override
    public String[] selectImports(AnnotationMetadata annotationMetadata)
        return new String[]"com.yc.Test.TestDemo3";
第二步:编写TestDemo 类,并标注上使用ImportSelector方式的Myclass类
@Import(TestDemo2.class,Myclass.class)
public class TestDemo
        @Bean
        public AccountDao2 accountDao2()
            return new AccountDao2();
第三步:编写打印容器中的组件测试类
**
 * 打印容器中的组件测试
 */
public class AnnotationTestDemo
    public static void main(String[] args)
        AnnotationConfigApplicationContext applicationContext=new AnnotationConfigApplicationContext(TestDemo.class);  //这里的参数代表要做操作的类

        String[] beanDefinitionNames = applicationContext.getBeanDefinitionNames();
        for (String name : beanDefinitionNames)
            System.out.println(name);
8.3 第三种用法:ImportBeanDefinitionRegistrar方式
同样是一个接口,类似于第二种ImportSelector用法,相似度80%,只不过这种用法比较自定义化注册,具体如下:
public class Myclass2 implements Spring Framework 组件注册 之 @Import