Spring框架介绍和IoC容器中Bean配置(Spring框架)
Posted Nothing_doit
tags:
篇首语:本文由小常识网(cha138.com)小编为大家整理,主要介绍了Spring框架介绍和IoC容器中Bean配置(Spring框架)相关的知识,希望对你有一定的参考价值。
Spring框架整理第一发,Spring框架介绍,HelloWorld,IoC容器介绍,Bean配置Spring概述 ①Spring为简化企业级开发而生,使用Spring,JavaBean就可以实现很多以前要靠EJB才能实现的功能。同样的功能,在EJB中要通过繁琐的配置和复杂的代码才能够实现,而在Spring中却非常的优雅和简洁。 ②Spring是一个开源的IoC(DI)和AOP容器框架。 ③Spring的优良特性 [1]非侵入式:基于Spring开发的应用中的对象可以不依赖于Spring的API [2]依赖注入:DI——Dependency Injection,反转控制(IoC)最经典的实现。 [3]面向切面编程:Aspect Oriented Programming——AOP [4]容器:Spring是一个容器,因为它包含并且管理应用对象的生命周期 [5]组件化:Spring实现了使用简单的组件配置组合成一个复杂的应用。在 Spring 中可以使用XML和Java注解组合这些对象。 [6]一站式:在IoC和AOP的基础上可以整合各种企业应用的开源框架和优秀的第三方类库(实际上Spring 自身也提供了表述层的SpringMVC和持久层的Spring JDBC)。

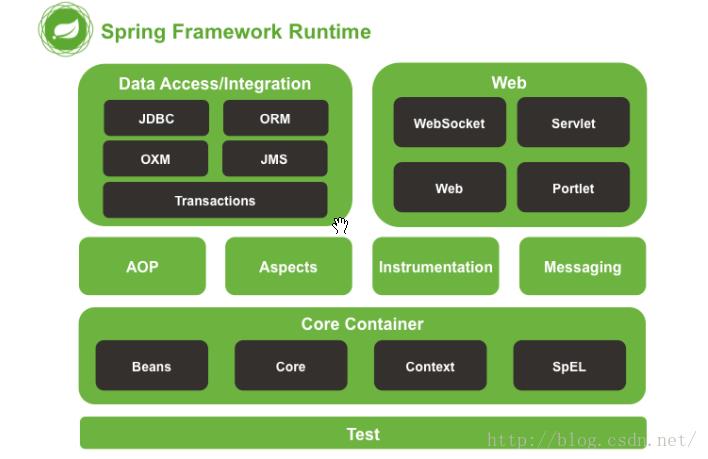
小结:Spring框架完全改变了我们以往获取对象的方式,项目中所有的对象都由Spring框架统一管理,我们在需要的时候只需要从容器中拿,不需要自己创建。同时Spring框架提供的声明式事务也给我们事务管理带来了极大的方便。同时从上图可以看出Spring框架是分模块的这样我们在使用的时候就可以自行组装。
Spring-HelloWorld
①导入核心包(CoreContainer)| spring-beans-4.0.0.RELEASE.jar spring-context-4.0.0.RELEASE.jar spring-core-4.0.0.RELEASE.jar spring-expression-4.0.0.RELEASE.jar 还有一个依赖的日志包 commons-logging-1.1.3.jar |
|
public
classBook
privateStringtitle;
privateStringauthor;
privatedoubleprice;
无参/有参构造器 get/set方法 |
③编写配置文件 applicationContext.xml(使用set方法注入),这个文件需要放到类路径下,方便测试。 <bean id="book" class="com.java.bean.Book"> <property name="title" value="明天会更好"></property> </bean> ④测试(使用Junit4测试) package com.java.bean;
import org.junit.Test; import org.springframework.context.ApplicationContext; import org.springframework.context.support.ClassPathXmlApplicationContext;
public class IOCTest
@Test public void test() //获取ioc容器 ApplicationContext ioc = new ClassPathXmlApplicationContext("applicationContext.xml"); //根据id获取到bean对象 Object bean = ioc.getBean("book"); System.out.println(bean);
HelloWorld分析: ①注意:要导入依赖包 commons-logging-1.1.3.jar 准备一个JavaBean类 ②配置文件的编写 <bean>标签 id任意设置,用于从容器中获取组件,一般为类名小写 class全类名 <property>子标签设置对象的属性(Spring框架会根据这个配置帮你创建对象) 它是使用set方法注入 ③测试 通过ClassPathXmlApplicationContext获取IoC容器对象,然后就可以根据设置的id名获取对应的bean
IoC容器和Bean配置
IoC和DI
①IoC(Inversion of Control):控制反转。 传统的资源获取方式:由开发人员手动创建资源,并管理资源。这种方式,当项目中的资源比较多的时候,创建,管理就会显得异常复杂。并且各种资源的创建方式不尽相同,开发人员学习各种创建资源的方式的成本也会大大增加。 控制反转,让这种主动创建资源的方式变成被动,所有的资源获取只需要被动的获取就行。开发人员在需要某资源的时候,只需要根据一定的规则从容器中获取即可。 Spring框架的IoC容器的设计就是基于这种模式,由IoC容器管理所有资源,资源创建,资源释放,全部由IoC容器管理,开发人员即用即取,而不用考虑其他事情。 ②DI(Dependency Injection):依赖注入。 IoC的另一种表述方式:即组件以一些预先定义好的方式(例如:setter 方法)接受来自于容器的资源注入。相对于IoC而言,这种表述更直接。 ③IoC容器在Spring中的实现 [1]在通过IoC容器读取Bean的实例之前,需要先将IoC容器本身实例化。 [2]Spring提供了IoC容器的两种实现方式 BeanFactory:IoC容器的基本实现,是Spring内部的基础设施,是面向Spring本身的,不是提供给开发人员使用的。 ApplicationContext:BeanFactory的子接口,提供了更多高级特性。面向Spring的使用者,几乎所有场合都使用ApplicationContext而不是底层的BeanFactory。 ④ApplicationContext的主要实现类 ClassPathXmlApplicationContext:对应类路径下的XML格式的配置文件(HelloWorld使用此方式获取IoC容器的实例) FileSystemXmlApplicationContext:对应文件系统中的XML格式的配置文件 在初始化时就创建单例的bean,也可以通过配置的方式指定创建的Bean是多实例的。(IoC容器默认单例) ⑤ConfigurableApplicationContext 是ApplicationContext的子接口,包含一些扩展方法 refresh()和close()让ApplicationContext具有启动、关闭和刷新上下文的能力。 ⑥WebApplicationContext 专门为WEB应用而准备的,它允许从相对于WEB根目录的路径中完成初始化工作Bean配置
IoC容器Bean配置3种方式: ①基于XML文件进行配置(在XML文件中使用bean标签进行配置) ②基于注解进行配置(利用在类和属性的相应位置加上注解完成配置) ③基于java进行配置(利用几个特殊的注解)(不常用)IoC容器的作用:控制反转(依赖注入),用于管理用户的所要使用组件和组件之间的关系。 使用ioc容器,ioc容器会依据你所配置的要求生成对象,根据要求装配对象之间的关系,ioc容器在初始化的时候,会自动根据要求创建对象并装配对象之间的关系,用户在需要的时候只需要在容器中取就行了。 依赖注入的方式主要有三种: ①接口注入 ②使用构造器注入 ③使用set方法注入 ②③比较常用
XML配置组件: 使用bean标签进行配置 ①使用set方法注入(设置要求创建的对象的属性)(这里的属性名是类的set方法后边的名字) <bean id="book01" class="com.atguigu.beans.Book"> <!-- 利用property标签给bean属性赋值 --> <property name="author" value="盐田七生"></property> <property name="title" value="罗马人的故事"></property> <property name="price" value="34.5"></property> </bean> 使用property给属性赋值也可以使用ref引用容器中的其他bean 当需要修改组件的属性时,也可以使用property标签 <property name="属性名" value="属性值"></property>
② 使用构造器注入,可以使用name/index精确定位每个参数进行赋值
| <constructor-arg name="参数名" value="参数值"></constructior-arg> |
不使用name/index,Spring框架底层算法会依次进行匹配,若不匹配,会报异常。 <bean id="book03" class="com.atguigu.beans.Book"> <constructor-arg value="平凡的世界"></constructor-arg> <constructor-arg value="10.9" ></constructor-arg> <constructor-arg value="路遥"></constructor-arg> </bean> 使用name对每个参数精确赋值 name指定参数名 <bean id="book04" class="com.atguigu.beans.Book"> <constructor-arg value="平凡的世界" name="title"></constructor-arg> <constructor-arg value="10.9" name="price" ></constructor-arg> <constructor-arg value="路遥" name="author"></constructor-arg> </bean> 使用index对每个参数进行赋值,index指定被赋值的参数索引 <bean id="book03" class="com.atguigu.beans.Book"> <constructor-arg value="10.9" index="1"></constructor-arg>
<constructor-arg value="平凡的世界" index="0"></constructor-arg> <constructor-arg value="路遥" index="2"></constructor-arg> </bean> 当调用参数个数相同但某些类型兼容的构造器时,可以使用type指定类型来调用 <!-- 使用type精确调用参数个数相同,但是某些类型兼容的构造器,自定义类型需要使用全类名,java.lang包下的不用写全类名 --> <bean id="book05" class="com.atguigu.beans.Book"> <constructor-arg value="平凡的世界" index="0"></constructor-arg> <constructor-arg value="12" index="1" type="double"></constructor-arg> <constructor-arg value="路遥" index="2"></constructor-arg> </bean>
IoC容器创建组件默认是单例的,可以使用scope指定其他模式
组件创建模式:

例:指定创建的方式是多实例的。 <bean id="book01" class="com.atguigu.beans.Book" scope="prototype"> <!-- 利用property标签给bean属性赋值 --> <property name="author" value="盐田七生"></property> <property name="title" value="罗马人的故事"></property> <property name="price" value="34.5"></property> </bean>
小结:在使用构造器注入的时候,若要精确调用,直接使用name属性指定参数名更为方便。
配置集合组件
使用list标签,map标签,props标签(配置properties集合组件)常用于配置数据库连接 集合中的值可以是内部bean,可以是基本数据类型,可以是一个引用List集合属性赋值 <!-- 给List集合属性赋值 --> <bean id="book07" class="com.atguigu.beans.Book"> <property name="title" value="追风筝的人"/> <property name="price" value="20"/> <property name="freeBook"> <bean p:title="免费书籍" class="com.atguigu.beans.Book"></bean> </property> <property name="list"> <!-- 给List集合属性赋值 --> <list> <!-- 可以是内部bean --> <bean p:title="内部Bean" class="com.atguigu.beans.Book"></bean> <!-- 可以是String字符串 --> <value>String字符串</value> <!-- 可以是一个引用 --> <ref bean="book01"/> </list> </property> </bean> map集合属性赋值 <!-- 给Map集合属性赋值 --> <bean id="book08" class="com.atguigu.beans.Book"> <property name="title" value="明朝那些事"></property> <property name="map"> <map> <entry key="免费书籍" value-ref="book01"></entry> <entry key="2"> <bean p:title="鹿鼎记(内部bean)" class="com.atguigu.beans.Book"></bean> </entry> <entry key="3" value="String字符串"></entry> </map> </property> </bean> properties集合属性赋值 <!-- 利用props标签,prop标签给Properties集合属性赋值 --> <bean id="book09" class="com.atguigu.beans.Book" p:title="鲁滨逊漂流记"> <property name="properties"> <props> <prop key="url">jdbc:mysql//localhost:8080/test</prop> <prop key="root">root</prop> <prop key="password">123456</prop> </props> </property> </bean> util名称空间的使用 <!-- 通过util命名空间创建一个通用的List --> <util:list id="list01"> <bean p:title="数据之巅" class="com.atguigu.beans.Book"></bean> <value>String字符串</value> <ref bean="book01"/> </util:list>
<!-- 通过util命名空间创建一个通用的map --> <util:map id="map01"> <entry key="i1" value="字符串"></entry> <entry key="i2" value-ref="book01"></entry> <entry key="i3"> <bean p:title="温州一家人" class="com.atguigu.beans.Book"></bean> </entry> </util:map>
<!-- 通过util命名空间创建一个通用properties --> <util:properties id="properties01"> <prop key="url">jdbc:mysql//127.0.0.1:8080/test</prop> <prop key="root">root</prop> <prop key="password">123456</prop> </util:properties>
<!-- 创建一个bean调用上边的通用的List,Map,Properties --> <bean id="book10" class="com.atguigu.beans.Book"> <property name="title" value="集合大杂烩"></property> <property name="map" ref="map01"></property> <property name="list" ref="list01"></property> <property name="properties" ref="properties01"></property> </bean>
使用其他方式配置IoC组件
| 使用p标签给组件的属性赋值(set方法注入) ①添加p命名空间(xmlns:p="http://www.springframework.org/schema/p") ②使用p标签进行赋值 |
<bean p:title="平凡的世界2" p:author="路遥" p:price="23" p:sales="100" id="book01" class="com.atguigu.beans.Book"/> <bean p:title="平凡的世界1" p:author="路遥" p:price="23" p:sales="100" p:freeBook-ref="book01" id="book02" class="com.atguigu.beans.Book"/>
获取bean组件
方式①:使用id获取 ApplicationContext ioc = new ClassPathXmlApplicationContext("ioc.xml"); @Test public void test5() Object bean = ioc.getBean("book05"); System.out.println(bean); 方式②:使用类型获取 /** * 通过类型获取bean,若ioc.xml中有同类型的多个bean会报no unique异常 * 这时只能通过id获取 * org.springframework.beans.factory.NoUniqueBeanDefinitionException: * No qualifying bean of type [com.atguigu.bean.Book] is defined: * expected single matching bean but found 2: book,book02 */ @Test public void test2() Book bean = ioc.getBean(Book.class); System.out.println(bean);
基于注解配置组件(最常用的方式)
| 1.给需要添加到IoC容器中的类加注解 2.导入aop包(spring-aop-4.0.0.RELEASE.jar) 3.配置自动扫描加了注解的类 |
示例: 使用注解配置的组件: ①默认id是类名首字母小写 ②注解的value属性可以设置新的id
@Repository public class BookDao
使用注解的value属性设置新的id @Repository(value="bd") public class BookDao @Service注解和@Autowired注解 @Service public class BookService @Autowired private BookDaobookDao; @Autowired注解:框架自动在IoC容器中查找对应的组件给属性赋值。默认是required=true,意思是必须装配上,若装配不上,报错。可以设置required=false设置此属性的装配不是必须的。
| 进行装配的时候尝试的方式: 1.类型 2.属性名作为id 3.@Qualifier 的value值 自动装配时这三种方式都会进行尝试 框架装配步骤: 利用@Autowired对BookDao进行装配 首先根据类型进行装配,找到就装配,找不到报错。 若同种类型找到多个,再按照属性名作为id找到指定的,找不到报错, 若根据id找不到,在看@Qualifier注解。 无论怎么找最后找到唯一的一个就返回,所有方式都尝试了,还没有找到就报错 注意:@Qualifier注解要加到属性名上,或者set方法处(@Autowired与这个注解要如影随行) |
@Controller @Controller public class BookServlet @Autowired private BookService bookService;
在配置文件中配置自动扫描加了注解的类
配置时常用的标签和属性介绍:
| <context:component-scan base-package=""></ context:component-scan> base-package设置要扫描的基包,框架会扫描这个包路径下的所有类 use-default-filters="true" 默认 :全部扫描 use-default-filters="false" 全不扫描 |
| 子标签①: <context:exclude-filter type="annotation" expression=""/> 基于注解配置不扫描的类 <context:exclude-filter type="assignable" expression=""/>基于类型配置不扫描的类 |
| 子标签②: <context:include-filter type="annotation" expression=""/> 基于注解配置要扫描的类 <context:include-filter type="assignable" expression=""/> 基于类型配置要扫描的类 |
示例: <context:component-scan base-package="com.myframe"> <!-- 设置不扫描的注解 --> <context:exclude-filter type="annotation" expression="org.springframework.stereotype.Controller"/> <!-- 类型是全类名 --> <context:exclude-filter type="assignable" expression="com.myframe.service.BookService"/> --> </context:component-scan>
<context:component-scan base-package="com.myframe" use-default-filters="false"> <context:include-filter type="annotation" expression="org.springframework.stereotype.Repository"/> <context:include-filter type="assignable" expression="com.myframe.service.BookService"/> </context:component-scan>
以上是关于Spring框架介绍和IoC容器中Bean配置(Spring框架)的主要内容,如果未能解决你的问题,请参考以下文章