Android基础知识——实现耗时进度圈效果
Posted ABded
tags:
篇首语:本文由小常识网(cha138.com)小编为大家整理,主要介绍了Android基础知识——实现耗时进度圈效果相关的知识,希望对你有一定的参考价值。
在开发过程中我们可能会去实现一些比较耗时的网络请求功能,而为了填补网络请求的时间,一般我们都是要加上一个加载进度圈的效果用以过渡。
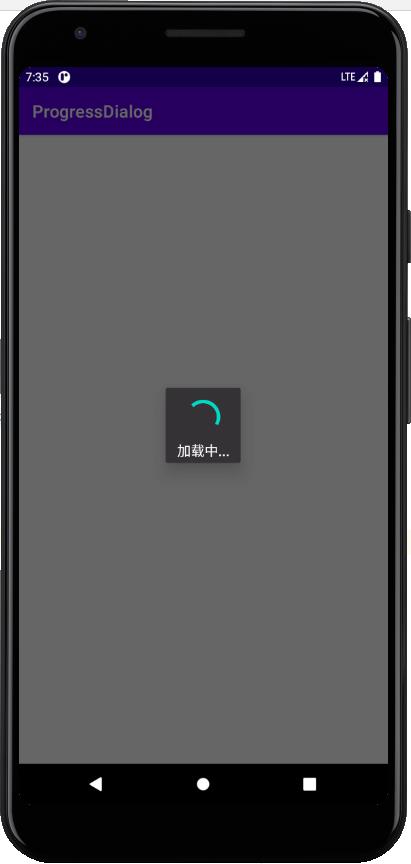
这篇文章我们就来介绍使用ProgressBar+AlertDialog来实现耗时进度圈的效果。
1.编写耗时对话框的背景shape文件progress_bg.xml
<?xml version="1.0" encoding="utf-8"?>
<shape xmlns:android="http://schemas.android.com/apk/res/android" android:shape="rectangle">
    <solid android:color="#343134" />
    <size android:height="100dp" android:width="100dp" />
</shape>
2.编写耗时对话框的布局文件progress_view.xml
<?xml version="1.0" encoding="utf-8"?>
<androidx.constraintlayout.widget.ConstraintLayout xmlns:android="http://schemas.android.com/apk/res/android"
    xmlns:app="http://schemas.android.com/apk/res-auto"
    android:background="@drawable/progress_bg"
    android:layout_width="match_parent"
    android:layout_height="match_parent">

    <ProgressBar
        android:id="@+id/progressBar"
        android:layout_width="wrap_content"
        android:layout_height="wrap_content"
        android:layout_marginTop="10dp"
        app:layout_constraintLeft_toLeftOf="parent"
        app:layout_constraintRight_toRightOf="parent"
        app:layout_constraintTop_toTopOf="parent" />

    <TextView
        android:layout_width="wrap_content"
        android:layout_height="wrap_content"
        android:layout_marginLeft="20dp"
        android:layout_marginTop="10dp"
        android:layout_marginRight="20dp"
        android:layout_marginBottom="10dp"
        android:gravity="center"
        android:text="加载中..."
        android:textColor="@color/white"
        android:textSize="16dp"
        app:layout_constraintBottom_toBottomOf="parent"
        app:layout_constraintLeft_toLeftOf="parent"
        app:layout_constraintRight_toRightOf="parent"
        app:layout_constraintTop_toBottomOf="@+id/progressBar"/>

</androidx.constraintlayout.widget.ConstraintLayout>
3.创建AlertDialog对话框
这里把AlertDialog的弹出和隐藏封装在了一个工具类中方便调用
public class ProgressDialogUtil

    private static AlertDialog mAlterDialog;

	//弹出对话框
    public static void showProgressDialog(Context context)
        if (mAlterDialog == null)
            mAlterDialog = new AlertDialog.Builder(context).create();


        View loadView = LayoutInflater.from(context).inflate(R.layout.progress_view, null);
        mAlterDialog.setView(loadView, 0, 0, 0, 0);
        mAlterDialog.setCanceledOnTouchOutside(false);

        mAlterDialog.show();


	//隐藏对话框
    public static void dismiss()
        if(mAlterDialog!=null&&mAlterDialog.isShowing())
            mAlterDialog.dismiss();
4.调用方法控制对话框的显示与隐藏
//显示对话框
ProgressDialogUtil.showProgressDialog(DialogActivity.this);
//隐藏对话框
ProgressDialogUtil.dismiss();
最终效果展示:

5.AlterDialog大小的调整
我们有时候可能需要去设置AlterDialog的长宽参数,用以应对不同的场景。
解决方法:
调用AlterDialog.getWindow().setLayout()方法。(注:该方法必须在AlterDialog.show()之后调用才有效果)
代码展示:
public static void showProgressDialog(Context context)
    if (mAlterDialog == null)
        mAlterDialog = new AlertDialog.Builder(context).create();

    View loadView = LayoutInflater.from(context).inflate(R.layout.recover_wait, null);
    mAlterDialog.setView(loadView, 0, 0, 0, 0);
    mAlterDialog.setCanceledOnTouchOutside(false);
    mAlterDialog.show();
    mAlterDialog.getWindow().setLayout(300,340);//宽为300,高为340
以上是关于Android基础知识——实现耗时进度圈效果的主要内容,如果未能解决你的问题,请参考以下文章