Android动态部署四:如何从插件apk中启动Activity
Posted ximsfei
tags:
篇首语:本文由小常识网(cha138.com)小编为大家整理,主要介绍了Android动态部署四:如何从插件apk中启动Activity相关的知识,希望对你有一定的参考价值。
转载请注明出处:http://blog.csdn.net/ximsfei/article/details/51063454
github地址:https://github.com/ximsfei/DynamicDeploymentApk
在上一篇文章:Android动态部署三:如何从插件apk中启动Activity(-)中分析了Activity的启动流程以及从插件apk中启动一个Activity时所需要关注的源码细节,相信读者已经自己去尝试过从插件apk中启动Activity了,也可能已经遇到了我们这篇文章所要讲的问题。
接下来我们会接着上一篇文章中我的猜想, 来详细分析一下为什么我们需要替换Context, Resources, AssetManager, Theme, Title, Application等信息。
替换Context
final void attach(Context context, ActivityThread aThread,
        Instrumentation instr, IBinder token, int ident,
        Application application, Intent intent, ActivityInfo info,
        CharSequence title, Activity parent, String id,
        NonConfigurationInstances lastNonConfigurationInstances,
        Configuration config, String referrer, IVoiceInteractor voiceInteractor)
    attachBaseContext(context);
    ...


public class Activity extends ContextThemeWrapper;
public class ContextThemeWrapper extends ContextWrapper;
public class ContextWrapper extends Context;
Activity 继承自ContextWrapper类,并且在attach方法中会调用到ContextWrapper类中的attachBaseContext方法,将ContextImpl实例保存到ContextWrapper的成员变量mBase中。
在ContextWrapper类中我们了解到原来Activity中真正的Context实现为ContextImpl类而ContextImpl中所保存的信息还是宿主apk中的上下文信息,Resources,AssetManager,ClassLoader等等,这些都是跟apk中的资源以及源文件息息相关的,所以想要在插件Activity中使用插件资源,源文件,我猜想需要将ContextImpl中的信息替换成插件apk的ContextImpl。我们不妨参照源码Activity的实现方式,来实现我们自己的DynamicContextImpl类:
DynamicContextImpl.java
public class DynamicContextImpl extends ContextWrapper
    private final Resources mResources;
    private final AssetManager mAssets;
    private final ClassLoader mClassLoader;
    private final String mPackageName;
    private final int mThemeResource;
    private final Application mApplication;
    private Resources.Theme mTheme;

    private DynamicContextImpl(Context hostContext, DynamicApkInfo apkInfo, int themeResource)
        super(hostContext);
        mThemeResource = themeResource;
        mResources = apkInfo.resources;
        mAssets = apkInfo.assets;
        mClassLoader = apkInfo.classLoader;
        mPackageName = apkInfo.packageName;
        mApplication = apkInfo.application;


    public static DynamicContextImpl createApplicationContext(Context hostContext, DynamicApkInfo apkInfo)
        return new DynamicContextImpl(hostContext, apkInfo, apkInfo.applicationInfo.theme);


    public static DynamicContextImpl createActivityContext(Context hostContext,
                                                           DynamicApkInfo apkInfo, int themeResource)
        return new DynamicContextImpl(hostContext, apkInfo, themeResource);


    @Override
    public Resources getResources()
        return mResources;


    @Override
    public AssetManager getAssets()
        return mAssets;


    @Override
    public ClassLoader getClassLoader()
        return mClassLoader;


    public Context getApplicationContext()
        return mApplication;
那么实现了这个类之后,什么时候去将Activity中的mBase替换成DynamicContextImpl类呢,在应用开发中我们需要在Activity的onCreate方法中调用setContentView来加载布局文件,之后的流程需要用到Context信息,所以要在onCreate方法之前替换,而mBase是在Activity的attach方法中初始化的,所以要在attach方法之后替换,重新整理上一篇文章的时序图,我们发现替换ContextImpl最好的的时机是在Instrumentation.java的callActivityOnCreate方法中,并且只有TargetActivity为插件apk中的Activity时才需要替换,插件apk标志信息在execStartActivity方法中设置,在DynamicInstrumentation中重写callActivityOnCreate方法:
public ActivityResult execStartActivity(
            Context who, IBinder contextThread, IBinder token, Fragment target,
            Intent intent, int requestCode, Bundle options)
    ActivityInfo ai = resolveActivity(intent, intent.resolveType(who), DynamicConstants.RESOLVE_ACTIVITY);

    if (ai != null)
        intent.putExtra(DynamicConstants.DYNAMIC_ACTIVITY_FLAG, ai.name);
        intent.setClassName(DynamicActivityThread.getInstance().getHostPackageName(),
                DynamicConstants.STUB_DYNAMIC_ACTIVITY);

    try
        return (ActivityResult) mInstrumentationReflect.setMethod("execStartActivity",
                Context.class, IBinder.class, IBinder.class, Fragment.class, Intent.class,
                int.class, Bundle.class)
                .invoke(mBase, who, contextThread, token, target, intent, requestCode, options);
     catch (Exception e)

    return null;


@Override
public void callActivityOnCreate(Activity activity, Bundle icicle)
    String clsName = activity.getIntent().getStringExtra(DynamicConstants.DYNAMIC_ACTIVITY_FLAG);
    DynamicApkParser.Activity a = (DynamicApkParser.Activity)
            DynamicApkManager.getInstance()
                    .queryClassName(clsName,
                            DynamicConstants.RESOLVE_ACTIVITY);
    if (a != null) hookActivity(a, activity);

    super.callActivityOnCreate(activity, icicle);


private void hookActivity(DynamicApkParser.Activity a, Activity activity)
    DynamicContextImpl dynamicContext = DynamicContextImpl.createActivityContext(
            activity.getBaseContext(), a.owner, a.info.getThemeResource());
    mActivityReflect.setField("mResources")
            .set(activity, dynamicContext.getResources());
    mActivityReflect.setField("mBase")
            .set(activity, dynamicContext);
    mActivityReflect.setField("mApplication")
            .set(activity, a.owner.application);
    mActivityReflect.setField("mActivityInfo")
            .set(activity, a.info);
    changeTheme(a, mActivityReflect, activity);
    changeTitle(a, activity);


private void changeTheme(DynamicApkParser.Activity a, Reflect r, Object o)
    if (a.info.getThemeResource() != 0)
        Resources.Theme theme = a.owner.resources.newTheme();
        theme.applyStyle(a.info.getThemeResource(), true);
        r.setField("mTheme").set(o, theme);


private void changeTitle(DynamicApkParser.Activity a, Activity activity)
    if (a.info.labelRes != 0)
        activity.setTitle(a.owner.resources.getString(a.info.labelRes));
     else if (a.owner.applicationInfo.nonLocalizedLabel != null)
        activity.setTitle(a.owner.applicationInfo.nonLocalizedLabel);
     else if (a.owner.applicationInfo.labelRes != 0)
        activity.setTitle(a.owner.resources.getString(a.owner.applicationInfo.labelRes));
替换Theme
我们接着来看Activity是如何加载布局文件的:
以下是在Activity的onCreate方法中调用setContentView方法后的时序图:
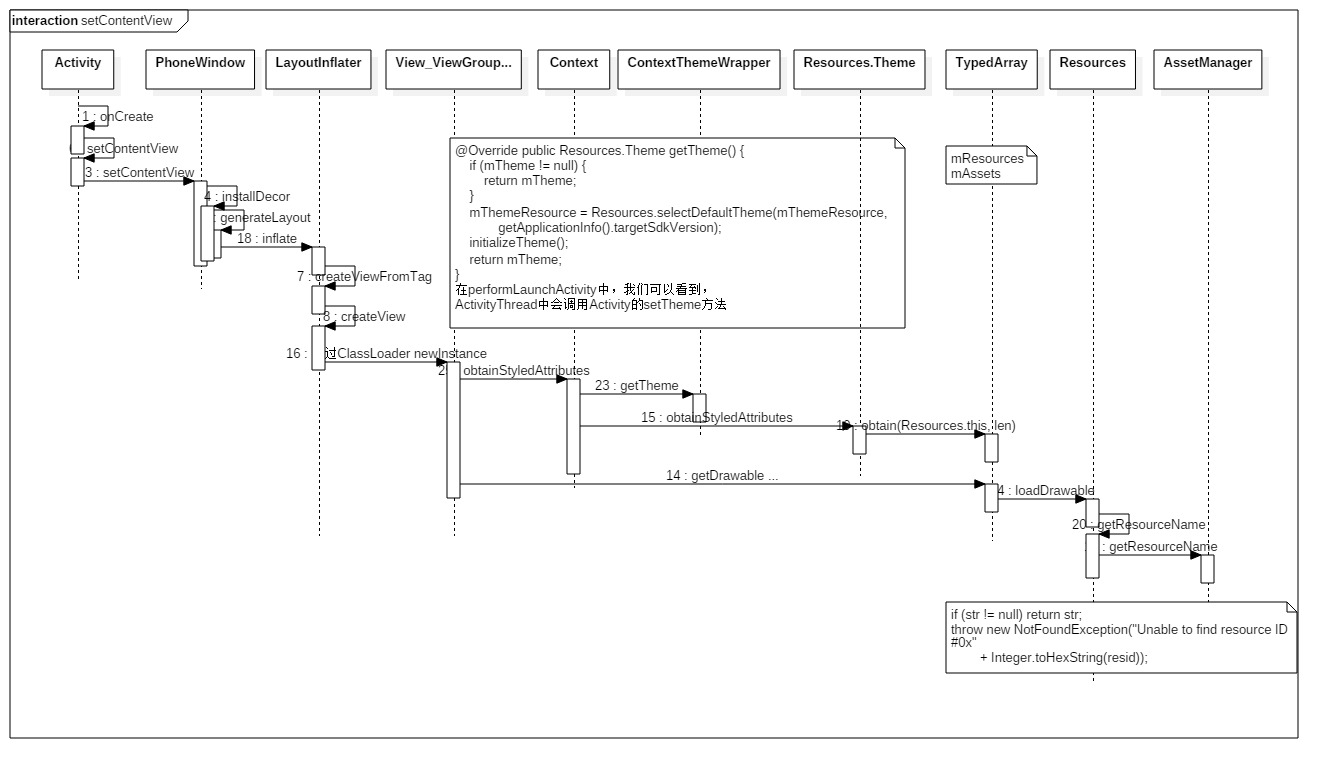
在LayoutInflater的createView方法中,会调用Context的getClassLoader方法如果是自定义View则会使用插件ClassLoader,系统View则会使用SystemClassLoader,所以需要使用如下代码创建插件ClassLoader(这里也证明了上面为什么需要替换ContextImpl)。
DexClassLoader classLoader = new DexClassLoader(apkFile.getAbsolutePath(),
                    optimizedDexDir, optimizedLibDir, ClassLoader.getSystemClassLoader().getParent());
LayoutInflater.java
public final View createView(String name, String prefix, AttributeSet attrs)
        throws ClassNotFoundException, InflateException
    ...
    clazz = mContext.getClassLoader().loadClass(
            prefix != null ? (prefix + name) : name).asSubclass(View.class);
    ...

    final View view = constructor.newInstance(args);
    ...
在newInstance之后会调用View/ViewGroup的构造方法,在构造方法中会调用Context的obtainStyledAttributes方法获取layout.xml布局文件中配置的相应信息,最终会调用Resources$Theme类中的obtainStyledAttributes方法,在该方法中会,传入Theme本身所持有的Resources对象,从上一篇文章我们知道,在调用attach方法之后,callActivityOnCreate方法之前会调用setTheme设置Activity的theme,而Theme中会持有Resources对象,并且会以参数的形式传给TypedArray,所以在解析layout.xml前我们也需要将Activity的mTheme设置为插件对应的Theme,或者说需要使用插件的Resources对象。
Context.java
public final TypedArray obtainStyledAttributes(@StyleableRes int[] attrs)
    return getTheme().obtainStyledAttributes(attrs);
Resources.java
public final class Theme
    ...
    public TypedArray obtainStyledAttributes(@StyleableRes int[] attrs)
        final int len = attrs.length;
        final TypedArray array = TypedArray.obtain(Resources.this, len);
        array.mTheme = this;
        AssetManager.applyStyle(mTheme, 0, 0, 0, attrs, array.mData, array.mIndices);
        return array;
替换Application
因为一个宿主apk的Application对象只会创建一次,我们不可能通过替换Application的Context,Resources等内容来满足插件apk对Application以及Application Context的需要,并且在android应用开发过程中,经常会重写Application类,并在重写的Application中做一些操作,写部分代码,这时在启动插件时我们也需要管理插件Application的生命周期,所以简单的先在启动插件的过程中使用如下代码实例化插件Application对象,并且在callActivityOnCreate方法中替换插件Activity中持有的Application对象:
public static Application makeDynamicApplication(Context applicationContext, ClassLoader cl,
                                          DynamicApkInfo apkInfo)
    Application app = null;

    String appClass = apkInfo.applicationInfo.className;
    if (appClass == null)
        appClass = "android.app.Application";


    try
        DynamicContextImpl appContext = DynamicContextImpl.createApplicationContext(
                applicationContext, apkInfo);
        app = (Application) cl.loadClass(appClass).newInstance();
        Reflect.create(Application.class).setMethod("attach",
                Context.class).invoke(app, appContext);
        DynamicActivityThread.getInstance().getInstrumentation().callApplicationOnCreate(app);
     catch (Exception e)


    return app;
在自定义View中经常会使用如下代码加载layout.xml
context 有可能为Activity,ContextImpl,Application等等
View.inflate(context, R.layout.xxx, null);以下是调用View.inflate方法后的时序图:
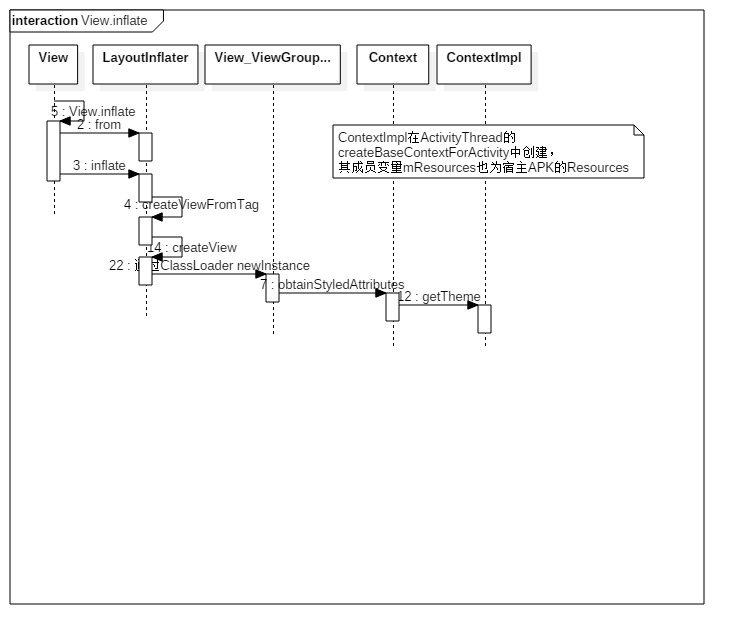
这里根据不同的代码环境,有可能会调用到ContextImpl类中的getTheme方法,所以,在DynamicContexImpl我们也需要重写getTheme方法,返回插件Resources对应的Theme。
至此,我们已经可以启动大部分Android开发中的Activity了,当然也有很多比较复杂的自定义View的情况,可能存在各种各样的bug,这就需要我们在较多的环境中去验证,并解决这些bug了。
以上是关于Android动态部署四:如何从插件apk中启动Activity的主要内容,如果未能解决你的问题,请参考以下文章