lnmp架构之php
Posted Tuki_a
tags:
篇首语:本文由小常识网(cha138.com)小编为大家整理,主要介绍了lnmp架构之php相关的知识,希望对你有一定的参考价值。
nginx
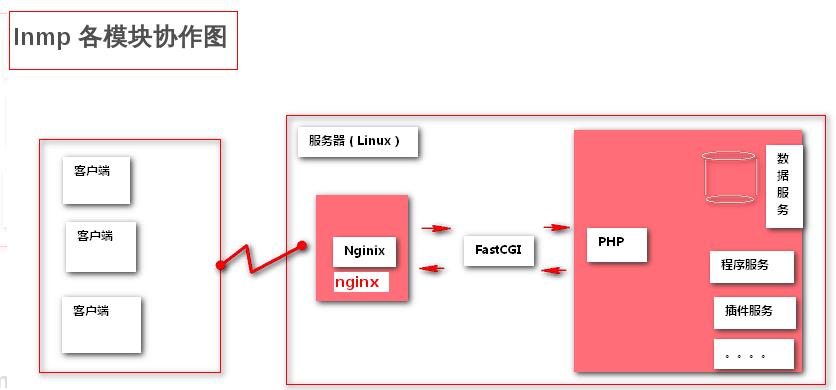
什么是lnmp架构
LNMP是指一组通常一起使用来运行动态网站或者服务器的自由软件名称首字母缩写
L指Linux,N指Nginx,M一般指mysql,也可以指MariaDB,P一般指php,也可以指Perl或Python
LNMP代表的就是:Linux系统下Nginx+MySQL+PHP这种网站服务器架构
Linux是一类Unix计算机操作系统的统称,是目前最流行的免费操作系统
代表版本有:debian、centos、ubuntu、fedora、gentoo等
Nginx是一个高性能的HTTP和反向代理服务器,也是一个IMAP/POP3/SMTP代理服务器
Mysql是一个小型关系型数据库管理系统
PHP是一种在服务器端执行的嵌入html文档的脚本语言
这四种软件均为免费开源软件,组合到一起,成为一个免费、高效、扩展性强的网站服务系统
PHP-FPM
PHP-FPM是一个实现了Fastcgi的程序,PHP-FPM的管理对象是php-cgi,被PHP官方收了
后来PHP内核集成了PHP-FPM之后就方便多了,使用enalbe-fpm这个编译参数即可
fast-CGI是nginx和php之间的一个通信接口,该接口实际处理过程通过启动php-fpm进程来解析php脚本
PHP-CGI
php-cgi 是解释PHP脚本的程序,只是个CGI程序,他自己本身只能解析请求,返回结果,不会进程管理
源码编译安装php
到官网下载安装包解压安装php
[root@server1 ~]# yum install -y bzip2
[root@server1 ~]# tar jxf php-7.4.12.tar.bz2
安装编译需要的依赖项,进行源码编译三部曲,注意安装路径!!!
[root@server1 ~]# yum install -y systemd-devel libxml2-devel.x86_64 sqlite-devel libcurl-devel libpng-devel oniguruma-devel-6.8.2-1.el7.x86_64.rpm oniguruma-6.8.2-1.el7.x86_64.rpm
[root@server1 php-7.4.12]# ./configure --prefix=/usr/local/lnmp/php --with-config-file-path=/usr/local/lnmp/php/etc --enable-fpm --with-fpm-user=nginx --with-fpm-group=nginx  --with-curl --with-iconv --with-mhash --with-zlib --with-openssl --enable-mysqlnd --with-mysqli --with-pdo-mysql --disable-debug --enable-sockets --enable-soap --enable-inline-optimization --enable-xml --enable-ftp --enable-gd --enable-exif --enable-mbstring  --enable-bcmath --with-fpm-systemd
[root@server1 php-7.4.12]# make
[root@server1 php-7.4.12]# make install
编辑配置文件
[root@server1 local]# cd /usr/local/lnmp/php/etc/
[root@server1 etc]# cp php-fpm.conf.default php-fpm.conf
[root@server1 etc]# ls
php-fpm.conf  php-fpm.conf.default  php-fpm.d
[root@server1 etc]# cd php-fpm.d/
[root@server1 php-fpm.d]# ls
www.conf.default
[root@server1 php-fpm.d]# cp www.conf.default www.conf
[root@server1 php-fpm.d]# ls
www.conf  www.conf.default
[root@server1 php-fpm.d]# cd ..
[root@server1 etc]# ls
php-fpm.conf  php-fpm.conf.default  php-fpm.d
[root@server1 etc]# vim php-fpm.conf

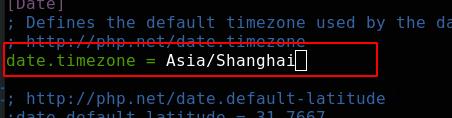
编辑php核心配置更改时区
[root@server1 etc]# cd
[root@server1 ~]# cd php-7.4.12/
[root@server1 php-7.4.12]# cp php.ini-production /usr/local/lnmp/php/etc/php.ini
[root@server1 php-7.4.12]# vim /usr/local/lnmp/php/etc/php.ini
使用systemctl命令来控制nginx
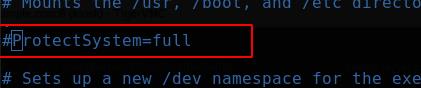
在systemd中配置php-fpm.service
[root@server1 php-7.4.12]# cd sapi/fpm/
[root@server1 fpm]# cp  php-fpm.service /usr/lib/systemd/system/php-fpm.service
[root@server1 fpm]# vim /usr/lib/systemd/system/php-fpm.service
设置让应用可以正常访问这三个目录
ProtectHome 可以设置为 true/false/read-only. 设置为 true 的时候, /home, /root, /run/user 对应用不可见. 设置为 read-only, 上述三个目录对应用只读. 设置为 false, 则应用可以正常访问这三个目录. 默认值是 false。
重载服务的配置,让服务的服务程序配置文件生效,可让systemctl 管理

nginx结合php-fpm
在nginx主配置文件中添加php支持
[root@server1 ~]# vim /usr/local/nginx/conf/nginx.conf
先关掉所有的重定向

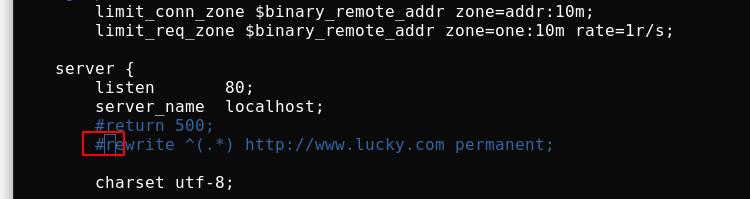
再加入如下内容,把原本的php注释掉
fastcgi配置文件里有各种模块

添加php测试网页
[root@server1 ~]# vim /usr/local/nginx/html/index.php
<?php
phpinfo()
?>
重载nginx后访问

配置环境变量
这两个目录下是php的命令

加到环境变量中
[root@server1 ~]# vim .bash_profile

变量生效

php添加memcache功能模块
传统缓存策略
访问流程就是:client -> nginx -> fastcgi_pass -> php-fpm:9000 -> memcached:11211

软件下载:http://pecl.php.net/package/memcache。解压memcache

安装依赖项
[root@server1 memcache-4.0.5.2]# yum install -y autoconf automake
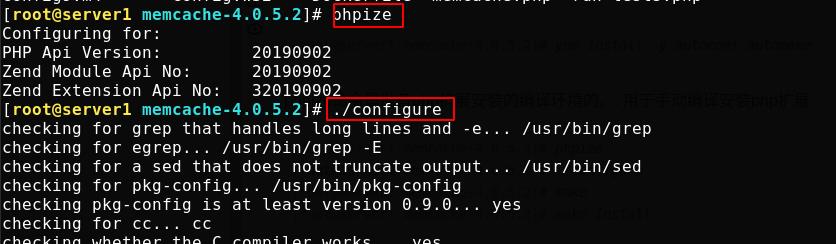
phpize命令是准备php扩展安装的编译环境的。用于手动编译安装php扩展
[root@server1 memcache-4.0.5.2]# phpize
[root@server1 memcache-4.0.5.2]# ./configure
[root@server1 memcache-4.0.5.2]# make
[root@server1 memcache-4.0.5.2]# make install
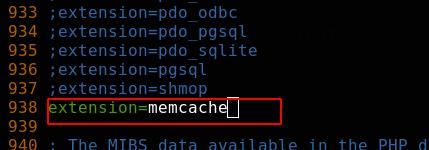
配置php加载模块
[root@server1 no-debug-non-zts-20190902]# cd /usr/local/lnmp/php/etc/
[root@server1 etc]# ls
php-fpm.conf  php-fpm.conf.default  php-fpm.d  php.ini
[root@server1 etc]# vim php.ini
重载php服务,安装启用memcached
[root@server1 etc]# systemctl reload php-fpm.service
[root@server1 etc]# yum install -y memcached
[root@server1 etc]# systemctl start memcached.service

将测试页面以及memcache复制至nginx html目录
[root@server1 etc]# cd
[root@server1 ~]# cd memcache-4.0.5.2/
[root@server1 memcache-4.0.5.2]# cp example.php /usr/local/nginx/html/
[root@server1 memcache-4.0.5.2]# cp memcache.php /usr/local/nginx/html/
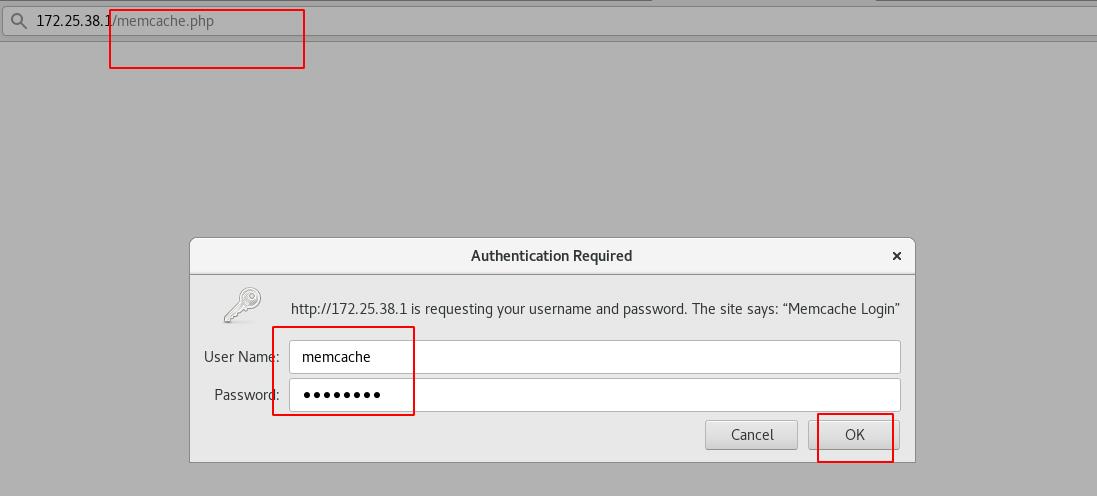
[root@server1 memcache-4.0.5.2]# vim /usr/local/nginx/html/memcache.php
编辑memcache.php,修改信息
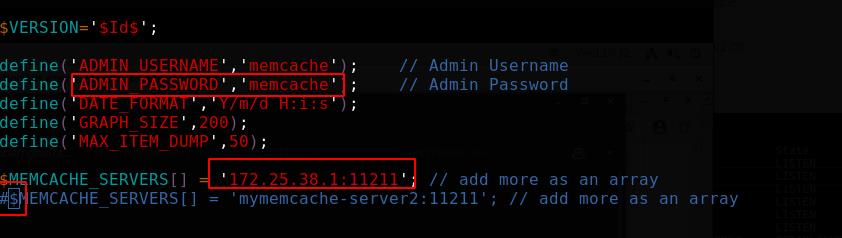
重载nginx访问memcache.php页面,输入上边自己写的用户名密码
页面如下
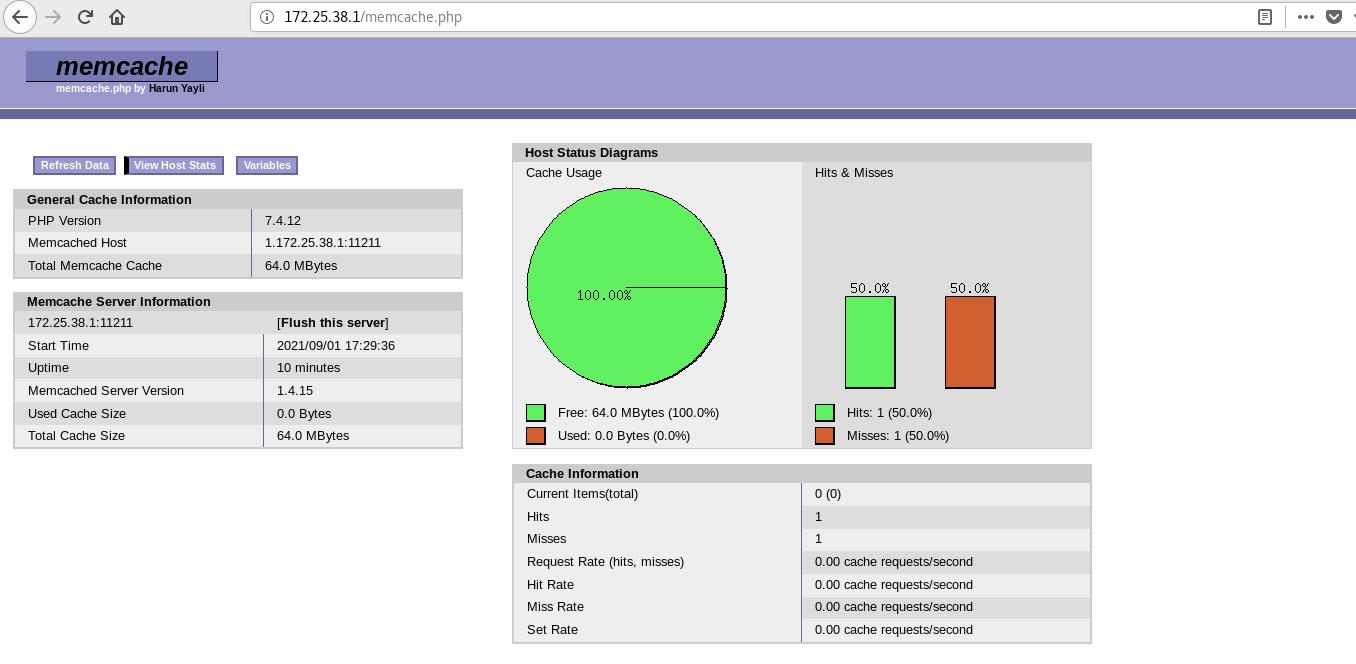
多次访问此时页面,只有第一次是从后端拿的(因为第一次访问缓存查自己没有所以去后端取),之后都是从缓存里拿的(之后访问缓存查自己已经有了就不会去后端拿了)

所以缓存命中率会越来越高

构建nginx高速缓存(openresty)
由于传统缓存是php从缓存拿,响应时间由php决定,现在我们让nginx直接去响应请求从缓存里拿。
访问流程如下:使用memc-nginx和srcache-nginx模块构建高效透明的缓存机制

要换一个nginx实现,也就是openresty;其实就是nginx的加强版,nginx加了一个lua模块。下载解压进入解压目录可以看到自带nginx

源码编译安装
[root@server1 bundle]# cd ..
[root@server1 openresty-1.19.3.1]# ./configure --with-http_ssl_module --with-http_stub_status_module --with-threads --with-file-aio
[root@server1 openresty-1.19.3.1]# make
[root@server1 openresty-1.19.3.1]# make install
编辑vim /usr/local/openresty/nginx/conf/nginx.confopenresty的配置文件,修改用户,worker进程已经连接数

php的配置也和之前一样

将之前现成的php测试页拷贝到openresty发布目录下
[root@server1 ~]# cp /usr/local/nginx/html/index.php /usr/local/openresty/nginx/html/
[root@server1 ~]# /usr/local/openresty/nginx/sbin/nginx -v
nginx version: openresty/1.19.3.1
停掉之前的nginx,开启openresty

网页访问如下

访问测试页正常

将测试缓存的示例页面拷贝到openresty发布目录下
[root@server1 ~]# cp /usr/local/nginx/html/example.php /usr/local/openresty/nginx/html/
在我们构建缓存之前!先在其他主机做压测,访问example静态页面看下速度,没有丢包
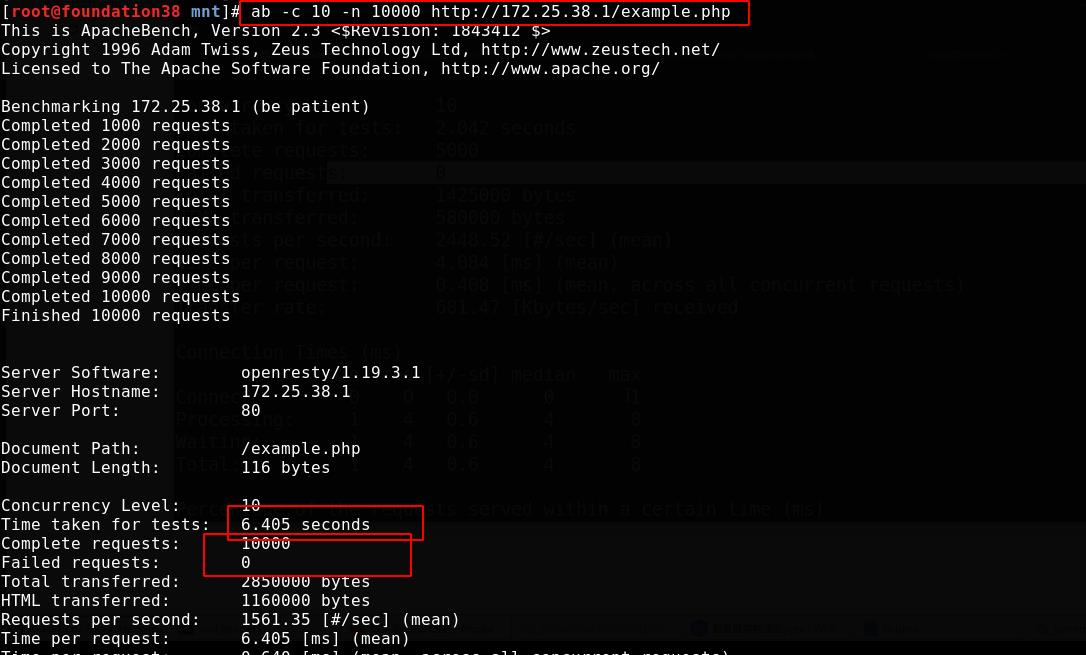
访问index动态页面,压力过大甚至出现了丢包的现象,php相应不及nginx

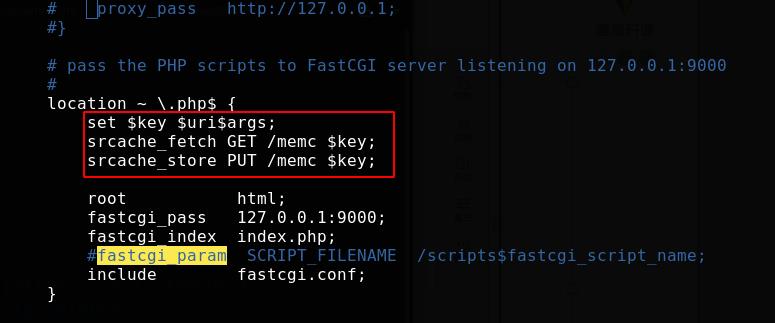
现在配置缓存,编辑openresty配置文件
当所请求的uri以“.php”结尾时,首先到memcache中查询有没有以
$uri$args为key的数据,如果有则直接返回;否则,执行location的逻辑,如果返回的http状态码为200,则在输出前以$uri$args为key,将输入结果存入memcache。
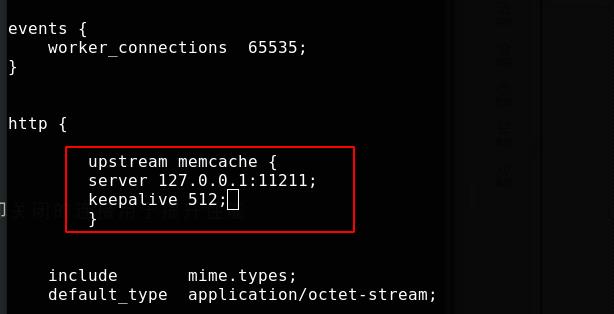
[root@server1 ~]# vim /usr/local/openresty/nginx/conf/nginx.conf
upstream memcache
server 127.0.0.1:11211;
keepalive 512; #保持512个不立即关闭的连接用于提升性能
location /memc
internal; #表示只接受内部访问
memc_connect_timeout 100ms;
memc_send_timeout 100ms;
memc_read_timeout 100ms;
set $memc_key $query_string; #使用内置的$query_string来作为key
set $memc_exptime 300; #表示缓存失效时间
memc_pass memcache;
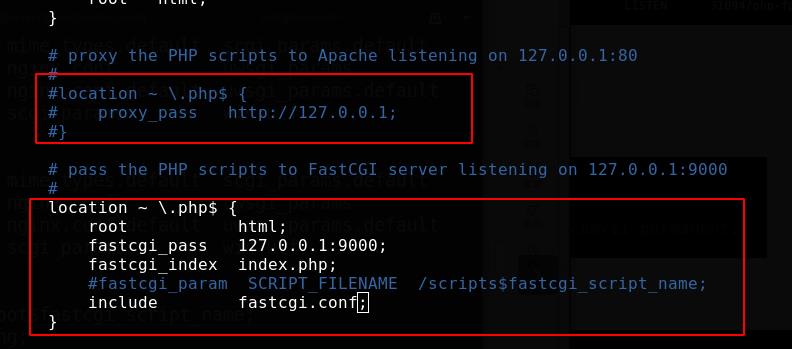
location ~ \\.php$
set $key $uri$args;
srcache_fetch GET /memc $key;
srcache_store PUT /memc $key;
root html;
fastcgi_pass 127.0.0.1:9000;
fastcgi_index index.php;
#fastcgi_param SCRIPT_FILENAME /scripts$fastcgi_script_name;
include fastcgi.conf;

重载openresty

这回再做压测,访问静态页面速度快多了
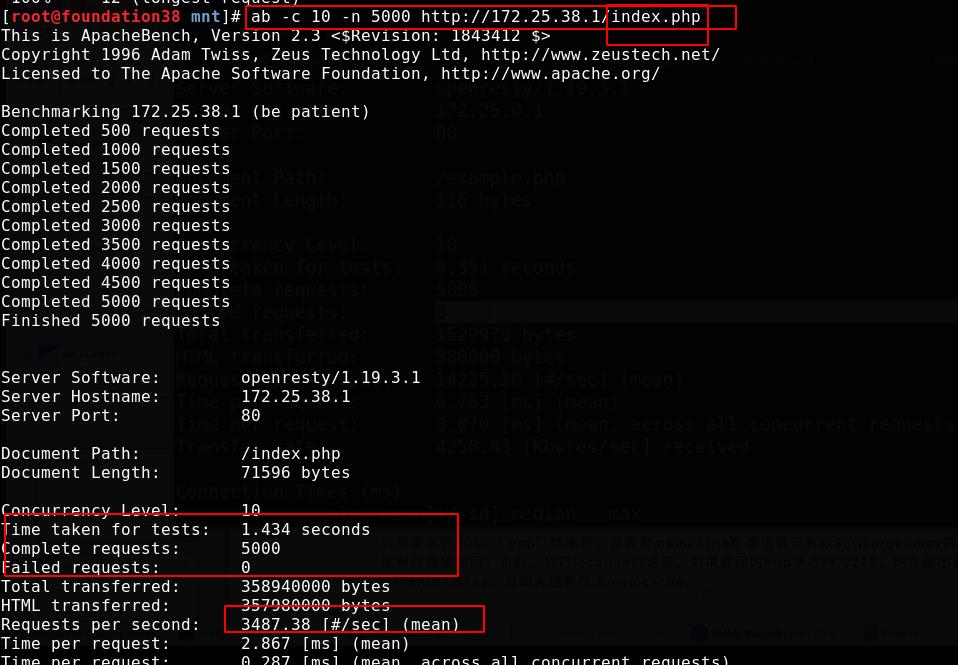
动态页面速度也实现了质的飞跃,也没有丢包的现象了

以上是关于lnmp架构之php的主要内容,如果未能解决你的问题,请参考以下文章