在css中,属性选择器前面为啥要加标签,比如 input[type="submit"]
Posted
tags:
篇首语:本文由小常识网(cha138.com)小编为大家整理,主要介绍了在css中,属性选择器前面为啥要加标签,比如 input[type="submit"]相关的知识,希望对你有一定的参考价值。
参考技术A CSS属性选择器就是指可以根据元素的属性以及属性值来选择元素。
input的type有
button
checkbox
file
hidden
image
password
radio
reset
submit
text
input[type="submit"]就可以了选择type为submit的input标签。
csscss选择器,伪类
前戏
前面我们说过CSS规则由选择器和声明组成,我们要给标签设置属性,那我们就要找到对应的标签,CSS选择器可以帮我们找到我们需要的标签
css选择器有:
标签选择器
类选择器
ID选择器
全局选择器
群组选择器
后代选择器
标签选择器
标签选择器前面我们用过,它是以HTML标签作为选择器
<!DOCTYPE html>
<html lang="en">
<head>
    <meta http-equiv="Content-Type" content="text/html;charset=utf-8"/>
     <style>
        pcolor:red
        h1,divcolor:blue
     </style>
</head>
<body>
    <h1>h1标签</h1>
    <div>css选择器</div>
    <p>标签选择器</p>
    <p>类选择器</p>
    <p>ID选择器</p>
</body>
</html>
注意:有多个标签之间用,隔开
类选择器
同一个元素可以设置多个类,之间用空格隔开
<!DOCTYPE html>
<html lang="en">
<head>
    <meta http-equiv="Content-Type" content="text/html;charset=utf-8"/>
     <style>
        .p1color:red
         .p2,.p3color:blue

     </style>
</head>
<body>
    <h1 class="p1">h1标签</h1>
    <div>css选择器</div>
    <p class="p1">标签选择器</p>
    <p class="p2">类选择器</p>
    <p class="p3">ID选择器</p>
</body>
</html>
注意:多个类时用,隔开
如果我们只想给p标签下的class=p1的设置怎么办?
<!DOCTYPE html>
<html lang="en">
<head>
    <meta http-equiv="Content-Type" content="text/html;charset=utf-8"/>
     <style>
      p.p1color:red

     </style>
</head>
<body>
    <h1 class="p1">h1标签</h1>
    <div>css选择器</div>
    <p class="p1">标签选择器</p>
    <p class="p2">类选择器</p>
    <p class="p3">ID选择器</p>
</body>
</html>
在类选择器前面加上标签名就可以了
ID选择器
id选择器和类选择器差不多,类选择器用的是点,id选择器用的是#

<!DOCTYPE html>
<html lang="en">
<head>
    <meta http-equiv="Content-Type" content="text/html;charset=utf-8"/>
     <style>
      #i1color: green

     </style>
</head>
<body>
    <p id="i1">标签选择器</p>
    <p id="i2">类选择器</p>
    <p id="i3">ID选择器</p>
</body>
</html>
群组选择器
群组选择器其实我们在标签选择器的时候已经使用过了,就是把多个标签用逗号隔开,当然,群组选择器不只可以用做标签,也可以用做类选择器,id选择器

<!DOCTYPE html>
<html lang="en">
<head>
    <meta http-equiv="Content-Type" content="text/html;charset=utf-8"/>
     <style>
      #i1,#i2,#i3,.h1color: red

     </style>
</head>
<body>
    <h1 class="h1">我是h1</h1>
    <p id="i1">标签选择器</p>
    <p id="i2">类选择器</p>
    <p id="i3">ID选择器</p>
</body>
</html>
这样,页面上所有的字体都成了红色
全局选择器
全局选择器就是给所有标签设置一个样式,一般用做清除标签默认的样式
我们来将上面的群组选择器换成全局选择器

<!DOCTYPE html>
<html lang="en">
<head>
    <meta http-equiv="Content-Type" content="text/html;charset=utf-8"/>
     <style>
      *color: red

     </style>
</head>
<body>
    <h1 class="h1">我是h1</h1>
    <p id="i1">标签选择器</p>
    <p id="i2">类选择器</p>
    <p id="i3">ID选择器</p>
</body>
</html>
后代选择器
使用后代选择器,之间用空格隔开
<!DOCTYPE html>
<html lang="en">
<head>
    <meta http-equiv="Content-Type" content="text/html;charset=utf-8"/>
     <style>
      p em color: red

     </style>
</head>
<body>
    <h1 class="h1"><em>明天</em>我是h1</h1>
    <p ><em>今天</em>标签选择器</p>
    <p id="i2">类选择器</p>
    <p id="i3">ID选择器</p>
</body>
</html>
这样写我们就给p标签下面的em标签加上了颜色
后代选择器可以写多层

伪类选择器
链接伪类
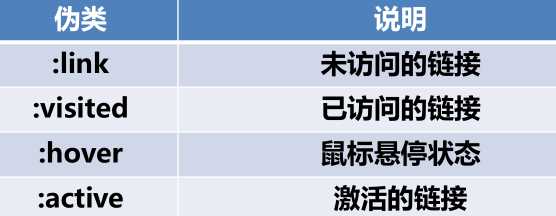
链接也就是a标签,有四种状态:激活状态,已访问状态,未访问状态,和鼠标悬停状态

伪类hover和active
上面的四种状态的:link和:visited是a标签专用的,而:hover和:active其他标签也可以使用
:hover用与访问的鼠标经过某个元素时
:active用于一个元素被激活时(既按下鼠标之后松开鼠标之前的时间)

<!DOCTYPE html>
<html lang="en">
<head>
    <meta http-equiv="Content-Type" content="text/html;charset=utf-8"/>
     <style>
      a:linkcolor: blue/*未访问状态*/
      a:visitedcolor: gray/*已访问状态*/
      a:hovercolor:red/*鼠标悬浮状态*/
      a:activecolor: green/*鼠标激活状态*/
      p:hovercolor:red
      p:activecolor: green

     </style>
</head>
<body>
    <a href="https://cn.bing.com/">必应</a>
    <p id="i2">类选择器</p>

</body>
</html>
链接伪类的顺序
:link>:visited>:hover>:active
说明:
a:hover必须置于a:link和a:visited之后才有效
a:active必须置于a:hover之后才有效
CSS优先级
同一样式表中:
1.权值相同,就近原则(离被设置元素越近优先级越高)
2.权值不同,根据权值来判断css样式,哪种权值高,就使用哪种样式
选择器权值
标签选择器,权值为1
类选择器和伪类,权值为10
id选择器,权值为100
通配符选择器,权值为0
行内样式,权值为1000
权值规则
统计不同选择器的个数
每类选择器的个数乘以相应的权值
把所有的值想加得出选择器的权值
!important规则
可调整样式规则的优先级
添加在样式规则之后,中间用空格隔开

CSS样式命名
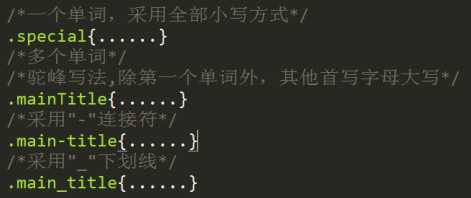
采用英文字母,数字以及”-“和”_“命名
以小写字母开头,不能以数字、”-“,"_"开头
命名形式:单字,连字符,下划线和驼峰

以上是关于在css中,属性选择器前面为啥要加标签,比如 input[type="submit"]的主要内容,如果未能解决你的问题,请参考以下文章
