SpringBoot3.0整合chatGPT
Posted miukoo
tags:
篇首语:本文由小常识网(cha138.com)小编为大家整理,主要介绍了SpringBoot3.0整合chatGPT相关的知识,希望对你有一定的参考价值。
导读
导读 | 12月总体来说互联网的技术圈是非常热闹的,chatGPT爆火,SpringBoot3.0发布等重磅陆消息续进入大家的视线,而本文作者将以技术整合的角度,带大家把最火的两个技术整合在一起。读完本文,你将熟悉SpringBoot3.0自定stater模块的操作流程,并熟悉OpenAi为chatGPT提供的49种场景。
项目项目我已经提交GITEE:https://gitee.com/miukoo/openai-spring 欢迎Star
新建父项目
我们这个项目分为starter和test两个模块,因此需要一个父项目来包裹。
1、快速新建父项目
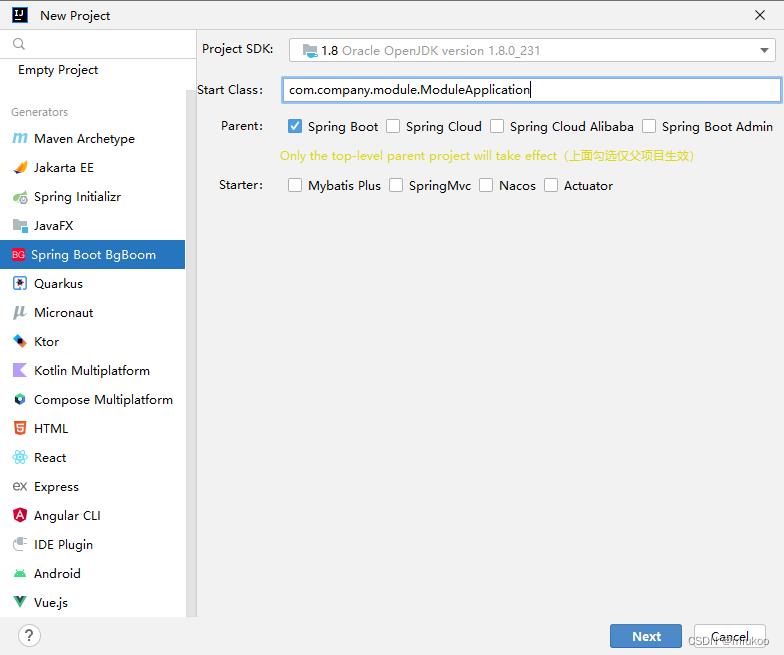
2、在pom.xml中引入SpringBoot3.0
- 项目的父工程设置成SpringBoot3.0
- 在项目中定义openai的版本并导入(com.theokanning.openai-gpt3-java)
<project xmlns="http://maven.apache.org/POM/4.0.0" xmlns:xsi="http://www.w3.org/2001/XMLSchema-instance"
         xsi:schemaLocation="http://maven.apache.org/POM/4.0.0 http://maven.apache.org/xsd/maven-4.0.0.xsd">
    <modules>
        <module>openai-spring-boot-starter</module>
        <module>openai-starter-test</module>
    </modules>
    <packaging>pom</packaging>
    <modelVersion>4.0.0</modelVersion>

    <groupId>cn.gjsm</groupId>
    <artifactId>openai-spring</artifactId>
    <version>1.0-SNAPSHOT</version>

    <properties>
        <project.build.sourceEncoding>UTF-8</project.build.sourceEncoding>
        <project.reporting.sourceEncoding>UTF-8</project.reporting.sourceEncoding>
        <openai-version>0.8.1</openai-version>
    </properties>

    <parent>
        <groupId>org.springframework.boot</groupId>
        <artifactId>spring-boot-starter-parent</artifactId>
        <version>3.0.0</version>
    </parent>
    <dependencyManagement>
        <dependencies>
            <dependency>
                <groupId>com.theokanning.openai-gpt3-java</groupId>
                <artifactId>client</artifactId>
                <version>$openai-version</version>
            </dependency>
        </dependencies>
    </dependencyManagement>
    <dependencies>
        <dependency>
            <groupId>org.projectlombok</groupId>
            <artifactId>lombok</artifactId>
        </dependency>
    </dependencies>
</project>
3、删除父项目的src文件夹
新建openai-spring-boot-starter模块
openai-spring-boot-starter 模块主要用来封装openai的核心api,该模块就是springboot自定starter的标准5步:
- 新建模块
- 在模块中引入相关依赖
- 定义模块外部属性有那些
- 实现核心业务逻辑
- 配置自动装配
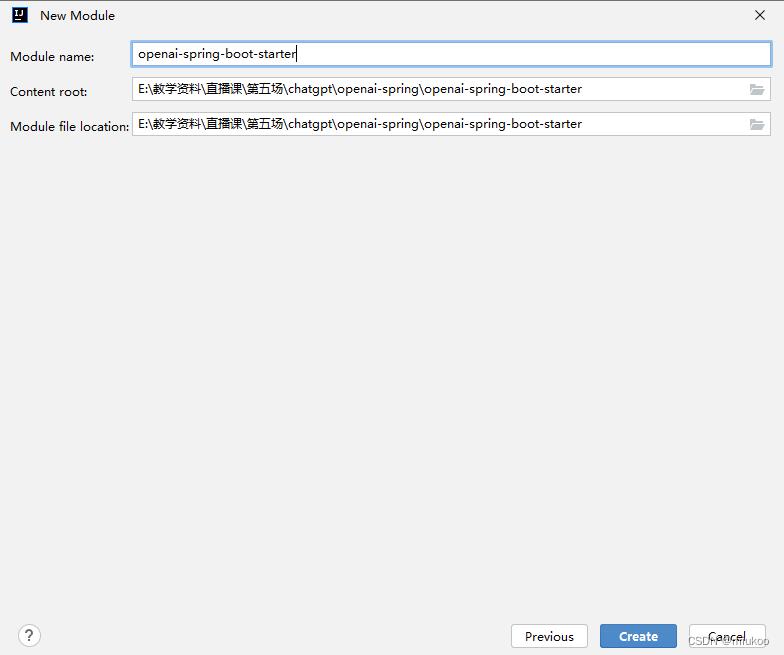
1、新增模块
注意模块名称的规范:非官方starter命名规则为 模块名称+'-spring-boot-starter’结尾
2、在模块中引入相关依赖
<project xmlns="http://maven.apache.org/POM/4.0.0" xmlns:xsi="http://www.w3.org/2001/XMLSchema-instance"
         xsi:schemaLocation="http://maven.apache.org/POM/4.0.0 http://maven.apache.org/xsd/maven-4.0.0.xsd">
    <packaging>pom</packaging>
    <parent>
        <artifactId>openai-spring</artifactId>
        <groupId>cn.gjsm</groupId>
        <version>1.0-SNAPSHOT</version>
    </parent>
    <modelVersion>4.0.0</modelVersion>

    <groupId>cn.gjsm</groupId>
    <artifactId>openai-spring-boot-starter</artifactId>
    <version>1.0-SNAPSHOT</version>


    <dependencies>
        <!-- 自定义starter必须导入的依赖 -->
        <dependency>
            <groupId>org.springframework.boot</groupId>
            <artifactId>spring-boot-starter</artifactId>
        </dependency>
        <!-- 这个包可以用来支持自定义属性的输入提示 -->
        <dependency>
            <groupId>org.springframework.boot</groupId>
            <artifactId>spring-boot-configuration-processor</artifactId>
            <optional>true</optional>
        </dependency>
        <!-- 导入openai依赖,版本在父项目中已经约束 -->
        <dependency>
            <groupId>com.theokanning.openai-gpt3-java</groupId>
            <artifactId>client</artifactId>
        </dependency>
    </dependencies>

</project>
3、定义模块外部属性有那些
通过@ConfigurationProperties配置一个类,这个类中的属性将从外部的application.yml中读取。在这里OpenAi需要两个属性需要配置,一是token秘钥,一是timeout超时时间。关于timeout可以配置时间长一点,因为OpenAi在国外有些慢。
package cn.gjsm.miukoo.properties;

import cn.gjsm.miukoo.utils.OpenAiUtils;
import lombok.Data;
import org.springframework.beans.factory.InitializingBean;
import org.springframework.boot.context.properties.ConfigurationProperties;

@Data
@ConfigurationProperties(prefix = "openai")
public class OpenAiProperties implements InitializingBean
    // 秘钥
    String token;
    // 超时时间
    Integer timeout;

    // 设置属性时同时设置给OpenAiUtils
    @Override
    public void afterPropertiesSet() throws Exception
        OpenAiUtils.OPENAPI_TOKEN = token;
        OpenAiUtils.TIMEOUT = timeout;
4、实现核心业务逻辑
核心业务逻辑指的就是你自定义这个starter可以提供给其它模块那些api使用;在这里我们直接通过一个静态类工具OpenAiUtils,这样在引入该模块后,其它模块直接可调用该静态工具类,使用便捷一些。
同时在这个类中提供openai官方49种场景想对应的方法。
package cn.gjsm.miukoo.utils;
import cn.gjsm.miukoo.pojos.OpenAi;
import com.theokanning.openai.OpenAiService;
import com.theokanning.openai.completion.CompletionChoice;
import com.theokanning.openai.completion.CompletionRequest;
import org.springframework.util.StringUtils;
import java.util.*;
/**
* 调用OpenAi的49中方法
*/
public class OpenAiUtils
public static final Map<String, OpenAi> PARMS = new HashMap<>();
static
PARMS.put("OpenAi01", new OpenAi("OpenAi01", "问&答", "依据现有知识库问&答", "text-davinci-003", "Q: %s\\nA:", 0.0, 1.0, 1.0, 0.0, 0.0, "\\n"));
PARMS.put("OpenAi02", new OpenAi("OpenAi02", "语法纠正", "将句子转换成标准的英语,输出结果始终是英文", "text-davinci-003", "%s", 0.0, 1.0, 1.0, 0.0, 0.0, ""));
PARMS.put("OpenAi03", new OpenAi("OpenAi03", "内容概况", "将一段话,概况中心", "text-davinci-003", "Summarize this for a second-grade student:\\n%s", 0.7, 1.0, 1.0, 0.0, 0.0, ""));
PARMS.put("OpenAi04", new OpenAi("OpenAi04", "生成OpenAi的代码", "一句话生成OpenAi的代码", "code-davinci-002", "\\"\\"\\"\\nUtil exposes the following:\\nutil.openai() -> authenticates & returns the openai module, which has the following functions:\\nopenai.Completion.create(\\n prompt=\\"<my prompt>\\", # The prompt to start completing from\\n max_tokens=123, # The max number of tokens to generate\\n temperature=1.0 # A measure of randomness\\n echo=True, # Whether to return the prompt in addition to the generated completion\\n)\\n\\"\\"\\"\\nimport util\\n\\"\\"\\"\\n%s\\n\\"\\"\\"\\n\\n", 0.0, 1.0, 1.0, 0.0, 0.0, "\\"\\"\\""));
PARMS.put("OpenAi05", new OpenAi("OpenAi05", "程序命令生成", "一句话生成程序的命令,目前支持操作系统指令比较多", "text-davinci-003", "Convert this text to a programmatic command:\\n\\nExample: Ask Constance if we need some bread\\nOutput: send-msg `find constance` Do we need some bread?\\n\\n%s", 0.0, 1.0, 1.0, 0.2, 0.0, ""));
PARMS.put("OpenAi06", new OpenAi("OpenAi06", "语言翻译", "把一种语法翻译成其它几种语言", "text-davinci-003", "Translate this into %s:\\n%s", 0.3, 1.0, 1.0, 0.0, 0.0, ""));
PARMS.put("OpenAi07", new OpenAi("OpenAi07", "Stripe国际API生成", "一句话生成Stripe国际支付API", "code-davinci-002", "\\"\\"\\"\\nUtil exposes the following:\\n\\nutil.stripe() -> authenticates & returns the stripe module; usable as stripe.Charge.create etc\\n\\"\\"\\"\\nimport util\\n\\"\\"\\"\\n%s\\n\\"\\"\\"", 0.0, 1.0, 1.0, 0.0, 0.0, "\\"\\"\\""));
PARMS.put("OpenAi08", new OpenAi("OpenAi08", "SQL语句生成", "依据上下文中的表信息,生成SQL语句", "code-davinci-002", "### %s SQL tables, 表字段信息如下:\\n%s\\n#\\n### %s\\n %s", 0.0, 1.0, 1.0, 0.0, 0.0, "# ;"));
PARMS.put("OpenAi09", new OpenAi("OpenAi09", "结构化生成", "对于非结构化的数据抽取其中的特征生成结构化的表格", "text-davinci-003", "A table summarizing, use Chinese:\\n%s\\n", 0.0, 1.0, 1.0, 0.0, 0.0, ""));
PARMS.put("OpenAi10", new OpenAi("OpenAi10", "信息分类", "把一段信息继续分类", "text-davinci-003", "%s\\n分类:", 0.0, 1.0, 1.0, 0.0, 0.0, ""));
PARMS.put("OpenAi11", new OpenAi("OpenAi11", "Python代码解释", "把代码翻译成文字,用来解释程序的作用", "code-davinci-002", "# %s \\n %s \\n\\n# 解释代码作用\\n\\n#", 0.0, 1.0, 1.0, 0.0, 0.0, ""));
PARMS.put("OpenAi12", new OpenAi("OpenAi12", "文字转表情符号", "将文本编码成表情服务", "text-davinci-003", "转换文字为表情。\\n%s:", 0.8, 1.0, 1.0, 0.0, 0.0, "\\n"));
PARMS.put("OpenAi13", new OpenAi("OpenAi13", "时间复杂度计算", "求一段代码的时间复杂度", "text-davinci-003", "%s\\n\\"\\"\\"\\n函数的时间复杂度是", 0.0, 1.0, 1.0, 0.0, 0.0, "\\n"));
PARMS.put("OpenAi14", new OpenAi("OpenAi14", "程序代码翻译", "把一种语言的代码翻译成另外一种语言的代码", "code-davinci-002", "##### 把这段代码从%s翻译成%s\\n### %s\\n \\n %s\\n \\n### %s", 0.0, 1.0, 1.0, 0.0, 0.0, "###"));
PARMS.put("OpenAi15", new OpenAi("OpenAi15", "高级情绪评分", "支持批量列表的方式检查情绪", "text-davinci-003", "对下面内容进行情感分类:\\n%s\\"\\n情绪评级:", 0.0, 1.0, 1.0, 0.0, 0.0, ""));
PARMS.put("OpenAi16", new OpenAi("OpenAi16", "代码解释", "对一段代码进行解释", "code-davinci-002", "代码:\\n%s\\n\\"\\"\\"\\n上面的代码在做什么:\\n1. ", 0.0, 1.0, 1.0, 0.0, 0.0, "\\"\\"\\""));
PARMS.put("OpenAi17", new OpenAi("OpenAi17", "关键字提取", "提取一段文本中的关键字", "text-davinci-003", "抽取下面内容的关键字:\\n%s", 0.5, 1.0, 1.0, 0.8, 0.0, ""));
PARMS.put("OpenAi18", new OpenAi("OpenAi18", "问题解答", "类似解答题", "text-davinci-003", "Q: %s\\nA: ?", 0.0, 1.0, 1.0, 0.0, 0.0, ""));
PARMS.put("OpenAi19", new OpenAi("OpenAi19", "广告设计", "给一个产品设计一个广告", "text-davinci-003", "为下面的产品创作一个创业广告,用于投放到抖音上:\\n产品:%s.", 0.5, 1.0, 1.0, 0.0, 0.0, ""));
PARMS.put("OpenAi20", new OpenAi("OpenAi20", "产品取名", "依据产品描述和种子词语,给一个产品取一个好听的名字", "text-davinci-003", "产品描述: %s.\\n种子词: %s.\\n产品名称: ", 0.8, 1.0, 1.0, 0.0, 0.0, ""));
PARMS.put("OpenAi21", new OpenAi("OpenAi21", "句子简化", "把一个长句子简化成一个短句子", "text-davinci-003", "%s\\nTl;dr: ", 0.7, 1.0, 1.0, 0.0, 1.0, ""));
PARMS.put("OpenAi22", new OpenAi("OpenAi22", "修复代码Bug", "自动修改代码中的bug", "code-davinci-002", "##### 修复下面代码的bug\\n### %s\\n %s\\n### %s\\n", 0.0, 1.0, 1.0, 0.0, 0.0, "###"));
PARMS.put("OpenAi23", new OpenAi("OpenAi23", "表格填充数据", "自动为一个表格生成数据", "text-davinci-003", "spreadsheet ,%s rows:\\n%s\\n", 0.5, 1.0, 1.0, 0.0, 0.0, ""));
PARMS.put("OpenAi24", new OpenAi("OpenAi24", "语言聊天机器人", "各种开发语言的两天机器人", "code-davinci-002", "You: %s\\n%s机器人:", 0.0, 1.0, 1.0, 0.5, 0.0, "You: "));
PARMS.put("OpenAi25", SpringBoot
🍌掌握基于SpringBoot框架的程序开发步骤
🍌使用SpringBoot配置信息修改服务器配置
今日目标:
- 基于SpringBoot的完成SSM整合项目开发第一步
一、SpringBoot整合junit
回顾 Spring 整合 junit
@RunWith(SpringJUnit4ClassRunner.class)
@ContextConfiguration(classes = SpringConfig.class)
public class UserServiceTest
@Autowired
private BookService bookService;
@Test
public void testSave()
bookService.save();
使用 @RunWith 注解指定运行器,使用 @ContextConfiguration 注解来指定配置类或者配置文件。而 SpringBoot 整合 junit 特别简单,分为以下三步完成
- 在测试类上添加
SpringBootTest 注解 - 使用
@Autowired 注入要测试的资源 - 定义测试方法进行测试
1.1 环境准备
创建一个名为 springboot_07_test 的 SpringBoot 工程,工程目录结构如下

在 com.itheima.service 下创建 BookService 接口,内容如下
public interface BookService
public void save();
在 com.itheima.service.impl 包写创建一个 BookServiceImpl 类,使其实现 BookService 接口,内容如下
@Service
public class BookServiceImpl implements BookService
@Override
public void save()
System.out.println("book service is running ...");
1.2 编写测试类
在 test/java 下创建 com.itheima 包,在该包下创建测试类,将 BookService 注入到该测试类中
@SpringBootTest
class Springboot07TestApplicationTests
@Autowired
private BookService bookService;
@Test
public void save()
bookService.save();
==注意:==这里的引导类所在包必须是测试类所在包及其子包。
例如:
- 引导类所在包是
com.itheima - 测试类所在包是
com.itheima
如果不满足这个要求的话,就需要在使用 @SpringBootTest 注解时,使用 classes 属性指定引导类的字节码对象。如 @SpringBootTest(classes = Springboot07TestApplication.class)
以上是关于SpringBoot3.0整合chatGPT的主要内容,如果未能解决你的问题,请参考以下文章