Spring Boot配置多数据源的四种方式
Posted 中国胖子风清扬
tags:
篇首语:本文由小常识网(cha138.com)小编为大家整理,主要介绍了Spring Boot配置多数据源的四种方式相关的知识,希望对你有一定的参考价值。
1、导读
在日常开发中我们都是以单个数据库进行开发,在小型项目中是完全能够满足需求的。
但是,当我们牵扯到像淘宝、京东这样的大型项目的时候,单个数据库就难以承受用户的CRUD操作。
那么此时,我们就需要使用多个数据源进行读写分离的操作,这种方式也是目前一种流行的数据管理方式。
2、所需的资源
- Spring boot
- Mybatis-plus
- Alibab Druid数据库连接池
- mysql 数据库
3、Spring Boot配置多数据源
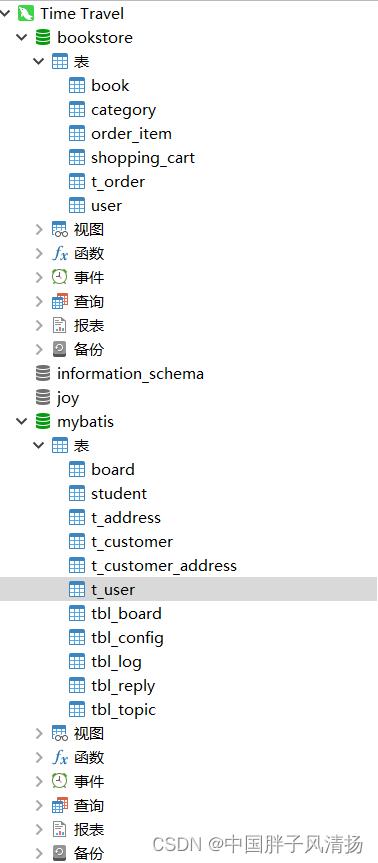
数据库

在YAML文件中定义数据源所需的数据
spring:
  datasource:
    type: com.alibaba.druid.pool.DruidDataSource ## 声明数据源的类型
    mysql-datasource1: ## 声明第一个数据源所需的数据
      url: jdbc:mysql://localhost:3306/mybatis?useSSL=true&serverTimezone=Asia/Shanghai
      username: root
      password: 123456
      driver-class-name: com.mysql.cj.jdbc.Driver

    mysql-datasource2: ## 声明第二个数据源所需的数据
      url: jdbc:mysql://localhost:3306/bookstore?useSSL=true&serverTimezone=Asia/Shanghai
      username: root
      password: 123456
      driver-class-name: com.mysql.cj.jdbc.Driver

    druid: ## druid数据库连接池的基本初始化属性
      initial-size: 5 ## 连接池初始化的大小
      min-idle: 1 ## 最小空闲的线程数
      max-active: 20 ## 最大活动的线程数


mybatis-plus:
  mapper-locations: classpath:/mapper/*.xml ## 配置MyBatis-Plus扫描Mapper文件的位置
  type-aliases-package: com.example.sqlite.entity ## 创建别名的类所在的包
mysql-datasource1、mysql-datasource2是自定义的数据。
定义多个数据源
@Configuration
public class DataSourceConfig

    @Bean(name = "mysqlDataSource1")
    @ConfigurationProperties(prefix = "spring.datasource.mysql-datasource1")
    public DataSource dataSource1()
        DruidDataSource build = DruidDataSourceBuilder.create().build();
        return build;


    @Bean(name = "mysqlDataSource2")
    @ConfigurationProperties(prefix = "spring.datasource.mysql-datasource2")
    public DataSource dataSource2()
        DruidDataSource build = DruidDataSourceBuilder.create().build();
        return build;
@ConfigurationProperties注解用于将YAML中指定的数据创建成指定的对象,但是,YAML中的数据必须要与对象对象中的属性同名,不然无法由Spring Boot完成赋值。
由于我们要定义多个数据源,所以在Spring Boot数据源自动配置类中就无法确定导入哪个数据源来完成初始化,所以我们就需要禁用掉Spring Boot的数据源自动配置类,然后使用我们自定义的数据源配置类来完成数据源的初始化与管理。
@SpringBootApplication(exclude = DataSourceAutoConfiguration.class)
public class DatasourceDomeApplication

    public static void main(String[] args)
        SpringApplication.run(DatasourceDomeApplication.class, args);
在启动类上声明需要禁用的自动配置类:exclude = DataSourceAutoConfiguration.class
3.1、实现DataSource接口
缺点:产生大量的代码冗余,在代码中存在硬编码。
3.1.1、代码
@Component
@Primary
public class DynamicDataSource implements DataSource

//使用ThreadLocal而不是String,可以在多线程的时候保证数据的可靠性
    public static ThreadLocal<String> flag = new ThreadLocal<>();

    @Resource
    private DataSource mysqlDataSource1; // 注入第一个数据源

    @Resource
    private DataSource mysqlDataSource2; // 注入第二个数据源


    public DynamicDataSource() // 使用构造方法初始化ThreadLocal的值
        flag.set("r");


    @Override
    public Connection getConnection() throws SQLException
    	// 通过修改ThreadLocal来修改数据源,
    	// 为什么通过修改状态就能改变已经注入的数据源? 这就得看源码了。
        if(flag.get().equals("r"))
            return mysqlDataSource1.getConnection();

        return mysqlDataSource2.getConnection();


    @Override
    public Connection getConnection(String username, String password) throws SQLException
        return null;


    @Override
    public PrintWriter getLogWriter() throws SQLException
        return null;


    @Override
    public void setLogWriter(PrintWriter out) throws SQLException


    @Override
    public void setLoginTimeout(int seconds) throws SQLException


    @Override
    public int getLoginTimeout() throws SQLException
        return 0;


    @Override
    public Logger getParentLogger() throws SQLFeatureNotSupportedException
        return null;


    @Override
    public <T> T unwrap(Class<T> iface) throws SQLException
        return null;


    @Override
    public boolean isWrapperFor(Class<?> iface) throws SQLException
        return false;
实现DataSource接口我们本质上只使用了一个方法,就是getConnection()这个无参的方法,但是DataSource接口中所有的方法我们也都需要实现,只是不用写方法体而已,也就是存在了很多的 “废方法” 。
@Primary注解 == @Order(1),用于设置此类的注入顺序。
3.1.2、使用
// 访问第一个数据库的t_user表

@RestController
public class UserController

    @Resource
    private UserService userService;

    @GetMapping(value = "/user_list")
    public List<User> showUserList()
        DynamicDataSource.flag.set("read"); // 修改数据源的状态
        List<User> list = userService.list();
        return list;
// 访问第二个数据库的Book表

@RestController
public class BookController

    @Resource
    private BookService BookService;

    @GetMapping(value = "/Book_list")
    public List<Book> getBookList()
        DynamicDataSource.flag.set("write"); // 修改数据源的状态
        List<Book> list = BookService.list();
        return list;
3.2、继承AbstrictRoutingDataSource类
减少了代码的冗余,但是还是会存在硬编码。
3.2.1、代码
@Primary
@Component
public class DynamicDataSource extends AbstractRoutingDataSource

    public static ThreadLocal<String> flag = new ThreadLocal<>();

    @Resource
    private DataSource mysqlDataSource1;

    @Resource
    private DataSource mysqlDataSource2;

    public DynamicDataSource()
        flag.set("read");


    @Override
    protected Object determineCurrentLookupKey()  // 通过Key来得到数据源
        return flag.get();


    @Override
    public void afterPropertiesSet()
        Map<Object,Object> targetDataSource = new ConcurrentHashMap<>();
        targetDataSource.put("read",mysqlDataSource1);
        // 将第一个数据源设置为默认的数据源。
        super.setDefaultTargetDataSource(mysqlDataSource1);
        targetDataSource.put("write",mysqlDataSource2);
         // 将Map对象赋值给AbstrictRoutingDataSource内部的Map对象中。
        super.setTargetDataSources(targetDataSource);

        super.afterPropertiesSet();
AbstrictRoutingDataSource的本质就是利用一个Map将数据源存储起来,然后通过Key来得到Value来修改数据源。
3.2.2、使用
// 访问第一个数据库的t_user表

@RestController
public class UserController

    @Resource
    private UserService userService;

    @GetMapping(value = "/user_list")
    public List<User> showUserList()
        DynamicDataSource.flag.set("read"); // 修改数据源的状态
        List<User> list = userService.list();
        return list;
// 访问第二个数据库的Book表

@RestController
public class BookController

    @Resource
    private BookService BookService;

    @GetMapping(value = "/Book_list")
    public List<Book> getBookList()
        DynamicDataSource.flag.set("write"); // 修改数据源的状态
        List<Book> list = BookService.list();
        return list;
3.3、使用Spring AOP + 自定义注解的形式
Spring AOP + 自定义注解的形式是一种推荐的写法,减少代码的冗余且不存在硬编码。
此方法适合对指定功能操作指定数据库的模式。
3.3.1、导入依赖
<dependency>
   <groupId>org.springframework.boot</groupId>
   <artifactId>spring-boot-starter-aop</artifactId>
</dependency>
3.3.2、开启AOP支持
@SpringBootApplication(exclude = DataSourceAutoConfiguration.class)
@EnableAspectJAutoProxy //开启Spring Boot对AOP的支持
public class AopDatasourceApplication

    public static void main(String[] args)
        SpringApplication.run(AopDatasourceApplication.class, args);
3.3.3、定义枚举来表示数据源的标识
public enum DataSourceType

    MYSQL_DATASOURCE1,

    MYSQL_DATASOURCE2,
3.3.4、继承AbstractRoutingDataSource类
@Primary
@Component
public class DataSourceManagement extends AbstractRoutingDataSource

    public static ThreadLocal<String> flag = new ThreadLocal<>();

    @Resource
    private DataSource mysqlDataSource1;

    @Resource
    private DataSource mysqlDataSource2;

    public DataSourceManagement()
        flag.set(DataSourceType.MYSQL_DATASOURCE1.name());


    @Override
    protected Object determineCurrentLookupKey()
        return flag.get();


    @Override
    public void afterPropertiesSet()
        Map<Object,Object> targetDataSource = new ConcurrentHashMap<>();
        targetDataSource.put(DataSourceType.MYSQL_DATASOURCE1.name(),mysqlDataSource1);
        targetDataSource.put(DataSourceType.MYSQL_DATASOURCE2.name(),mysqlDataSource2);
        super.setTargetDataSources(targetDataSource);
        super.setDefaultTargetDataSource(mysqlDataSource1);
        super.afterPropertiesSet();
3.3.5、自定义注解
@Target(ElementType.TYPE,ElementType.METHOD)
@Retention(RetentionPolicy.RUNTIME)
@Documented
public @interface TargetDataSource

    DataSourceType value() default DataSourceType.MYSQL_DATASOURCE1;
3.3.6、定义注解的实现类
@Component
@Aspect
@Slf4j
public class TargetDataSourceAspect


    @Before("@within(TargetDataSource) || @annotation(TargetDataSource)")
    public void beforeNoticeUpdateDataSource(JoinPoint joinPoint)
        TargetDataSource annotation = null;
        Class<? extends Object> target = joinPoint.getTarget().getClass();
        if(target.isAnnotationPresent(TargetDataSource.class))
            // 判断类上是否标注着注解
             annotation = target.getAnnotation(TargetDataSource.class);
             log.info("类上标注了注解");
        else
            Method method = ((MethodSignature) joinPoint.getSignature()).getMethod();
            if(method.isAnnotationPresent(TargetDataSource.class))
                // 判断方法上是否标注着注解,如果类和方法上都没有标注,则报错
                annotation = method.getAnnotation(TargetDataSource.class);
                log.info("方法上标注了注解");
            else
                throw new RuntimeException("@TargetDataSource注解只能用于类或者方法上, 错误出现在:[" +
                        target.toString() +" " + method.toString() + "];");


        // 切换数据源
        DataSourceManagement.flag.set(annotation.value().name());
在有的博客中也会使用@Around环绕通知的方式,但是环绕通知需要执行joinPoint.process()方法来调用目标对象的方法,最后返回执行的值,不然得不到所需要的数据。
我这里使用了@Before前置通知,效果是一样的,因为@Around就会包含@Before。
 @Around("@within(TargetDataSource) || @annotation(TargetDataSource)")
    public Object beforeNoticeUpdateDataSource(ProceedingJoinPoint joinPoint)
       	// 省略逻辑代码
       	Object result = null;
       	try
            result = joinPoint.proceed();
         catch (Throwable e)
            e.printStackTrace();

        return result;
ProceedingJoinPoint 对象只能在@Around环绕通知中使用,在其他通知中使用就会报错。
3.3.7、使用
// 访问第一个数据源。

@RestController
// 将注解标注在类上,表示本类中所有的方法都是使用数据源1
@TargetDataSource(value = DataSourceType.MYSQL_DATASOURCE1)
public class UserController

    @Resource
    private UserService userService;

    @GetMapping(value = "/user_list")
    public List<User> showUserList()
        System.out.println(DataSourceType.MYSQL_DATASOURCE1.name());
        List<User> list = userService.list();
        return list;
// 访问第二个数据源

@RestController
public class BookController

    @Resource
    private BookService BookService;

    @GetMapping(value = "/Book_list")
    // 将注解标注在方法上,表示此方法使用数据源2
    @TargetDataSource(value = DataSourceType.MYSQL_DATASOURCE2)
    public List<Book> getBookList()
        List<Book> list = BookService.list();
        return list;
3.4、通过SqlSessionFactory指定的数据源来操作指定目录的XML文件
使用此方法则不会与上面所述的类有任何关系,本方法会重新定义类。
本方法也是一种推荐的方法,适用于对指定数据库的操作,也就是适合读写分离。不会存在代码冗余和存在硬编码。
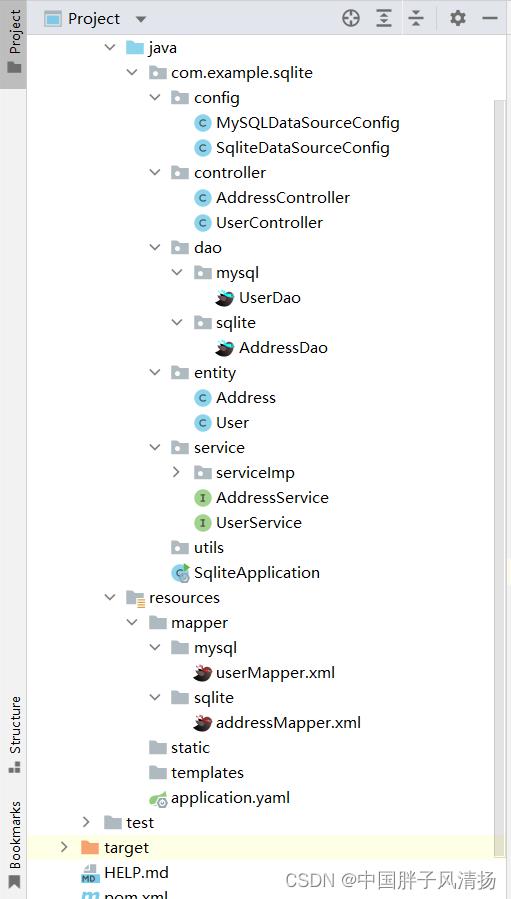
3.4.1、项目的目录结构
对所需要操作的数据库的Mapper层和dao层分别建立一个文件夹。

3.4.2、配置YAML文件
spring:
  datasource:
    type: com.alibaba.druid.pool.DruidDataSource
    mysql-datasource:
      jdbc-url: jdbc:mysql://localhost:3306/mybatis?useSSL=true&serverTimezone=Asia/Shanghai
      username: root
      password: 123456
      driver-class-name: com.mysql.cj.jdbc.Driver


<bean id="dataSource"
	  class="org.springframework.jdbc.datasource.DriverManagerDataSource">
    <property name="driverClassName" value="oracle.jdbc.driver.OracleDriver" />
    <property name="url" value="jdbc:oracle:thin:@172.19.34.6:1521:ORCL" />
    <property name="username" value="orclight" />
    <property name="password" value="123456" />
</bean>