Android常用对话框大全Android Dialog
Posted 宾有为
tags:
篇首语:本文由小常识网(cha138.com)小编为大家整理,主要介绍了Android常用对话框大全Android Dialog相关的知识,希望对你有一定的参考价值。
android的对话框有多少种?Android好看的对话框有很多,如Android、material、qmui、xui、kongzue等系列对话框,但博主只打算讲解Android、material系列对话框,讲太多没必要,实在想要做成人家那样的对话框,花点时间自定义一下就好。
Android常用对话框系列文章
【Android】常用对话框大全(一)Android Dialog
【Android】常用对话框大全(二)Material Dialog
【Android】常用对话框大全(三)自定义Dialog的三种方式(Theme,PopupWindow,Dialog)
目录
AlertDialog系列
AlertDialog系列对话框,实现方式皆与
AlertDialog类相关,可以说,一个类便可实现了多种类型对话框。
提示对话框
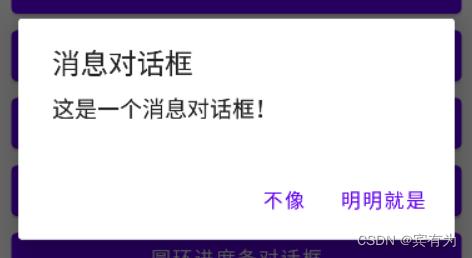
实现代码:
AlertDialog.Builder(this)
            .setTitle("消息对话框")
            .setMessage("这是一个消息对话框!")
            .setNegativeButton("不像")  dialog: DialogInterface?, which: Int -> showMessage("真不像?")
            .setPositiveButton("明明就是")  dialog: DialogInterface?, which: Int -> showMessage("明明就是")
            .show()
| use methods | Describe |
|---|---|
| setTitle(CharSequence title) | 设置对话框中显示的标题 |
| setMessage(CharSequence message) | 设置要显示的消息 |
| setNegativeButton(CharSequence text, final OnClickListener listener) | 设置按下对话框的否定按钮时要调用的侦听器 |
| setPositiveButton(CharSequence text, final OnClickListener listener) | 设置按下对话框的肯定按钮时要调用的侦听器 |
左右按钮对话框

实现代码:
AlertDialog.Builder(this)
            .setMessage("左右按钮对话框!")
            .setNeutralButton("左")  dialog: DialogInterface?, which: Int -> showMessage("左")
            .setPositiveButton("右")  dialog: DialogInterface?, which: Int -> showMessage("右") .show()
| use methods | Describe |
|---|---|
| setMessage(CharSequence message) | 设置要显示的消息 |
| setNeutralButton(CharSequence text, final OnClickListener listener) | 设置按下对话框的中性按钮时要调用的侦听器 |
| setPositiveButton(CharSequence text, final OnClickListener listener) | 设置按下对话框的正按钮时要调用的侦听器 |
列表对话框
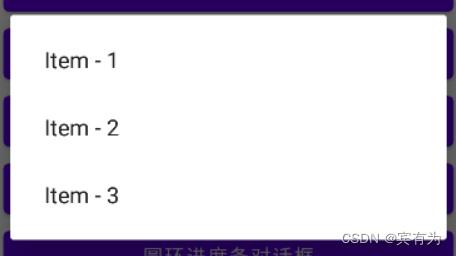
实现代码:
AlertDialog.Builder(this)
            .setItems(items)  dialog: DialogInterface?, which: Int -> showMessage("点击了列表对话框的 " + items[which])
            .show()
| use methods | Describe |
|---|---|
| setItems(CharSequence[] items, final OnClickListener listener) | 设置要在对话框中显示的项目列表作为内容,您将通过提供的侦听器通知您选择的项目 |
单选对话框
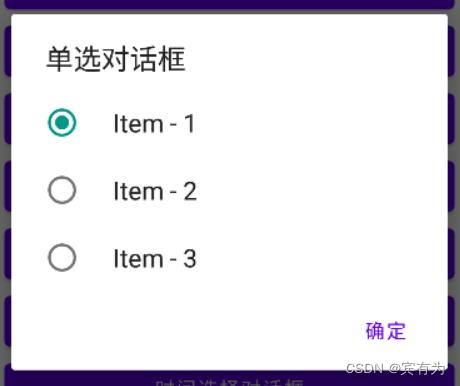
实现代码:
AlertDialog.Builder(this)
            .setTitle("单选对话框")
            .setSingleChoiceItems(items,0)  dialog: DialogInterface?, which: Int ->
            	singleSelectResult = items[which]

            .setPositiveButton("确定")  dialog: DialogInterface?, which: Int ->
                showMessage(singleSelectResult)

            .show()
| use methods | Describe |
|---|---|
| setTitle(CharSequence title) | 设置Dialog中显示的标题 |
| setSingleChoiceItems(CharSequence[] items, int checkedItem, final OnClickListener listener) | 设置要在对话框中显示的项目列表作为内容,您将通过提供的侦听器收到所选项目的通知。该列表将在选中项目的文本右侧显示一个复选标记。单击列表中的项目不会关闭对话框。单击按钮将关闭对话框。 |
| setPositiveButton(CharSequence text, final OnClickListener listener) | 设置按下对话框的正按钮时要调用的侦听器 |
多选对话框
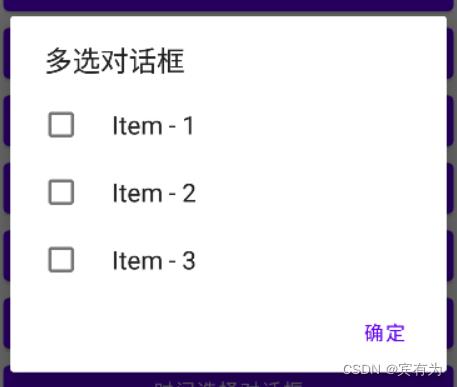
实现代码:
val bool = booleanArrayOf(false, false, false, false)
        AlertDialog.Builder(this)
            .setTitle("多选对话框")
            .setMultiChoiceItems(items,bool)  dialog: DialogInterface?, which: Int, isChecked: Boolean ->
            .setPositiveButton("确定")  dialog: DialogInterface?, which: Int ->
                var result = "选中了"
                for (i in bool.indices)
                    if (bool[i])
                        result += items[i]


                showMessage(result)
            .show()
| use methods | Describe |
|---|---|
| setTitle(CharSequence title) | 设置Dialog中显示的标题 |
| setMultiChoiceItems(CharSequence[] items, boolean[] checkedItems, final OnMultiChoiceClickListener listener) | 设置要在对话框中显示的项目列表作为内容,您将通过提供的侦听器收到所选项目的通知。该列表将在每个选中项目的文本右侧显示一个复选标记。单击列表中的项目不会关闭对话框。单击按钮将关闭对话框。 |
| setPositiveButton(CharSequence text, final OnClickListener listener) | 设置按下对话框的正按钮时要调用的侦听器 |
圆环进度条对话框(自定义)
圆环进度条对话框同水平进度条对话框一样,在低版本的Android系统可直接使用ProgressDialog展示(可参考下方的进度条对话框),设置参数将setProgressStyle(int style)的参数改为ProgressDialog.STYLE_SPINNER即可。
如果需要自定义Android对话框,步骤与水平进度条对话框相似,只是布局不同,如下:
1、xml布局
<LinearLayout xmlns:android="http://schemas.android.com/apk/res/android"
    android:layout_width="match_parent"
    android:layout_height="match_parent"
    android:gravity="center"
    android:orientation="horizontal">

    <ProgressBar
        android:id="@+id/progressBar"
        style="?android:attr/progressBarStyle"
        android:layout_width="wrap_content"
        android:layout_height="wrap_content"
        android:layout_marginTop="10dp"
        android:layout_marginBottom="10dp"/>

    <TextView
        android:id="@+id/percentage"
        android:layout_width="wrap_content"
        android:layout_height="wrap_content"
        android:layout_marginLeft="10dp"
        android:text="正在下载..."
        android:textSize="16dp"
        android:textStyle="bold"
        android:layout_marginTop="10dp"
        android:layout_marginBottom="10dp"/>
</LinearLayout>
2、Java中设置
AlertDialog.Builder alertDialog = new AlertDialog.Builder(this);
View inflate = LayoutInflater.from(this).inflate(R.layout.progress_bar2, null);
// 设置一直滚动的效果
for (int i = 0; i <= 100 ; i++)
    if (i == 0)
        i = 100;

    ((ProgressBar)inflate.findViewById(R.id.progressBar)).setProgress(i);

alertDialog.setView(inflate);
AlertDialog dialog = alertDialog.create();
dialog.show();
// 设置对话框宽高,要先show()再设置才回生效
Window window = dialog.getWindow();
WindowManager.LayoutParams attributes = window.getAttributes();
attributes.width = 700;
attributes.height = WindowManager.LayoutParams.WRAP_CONTENT;
attributes.gravity = Gravity.CENTER;
window.setAttributes(attributes);
效果如下:

带半径的对话框(自定义)
每个人开发带半径的对话框时应该都会遇到这样的一个问题,设置了半径却不显示效果,而这样的情况我已经试过两三次了,每次都靠网友的答案才能帮我度过此劫,做一个半径的对话框记录下来,再遇到这种问题就无需到处跑去找原因啦。
1、在layout创建一个dialog_radius.xml布局文件,作为对话框的布局文件。
<?xml version="1.0" encoding="utf-8"?>
<LinearLayout xmlns:android="http://schemas.android.com/apk/res/android"
    android:layout_width="match_parent"
    android:layout_height="match_parent"
    android:layout_gravity="center"
    android:background="@drawable/background_radius">

    <TextView
        android:layout_width="333dp"
        android:layout_height="320dp"
        android:gravity="center"
        android:text="有半径的对话框"
        android:textSize="25sp" />
</LinearLayout>
2、在drawable文件夹下创建一个background_radius.xml文件,作为对话框的背景。
<?xml version="1.0" encoding="utf-8"?>
<shape xmlns:android="http://schemas.android.com/apk/res/android">
    <corners android:radius="20dp"/>
    <solid android:color="@color/white"/>
</shape>
3、在代码中设置好参数后,show()一下就是一个对话框。
// 创建一个AlertDialog并设置View布局文件
val dialog: AlertDialog = AlertDialog.Builder(this).setView(R.layout.dialog_radius).create()
dialog.show()
但这个时候并未完成全部工作,这时候运行起来的对话框必定是没有半径的对话框,相当于我们设置的半径并未生效。原因在于AlertDialog是有它自己的一个背景,需要将AlertDialog的背景隐藏掉,才能正常显示出设置好的半径对话框。
// 设置对话框显示的位置
dialog.window!!.setGravity(Gravity.CENTER);
// 将背景设置为透明
dialog.window!!.setBackgroundDrawable(ColorDrawable(Color.TRANSPARENT));
在dialog_radius.xml布局中修改宽度、高度设置为match_parent、wrap_content是不会对对话框的宽度、高度产生变化,宽度的设置唯有使用如下方法设置宽度。高度的设置只能是指定的dp,且不能是父布局设置宽高,高度只会随着子布局的高度增大而增大,当然对话框高度的设置也可使用以下方式。
// 在xml设置的宽度、高度不起作用时,可使用如下方法设置宽高
// setLayout(int width, int height)设置的宽高默认为px单位,如需适配其它屏幕需要转换
dialog.window!!.setLayout(ViewGroup.LayoutParams.WRAP_CONTENT, ViewGroup.LayoutParams.WRAP_CONTENT);
效果如下:

AlertDialog其它常用属性
| use methods | Describe |
|---|---|
| setIcon(Drawable icon) | 设置Drawable在标题中使用 |
| setCancelable(boolean cancelable) | 设置对话框是否可取消 |
| setCustomTitle(View customTitleView) | 使用自定义视图设置标题customTitleView |
| setAdapter(ListAdapter adapter, DialogInterface.OnClickListener listener) | 设置由 given 提供的项目列表,ListAdapter作为内容显示在对话框中,您将通过提供的侦听器收到所选项目的通知 |
日期时间系列
日期时间系列对话框,用到了两个类,分别是TimePickerDialog、DatePickerDialog,这两个对话框样式不多,它们只做自己专业的事,例如使用TimePickerDialog,你只能做一个时间选择的对话框,无法类似AlertDialog做到一个class多种样式。同时,TimePickerDialog、DatePickerDialog的父类都是AlertDialog,这也就使得AlertDialog的公共方法这两个对话框都可以使用。
时间选择器
TimePickerDialog
TimePickerDialog类的方法不多,直接写构造方法 + show(),效果就出来了。
TimePickerDialog(this, timePicker: TimePicker?, hourOfDay: Int, minute: Int ->
		show("选中了" + hourOfDay + "时" + minute + "分")
	,0,0,true).show()

TimePickerDialog属性
| Public constructors | Describe |
|---|---|
| TimePickerDialog(Context context, TimePickerDialog.OnTimeSetListener listener, int hourOfDay, int minute, boolean is24HourView) | 创建一个新的时间选择器对话框 |
| TimePickerDialog(Context context, int themeResId, TimePickerDialog.OnTimeSetListener listener, int hourOfDay, int minute, boolean is24HourView) | 创建具有指定主题的新时间选择器对话框 |
| Public methods | Describe |
|---|---|
| onClick(DialogInterface dialog, int which) | 单击对话框中的按钮时将调用此方法 |
| onRestoreInstanceState(Bundle savedInstanceState) | 从以前保存的包中恢复对话框的状态 |
| onSaveInstanceState() | 将对话框的状态保存到包中 |
| updateTime(int hourOfDay, int minuteOfHour) | 设置当前时间 |
| show() | 启动对话框并将其显示在屏幕上 |
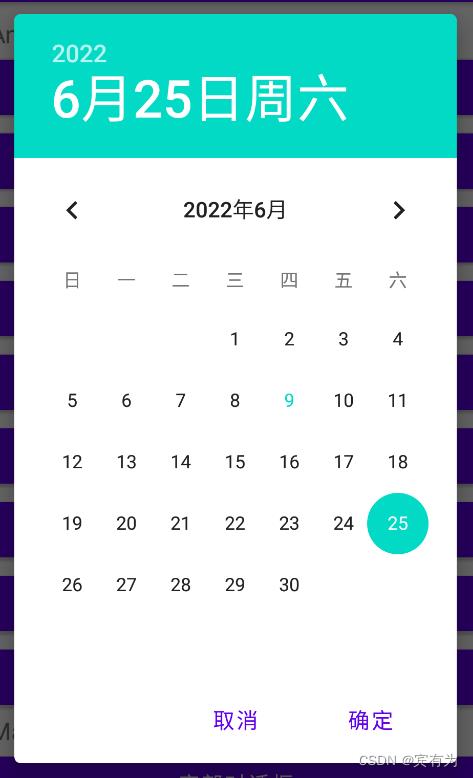
日期选择器
DatePickerDialog
DatePickerDialog与TimePickerDialog类一样,直接写构造方法 + show(),效果就出来了。
DatePickerDialog(this, datePicker: DatePicker?, year: Int, month: Int, dayOfMonth: Int ->
		show("选中了" + year + "年" + month + "月" + dayOfMonth + "日")
	,2022,5,25).show()
DatePickerDialog属性
| Public constructors | Describe |
|---|---|
| DatePickerDialog(context: Context) | 使用父上下文的默认日期选择器对话框主题为当前日期创建一个新的日期选择器对话框 |
| DatePickerDialog(context: Context, themeResId: Int) | 为当前日期创建一个新的日期选择器对话框 |
| DatePickerDialog(context: Context, listener: DatePickerDialog.OnDateSetListener?, year: Int, month: Int, dayOfMonth: Int) | 使用父上下文的默认日期选择器对话框主题为指定日期创建一个新的日期选择器对话框 |
| DatePickerDialog(context: Context, themeResId: Int, listener: DatePickerDialog.OnDateSetListener?, year: Int, monthOfYear: Int, dayOfMonth: Int) | 为指定日期创建一个新的日期选择器对话框 |
| Public methods | Describe |
|---|---|
| onClick(dialog: DialogInterface, which: Int) | 单击对话框中的按钮时将调用此方法 |
| onDateChanged(view: DatePicker, year: Int, month: Int, dayOfMonth: Int) | 要求更改日期 |
| setOnDateSetListener(listener: DatePickerDialog.OnDateSetListener?) | 设置在用户设置日期时调用的侦听器 |
| updateDate(year: Int, month: Int, dayOfMonth: Int) | 设置当前日期 |
进度条系列(ProgressDialog)
进度条对话框在低版本的Android系统可直接使用ProgressDialog展示,这样简单又快捷。
val progressDialog = ProgressDialog(this)
progressDialog.setProgressStyle(ProgressDialog.STYLE_HORIZONTAL)
progressDialog.setTitle("正在下载...")
progressDialog.progress = 50
progressDialog.show()
可惜的是,在 Android 8 及以上的系统中,该类已被废弃。

要想实现类似效果,我们也只能自定义了。
ProgressDialog类的直接父类是AlertDialog,使用AlertDialog实现水平进度条对话框应该是最简单的方式。步骤如下:
1、定义一个xml布局,在布局里使用ProgressBar充当ProgressDialog的水平进度条。
<androidx.constraintlayout.widget.ConstraintLayout xmlns:android="http://schemas.android.com/apk/res/android"
    xmlns:tools="http://schemas.android.com/tools"
    android:layout_width="match_parent"
    android:layout_height="match_parent"
    android:paddingBottom="10dp"
    xmlns:app="http://schemas.android.com/apk/res-auto">

    <ProgressBar
        android:id="@+id/progressBar"
        style="?android:attr/progressBarStyleHorizontal"
        android:layout_width="match_parent"
        android:layout_height="wrap_content"
        android:layout_marginLeft="25dp"
        android:layout_marginRight="25dp"
        app:layout_constraintTop_toTopOf="parent"
        app:layout_constraintBottom_toBottomOf="parent"
        app:layout_constraintRight_toRightOf="parent"
        app:layout_constraintLeft_toLeftOf="parent"/>

    <TextView
        android:id="@+id/percentage"
        android:layout_width="wrap_content"
        android:layout_height="wrap_content"
        app:layout_constraintTop_toBottomOf="@id/progressBar"
        app:layout_constraintRight_toRightOf="parent"
        android:text="0%"
        android:layout_marginRight="25dp"/>

</androidx.constraintlayout.widget.ConstraintLayout>
2、使用AlertDialog.Builder的setView(View view)方法将编写好的xml塞入到AlertDialog.Builder里面。
val alertDialog = AlertDialog.Builder(this)
alertDialog.setTitle("水平进度条对话框")
val inflate = LayoutInflater.from(this).inflate(R.layout.progress_bar, null)
(inflate.findViewById(R.id.progressBar) as ProgressBar).progress = 50
(inflate.findViewById(R.id.percentage) as TextView).text = "50%"
alertDialog.setView(inflate)
alertDialog.show()
效果如下:

参考文档:Android developers
以上是关于Android常用对话框大全Android Dialog的主要内容,如果未能解决你的问题,请参考以下文章