YOLOYOLOv8实操:环境配置/自定义数据集准备/模型训练/预测
Posted 摇曳的树
tags:
篇首语:本文由小常识网(cha138.com)小编为大家整理,主要介绍了YOLOYOLOv8实操:环境配置/自定义数据集准备/模型训练/预测相关的知识,希望对你有一定的参考价值。
YOLOv8实操:环境配置/自定义数据集准备/模型训练/预测
引言
源码链接:https://github.com/ultralytics/ultralytics
yolov8和yolov5是同一作者,相比yolov5,yolov8的集成性更好了,更加面向用户了
YOLO命令行界面(command line interface, CLI) 方便在各种任务和版本上训练、验证或推断模型。CLI不需要定制或代码,可以使用yolo命令从终端运行所有任务。
如果想了解yolo系列的更新迭代,以及yolov8的模型结构,推荐下面的链接:
YOLOv8详解 【网络结构+代码+实操】
笔者直接从实操入手
1 环境配置
安装pytorch、torchvision和其他依赖库
环境配置部分可以参考笔者的博客
【YOLO】YOLOv5-6.0环境搭建(不定时更新)
安装ultralytics
git clone https://github.com/ultralytics/ultralytics
cd ultralytics
pip install -e .
2 数据集准备
针对检测的数据集准备可以参考笔者的博客,这里不再赘述了
【YOLO】训练自己的数据集
3 模型训练
比起YOLOv5,YOLOv8的训练封装性更好了,有利有弊吧,参数默认值修改比较麻烦
训练指令如下:
yolo task=detect mode=train model=yolov8s.pt data=/media/ll/L/llr/DATASET/subwayDatasets/coco.yaml device=0 cache=True epochs=300 project=/media/ll/L/llr/mode name=yolov8
除了上述笔者使用的参数,其他参数说明
task: detect  # 可选择:detect, segment, classify
mode: train  #可选择: train, val, predict

# Train settings -------------------------------------------------------------------------------------------------------

model:  # 设置模型。格式因任务类型而异。支持model_name, model.yaml,model.pt
data:  # 设置数据,支持多数类型 data.yaml, data_folder, dataset_name
epochs: 300  # 需要训练的epoch数
patience: 50  # epochs to wait for no observable improvement for early stopping of training
batch: 16  # Dataloader的batch大小
imgsz: 640  # Dataloader中图像数据的大小
save: True  # save train checkpoints and predict results
save_period: -1 # Save checkpoint every x epochs (disabled if < 1)
cache: True  # True/ram, disk or False. Use cache for data loading
device:  # device to run on, i.e. cuda device=0 or device=0,1,2,3 or device=cpu
workers: 8  # 每个进程使用的cpu worker数。使用DDP自动伸缩
project: /media/ll/L/llr/model # project name
name: yolov8 # experiment name
exist_ok: False  # whether to overwrite existing experiment
pretrained: False  # whether to use a pretrained model
optimizer: SGD  # 支持的优化器:Adam, SGD, RMSProp
verbose: True  # whether to print verbose output
seed: 0  # random seed for reproducibility
deterministic: True  # whether to enable deterministic mode
single_cls: False  # 将多类数据作为单类进行训练
image_weights: False  # 使用加权图像选择进行训练
rect: False  # 启用矩形训练
cos_lr: False  # 使用cosine LR调度器
close_mosaic: 10  # disable mosaic augmentation for final 10 epochs
resume: False  # resume training from last checkpoint
min_memory: False  # minimize memory footprint loss function, choices=[False, True, <roll_out_thr>]
# Segmentation
overlap_mask: True  # 分割:在训练中使用掩码重叠
mask_ratio: 4  # 分割:设置掩码下采样
# Classification
dropout: 0.0  # 分类:训练时使用dropout

# Val/Test settings ----------------------------------------------------------------------------------------------------
val: True  # validate/test during training
split: val  # dataset split to use for validation, i.e. 'val', 'test' or 'train'
save_json: False  # save results to JSON file
save_hybrid: False  # save hybrid version of labels (labels + additional predictions)
conf:  # object confidence threshold for detection (default 0.25 predict, 0.001 val)
iou: 0.7  # intersection over union (IoU) threshold for NMS
max_det: 300  # maximum number of detections per image
half: False  # use half precision (FP16)
dnn: False  # 使用OpenCV DNN进行ONNX推断
plots: True  # 在验证时保存图像

# Prediction settings --------------------------------------------------------------------------------------------------
source:  # 输入源。支持图片、文件夹、视频、网址
show: False  # 查看预测图片
save_txt: False  # 保存结果到txt文件中
save_conf: False  # save results with confidence scores
save_crop: False  # save cropped images with results
hide_labels: False  # hide labels
hide_conf: False  # hide confidence scores
vid_stride: 1  # 输入视频帧率步长
line_thickness: 3  # bounding box thickness (pixels)
visualize: False  # 可视化模型特征
augment: False  # apply image augmentation to prediction sources
agnostic_nms: False  # class-agnostic NMS
classes:  # filter results by class, i.e. class=0, or class=[0,2,3]
retina_masks: False  #分割:高分辨率掩模
boxes: True # Show boxes in segmentation predictions

# Export settings ------------------------------------------------------------------------------------------------------
format: torchscript  # format to export to
keras: False  # use Keras
optimize: False  # TorchScript: optimize for mobile
int8: False  # CoreML/TF INT8 quantization
dynamic: False  # ONNX/TF/TensorRT: dynamic axes
simplify: False  # ONNX: simplify model
opset:  # ONNX: opset version (optional)
workspace: 4  # TensorRT: workspace size (GB)
nms: False  # CoreML: add NMS

# Hyperparameters ------------------------------------------------------------------------------------------------------
lr0: 0.01  # 初始化学习率
lrf: 0.01  # 最终的OneCycleLR学习率
momentum: 0.937  # 作为SGD的momentum和Adam的beta1
weight_decay: 0.0005  # 优化器权重衰减
warmup_epochs: 3.0  # Warmup的epoch数,支持分数)
warmup_momentum: 0.8  # warmup的初始动量
warmup_bias_lr: 0.1  # Warmup的初始偏差lr
box: 7.5  # box loss gain
cls: 0.5  # cls loss gain (scale with pixels)
dfl: 1.5  # dfl loss gain
fl_gamma: 0.0  # focal loss gamma (efficientDet default gamma=1.5)
label_smoothing: 0.0  # label smoothing (fraction)
nbs: 64  # nominal batch size
hsv_h: 0.015  # image HSV-Hue augmentation (fraction)
hsv_s: 0.7  # image HSV-Saturation augmentation (fraction)
hsv_v: 0.4  # image HSV-Value augmentation (fraction)
degrees: 0.0  # image rotation (+/- deg)
translate: 0.1  # image translation (+/- fraction)
scale: 0.5  # image scale (+/- gain)
shear: 0.0  # image shear (+/- deg)
perspective: 0.0  # image perspective (+/- fraction), range 0-0.001
flipud: 0.0  # image flip up-down (probability)
fliplr: 0.5  # image flip left-right (probability)
mosaic: 1.0  # image mosaic (probability)
mixup: 0.0  # image mixup (probability)
copy_paste: 0.0  # segment copy-paste (probability)

# Custom config.yaml ---------------------------------------------------------------------------------------------------
cfg:  # for overriding defaults.yaml

# Debug, do not modify -------------------------------------------------------------------------------------------------
v5loader: False  # use legacy YOLOv5 dataloader
4 模型预测
weight_path = "best.pt" # 自训练的模型
imgdir = r'/media/ll/L/llr/DATASET/subwayDatasets/bjdt/images'
img_path = r'/media/ll/L/llr/DATASET/subwayDatasets/bjdt/images/L_0000018.jpg'
model = YOLO(weight_path)
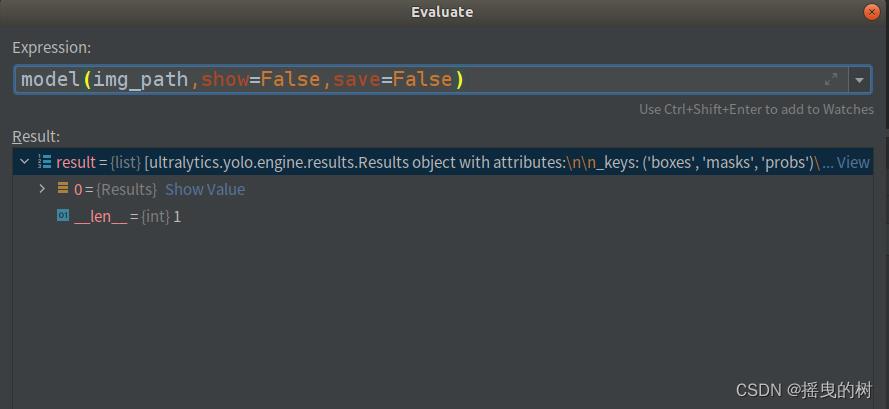
results = model(img_path,show=False,save=False) # 是否显示和保存结果数据
预测一张图片,results如下图所示:
预测文件夹目录,results如图所示:
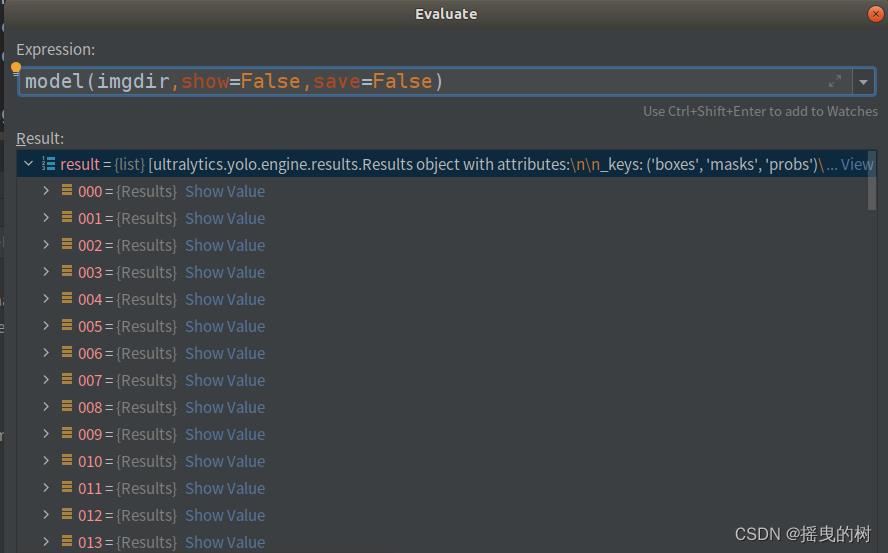
无论是一张图片还是图片目录,返回的results都是list
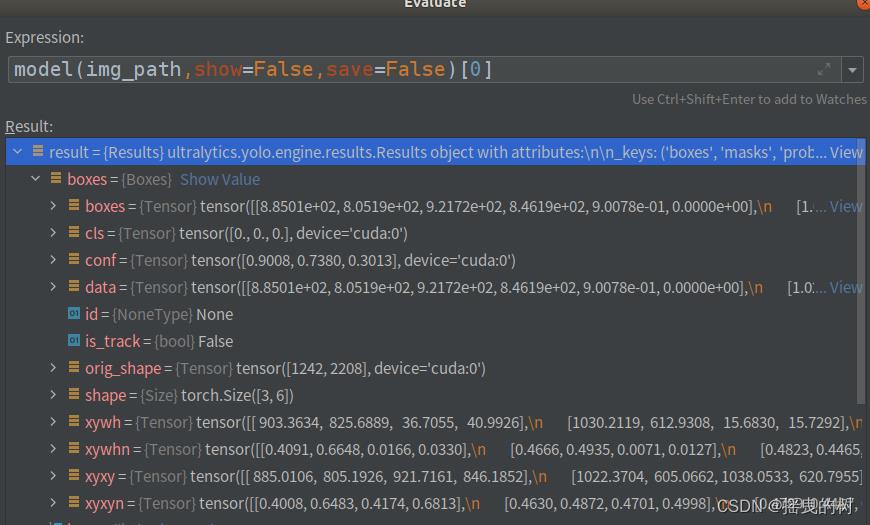
要对预测结果进行处理需要索引进去,如下图所示

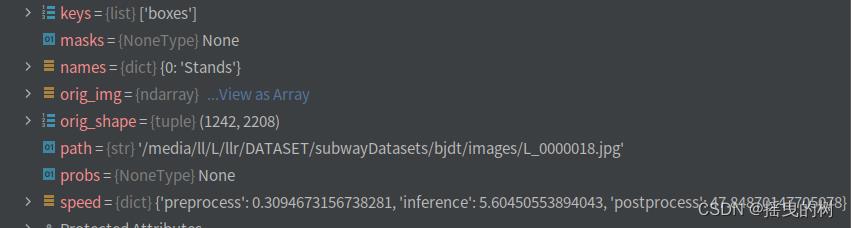
结果参数说明:
 boxes:各种形式的检测框信息(xyxy、xywh、归一化的)、类别索引、置信度等
 names:类别字典
 orig_img:原图数组
 orig_shape:原图尺寸
 plots:在验证时保存图像(预测时一般为None)
 speed:处理速度
基于上述模型提供的检测结果进行后处理算法等
上述即为yolov8的快速使用
Hadoop大数据技术Yarn 案例实操
Yarn 案例实操
1. Yarn 生产环境核心参数配置案例
注:调整下列参数之前尽量拍摄 Linux 快照,否则后续的案例,还需要重写准备集群。
1)需求:从 1G 数据中,统计每个单词出现次数。服务器 3 台,每台配置 4G 内存,4 核CPU,4 线程。
2)需求分析:
-
1G / 128m = 8 个 MapTask;1 个 ReduceTask;1 个mrAppMaster
-
平均每个节点运行 10 个 / 3 台 ≈ 3 个任务(4 3 3)
3)修改 yarn-site.xml 配置参数如下:
<!-- 选择调度器,默认容量 -->
<property>
<description>The class to use as the resource scheduler.</description>
<name>yarn.resourcemanager.scheduler.class</name>
<value>org.apache.hadoop.yarn.server.resourcemanager.scheduler.capacity.CapacityScheduler</value>
</property>
<!-- ResourceManager 处理调度器请求的线程数量,默认 50;如果提交的任务数大于 50,可以
增加该值,但是不能超过 3 台 * 4 线程 = 12 线程(去除其他应用程序实际不能超过 8) -->
<property>
<description>Number of threads to handle scheduler interface.</description>
<name>yarn.resourcemanager.scheduler.client.thread-count</name>
<value>8</value>
</property>
<!-- 是否让 yarn 自动检测硬件进行配置,默认是 false,如果该节点有很多其他应用程序,建议
手动配置。如果该节点没有其他应用程序,可以采用自动 -->
<property>
<description>Enable auto-detection of node capabilities such as memory and CPU.
</description>
<name>yarn.nodemanager.resource.detect-hardware-capabilities</name>
<value>false</value>
</property>
<!-- 是否将虚拟核数当作 CPU 核数,默认是 false,采用物理 CPU 核数 -->
<property>
<description>Flag to determine if logical processors(such as
hyperthreads) should be counted as cores. Only applicable on Linux
when yarn.nodemanager.resource.cpu-vcores is set to -1 and
yarn.nodemanager.resource.detect-hardware-capabilities is true.
</description>
<name>yarn.nodemanager.resource.count-logical-processors-ascores</name>
<value>false</value>
</property>
<!-- 虚拟核数和物理核数乘数,默认是 1.0 -->
<property>
<description>Multiplier to determine how to convert phyiscal cores to
vcores. This value is used if yarn.nodemanager.resource.cpu-vcores
is set to -1(which implies auto-calculate vcores) and
yarn.nodemanager.resource.detect-hardware-capabilities is set to true.
The number of vcores will be calculated as number of CPUs * multiplier.
</description>
<name>yarn.nodemanager.resource.pcores-vcores-multiplier</name>
<value>1.0</value>
</property>
<!-- NodeManager 使用内存数,默认 8G,修改为 4G 内存 -->
<property>
<description>Amount of physical memory, in MB, that can be allocated
for containers. If set to -1 and
yarn.nodemanager.resource.detect-hardware-capabilities is true, it is
automatically calculated(in case of Windows and Linux).
In other cases, the default is 8192MB.
</description>
<name>yarn.nodemanager.resource.memory-mb</name>
<value>4096</value>
</property>
<!-- nodemanager 的 CPU 核数,不按照硬件环境自动设定时默认是 8 个,修改为 4 个 -->
<property>
<description>Number of vcores that can be allocated
for containers. This is used by the RM scheduler when allocating
resources for containers. This is not used to limit the number of
CPUs used by YARN containers. If it is set to -1 and
yarn.nodemanager.resource.detect-hardware-capabilities is true, it is
automatically determined from the hardware in case of Windows and Linux.
In other cases, number of vcores is 8 by default.</description>
<name>yarn.nodemanager.resource.cpu-vcores</name>
<value>4</value>
</property>
<!-- 容器最小内存,默认 1G -->
<property>
<description>The minimum allocation for every container request at theRM in MBs. Memory requests lower than this will be set to the value of
this property. Additionally, a node manager that is configured to have
less memory than this value will be shut down by the resource manager.
</description>
<name>yarn.scheduler.minimum-allocation-mb</name>
<value>1024</value>
</property>
<!-- 容器最大内存,默认 8G,修改为 2G -->
<property>
<description>The maximum allocation for every container request at the
RM in MBs. Memory requests higher than this will throw an
InvalidResourceRequestException.
</description>
<name>yarn.scheduler.maximum-allocation-mb</name>
<value>2048</value>
</property>
<!-- 容器最小 CPU 核数,默认 1 个 -->
<property>
<description>The minimum allocation for every container request at the
RM in terms of virtual CPU cores. Requests lower than this will be set to
the value of this property. Additionally, a node manager that is configured
to have fewer virtual cores than this value will be shut down by the
resource manager.
</description>
<name>yarn.scheduler.minimum-allocation-vcores</name>
<value>1</value>
</property>
<!-- 容器最大 CPU 核数,默认 4 个,修改为 2 个 -->
<property>
<description>The maximum allocation for every container request at the RM in terms of virtual CPU cores. Requests higher than this will throw an InvalidResourceRequestException.</description>
<name>yarn.scheduler.maximum-allocation-vcores</name>
<value>2</value>
</property>
<!-- 虚拟内存检查,默认打开,修改为关闭 -->
<property>
<description>Whether virtual memory limits will be enforced forcontainers.</description>
<name>yarn.nodemanager.vmem-check-enabled</name>
<value>false</value>
</property>
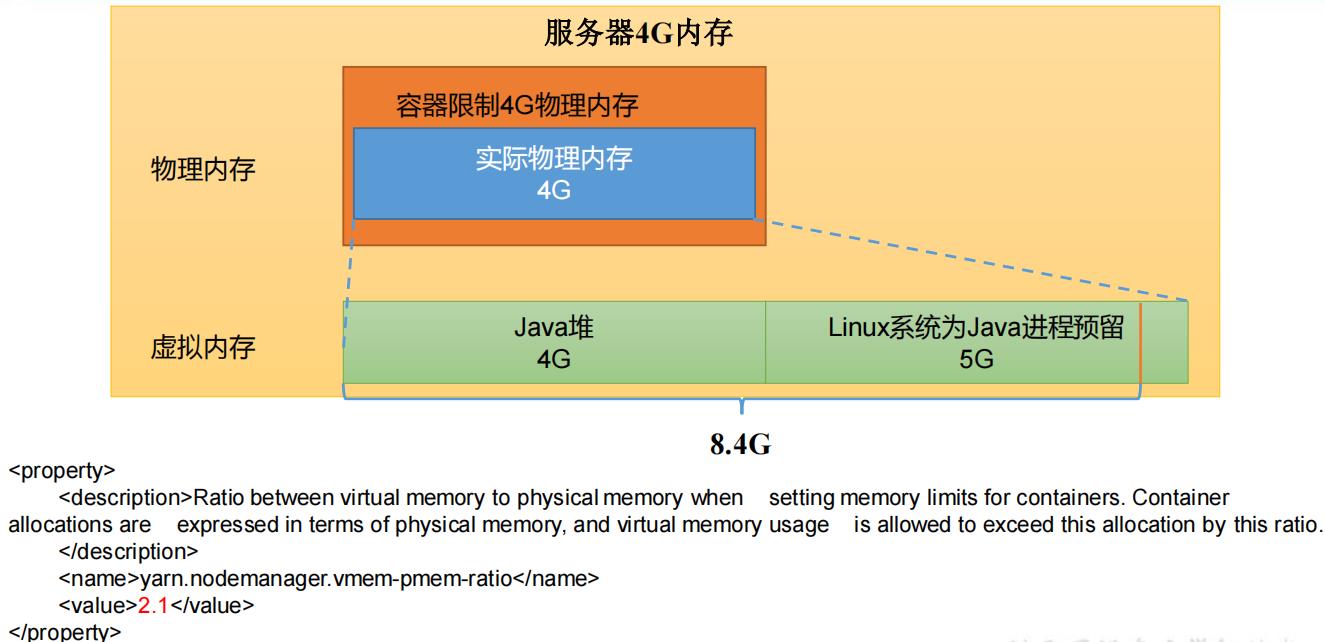
<!-- 虚拟内存和物理内存设置比例,默认 2.1 -->
<property>
<description>Ratio between virtual memory to physical memory when
setting memory limits for containers. Container allocations are
expressed in terms of physical memory, and virtual memory usage is
allowed to exceed this allocation by this ratio.
</description>
<name>yarn.nodemanager.vmem-pmem-ratio</name>
<value>2.1</value>
</property>
关闭虚拟内存检查原因
4)分发配置
注意:如果集群的硬件资源不一致,要每个 NodeManager 单独配置
5)重启集群
[zs@hadoop102 hadoop-3.1.3]$ sbin/stop-yarn.sh
[zs@hadoop103 hadoop-3.1.3]$ sbin/start-yarn.sh
6)执行 WordCount 程序
[zs@hadoop102 hadoop-3.1.3]$ hadoop jar share/hadoop/mapreduce/hadoop-mapreduce-examples-3.1.3.jar wordcount /input /output
7)观察 Yarn 任务执行页面
http://hadoop103:8088/cluster/apps
2. 容量调度器多队列提交案例
1)在生产环境怎么创建队列?
(1)调度器默认就 1 个 default 队列,不能满足生产要求。
(2)按照框架:hive /spark/ flink 每个框架的任务放入指定的队列(企业用的不是特别多)
(3)按照业务模块:登录注册、购物车、下单、业务部门 1、业务部门 2
2)创建多队列的好处?
(1)因为担心员工不小心,写递归死循环代码,把所有资源全部耗尽。
(2)实现任务的降级使用,特殊时期保证重要的任务队列资源充足。11.11 6.18 业务部门 1(重要)=》业务部门 2(比较重要)=》下单(一般)=》购物车(一般)=》登录注册(次要)
(1)因为担心员工不小心,写递归死循环代码,把所有资源全部耗尽。
(2)实现任务的降级使用,特殊时期保证重要的任务队列资源充足。11.11 6.18 业务部门 1(重要)=》业务部门 2(比较重要)=》下单(一般)=》购物车(一般)=》
登录注册(次要)
2.1 需求
需求 1:default 队列占总内存的 40%,最大资源容量占总资源 60%,hive 队列占总内存的 60%,最大资源容量占总资源 80%。
需求 2:配置队列优先级
2.2 配置多队列的容量调度器
1)在 capacity-scheduler.xml 中配置如下:
(1)修改如下配置
<!-- 指定多队列,增加 hive 队列 -->
<property>
	 <name>yarn.scheduler.capacity.root.queues</name>
	 <value>default,hive</value>
 <description>
 The queues at the this level (root is the root queue).
 </description>
</property>
<!-- 降低 default 队列资源额定容量为 40%,默认 100% -->
<property>
	 <name>yarn.scheduler.capacity.root.default.capacity</name>
	 <value>40</value>
</property>
<!-- 降低 default 队列资源最大容量为 60%,默认 100% -->
<property>
	 <name>yarn.scheduler.capacity.root.default.maximum-capacity</name>
	 <value>60</value>
</property>
(2)为新加队列添加必要属性:
<!-- 指定 hive 队列的资源额定容量 -->
<property>
	 <name>yarn.scheduler.capacity.root.hive.capacity</name>
	 <value>60</value>
</property>
<!-- 用户最多可以使用队列多少资源,1 表示 -->
<property>
	 <name>yarn.scheduler.capacity.root.hive.user-limit-factor</name>
	 <value>1</value>
</property>
<!-- 指定 hive 队列的资源最大容量 -->
<property>
	 <name>yarn.scheduler.capacity.root.hive.maximum-capacity</name>
	 <value>80</value>
</property>
<!-- 启动 hive 队列 -->
<property>
	 <name>yarn.scheduler.capacity.root.hive.state</name>
	 <value>RUNNING</value>
</property>
<!-- 哪些用户有权向队列提交作业 -->
<property>
	 <name>yarn.scheduler.capacity.root.hive.acl_submit_applications</name>
	 <value>*</value>
</property>
<!-- 哪些用户有权操作队列,管理员权限(查看/杀死) -->
<property>
	 <name>yarn.scheduler.capacity.root.hive.acl_administer_queue</name>
	 <value>*</value>
</property>
<!-- 哪些用户有权配置提交任务优先级 -->
<property>

	<name>yarn.scheduler.capacity.root.hive.acl_application_max_priority</name>
	<value>*</value>
</property>
<!-- 任务的超时时间设置:yarn application -appId appId -updateLifetime Timeout
参考资料: https://blog.cloudera.com/enforcing-application-lifetime-slasyarn/ --> <!-- 如果 application 指定了超时时间,则提交到该队列的 application 能够指定的最大超时
时间不能超过该值。
-->
<property>
	 <name>yarn.scheduler.capacity.root.hive.maximum-applicationlifetime</name>
	 <value>-1</value>
</property>
<!-- 如果 application 没指定超时时间,则用 default-application-lifetime 作为默认
值 -->
<property>
	 <name>yarn.scheduler.capacity.root.hive.default-applicationlifetime</name>
	 <value>-1</value>
</property>
2)分发配置文件
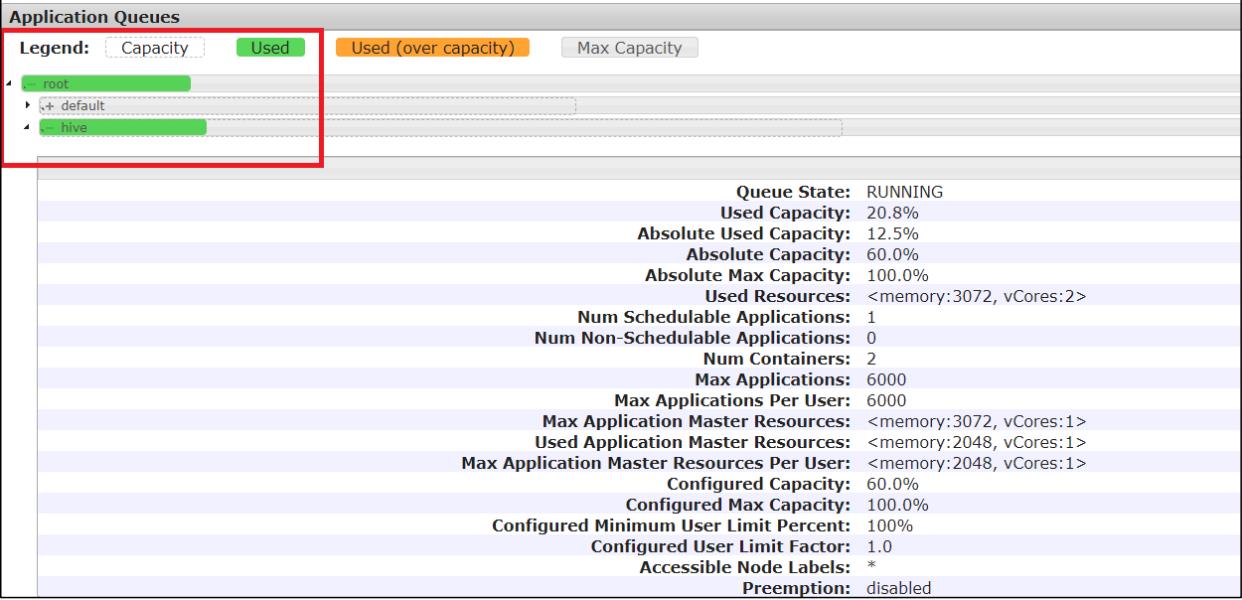
3)重启 Yarn 或者执行 yarn rmadmin -refreshQueues 刷新队列,就可以看到两条队列:
[zs@hadoop102 hadoop-3.1.3]$ yarn rmadmin -refreshQueues

2.3 向 Hive 队列提交任务
1)hadoop jar 的方式
[zs@hadoop102 hadoop-3.1.3]$ hadoop jar share/hadoop/mapreduce/hadoop-mapreduce-examples-3.1.3.jar wordcount -D mapreduce.job.queuename=hive /input /output
注: -D 表示运行时改变参数值
2)打 jar 包的方式
默认的任务提交都是提交到 default 队列的。如果希望向其他队列提交任务,需要在Driver 中声明:
public class WcDrvier {
 	public static void main(String[] args) throws IOException, ClassNotFoundException, InterruptedException {
		 Configuration conf = new Configuration();
		 conf.set("mapreduce.job.queuename","hive");
		 //1. 获取一个 Job 实例
		 Job job = Job.getInstance(conf);
		 。。。 。。。
		 //6. 提交 Job
		 boolean b = job.waitForCompletion(true);
		 System.exit(b ? 0 : 1);
	 }
}
这样,这个任务在集群提交时,就会提交到 hive 队列:
2.4 任务优先级
容量调度器,支持任务优先级的配置,在资源紧张时,优先级高的任务将优先获取资源。
默认情况,Yarn 将所有任务的优先级限制为 0,若想使用任务的优先级功能,须开放该限制。
1)修改 yarn-site.xml 文件,增加以下参数
<property>
	 <name>yarn.cluster.max-application-priority</name>
	 <value>5</value>
</property>
2)分发配置,并重启 Yarn
[zs@hadoop102 hadoop]$ xsync yarn-site.xml
[zs@hadoop103 hadoop-3.1.3]$ sbin/stop-yarn.sh
[zs@hadoop103 hadoop-3.1.3]$ sbin/start-yarn.sh
3)模拟资源紧张环境,可连续提交以下任务,直到新提交的任务申请不到资源为止。
[zs@hadoop102 hadoop-3.1.3]$ hadoop jar /opt/module/hadoop-3.1.3/share/hadoop/mapreduce/hadoop-mapreduce-examples-3.1.3.jar pi 5 2000000
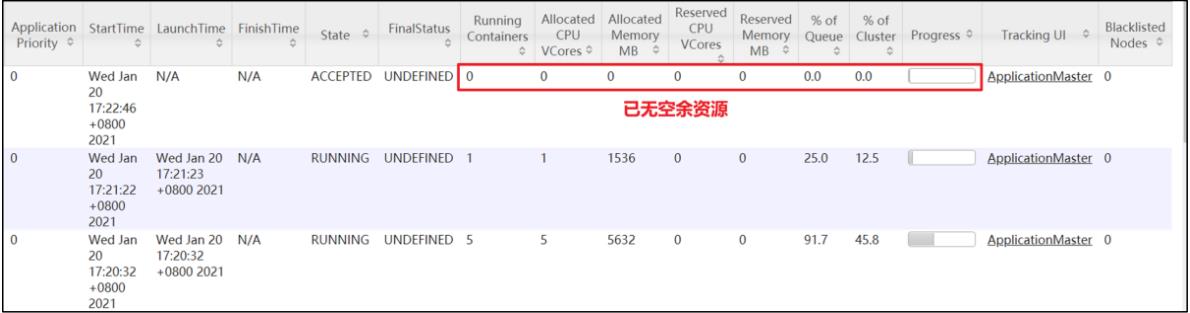
4)再次重新提交优先级高的任务
[zs@hadoop102 hadoop-3.1.3]$ hadoop jar /opt/module/hadoop-3.1.3/share/hadoop/mapreduce/hadoop-mapreduce-examples-3.1.3.jar pi -Dmapreduce.job.priority=5 5 2000000

5)也可以通过以下命令修改正在执行的任务的优先级
yarn application -appID <ApplicationID> -updatePriority 优先级
[zs@hadoop102 hadoop-3.1.3]$ yarn application -appID
application_1611133087930_0009 -updatePriority 5
3. 公平调度器案例
3.1 需求
创建两个队列,分别是 test 和 zs(以用户所属组命名)。期望实现以下效果:若用户提交任务时指定队列,则任务提交到指定队列运行;若未指定队列,test 用户提交的任务到 root.group.test 队列运行,zs提交的任务到 root.group.zs队列运行(注:group 为用户所属组)。
公平调度器的配置涉及到两个文件,一个是 yarn-site.xml,另一个是公平调度器队列分配文件 fair-scheduler.xml(文件名可自定义)。
(1)配置文件参考资料:
https://hadoop.apache.org/docs/r3.1.3/hadoop-yarn/hadoop-yarn-site/FairScheduler.html
(2)任务队列放置规则参考资料:
https://blog.cloudera.com/untangling-apache-hadoop-yarn-part-4-fair-scheduler-queuebasics/
3.2 配置多队列的公平调度器
1)修改 yarn-site.xml 文件,加入以下参数:
<property>
 <name>yarn.resourcemanager.scheduler.class</name>
<value>org.apache.hadoop.yarn.server.resourcemanager.scheduler.fair.FairScheduler</value>
 <description>配置使用公平调度器</description>
</property>
<property>
 <name>yarn.scheduler.fair.allocation.file</name>
 <value>/opt/module/hadoop-3.1.3/etc/hadoop/fair-scheduler.xml</value>
 <description>指明公平调度器队列分配配置文件</description>
</property>
<property>
 <name>yarn.scheduler.fair.preemption</name>
 <value>false</value>
 <description>禁止队列间资源抢占</description>
</property>
2)配置 fair-scheduler.xml
<?xml version="1.0"?>
<allocations>
<!-- 单个队列中 Application Master 占用资源的最大比例,取值 0-1 ,企业一般配置 0.1 -->
<queueMaxAMShareDefault>0.5</queueMaxAMShareDefault>
<!-- 单个队列最大资源的默认值 test atguigu default -->
<queueMaxResourcesDefault>4096mb,4vcores</queueMaxResourcesDefault>
<!-- 增加一个队列 test -->
<queue name="test">
<!-- 队列最小资源 -->
<minResources>2048mb,2vcores</minResources>
<!-- 队列最大资源 -->
<maxResources>4096mb,4vcores</maxResources>
<!-- 队列中最多同时运行的应用数,默认 50,根据线程数配置 -->
<maxRunningApps>4</maxRunningApps>
<!-- 队列中 Application Master 占用资源的最大比例 -->
<maxAMShare>0.5</maxAMShare>
<!-- 该队列资源权重,默认值为 1.0 -->
<weight>1.0</weight>
<!-- 队列内部的资源分配策略 -->
<schedulingPolicy>fair</schedulingPolicy>
</queue>
<!-- 增加一个队列 atguigu -->
<queue name="atguigu" type="parent">
<!-- 队列最小资源 -->
<minResources>2048mb,2vcores</minResources>
<!-- 队列最大资源 -->
<maxResources>4096mb,4vcores</maxResources>
<!-- 队列中最多同时运行的应用数,默认 50,根据线程数配置 -->
<maxRunningApps>4</maxRunningApps>
<!-- 队列中 Application Master 占用资源的最大比例 -->
<maxAMShare>0.5</maxAMShare>
<!-- 该队列资源权重,默认值为 1.0 -->
<weight>1.0</weight>
<!-- 队列内部的资源分配策略 -->
<schedulingPolicy>fair</schedulingPolicy>
</queue>
<!-- 任务队列分配策略,可配置多层规则,从第一个规则开始匹配,直到匹配成功 -->
<queuePlacementPolicy>
<!-- 提交任务时指定队列,如未指定提交队列,则继续匹配下一个规则; false 表示:如果指定队列不存在,不允许自动创建-->
<rule name="specified" create="false"/>
<!-- 提交到 root.group.username 队列,若 root.group 不存在,不允许自动创建;若root.group.user 不存在,允许自动创建 -->
<rule name="nestedUserQueue" create="true