AndroidService完全解析之必知必会
Posted 寒小枫
tags:
篇首语:本文由小常识网(cha138.com)小编为大家整理,主要介绍了AndroidService完全解析之必知必会相关的知识,希望对你有一定的参考价值。
想必对于android开发者来说,对Service一定不陌生了,作为大名鼎鼎的四大组件之一的service,在Android中有着不可替代的作用,它不像Activity那么光鲜亮丽,一般都是默默躲在后台执行着一些“见不得人的”任务,比如下载文件,音乐播放等等,即使退出应用了,它还是很顽强的在后台运行着,虽然随着android版本的不断提高,安全性的要求也越来越高,Service的一些黑科技也变得越来越难。
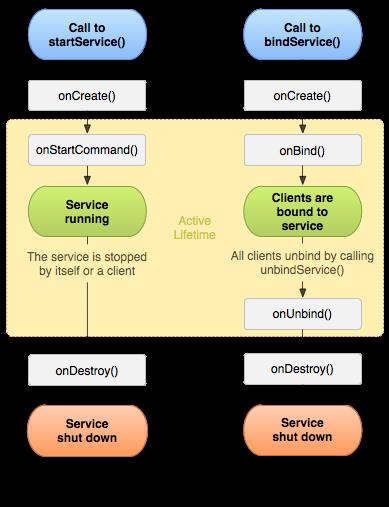
最近在学习Service,做个记录,希望能给您一些帮助,我们都知道service有两种启动方式,分别是startService和bindService,它们有各自的生命周期方法,盗张官网的图:

下面分别来看下它的使用吧,我们先创建一个Service:
public class MyService extends Service
    @Nullable
    @Override
    public IBinder onBind(Intent intent)
        Log.e("wangkeke","------onBind");
        return new MyBinder();


    public interface MyIBinder
        void showGetMyService();


    public class MyBinder extends Binder implements MyIBinder

        public void stopService(ServiceConnection serviceConnection)
            unbindService(serviceConnection);


        @Override
        public void showGetMyService()
            Log.e("wangkeke","------获取远程服务");


    @Override
    public void onCreate()
        super.onCreate();
        Log.e("wangkeke","------onCreate");


    @Override
    public int onStartCommand(Intent intent, int flags, int startId)
        Log.e("wangkeke","------onStartCommand");
        return super.onStartCommand(intent, flags, startId);


    @Override
    public boolean onUnbind(Intent intent)
        Log.e("wangkeke","------onUnbind");
        return super.onUnbind(intent);


    @Override
    public void onDestroy()
        super.onDestroy();
        Log.e("wangkeke","------onDestroy");
我们简单定义了一个MyService,重写了几个比较重要的方法,别忘了在AndroidManifest.xml里面注册:
<service android:name=".MyService"/>
1.startService
然后在Activity里我们先通过startService来启动它:
Intent intent = new Intent(MainActivity.this,MyService.class);
startService(intent);
很简单传递给它一个intent,指定要启动的Service就可以了,运行看看结果:

执行了onCreate,onStartCommand,那么如果我们多次startService呢?看看效果:

可以看出只有第一次执行才会调用onCreate,之后只会调用onStartCommand方法,启动是成功了,但我们该如何停止Servcie呢?一种方式是在自定义的Service中使用stopSelf()停止自己,另一种是在外部通过stopService(intent)的方式停止服务。
现在我们调用如下停止服务的代码:
Intent intent = new Intent(MainActivity.this,MyService.class);
stopService(intent);
看控制台打印日志:

停止服务只会调用onDestory方法,多次调用stopService时,onDestory只会调用一次,这个也很好理解,比较服务都不在了,调用也就无效了。
startService适用于执行后台任务,但是要注意service默认是在主线程执行的,执行耗时操作的话请务必开启子线程去处理。
2.bindService
下面我们换种方式启动Service,通过bindService的方式,bindService方法需要三个参数:
    @Override
    public boolean bindService(Intent service, ServiceConnection conn,
            int flags)
        return mBase.bindService(service, conn, flags);
service就是我们的intent,ServiceConnection是个接口,当我们bindservice之后,AMS会回调ServiceConnection接口对象的onServiceConnected()方法,onServiceConnected方法会把远端service的代理binder传递过来,这样就可以通过这个代理binder跨进程调用service中的方法了。
我们先创建一个ServiceConnection对象:
    public ServiceConnection conn =  new ServiceConnection()
        @Override
        public void onServiceConnected(ComponentName name, IBinder service)
            Log.e("wangkeke","-------onServiceConnected");
            serviceIsConnected = true;
            MyService.MyBinder myBinder = (MyService.MyBinder) service;
            myBinder.showGetMyService();


        @Override
        public void onServiceDisconnected(ComponentName name)
            Log.e("wangkeke","-------onServiceDisconnected");
            serviceIsConnected = false;

    ;
然后通过bindService启动它:
Intent intent = new Intent(MainActivity.this,MyService.class);
bindService(intent, conn, Context.BIND_AUTO_CREATE);
运行结果如下:

依次调用了onCreate,onBind,之后远程服务连接成功,调用了onServiceConnected,可以看到所有的回调都在主线程,当服务连接成功后,通过onServiceConnected拿到IBinder对象,就可以调用远程service的方法了。
bindService的第三个参数的含义:bindservice在建立连接时,如果发现service还没启动,会根据flag是否设置BIND_AUTO_CREATE,决定是否启动这个service。
那么绑定后的service如何解绑呢,通过unbindService方法,传入绑定service时所创建的ServiceConnection对象即可:
unbindService(conn);
生命周期打印如下:

ServiceConnection接口的onServiceDisconnected()方法并不会在unbindService()操作断开逻辑连接时执行。而是在远端service进程终止时,AMS才会回调onServiceDisconnected()。
上面的例子,在onBind方法中,我们返回了new MyBinder(),如果我们直接返回null的话,就不会回调ServiceConnection的onServiceConnected方法了。
注意:bindservice是和组件绑定的,依赖于组件而存在,所以在页面退出的时候一定要调用unbindService解绑,不然会抛出异常,而startService则不受启动服务组件的影响,可以继续在后台继续执行。
另外要注意,服务是在主线程中运行的,如果要进行网络操作,音乐播放等CPU密集型工作或者阻塞性操作,请开启新线程来处理。
3.startService之后调用bindService
现在我们看这么一种情况,我们startService之后调用bindService,看看运行结果:

可以看到当bindService已经启动的服务时,依然可以bind成功,只是不会重新调用onCreate方法,接着我们调用stopService看看,咦,点击之后并没有回调onDestory,看来仅仅通过
stopService是无法停止服务了,因为它和其他组件还绑定着呢,现在调下unbindService试试:

unBindService之后,服务才会销毁,所以说如果同时使用了start和bind启动服务,必须要stopservice和unbindservice都执行后服务才会销毁。
至于先bind再start也是同样的道理,服务的创建onCreate方法只会调用一次,销毁同样需要调用stopservice和unbindservice后才能成功,具体大家可以自己实验感受下。
4.Service模拟下载任务
我们来模拟一个下载任务,具体代码如下:
public class DownloadService extends Service

    private ServiceHandler serviceHandler;
    private NotificationManager mNotificationManager;

    private final class ServiceHandler extends Handler

        public ServiceHandler(Looper looper)
            super(looper);


        @Override
        public void handleMessage(Message msg)
            //开始处理耗时任务
            try
                Thread.sleep(5000);
             catch (InterruptedException e)
                e.printStackTrace();

            Toast.makeText(DownloadService.this, "下载任务完成···", Toast.LENGTH_SHORT).show();
            mNotificationManager.cancel(100);
            //任务执行完毕,根据startId停止服务
            stopSelf(msg.arg1);


    @Override
    public void onCreate()
        HandlerThread thread = new HandlerThread("downloadTest", Process.THREAD_PRIORITY_BACKGROUND);
        thread.start();

        serviceHandler = new ServiceHandler(thread.getLooper());


    @Override
    public int onStartCommand(Intent intent, int flags, int startId)

        Toast.makeText(this, "开始任务···", Toast.LENGTH_SHORT).show();

        Message msg = Message.obtain();
        msg.arg1 = startId;
        serviceHandler.sendMessage(msg);
        showNotifycation();
        return super.onStartCommand(intent, flags, startId);


    private void showNotifycation()
        NotificationCompat.Builder mBuilder =
                new NotificationCompat.Builder(this,"downloadfile")
                        .setSmallIcon(R.mipmap.ic_launcher)
                        .setContentTitle("温馨提醒")
                        .setContentText("当前正在下载中···");
        mNotificationManager = (NotificationManager) getSystemService(Context.NOTIFICATION_SERVICE);
        mNotificationManager.notify(100, mBuilder.build());


    @Nullable
    @Override
    public IBinder onBind(Intent intent)
        return null;


    @Override
    public void onDestroy()
        super.onDestroy();
我们在onCreate中创建了HandlerThread,开启消息循环,然后创建了Handler用来处理耗时任务,此时Handler取的是HandlerThread的Looper,运行在子线程中,在onStartCommand中我们发送了message并显示了个通知,任务sleep 5秒后结束,关闭通知并停止服务。运行效果如下:

5.onStartCommand的返回值
Service作为一个组件,很难保证一直存在,当service进程被kill掉的时候,service会如何响应呢?onStartCommand的返回值其实就是对应的响应策略:
1.START_STICKY:service进程被kill掉后,会重新创建service,并且调用onStartCommand(Intent,int,int)方法,但Intent将为null。
2.START_NOT_STICKY:如果在执行完onStartCommand后,服务被异常kill掉,系统不会自动重启该服务。
3.START_REDELIVER_INTENT:如果在执行完onStartCommand后,服务被异常kill掉,系统会自动重启该服务,并将Intent的值传入。
4.START_STICKY_COMPATIBILITY:兼容低版本,与 START_STICKY 作用相同,但不保证每次都能重启成功。
6.启动activity和弹出dialog
我们可能在某个合适的时机需要在Service里弹出Dialog,来测试下,我们启动服务5秒后弹出dialog,代码如下:
public class DialogService extends Service

    private ServiceHandler serviceHandler;
    private NotificationManager mNotificationManager;

    private final class ServiceHandler extends Handler

        public ServiceHandler(Looper looper)
            super(looper);


        @Override
        public void handleMessage(Message msg)
            //弹出dialog
            showDialog();


    private void showDialog()

        AlertDialog.Builder dialog = new AlertDialog.Builder(this);

        dialog.setTitle("我是Service里的弹窗")
                .setIcon(R.mipmap.ic_launcher)
                .setMessage("没想到吧!!")
                .setPositiveButton("取消", new DialogInterface.OnClickListener()
                    @Override
                    public void onClick(DialogInterface dialog, int which)
                        Toast.makeText(DialogService.this, "点击了取消", Toast.LENGTH_SHORT).show();
                        dialog.dismiss();

                ).setNegativeButton("确定", new DialogInterface.OnClickListener()
            @Override
            public void onClick(DialogInterface dialog, int which)
                Toast.makeText(DialogService.this, "点击了确定", Toast.LENGTH_SHORT).show();
                dialog.dismiss();

        ).create().show();


    @Override
    public void onCreate()
        serviceHandler = new ServiceHandler(Looper.getMainLooper());


    @Override
    public int onStartCommand(Intent intent, int flags, final int startId)

        new Thread(new Runnable()
            @Override
            public void run()
                try
                    Thread.sleep(5000);
                 catch (InterruptedException e)
                    e.printStackTrace();

                Message msg = Message.obtain();
                msg.arg1 = startId;
                serviceHandler.sendMessage(msg);

        ).start();


        return super.onStartCommand(intent, flags, startId);


    @Nullable
    @Override
    public IBinder onBind(Intent intent)
        return null;


    @Override
    public void onDestroy()
        super.onDestroy();
然后运行后,5秒后,果然········崩溃了,异常如下:

好吧,既然要主题那就给你设置个:
    <style name="myDialogTheme" parent="Theme.AppCompat.Light.Dialog">
        <!--设置按钮颜色-->
        <item name="colorAccent">@color/brand_accent</item>
        <!--设置背景颜色-->
        <item name="android:windowBackground">@color/white</item>
    </style>

    AlertDialog.Builder dialogBuilder = new AlertDialog.Builder(this,R.style.myDialogTheme);
再次运行:

崩溃也很正常,咱们想脱离activity弹出dialog肯定不是那么简单,经过一番调研搜索,要想弹出系统级别的dialog需要设置dialog的窗口类型为TYPE_SYSTEM_ALERT,提高dialog的窗口等级,我们添加如下代码再次尝试:
if (Build.VERSION.SDK_INT >= Build.VERSION_CODES.O) //8.0新特性
      diaclog.getWindow().setType(WindowManager.LayoutParams.TYPE_APPLICATION_OVERLAY - 1);
 else
      diaclog.getWindow().setType(WindowManager.LayoutParams.TYPE_SYSTEM_ALERT);


记得添加权限:
<uses-permission android:name="android.permission.SYSTEM_ALERT_WINDOW" />
运行后,终于成功弹出dialog,启动服务后5秒钟弹出dialog,效果如下:

当然在Service中弹出Dialog也可以通过启动透明Activity的方式,在Activity上弹出Dialog,这里就不具体实现了,有兴趣的同学可以自己实现感受下。
至于在Service中启动Activity就很简单了,只需要注意要设置flag为FLAG_ACTIVITY_NEW_TASK,即在新的任务栈中启动:
Intent intent = new Intent(this, YourActivity.class);
intent.addFlags(Intent.FLAG_ACTIVITY_NEW_TASK);
startActivity(intent);
至于为什么要添加newtask大家可以点这里查看。
7.前台服务
服务虽然会在后台运行,但系统在内存不足的时候,也会考虑将其终止,所以为了提高Service的存活率,我们可以通过启动前台服务的方式来提高它的优先级,前台服务其实就是在通知栏常驻一个通知,一般音乐播放器都是这种方式来处理的。
注意:前台服务startForeground是android8.0特有的,也就是说8.0前后需要进行适配,8.0之前继续使用原来的NotificationCompat.Builder来创建通知,并设置setOngoing(true)来保持通知常驻,8.0以及8.0之后直接startForeground启动即可。
这里不介绍通知的使用,具体大家可以自行查看,8.0通知改动挺大,新增了channel的概念,大家可以自行google了解。
下面来看下它的具体用法:
public class ForegroundService extends Service
    private NotificationManager notificationManager;

    @RequiresApi(api = Build.VERSION_CODES.O)
    @Override
    public void onCreate()

        notificationManager = (NotificationManager) getSystemService(NOTIFICATION_SERVICE);
        Intent intentForeSerive = new Intent(this, MainActivity.class);
        PendingIntent pendingIntent = PendingIntent.getActivity(this, 0, intentForeSerive, 0);
        //8.0以及8.0之后
        if (Build.VERSION.SDK_INT >= Build.VERSION_CODES.O)
            if (null == notificationManager.getNotificationChannel("fore_service"))
                NotificationChannel channel = new NotificationChannel("fore_service", "前台服务", NotificationManager.IMPORTANCE_HIGH);
                notificationManager.createNotificationChannel(channel);

            Notification notification = new NotificationCompat.Builder(this, "fore_service")
                    .setContentTitle("This is content title")
                    .setContentText("This is content text")
                    .setWhen(System.currentTimeMillis())
                    .setSmallIcon(R.mipmap.ic_launcher)
                    .setContentIntent(pendingIntent)
                    .build();
            startForeground(1, notification);
        else
            //8.0之前的版本
            Notification notification = new NotificationCompat.Builder(this, "fore_service")
                    .setContentTitle("This is content title")
                    .setContentText("This is content text")
                    .setWhen(System.currentTimeMillis())
                    .setAutoCancel(false)
                    .setOngoing(true)
                    .setSmallIcon(R.mipmap.ic_launcher)
                    .setContentIntent(pendingIntent)
                    .build();
            notificationManager.notify(1,notification);


    @RequiresApi(api = Build.VERSION_CODES.O)
    @Override
    public int onStartCommand(Intent intent, int flags, final int startId)

        int flag = intent.getIntExtra("flag",0);

        if (Build.VERSION.SDK_INT >= Build.VERSION_CODES.O)
            if(flag == 0)
                //关闭前台服务
                stopForeground(true);
                stopSelf();

        else
            if(flag == 0)
                //关闭通知
                notificationManager.cancel(1);
                stopSelf();


        return super.onStartCommand(intent, flags, startId);


    @Nullable
    @Override
    public IBinder onBind(Intent intent)
        return null;


    @Override
    public void onDestroy()
        super.onDestroy();
我通过一个按钮来启动服务和关闭服务:
private int currentFlag = 1;

//点击按钮之后执行如下代码
Intent intent = new Intent(MainActivity.this, ForegroundService.class);
intent.putExtra("flag",currentFlag);
startService(intent);
if(currentFlag == 1)
     currentFlag = 0;
else
     currentFlag = 1;
运行效果如下:

8.Android 5.0之后必须显式启动Service
在上面的例子中,我们都是使用Intent指定Service.class的方式显式启动的,那么我们在5.0以上的模拟器上运行如下代码:
    <service android:name=".MyService">
            <intent-filter>
                <action android:name="com.wangkeke.service.test"/>
                <category android:name="android.intent.category.default" />
            </intent-filter>
        </service>

    Intent intent = new Intent();
    intent.setAction("com.wangkeke.service.test");
    startService(intent);
话不多说,直接运行并点击启动Service,正如我们"期待的那样",崩溃出现了!!

注意注意:Android 5.0之后必须显式启动Service!!!
以上是关于AndroidService完全解析之必知必会的主要内容,如果未能解决你的问题,请参考以下文章