java后端开发第四篇:springboot中thymeleaf入门
Posted 事在人为,幸福从不抱怨开始!
tags:
篇首语:本文由小常识网(cha138.com)小编为大家整理,主要介绍了java后端开发第四篇:springboot中thymeleaf入门相关的知识,希望对你有一定的参考价值。
thymeleaf是springboot中所支持的一种模板引擎。入门级使用如下:
- pom.xml中引入依赖:
 <!-- 引入模板引擎-->
        <dependency>
            <groupId>org.springframework.boot</groupId>
            <artifactId>spring-boot-starter-thymeleaf</artifactId>
        </dependency>
2.application.yml中根据情况添加配置:
 thymeleaf:
    cache: false #开发过程中建议关闭cache
    encoding: UTF-8  #thymeleaf编码
    suffix: .html #thymeleaf后缀
    servlet:
      content-type: text/html
3.在项目的templates目录下新建要显示的模板界面custom.html文件:
<!DOCTYPE html>
<html lang="en" xmlns:th="http://www.thymeleaf.org">
<head>
    <meta charset="UTF-8">
    <title>SpringBoot之thymeleaf</title>
</head>
<body>
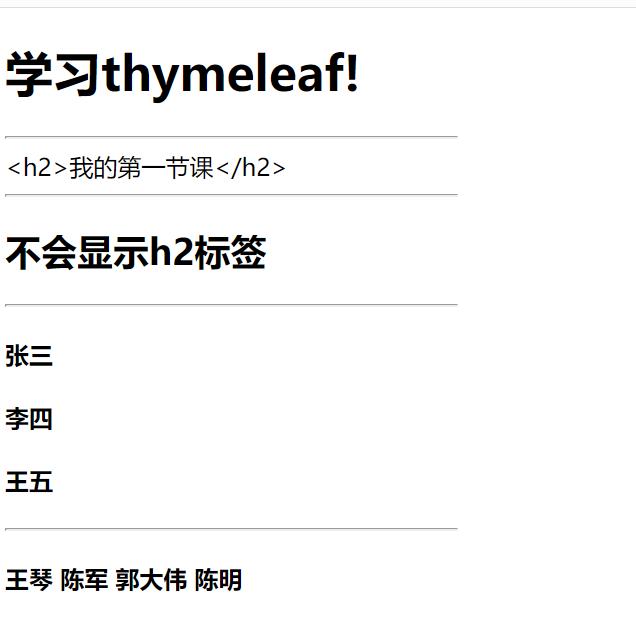
<h1>学习thymeleaf!</h1>

<hr width="300" align="left">

<div th:text="$hello"></div> <!--th:text,显示时会把html对应的标签显示出来-->

<hr width="300" align="left">

<div th:utext="$hello2"></div> <!--th:text,显示时不会把html对应的标签显示出来-->

<hr width="300" align="left">

<h4 th:text="$user" th:each="user:$users"></h4><!--th:eachg对传入的数组进行遍历-->

<hr width="300" align="left">

<h4>
    <span th:each="student:$students">[[$student]]  </span> <!--[]转义特殊字符-->
</h4>
</body>
</html>
4.controller中编写代码,给模板中添加相应数据
@Controller
public class IndexController

    @RequestMapping("/custom")
    public String success(Map<String,Object> map)
        map.put("hello","<h2>我的第一节课</h2>");
        map.put("hello2","<h2>不会显示h2标签</h2>");
        map.put("users", Arrays.asList("张三","李四","王五"));
        map.put("students", Arrays.asList("王琴","陈军","郭大伟","陈明"));
        return "custom";
5.浏览器中测试,访问http://localhost:8080/custom,结果如下:

6.开始时,在controller中一个疏忽点,写错了注解,把@Controller写成了@RestController,结果显示就如下了。

备注:@RestController=@ResponseBody + @Controller
以上是关于java后端开发第四篇:springboot中thymeleaf入门的主要内容,如果未能解决你的问题,请参考以下文章