浅谈PopupWindow的使用
Posted sq19920518
tags:
篇首语:本文由小常识网(cha138.com)小编为大家整理,主要介绍了浅谈PopupWindow的使用相关的知识,希望对你有一定的参考价值。
一、PopupWindow与AlertDialog的区别
最关键的区别是AlertDialog不能指定显示位置,只能默认显示在屏幕最中间(当然也可以通过设置WindowManager参数来改变位置)。而PopupWindow是可以指定显示位置的,随便哪个位置都可以,更加灵活。
二、PopupWindow的显示方法
// 相对于某个控件的位置(正左下方),无偏移
showAsDropDown(View anchor)

// 相对于某个控件的位置,有偏移;xoff表示x轴的偏移,正值表示向右,负值表示向左;
// yoff表示y轴的偏移,正值表示向下,负值表示向上
showAsDropDown(View anchor, int xoff, int yoff);

// 相对于整个窗口的位置(例如:正中央Gravity.CENTER,下方Gravity.BOTTOM等),
// 可以设置偏移或无偏移无偏移
showAtLocation(View parent, int gravity, int x, int y);
【注意:】
第一个参数anchor:是View类型的parent,虽然这里参数名是parent,其实,不是把PopupWindow放到这个parent里,并不要求这个parent是一个ViewGroup,这个参数名让人误解。官方文档”a parent view to get the android.view.View.getWindowToken() token from”,这个parent的作用应该是调用其getWindowToken()方法获取窗口的Token,所以,只要是该窗口上的控件就可以了。
三、案例演示
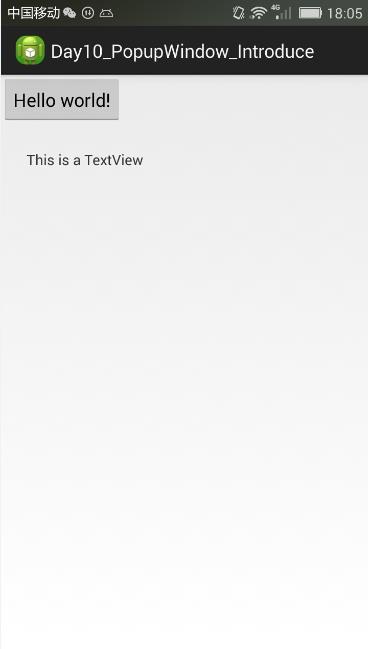
1. PopupWindow显示在某个控件的下方
代码如下:
package com.danny_jiang.day10_popupwindow_introduce;

import android.app.Activity;
import android.os.Bundle;
import android.view.Menu;
import android.view.MenuItem;
import android.view.View;
import android.view.View.OnClickListener;
import android.view.ViewGroup.LayoutParams;
import android.widget.Button;
import android.widget.PopupWindow;
import android.widget.TextView;

/**
 * PopupWindow控件,可以在屏幕任何地方以弹出框的方式显示任何View
 * 1 初始化弹出框所需要显示的View对象
 * 2 初始化弹出框,并将View对象传递给弹出框
 * 3 调用PopupWindow.showXXX方法将弹出框显示到屏幕上的具体位置
 *
 */
public class MainActivity extends Activity implements OnClickListener

    private Button btn;

    private PopupWindow popWindow;

    @Override
    protected void onCreate(Bundle savedInstanceState)
        super.onCreate(savedInstanceState);
        setContentView(R.layout.activity_main);

        btn = (Button) findViewById(R.id.btn);
        btn.setOnClickListener(this);


    @Override
    public void onClick(View v)
        // 将所点击的View控件传递给showPopupWindow方法
        showPopupWindow(v);


    private void showPopupWindow(View anchor)
        // 1 初始化弹出框所需要显示的View
        TextView text = new TextView(this);
        text.setText("This is a TextView");

        // 2 初始化弹出框,并传递View对象,以及弹出框的宽高
        popWindow = new PopupWindow(text,
                LayoutParams.WRAP_CONTENT, LayoutParams.WRAP_CONTENT);

        // 3 显示弹出框
        popWindow.showAsDropDown(anchor, 30, 50);
效果图如下:

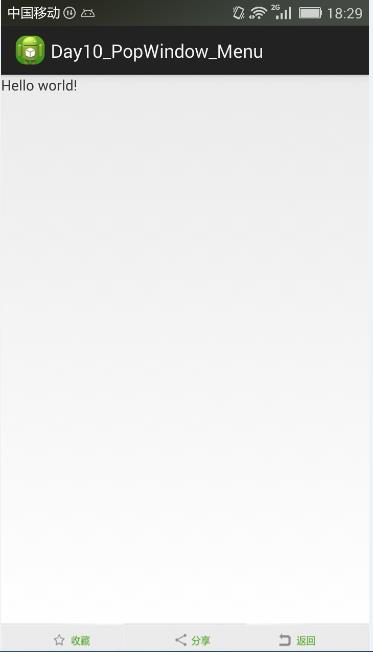
2.PopupWindow显示在整个窗口的任意位置
代码如下:
package com.danny_jiang.day10_popwindow_menu;

import android.app.Activity;
import android.graphics.drawable.BitmapDrawable;
import android.os.Bundle;
import android.view.Gravity;
import android.view.KeyEvent;
import android.view.View;
import android.view.ViewGroup.LayoutParams;
import android.widget.PopupWindow;

/**
 * 使用PopupWindow实现自定义Menu
 * 1 将系统的Menu按键点击事件拦截
 * 2 当拦截Menu的点击事件之后,通过PopupWindow来显示自定义Menu View
 *  2.1 初始化PopupWindow所需要显示视图对象
 *  2.2 初始化PopupWindow对象,并传递View
 *
 */
public class MainActivity extends Activity

    // 声明弹出框所需要显示的View对象
    private View popView;
    private PopupWindow popWindow;


    @Override
    protected void onCreate(Bundle savedInstanceState)
        super.onCreate(savedInstanceState);
        setContentView(R.layout.activity_main);

        popView = getLayoutInflater().inflate(R.layout.popup_layout, null);

        // 如果在代码中重新设置了popupWindow的宽和高,那就以代码中所设置为准
        // 此时popup_layout.xml布局文件中的LinearLayout布局的match_parent将失效
        popWindow = new PopupWindow(popView, LayoutParams.MATCH_PARENT,
                LayoutParams.WRAP_CONTENT);
        popWindow.setOutsideTouchable(true);
        popWindow.setBackgroundDrawable(new BitmapDrawable());


    /**
     * 监听手机实体按键的点击事件:MENU、BACK、HOME、VOLUME、POWER
     * @param keyCode
     *      实体键码,在不同的设置上值不一定相同,但是以静态变量的方式封装在KeyEvent当中
     *      KeyEvent.KEYCODE_MENU   表示菜单键
     *      KeyEvent.KEYCODE_BACK   表示返回键
     * @param event
     *      实体按键的处理事件
     *      DOWN        点击,或者手指按下事件
     *      MOVE        手指在实体键上滑动
     *      UP      手指离开实体按键
     */
    @Override
    public boolean onKeyDown(int keyCode, KeyEvent event)

        switch (keyCode)
        // 拦截实体Menu键的点击事件
        case KeyEvent.KEYCODE_MENU: // 说明点击了Menu实体键
            // 判断PopUpWindow是否已经显示
            if (popWindow.isShowing())
                popWindow.dismiss();
             else
                // 如果当前没有显示弹出框,则将其显示在屏幕的最下方
                popWindow.showAtLocation(popView, Gravity.BOTTOM, 0, 0);

            return true;
        case KeyEvent.KEYCODE_BACK:
            if (popWindow.isShowing())
                popWindow.dismiss();
                return true;


        default:
            break;


        /**
         * 注意onKeyDown返回值,尽量不要统一返回true

         */
        return super.onKeyDown(keyCode, event);
popup_layout.xml布局文件:
<?xml version="1.0" encoding="utf-8"?>
<LinearLayout xmlns:android="http://schemas.android.com/apk/res/android"
    android:layout_width="match_parent"
    android:layout_height="match_parent"
    android:orientation="horizontal" >

    <ImageView
        android:layout_width="0dp"
        android:layout_height="wrap_content"
        android:layout_weight="1"
        android:scaleType="fitXY"
        android:src="@drawable/collectcontent" />

    <ImageView
        android:layout_width="0dp"
        android:layout_height="wrap_content"
        android:layout_weight="1"
        android:scaleType="fitXY"
        android:src="@drawable/contentshare" />

    <ImageView
        android:layout_width="0dp"
        android:layout_height="wrap_content"
        android:layout_weight="1"
        android:scaleType="fitXY"
        android:src="@drawable/contentback" />

</LinearLayout>
效果图如下:

更多有关PopupWindow的详细介绍,见博客
http://blog.csdn.net/harvic880925/article/details/49272285
以上是关于浅谈PopupWindow的使用的主要内容,如果未能解决你的问题,请参考以下文章